
Article 5-Understanding Android User Interactivity and Sensors With a Real Time Example
4.76/5 (14 votes)
Understand the fundamentals of Sensors and Touch Interface of Android
Download MyTouchAndSensorHandler.zip
1. Background
In the last article we learnt about managing our resources, principles of menu and layout management and their best practices and built ImageList App. The app also demonstrated data binding with assets. Now we want to move ahead and utilize the sensors of to build a more interactive system. I would want to recall here that we are trying to build an app similar to DreamCurtains from scratch.
So what are we going to do in this tutorial?
1) We will develop a Touch based overlay Rectangular control: This control should be moved using touch.
2) We will see the principle of multi touch for our App
3) Then we will use sensors and add some cool features to our application.
Before moving ahead, Download Complete Source Code of MyImageList application and refractor the package name to com.grasshoppernetwork.mytouchandsensorhandler . You can obviously use your own package name for developing your app.
Firstly let us see what we are trying to achieve here. This makes the whole process of learning much more interesting. In the last tutorial we have displayed the selected curtain on an Image view. But now we want to display a rectangular control in the main window. This control should have four balls at four corners. We should be able to drag and change the position of the control by pressing and moving the top left rectangle. We should be able to change the size of the control by moving the bottom right circle. Also we will place two such control. On the process we would understand:
1) how to work with touch
2) how to interpret touch points depending specific to different controls.
3) We will also try to understand the principle of simple gestures

2. Creating Custom Views
For developing the control first you need to have a cicle png image. As we have learnt, some resources needs to be png in order to avoid periodic code call to make the image transparent.

Download the circle png image and upload in your drawable-xhdpi folder. Now Seeing the Window control image it is quite clear that we want to present a custom view to the user. There are no Android tool which contains four circles on four corners of rectangle. So we have to build this tool from scratch and then use it with our form. You can create a custom display item with it's own independent behevior by creating a class that extends android.view.View and then override the methods inherited from View class to provide custom behevior to the control.
Alright create a Class called DrawView inside src/yourpackage folder that extends View. Once you create the class, it will trigger you Unimplemented code error. Left click on the error and it will give you hint on implementing contructor. Implement all the three constructors shown in the hint. So we have our DrawView class some like below code.
package com.grasshoppernetwork.mytouchandsensorhandler;

import android.content.Context;
import android.graphics.Canvas;
import android.graphics.Paint;
import android.util.AttributeSet;
import android.view.View;

public class DrawView extends View
{

    public DrawView(Context context) {
        super(context);


    }

    public DrawView(Context context, AttributeSet attrs, int defStyle) {
        super(context, attrs, defStyle);

    }

    public DrawView(Context context, AttributeSet attrs) {
        super(context, attrs);

    }

}
As DrawView class will be using four Circles, each circle having it's own property sets, let us also define a class called colorball and provide it with needed attributes to represent the circles. Each ColorBall object will have an id, a drawingcontext over which it is drawn, width and height properties. Create the ColorBall class within your application's source folder.
package com.grasshoppernetwork.mytouchandsensorhandler;

import android.content.Context;
import android.graphics.Bitmap;
import android.graphics.BitmapFactory;
import android.graphics.Point;

public  class ColorBall {

    Bitmap bitmap;
    Context mContext;
    Point point;
    int id;
     int count = 0;
     public int SIZE=64;
public void Rescale()
{  bitmap= Bitmap.createScaledBitmap(bitmap, SIZE, SIZE, false);

}
    public ColorBall(Context context, int resourceId, Point point) {
        this.id = count++;
        bitmap = BitmapFactory.decodeResource(context.getResources(),
                resourceId);
      bitmap= Bitmap.createScaledBitmap(bitmap, SIZE, SIZE, false);
       // Bitmap b = BitmapFactory.decodeByteArray(imageAsBytes, 0, imageAsBytes.length)
        //        profileImage.setImageBitmap(Bitmap.createScaledBitmap(b, 120, 120, false));
        mContext = context;
        this.point = point;
    }

    public int getWidthOfBall() {
        return bitmap.getWidth();
    }

    public int getHeightOfBall() {
        return bitmap.getHeight();
    }

    public Bitmap getBitmap() {
        return bitmap;
    }

    public int getX() {
        return point.x;
    }

    public int getY() {
        return point.y;
    }

    public int getID() {
        return id;
    }

    public void setX(double d) {
        point.x = (int)d;
    }

    public void setY(int y) {
        point.y = y;
    }
}
resourceId must be the drawable/circle resource id which would be decoded to Android Bitmap image. The Bitmap must be scaled to whatever size you want the circle to displayed with! Point is the absolute point in dp which should be the center of the circle and context will be passed the context on which it will be drawn, and that would certainly be the context of DrawView class.
DrawView class must have four points ( specific to four corners), a BitmapImage to hold the Curtain Image returned by our ImageList form. The class must have a rectangle which connects the four points or rather four ColorBalls. Let us define tyhe members of the DrawView class. If you want to toggle between displaying the curtain and hiding it, you can use a boolean flag variable called SHOW_CURTAIN. If you want to vary the transparancy of the curtain image, use a variable to hold the transparancy, call it ALPHA.
     int groupId = -1;
    public int _color=Color.WHITE;
    public int ALPHA=220;
    public boolean SHOW_CURTAIN=true;
    public String curtainBmp=null;
    public ArrayList<ColorBall> colorballs = new ArrayList<ColorBall>();
    private int balID = 0;
    Paint paint;
    Canvas canvas;
    public Drawable drawable=null;
    public Rect myRect=null;
Update the declared constructors to initialize new instance of Paint and Canvas. Most importantly the custom view will be an overlay above the ImageView in the firstwindow. Therefore Touch needs to be passed to DrawView from first form. This can happen only if the new View can take the focus. This can be ensure by making setFocusable(true).
public Rect myRect=null;
    public DrawView(Context context) {
        super(context);
        paint = new Paint();
        setFocusable(true); // necessary for getting the touch events
        canvas = new Canvas();


    }

    public DrawView(Context context, AttributeSet attrs, int defStyle) {
        super(context, attrs, defStyle);
        paint = new Paint();
        setFocusable(true); // necessary for getting the touch events
        canvas = new Canvas();

    }

    public DrawView(Context context, AttributeSet attrs) {
        super(context, attrs);
        paint = new Paint();
        setFocusable(true); // necessary for getting the touch events
        canvas = new Canvas();

    }
Two "The Most Important" methods in DrawView class are onDraw and onTouch methods. Needless to say both of them are inherited from the view class and are needed to be overriden in the in DrawView class. First let us discuss the implementation of onDraw method. Whenever DrawView object is invalidated, or any entity of the DrawView ( like curtain, position of the ColorBall) changes, onDraw method is called. This is similar to onPaint() method that .Net GDI programmers are familiar with.
DrawView will be provided with four points. These points will be updated only if user has manipulated any of the ColorBalls, otherwise the points will be null. Depending upon the manipulation of the ColorBall points, we will define top (or minY),left (or minX),bottom ( or maxY), right ( or maxX) and will be updated par manipulation. Every manipulation would trigger onDraw. Also the onDraw is not required to draw anything if the flag SHOW_CURTAIN is set flag. This is particularly helpful in Apps where user needs to toggle between design and preview mode. Hence the logic is implemented inside onDraw as bellow.
  if(!SHOW_CURTAIN)
       {
           return;
       }
        if(points[3]==null) //point4 null when user did not touch and move on screen.
            return;
        int left, top, right, bottom;
        left = points[0].x;
        top = points[0].y;
        right = points[0].x;
        bottom = points[0].y;
        for (int i = 1; i < points.length; i++) {
            left = left > points[i].x ? points[i].x:left;
            top = top > points[i].y ? points[i].y:top;
            right = right < points[i].x ? points[i].x:right;
            bottom = bottom < points[i].y ? points[i].y:bottom;
        }
Now we want to draw rectangle and curtain images in a canvas that will represent the view of the DrawView class. Objects can be drawn on the canvas using using a paint object. As many different objects are to be drawn on the canvas( ColorBall, Rectabgle, Curtain), set the anti aliasing mode and dither mode true for the paint object. antiAliasing() is an image filtering technique which gets rid of sampling error that occours when multiple image objects are sampled( or drawn over) one window. Dithering is a technique of adding systematic noise with the image such that boundaries of the objects are not clearly markable. Thus the whole canvas looks like a single entity rather than a clobbed window of some independent visual elements.
 paint.setAntiAlias(true);
        paint.setDither(true);
        paint.setStrokeJoin(Paint.Join.ROUND);
        paint.setStrokeWidth(5);
paint.setAlpha(ALPHA);
        //draw stroke
        paint.setStyle(Paint.Style.STROKE);
        paint.setColor(_color);
        paint.setStrokeWidth(2);
        canvas.drawRect(
                    left + colorballs.get(0).getWidthOfBall() / 2,
                    top + colorballs.get(0).getWidthOfBall() / 2,
                    right + colorballs.get(2).getWidthOfBall() / 2,
                    bottom + colorballs.get(2).getWidthOfBall() / 2, paint);
Once the rectangle is drawn, it is time to fill the rectangle with the curtain bitmap image which is selected through CurtainListActivity form. Recall that CurtainActivity returns the image path. But inorder to obtain the Drawable element, we need to find the resourceId and then create a Drawable object with that resource id.
Once a Drawable is created, we are not supposed to draw it as it is, rather it needs to be drawn over a rectangle whose positions are defined by (left,top),(right,bottom).
   if(curtainBmp!=null)
        {
            Log.i("in Main Form New Curtain Resource name"," "+curtainBmp+" Pack name:"+getContext().getApplicationContext().getPackageName());
             //int imageResource = getContext().getApplicationContext().getResources().getIdentifier(curtainBmp, null, getContext().getApplicationContext().getPackageName());
            int imageResource = getResources().getIdentifier(curtainBmp, null,getContext().getApplicationContext().getPackageName());
             Log.i("in Main Form New Curtain Image="," "+imageResource);

             drawable = getContext().getResources().getDrawable(imageResource);
             Bitmap b=drawableToBitmap(drawable);
             drawable= new BitmapDrawable(getResources(),b);
             drawable.setAlpha(ALPHA);


            myRect=new Rect(left + colorballs.get(0).getWidthOfBall() / 2,
                top + colorballs.get(0).getWidthOfBall() / 2,
                right + colorballs.get(2).getWidthOfBall() / 2,
                bottom + colorballs.get(2).getWidthOfBall() / 2);
                 drawable.setBounds(myRect);
                drawable.draw(canvas);

}
Now that the rectangle is drawn and the CurtainImage is drawn, it is time to draw the ColorBalls in onDraw method.
for (int i =0; i < colorballs.size(); i ++) {
            ColorBall ball = colorballs.get(i);

            canvas.drawBitmap(ball.getBitmap(), ball.getX(), ball.getY(),
                    paint);

        //    canvas.drawText("" + (i+1), ball.getX(), ball.getY(), paint);
        }
Before we understand the essence of touch handlers, which ofcourse is the main loot of this tutorial, we want to check out if the Curtains appears on first form as planned or not. We will also have two DrawView objects in the first form in order to be able to show two curtains.
Let us modify activity_main.xml which represents our first form.
<RelativeLayout xmlns:android="http://schemas.android.com/apk/res/android"
    xmlns:tools="http://schemas.android.com/tools"
    android:layout_width="match_parent"
    android:layout_height="match_parent"
    android:paddingBottom="@dimen/activity_vertical_margin"
    android:paddingLeft="@dimen/activity_horizontal_margin"
    android:paddingRight="@dimen/activity_horizontal_margin"
    android:paddingTop="@dimen/activity_vertical_margin"
    tools:context=".MainActivity" >

    <ImageView
        android:id="@+id/Image1"
         android:layout_width="fill_parent"
        android:layout_height="fill_parent"
        android:layout_alignParentTop="true"
        android:adjustViewBounds="true"
        android:layout_gravity="left"
        android:layout_marginBottom="2dp"
        android:layout_marginLeft="2dp"
        android:layout_marginRight="2dp"
        android:layout_marginTop="2dp"
        android:scaleType="matrix"
        />
    <com.grasshoppernetwork.mytouchandsensorhandler.DrawView
    android:id="@+id/Rect2"
    android:layout_width="match_parent"
            android:layout_height="match_parent"
    />
<com.grasshoppernetwork.mytouchandsensorhandler.DrawView
    android:id="@+id/Rect1"
    android:layout_width="match_parent"
            android:layout_height="match_parent"
    />

<Switch
    android:id="@+id/switch1"
    android:layout_width="wrap_content"
    android:layout_height="wrap_content"
    android:layout_alignParentRight="true"
    android:layout_alignParentTop="true"
    android:text="Control"
    android:checked="true" />

</RelativeLayout>
It now has two controls by name Rect1 and Rect2 which are nothing but the two instances of the DrawView class.
If things goes perfectly you will see a graphics layout scene for the main form something like below:

You can not identify Rect1 or Rect2 controls because they are created and inflated only in the run time. So let us go to code behind of activity_main which is MainActivity.java. Here we need to declare two objects associated with two DrawView controls. We also need to update the code that handles return value from intents i.e. onActivityResult to now load the return images to Bitmap object of the DrawViw class and trigger onDraw of DrawView class for both objects by Invalidating them.
Here is the declaration and initialization of DrawView objects:
DrawView dv,dv1;
       dv=(DrawView)findViewById(R.id.Rect1);
        dv.setVisibility(View.INVISIBLE);
        dv.points=new Point[4];
        dv.points[2]=new Point(30,30);
        dv.points[1]=new Point(width/4,30);
        dv.points[0]=new Point(30,(int)(((float)height)*.75));
        dv.points[3]=new Point(width/4,(int)(((float)height)*.75));
        dv.colorballs=new ArrayList<ColorBall>();
        dv.setOnTouchListener(this);

        dv.colorballs.add(new ColorBall(dv.getContext(), R.drawable.circle, dv.points[0]));
        dv.colorballs.add(new ColorBall(dv.getContext(), R.drawable.circle, dv.points[1]));
        dv.colorballs.add(new ColorBall(dv.getContext(), R.drawable.circle, dv.points[2]));
        dv.colorballs.add(new ColorBall(dv.getContext(), R.drawable.circle, dv.points[3]));
        dv.setTag("dv");
        dv1=(DrawView)findViewById(R.id.Rect2);

        dv1.points=new Point[4];
         dv1.points[2]=new Point((int)(((float)width)*.65),30);//880 30
        dv1.points[1]=new Point((int)(((float)width)*.92),30);//1180 30
        dv1.points[0]=new Point((int)(((float)width)*.65),(int)(((float)height)*.75));//880 560
        dv1.points[3]=new Point((int)(((float)width)*.92),(int)(((float)height)*.75));
        dv1.colorballs=new ArrayList<ColorBall>();

        dv1.colorballs.add(new ColorBall(dv1.getContext(), R.drawable.circle, dv1.points[0]));
        dv1.colorballs.add(new ColorBall(dv1.getContext(), R.drawable.circle, dv1.points[1]));
        dv1.colorballs.add(new ColorBall(dv1.getContext(), R.drawable.circle, dv1.points[2]));
        dv1.colorballs.add(new ColorBall(dv1.getContext(), R.drawable.circle, dv1.points[3]));


        dv.curtainBmp="drawable/"+"photo0";
        dv1.curtainBmp="drawable/"+"photo0";
As it can be seet that we have Initialized bothe the objects to display curtain photo0 initially. width and height are device width and height. We will cover it's significance and calculation in the next sub section. Consider that the device display specification is 1200x700 ( heightxwidth), can you find out the absolute points for eight color balls corresponding to two DrawView objects by seeing the first photo? Depending upon the calculation the positions are specified as a fraction of the device width and height. Now for different devices, these values are automatically adjusted.
Here is how our home form looks like after the changes:

Now when you select The Curtain selection form and select any curtain, here is what you will get result which will be similar to the following screen. Can you see the selected crurtains behind our curtain control? Well that is purely because we had not assigned the returned image to Bitmap of DrawView objects. Now we will do that change.

Let us update the case FABRIC_SELECTION in MainActivity onActivityResult method:
case FABRIC_SELECTION:
            try{
            if(resultCode==RESULT_OK)
            {
            Bundle res = imageReturnedIntent.getExtras();
            //ad.setMessage(res.getString("icon"));
        //    ad.show();
            try{
            dv.curtainBmp="drawable/"+res.getString("icon");
            dv.curtainBmp=dv.curtainBmp.split(".jpg")[0];
            dv1.curtainBmp=dv.curtainBmp.split(".jpg")[0];
            Log.i("In setting curtain:",dv.curtainBmp);
            }catch(Exception ex)
            {

            }
            dv.invalidate();
            dv1.invalidate();
            }
            }catch(Exception ex)
            {}
            break;
This is real straight forward isn't it? All you have to do is assign the icon return variable in both DrawView object's cutainBmp String variable. As the icon will be in the form photo0.jpg, remove .jpg get absolute drawable resource.
Then invalidate both the objects which forces the onDraw method of the objects which redraws the new curtainImages over defined rectangle. See the following screen. We are now able to change the curtain image depending upon our selection.

The Curtains are appearing against a white background and is not making quite sense. So let us change the background image with a window image such that curtains appears over the window. Download the below firstImage.jpg and paste it inside drawable-xhdpi. Change the Image1's source to this image from activity_main.

When you view the designer, it looks something like this.
Needless to say that because of potrait layout, part of the image is gone. However when you run the App, the results will not be too promising in any layout. The reason is that the image is not exactly fitting the panel.
In order to make the image fit on the panel, we need to assign the image in the code and set the ScaleType to ScaleType.FIT_XY; So update the code in onCreate method of MainActivity by appending following code block between initialization of Image imgView1 and dv.
 Uri selectedImage =  Uri.parse("android.resource://"+this.getPackageName()+"/drawable/firstimage");;

         InputStream imageStream;
        try {
            imageStream = getContentResolver().openInputStream(selectedImage);

             Bitmap si = BitmapFactory.decodeStream(imageStream);

             imgView1.setImageBitmap(si);

             imgView1.setScaleType(ScaleType.FIT_XY);
        } catch (FileNotFoundException e) {
            // TODO Auto-generated catch block
            e.printStackTrace();
        }
Now when you run your app you will get desired result.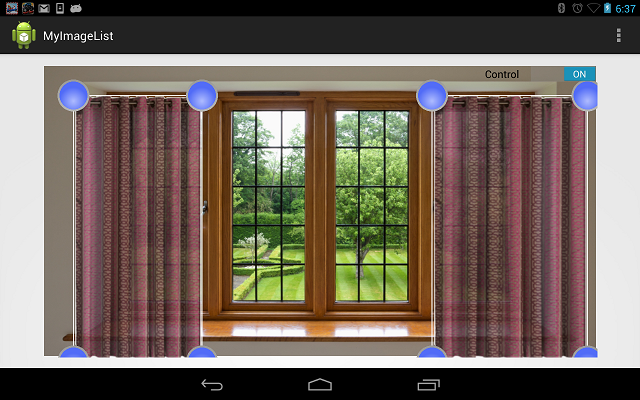
There is still a small problem. As you can see, the curtains are placed based on four point's coordinates. These coordinates are calculated based on fixed height and width.(width=1150,height=750). However these values will certainly differ from one device to another device. Therefore it makes sense to obtain the height and width component of the device. This can be easily obtained in Android using DisplayMatrix.
DisplayMetrics displaymetrics = new DisplayMetrics();
        getWindowManager().getDefaultDisplay().getMetrics(displaymetrics);
        int height = displaymetrics.heightPixels;
        int width = displaymetrics.widthPixels;
3. Working With Touch
To be very honest, to understand how touch works, you do not really need any external views and as complicated a workflow as we have performed as a prerequisite to meeting our objective. But touch has some fascinating features, the events can be heirarchial: i.e. it can be passed from one view to another view or view group. Therefore an example where touch can effect differently to different views is an important step of understanding it's behevior.
Now inorder to handle the touch events all you have to do is make the Activity class implement OnTouchListener and then override onTouch method.
In our case we are interested to pass the event to two objects of DrawView class: dv and dv1.
@Override
    public boolean onTouch(View v, MotionEvent event) {
        // TODO Auto-generated method stub
        Log.i("ok","ok");

        dv1.onTouchEvent(event);
        dv.onTouchEvent(event);
        return true;
    }
Ofcourse will will use the event in DrawView class in detail, but before that a quick not: event variable holds the MotionEvent here. event.getX() and event.getY() returns the current touch positions. Note that Android doesn't have advanced gesture event handlers and you have to calculate the gesture from the derivative of previous and current touch points. event.getDownTime() return how long user kept the touch down. This is significant in finding out gestures like mouse drag and so on. We shall shortly see how to use touch more efficiently.
In our case we are passing the touch event to another view. For this to happen successfully the views must also subscribe to same touch event. This is done simply by passing current instance to touchListener of both the DrawView objects.
dv1.setOnTouchListener(this);
dv.setOnTouchListener(this);
Now when you move your finger over the your app, onTouch method of DrawView will be called. Let us first see the complete implementation of the onTouch event handler and then we will try to understand every bit of it.
 public boolean onTouchEvent(MotionEvent event) {
        int eventaction = event.getAction();
   Log.i("routed",this.getTag().toString());
        int X = (int) event.getX();
        int Y = (int) event.getY();

        switch (eventaction) {

        case MotionEvent.ACTION_DOWN: // touch down so check if the finger is on
            startTime = System.currentTimeMillis();
            clickCount++;
            double radCircle1 = Math
                    .sqrt((double) (((points[2].x - X) * (points[2].x - X)) + (points[2].y - Y)
                            * (points[2].y - Y)));

            if (radCircle1 < colorballs.get(0).getWidthOfBall())
            {
                isPosChange=true;
                firstX=X;
                firstY=Y;
            }
            // a ball
            if (points[0] == null) {
                //initialize rectangle.
                points[0] = new Point();
                points[0].x = X;
                points[0].y = Y;

                points[1] = new Point();
                points[1].x = X;
                points[1].y = Y + 30;

                points[2] = new Point();
                points[2].x = X + 30;
                points[2].y = Y + 30;

                points[3] = new Point();
                points[3].x = X +30;
                points[3].y = Y;

                balID = 2;
                groupId = 1;
                 // declare each ball with the ColorBall class
                for (Point pt : points) {
                     colorballs.add(new ColorBall(getContext(), R.drawable.circle, pt));
                }
            } else {
                //resize rectangle
                balID = -1;
                groupId = -1;
                for (int i = colorballs.size()-1; i>=0; i--) {
                    ColorBall ball = colorballs.get(i);
                    // check if inside the bounds of the ball (circle)
                    // get the center for the ball
                    int centerX = ball.getX() + ball.getWidthOfBall();
                    int centerY = ball.getY() + ball.getHeightOfBall();
                    paint.setColor(Color.CYAN);
                    // calculate the radius from the touch to the center of the
                    // ball
                    double radCircle = Math
                            .sqrt((double) (((centerX - X) * (centerX - X)) + (centerY - Y)
                                    * (centerY - Y)));

                    if (radCircle < ball.getWidthOfBall()) {

                        balID = ball.getID();
                        if (balID == 1 || balID == 3) {
                            groupId = 2;
                        } else {
                            groupId = 1;
                        }
                        invalidate();
                        break;
                    }
                    invalidate();
                }
            }
            break;

        case MotionEvent.ACTION_MOVE: // touch drag with the ball

            if (balID > -1) {
                if(!isPosChange)
                {
                // move the balls the same as the finger
                colorballs.get(balID).setX(X);
                colorballs.get(balID).setY(Y);

                paint.setColor(Color.CYAN);
                if (groupId == 1) {
                    colorballs.get(1).setX(colorballs.get(0).getX());
                    colorballs.get(1).setY(colorballs.get(2).getY());
                    colorballs.get(3).setX(colorballs.get(2).getX());
                    colorballs.get(3).setY(colorballs.get(0).getY());
                } else {
                    colorballs.get(0).setX(colorballs.get(1).getX());
                    colorballs.get(0).setY(colorballs.get(3).getY());
                    colorballs.get(2).setX(colorballs.get(3).getX());
                    colorballs.get(2).setY(colorballs.get(1).getY());
                }
                }
                else
                {
                    double diffX=X-firstX;
                    double diffY=Y-firstY;
                    firstX=X;
                    firstY=Y;
                      for (int i = colorballs.size()-1; i>=0; i--)
                      {
                          ColorBall ball = colorballs.get(i);
                          ball.setX(ball.getX()+(int)diffX);
                          ball.setY(ball.getY()+(int)diffY);
                      }

                }

                invalidate();
            }

            break;

        case MotionEvent.ACTION_UP:
            // touch drop - just do things here after dropping
isPosChange=false;
firstX=-1;
firstY=-1;
            long time = System.currentTimeMillis() - startTime;
            duration=  duration + time;
            if(clickCount == 2)
            {
                if(duration<= MAX_DURATION)
                {
                    Log.i("Double tap",this,getTag();
                }
                clickCount = 0;
                duration = 0;
                break;
            }

            break;
        }
        // redraw the canvas
        invalidate();
        return true;

    }
Before go inside the logic why don't you check out the result? You may find an application crash. Look for either of the objects same touch event is handled. Therefore it is difficult to debug which object's touch listener is currently working. Hence we have used a debugging option:
Log.i("routed",this.getTag().toString());
However there are no tag attached to the objects. That is why you must add tags to the views if you are handling touch for them.
Adding following two lines to your MainActivity will solve the problem.
 dv1.setTag("dv1");
 dv.setTag("dv");
You will also be able to trace the independent touch points specific to the objects. Once running perfectly, you can press top left circle and move the curtain, you can press the bottom circle and resize the curtain.

Now let us dig the logic of this:
You must have noted that all the actions take place while your touch is down. The moment you lift your fingers, no event occours. Therefore touch handler must find out if touch is down or not. If so, perform the rest of the logic.
event.getAction() return an enumerator code corresponding to current touch action. You can switch your logic based on touchAction . We will enclose our logic inside MotionEvent.ACTION_DOWN case.
We will enclose our logic in case statement.
Next thing is we have to reposition our curtain based on touch. We will find the closeness of the touch point with top left ColorBall. The distance is obtained using Euclidean distance. T=If the touch point is over the ToLeft ColorBall then reposition this ball, calculate the deviation and reposition rest of the balls accordingly. Before that obtain the current location when mouse is down.
        int X = (int) event.getX();
        int Y = (int) event.getY();
The distance formula and measuring the closeness of the touch point with the Top-Left color ball is calculated as bellow.
double radCircle1 = Math
                    .sqrt((double) (((points[2].x - X) * (points[2].x - X)) + (points[2].y - Y)
                            * (points[2].y - Y)));

            if (radCircle1 < colorballs.get(0).getWidthOfBall())
            {
                isPosChange=true;
                firstX=X;
                firstY=Y;
            }
isPosChange when set true will enforce positional update of the control during MOVE action. Suppose your touch was outside the To-Left ColorBall when you had touched the device, then you had moved your finger which also touched that ball, then too there will be no movement of the window. So ACTION_DOWN event can be used to perform the preliminaries before comprehensive logic for mouse MOVEMENT.
Inside ACTION_MOVE case two things are possible, if positionChange is true, then ball's position and respectively DrawView object's position needs to be updated, else bottom right ball has to move according to current point, but third ball's y must change and second ball's x must change. You can test the case by playing with the curtain.
 if(!isPosChange)
                {
                // move the balls the same as the finger
                colorballs.get(balID).setX(X);
                colorballs.get(balID).setY(Y);


                if (groupId == 1) {
                    colorballs.get(1).setX(colorballs.get(0).getX());
                    colorballs.get(1).setY(colorballs.get(2).getY());
                    colorballs.get(3).setX(colorballs.get(2).getX());
                    colorballs.get(3).setY(colorballs.get(0).getY());
                } else {
                    colorballs.get(0).setX(colorballs.get(1).getX());
                    colorballs.get(0).setY(colorballs.get(3).getY());
                    colorballs.get(2).setX(colorballs.get(3).getX());
                    colorballs.get(2).setY(colorballs.get(1).getY());
                }
                }
It is pretty simple here. ball 1's x must be changed according to ball 0's position, ball 3's y must be changed according to 0's position. We have not used the movement of the other balls so else part never gets executed. You can utilize it by providing motion option for other two balls too.
So how to handle movement of the curtain when user moves the top left ball? Simple, first calculate the total deviation for that ball and then apply the same amount of deviation to other balls.
                    double diffX=X-firstX;
                    double diffY=Y-firstY;
                    firstX=X;
                    firstY=Y;
                      for (int i = colorballs.size()-1; i>=0; i--)
                      {
                          ColorBall ball = colorballs.get(i);
                          ball.setX(ball.getX()+(int)diffX);
                          ball.setY(ball.getY()+(int)diffY);
                      }
ACTION_UP event is particularly helpful for calculating Gestures like double tap. Though we are not doing anythin logical, I have kept this method for you to explore the option. Remember startTime was calculated for ACTION_DOWN. We also had calculated clickPoints. if ACTION_DOWN was called quickly twice ( in double tap case) then click count will be 2, total lag between first time and last touchUp will be very low. You can also calculate the distance between the points at the time of first ACTION_DOWN to last ACTION_UP. If the points are CLOSE_IN_TIME and CLOSE_IN_DISTANCE then it's a double tap event. When you run your app and double tap over the area of either of the curtains, it will print a debugging info about which one was double tapped.
 long time = System.currentTimeMillis() - startTime;
            duration=  duration + time;
            if(clickCount == 2)
            {
                if(duration<= MAX_DURATION)
                {
                    Log.i("Double tap",this,getTag();
                }
                clickCount = 0;
                duration = 0;
                break;
            }
If you want to use these logic in the main form, then rather than routing the events to DrawView you can handle the event in the same way inside onTouch method of the mainActivity form.
You can also write methods for gesture recognization like Pinch and Zoom gesture, Scale and rotation gesture and so on.
4. Handling Multitouch Events
You can find out if the user has used MultiTouch gesture or not simply by checkig
if (event.getPointerCount() > 1){

Log.i("MOUSE EVENT=","MULTI TOUCH ");

}
Incase of multi touch gesture there are multiple touch points. You can extract all the touch points by:
for(int i=0;i<event.getPointerCount();i++){

int  xPos = (int)MotionEventCompat.getX(event, i);
int yPos = (int)MotionEventCompat.getY(event, i);

Log.i("FOR touch point "+i+" (x,y)=","x="+xPos+" y="+yPos;


}
You can also use event.getTouchMajor() and event.getTouchMinor() to get the major and minor touch points which you can use for gesture recognition.
Also you can not only route the touche event to other views, you can perform certain operations on the main form too.
5. Working With Sensors
Android devices comes with range of sensors which are: Gyroscope, Accelerometer, AmbientLight Sensor, Compass, GPS, Camera and so on. For using any sensor, we need to first allow the app to use that specific hardware through Manifest.
We shall broadly discuss the ways of using CAMERA as we would definately want to take a real snapshot of our window and checkout the curtains over it. We will then discuss about other sensors as an end note.
5.1 Working with Camera
For starting camera ( or for that matter any other sensor) double click on the AndroidManifest file, go to Permissions tab and add "Uses Permission". Add android.permission.CAMERA. Now here is a very important thing that you should know. If you are using uses permission with your app, after publishing in Google play, devices only with camera will see your app. Others can't discover your app. But if you do not use this permission, all the devices can discover this app. For instance my Google Nexus fails to discover DreamCurtains when it is published with CAMERA permission, but it can still work with the app if you install the apk from Android environment. So using the Permissions is safer to ensure devices without the capabilities will not access the services.
We would also want to add a menu option in main_activity to facilitate working with CAMERA.
Go ahead and add following line to your /res/menu/
main.xml
<item android:id="@+id/menuCapture" android:title="Take Snapshot"/>
Now you need to add a case for handling this menu option. But before that let us be clear that for Handling camera stream we are going to use another Intent. When you have another Intent, define a separate request and response code for that. Also Camera Intent will return a temporary Image URI after capture. Define a variable to hold the data. Declare following members in MainActivity class
    public static final int MEDIA_TYPE_IMAGE = 1;
    private static final int CAPTURE_IMAGE_ACTIVITY_REQUEST_CODE = 2;
    Uri fileUri=null;
Now update the onOptionsItemSelected and add the new case to handle camera intent.
case R.id.menuCapture:
                try{
                Intent captureI = new Intent(MediaStore.ACTION_IMAGE_CAPTURE);

                fileUri = getOutputMediaFileUri(MEDIA_TYPE_IMAGE);
                captureI.putExtra(MediaStore.EXTRA_OUTPUT, fileUri); // set the image file name

                startActivityForResult(captureI, CAPTURE_IMAGE_ACTIVITY_REQUEST_CODE);
                }catch(Exception ex)
                {

                }
                break;
You can observe that we are starting the intent for a result. Therefore we must also update the onActivityResult method and add a handler for camera instance.
So assign the returned image fileUri to ImageView's ImageUri in MainActivity form after camera Intent has returned a value.
 case CAPTURE_IMAGE_ACTIVITY_REQUEST_CODE:
            try{
            if(resultCode==RESULT_OK)
            {
                   imgView1.setImageURI(fileUri);
                imgView1.setDrawingCacheEnabled(true);
                imgView1.setScaleType(ScaleType.FIT_XY);


            }
            }catch(Exception ex)
            {

            }
            break;
Now when you start the camera option by clicking the menu, you will see real camera stream in a new form

And after you have opted for ok option you get what you are looking for.

5.2 Working With Other Sensors
You can work with Android sensors by implementing SensorEventListener from your activity form. SensorManager can be accessed from following major sensor types:
Sensor.TYPE_GYROSCOPE
Sensor.TYPE_ORIENTATION
Sensor.TYPE_ACCELEROMETER
Define a SensorManager object in your Activity class.
private SensorManager sensorManager=null;
Initialize the sensor object inside onCreate method
sensorManager = (SensorManager) getSystemService(SENSOR_SERVICE);
         sensorManager.registerListener(this, sensorManager.getDefaultSensor(Sensor.TYPE_ORIENTATION),sensorManager.SENSOR_DELAY_NORMAL);
Instead of ORIENTATION sensor, you can use other sensors.
Finally you can write you coding logic in onSensorValueChanged method
@Override
    public void onSensorChanged(SensorEvent arg0)
    {
        // TODO Auto-generated method stub
        Log.i("SENSOR TYpe=",""+arg0.sensor.getType());
        Log.i("SENSOR VALUE=","x="+arg0.values[0]+" y="+arg0.values[0]+" z="+arg0.values[0]);


    }
Values method of the sensors will contain x, y and z values as par applicable.
6. Conclusion
This work is an afford to teach the beginers and Intermediate Android enthusiast with an easy way to get started with Sensors and especially touch. We used a sample application to understand the fundamentals of the tutorial rather than taking a simple example. We also understood the applicability and how to debug the touch and multitouch events. Hope you have enjoyed the tutorial and are able to get going with the topics covered.