
Article 3 Creating a Simple Hello World Android Project (The Fun Way)
4.85/5 (6 votes)
Creating a Simple Hello World Android Project
I am all excited for my first app, tell me what will be my first app?
Even i am as excited as you are. We will be making a bot called Mike. We will make him say "Hello World".
Should i follow along or i will just run through this?
This is a very important article if you are a begineer. You must follow along. Open Android Studio.
Am ready . Let's begin
Open Android Studio

Click on New Project

Application Name
Here we specify the name of the application
Company Domain
You can put either your company name or your own name here . Make this as much unique as possible.
Package Name
It's a unique identifier for your app in the Google Play Store.
Proceed by clicking on next
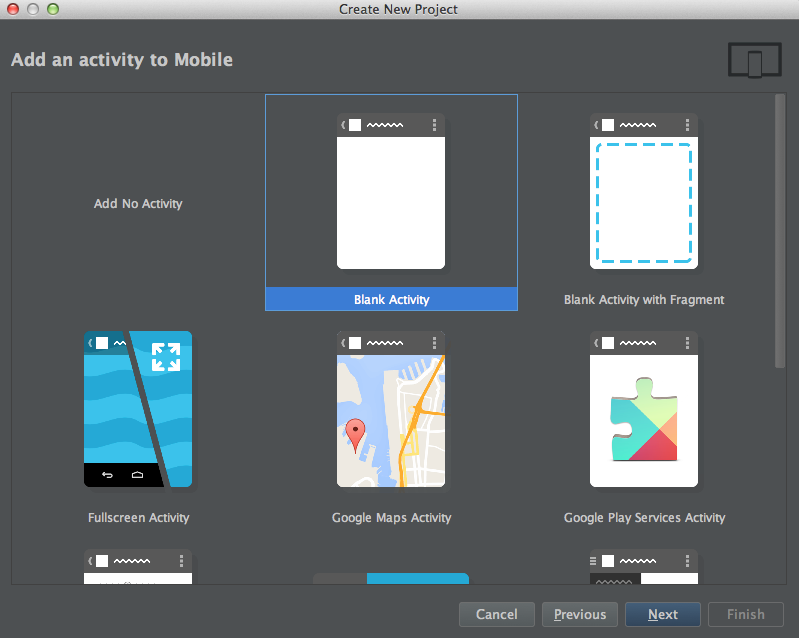
Android Studio will now show you different templates to choose from. We will need only a blank activity. Select blank activity and then click on next.

Wait , what is activity name and what is layout name?
In any screen or activity there are two main components. Activity Class and Layout. Activity Class is like the skeliton and layout is like the skin. In layout we specify where the elements must be shown . In activity class we write code for interacting with the layout . Once you have finished , proceed by clicking on finish.
Can you explain me the different windows here before i get confused?

If you are not seeing a similar screen. Click on the Design Tab on the bottom (Marked red on the image).
Navigation Window
This help you to navigate through your project files.

Expand the java folder. You will see the package name. We will be writing all the java code here. Mike_Activity contains the java code for our main activity (The screen which shows "Hello world!") , "res" stands for Resources, here will be putting all the resources for our project (We will be going in more detail on resources later in another article).You will notice a layout folder. This will contain layout file for our main activity. It's written in XML.
The file i have marked on red is the manifest file.This tells information about your app to the android system (We will be editing this file and learning more about it , in another article).
Components
These are the elements that make your app . Like layouts, textviews, textbox, progress bar etc. You can drag and drop them to the preview to add them.
Preview Window
Here you will see the preview of your layout. It will differ from the actual screen. This is only for designning purposes.
Component Tree
This shows the hierarchy of the comonents. So you can easily find out which component is inside which layout.
Property Window
This allows you to edit the properties of the components. You need to select the component in the preview window, and you can edit it's respetive property in the property window.
What's next ? Shall i run the app since i am excited to see how it looks?
Wait, this time we will use an actual device. If you don't have one you can continue running it on the virtual device. To run it on an actual device you will need to enable the developer mode. Follow the following steps.
Step 1.) Go to Settings
Step 2.) Scroll down to bottom, if you see developer option then you can skip to step 6 otherwise continue.
Step 3.) Tap on About , Software Information , and then more.
Step 4.) Tap the "build number" seven times. Then the phone will flash saying you are a developer.
Step 5.) Go back to settings.

Step 6.) Tap on Developer Options, Enable the developer mode by toggling the button on top , make sure USB debugging is selected.

Now on the top toolbar click on the run button (Marked red on the above image).

If you don't see the devices listed. Either you have not plugged the device via USB or you haven't completed the above steps.
Click on OK to proceed.

What's this?

It's the Logcat . It displays log messages . It's very usefull in debugging.
Can you explain it to me how this works?
Yes , let's first navigate to the activity class. Which is inside the java folder.

Double click on the Mike_Activity file

So on the top you see package name,imports. Later we see the Mike Activity Class which extends Activity. OnCreate function is where the activity is created.
Notice the following line
setContentView(R.layout.activity_mike);

Double click on actvity_mike.xml


If you don't see the xml . Make sure you have selected the Text Tab on the bottom as shown on the above image.
Best Tips & Practices
1.) Give proper naming to your activity and your layout files .
2.) Before writing code, draw a sketch of your app in paper. Then you will have a clear idea on what activities and layout you need to create.
3.)You can debug your app using wifi by following the below steps
- Connect device via USB and make sure debugging is working.
adb tcpip 5555adb connect <DEVICE_IP_ADDRESS>:5555- Disconnect USB and proceed with wireless debugging.
adb -s <DEVICE_IP_ADDRESS>:5555 usbto switch back when done.