
Creating a Simple Hello World Android Project
5.00/5 (6 votes)
Sample Code of Hello World App
Introduction
Hello everyone again, in this article, I am going to explain about sample project of android. During the discussion I am going to cover following points given below.
- Walkthrough of creating a simple Hello World template app.
- Basic explanation of the various files/components (i.e. Main Activity File, Manifest File, Strings File, R File, Layout File etc.).
- Testing your Hello Word app on an emulator.
- Build, test, deploy and install your Hello World app on a physical device.
Walkthrough of creating a simple Hello World template app
I am going to create a sample project using Eclipse.
Step 1: Open an eclipse , click on file -> Project. It will Open a new window.

Step 2: select an android project. Select an android application project for new project and click on next button.

Step 3: Select an application name project name and package name. Also select minimum version and maximum version of SDK and click on next.

Step 4: Configure the Launcher icon and click on next.

Step 5: Select an activity template and click on next.

Step 6: Fill the Activity,Layout and Fragment Name.Click on Finish.

Step 7: Finally you project structure is ready, I am going share my screen shot below.


Basic explanation of the various files/components
Let Me Start with the src folder.
- Src folder contains a java packages and their class files with .java extension, you can create more than one package inside this folder like you can also create the package ‘com.testCodeproject.db’ for database classes.

- Here we MainActivity.Java class Let me Share the code of my class Start Discussion on it.
import android.os.Bundle;
import android.support.v4.app.Fragment;
import android.support.v7.app.ActionBarActivity;
import android.view.LayoutInflater;
import android.view.Menu;
import android.view.MenuItem;
import android.view.View;
import android.view.ViewGroup;
These are android packages import by ide by default. You can see the defination of every package in eclipse select the class name and press f3 .
- Main Activity class is inherted ny ActionBarActivityClass which is inherited by activity class.
public class MainActivity extends ActionBarActivity
android:name = "ActivityClassName With Package Name" , android:label="ApplicationName"
You must declare an activity here , Before going to use it. To know more about it detail follow this url.
- onCreate is override by MainActivityClass.When you run application , it will point this method first , So that if you want intialize any thing do it here.
protected void onCreate(Bundle savedInstanceState) { } - This activity is configurable in your android mainfest file
<activity android:name="com.testcodeproject.MainActivity"
android:label="@string/app_name" >
<intent-filter>
<action android:name="android.intent.action.MAIN" /><category android:name="android.intent.category.LAUNCHER" />
</intent-filter>
</activity>
- Gen Folder contains the java package name and two important class file named as R.Java and BuildConfig.Java

R.Java File generates automatically when you build your project it's a static class contains an attribute which is mapped with component with the unique hex value. For example if you’re going create a text box in view assign some id, Then one entry is made in R.Java file with name of ID of the textbox. This can be done by ADT plug-in in eclipse. This file is updated automatically..
BuildConfig.Java File is used to determine the current build Mode. This file is used by several libraries and apps.
- Assets Folder is used to add the html file and js scripts file or jquery files. Once you are going to use a hybrid app, you will create your html files in assets folder.
-
Bin Folder is used by compiler to generate the compiled java files, .dex files, resource files, Android manifest file or Configuration file and kept a full package of zipped files for .apk. Every time once you build your project, Compiler will clean up this folder and generate the new build for you.
-
Libs Folder is used to place a libraries for your application like Android SDK Libraries, KSoap2 libs and other third party libraries.
-
Res folder is used to contains the view components like style, images, and view layouts. Res child Folder contains child folders given below
1: Drawable: This folder is used save drawable components like image and so on. We have different drawable folder for different - different size view like drawable-hdpi which maintains the image of high resolution and idpi maintains the image low resolution for lower resolution device and so on.
2. Layout: This folder is used maintain the android view layout or you can say the screen or form of android applications. Like in my application, I am using the activitymain.xml and fragment view.xml.
3. Menu: This folder is used maintain the generic menu file for your application menu.xml.
4. Values: This folder is used maintain style, constants and dimensions of your applications. You can define the generic style of an app in syle.xml, you can define the constants in string.xml and dimensions in dimens.xml file. We have multiple folders of values used to map for different - different device size and resolutions.
<?xml version="1.0" encoding="utf-8"?>
<resources>
    <string name="app_name">testCodeProject</string>
    <string name="hello_world">Hello world with Eclipse!</string>
    <string name="action_settings">Settings</string>
</resources>
Above is the source code of string.xml file inside the resource tag we have declared constant strings like app name and all.
- Android.manifest file or you can say the configuration file for android application.

Let me explain this file line by line Start with element name manifest contains the attributes xmlns:android define as the android namespace for all the view layouts and controls and always set as "http://schemas.android.com/apk/res/android", Now the question raised in your mind what is the use of it, In manifest file 'xmlns:android' define as a namespace. You can defined the attribute properties using this namespace as android:versionCode="1" or in user-sdk element we have defined one attribute android:minSdkVersion all these are properties are defined inside that namespace you have declared.
Next element is user-sdk basically used to define the sdk versions and contains the attributes android:minSdkVersion and android:targetSdkVersion .Target version defines sdk version on which your android application will run.
Next element is application under this element we will define the attributes related to the application like allow back, define the log for application themes and so on. In your IDE put cursor inside this element press ctrl + space it will show all the properties that you can set for your application. Like given below in screenshot
.
Next child element of application is Activity all the activity of your app defined inside the Application element before going to use it. Activity element also has the multiple attributes like screen Orientation n all. Inside the activity element we have intent-filter element, which is basically used to specifies the types of intents that an activity, service, or broadcast receiver can respond to. An intent filter declares the capabilities of its parent component, an activity or service can do and what types of broadcasts a receiver can handle.
Apart from an activity we have other elements that we can define as per the application requirements. Like Service element is used to define background service of your application and so on. To know more about other element in depth click Here. 
- Apart from an application element, There are so many other element it have like shown in a screen shot below. Like I have define the user-permission element to access the fine location of device To know more about it click here , it will provide a depth knowledge of manifest file.

- In eclipse you can also configure your app or android manifest file through view like the screenshot is given below just double click on android manifest file it will shows this screen, As you can see there are five tab Manifest, Application, Permissions, Instrumentation and AandroidManifest.xml you can easily configure your application through this view like permissions and all.

- Next is the .png file for and logo and app logo.
- Next one is project.properties file, This file is automatically generated by Android Tools.Please Don't modify it.
Testing your Hello Word app on an emulator
First you have to configure your android emulator or your device. I am going to explain this process line by line for emulator and device both.
Configuration steps for an emulator :
- In eclipse studio click on run >> run configurations >> it will open run configuration window.

- Click on target tab configure your emulator. Select the automatically pick compatible device option or radio button and the check the checkbox for future launch. So that once you have selected the device, it will always launch your app on same device.


check the wipe user data option to clean up app at every installation.
- Setup the emulator for your app, Click on Manager >> It will open the new window Android Virtual Device Manager.

- Click on new button,It will open a new window.Configure your AVD device as per your requirement and click ok to save your avd settings. click here to know about the avd settings.

- Select the AVD device from run configuration window and click on run button or ctrl + F11. It will start your emulator. Now click on run button from eclipse as shown below.

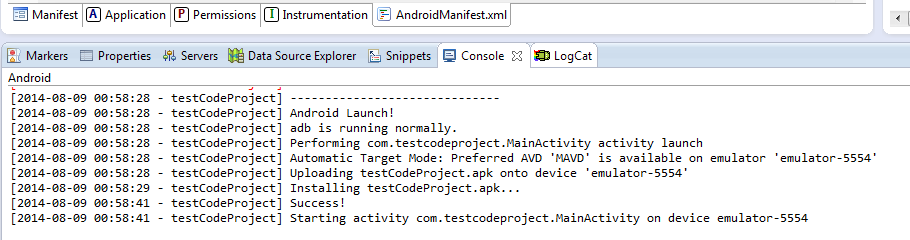
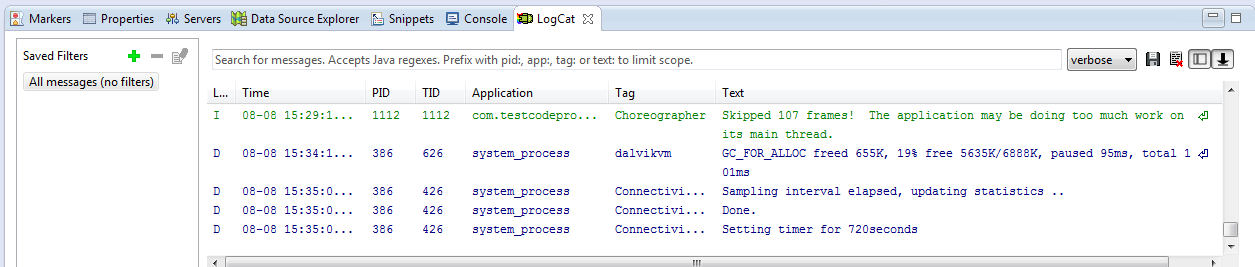
- Now check you emulator device as shown below and check your console and logcat for installation log.


Build, test, deploy and install your Hello World app on a physical device.
- Now set up your application on device click on settings > Developer options > check the USB debugging option. Now connect your device from system and again click on run button or ctrl + F11 on eclipse. It will install that application on your device. You can also debug your application from device too. Let share some screen shot of device.


Note :
- To Debug your application put break point on any java class and press F11 to debug your application in eclipse
- To signed your apk file click here.
- Always make your that your AVD has been started before it used.
- For Android Studio I will write a separate article on it for basic reference you will follow my already published article.
Using the code
I am going to attach my code.
Points of Interest
I am trying to cover everything for basic of application and their folder structure, I hope so this post will be helpful for beginners.