
ASP.NET MVC Documents sample Part 2
4.84/5 (15 votes)
Part two of the ASP.NET MVC Documents Sample
Introduction
This article that is the second part of the ASP.NET MVC Documents Sample, if you didn't read that please first have a look at :
http://www.codeproject.com/Articles/755459/ASP-NET-MVC-Documents-Sample
In this part we are going to extend the previous build version. Basically what we want is to show the data as we want.

Above is a screen shot of what we want for our documents view.
There will be a lot of document and company records in the database after using the application for a while and we don't want them all on one page displayed so we have to add Paging. It's also handy that we can search for a specific company instead of going true all the companies by hand to find the company we are looking for so we have to add Search functionality to the application. When we enter a new Company to our database and we go back to the list we don't get the companies in alphabetical order so we have to write some code to make it Sort on alphabetical order.Then there is also the fact that we don't want anyone to see our documents so we have to make sure that only those who are logged in can view them. We have to build that in also. And we want to upload the scans we make from the real documents that we get in our mail and make them available as .PDF in our application. So we need to create an upload for that and create a link to view these documents in the browser.
To sum it up:
-
Create paging
-
Add search functionality
-
Add Alphabetical Sorting
-
Make it private
-
Create an upload.
-
Validation
Thats what we are going to do in this part.
Background
This article is not going to talk about the MVC Model itself or how the Controllers work and so on because a lot is written about that already in other articles. The main goal I have with this article is to show someone who starts with programming to go from nothing to a fully working Web Application with Dynamic data. With Dynamic data I mean that no static lists will be in the HTML code, all data in the lists will come from the database and can be changed if needed.
Using the code
I have build this sample in Visual Studio 2012 Professional and after that tested in Visual Studio 2013 Ultimate 90 day's trial version to see if it works as it does so you can use that version also.
Important: Make sure that EntityFramework is installed. To find out click on the created project in the Solution Explorer and go to Manage NuGet Packages... en select the All View in the next Screen, if it's not in the list go to the Online option at the left and you get a list of available packages, select EntityFramework and Click on Install, a reference will be added in your project.
You can download the Project from my OneDrive:
https://onedrive.live.com/redir?resid=CDF4A34C128AE7C4%213254
Click on the MvcDocuments Sample in OneDrive and select download:

1. Create Paging
The first thing we are going to do is Add a reference to the Application, to do that go to the TOOLS menu in Visual Studio and Select NuGet Package Manager and in that the Option Manage NuGet Packages for Solution... as shown below in the Image:

You will get the following screen:

Select the Online tab at the left and type: PagedList in the top corner search box at the right, you will get the above shown result and if you Click on Install this PagedList will be added to the solution.Have a look with the Solution Explorer and expand The Reference Folder you will see that a reference to the PagedList Library is added as shown below:

Now we can use PagedList and add paging to our application. To do so we are going to change some code , lets start with implementing paging in our Document part of the application.
As you remember from the first part of the MVCDocuments Sample we have created Controllers, we didn't touch these controllers at all but now we are going to change a part of the DocumentController.cs code. Please go to the Solution Explorer, Expand the Controllers folder and find the DocumentController.cs file and open it.
We are going to Add a using reference to the Library file PagedList we just have added in the previous part and make use if the PagedList Library.
First add the using PagedList; to the using part of this Class as shown below as //Added:
using System;
using System.Collections.Generic;
using System.Data;
using System.Data.Entity;
using System.Linq;
using System.Web;
using System.Web.Mvc;
using PagedList; //Added
using MvcDocuments.Models;
Then go to the following part of the Code:
public ActionResult Index()
{
   var documents = db.Documents.Include(d => d.Company).Include
   (d => d.Mail_category).Include(d => d.Costs_group).Include(d => d.Payment_status);

   return View(documents.ToList());
}
We are going to change this code to this:
public ViewResult Index(int? page)

{

   var documents = db.Documents.Include(d => d.Company).Include
  (d => d.Mail_category).Include(d => d.Costs_group).Include
  (d => d.Payment_status).OrderByDescending(d => d.Document_date);

  //Pager

  int pageSize = 2;
  int pageNumber = (page ?? 1);

  //Return content

  return View(documents.ToPagedList(pageNumber, pageSize));

}
As you can see a lot has changed, this method has changed from a ActionResult into a ViewResult and the sort order is added with:
.OrderByDescending(d => d.Document_date);
The code for the pager is Added. As you can see the pageSize is set to 2 so two records will be shown per page but you can change that (I have set the value to 2 for testing purposes). Notice that the return View is changed to: Documents.ToPagedList(...) so a Paged List will be returned.
When you have made these changes to the: DocumentController.cs files code go to the Solution Explorer and Expand the Views folder and go to the Index.cshtml file and open that file.

On top of the code of this: Index.cshtml page you see this line:
@model IEnumerable<MvcDocuments.Models.Document>
Change this code so it looks like this:
@model PagedList.IPagedList<MvcDocuments.Models.Document>
Now look for the <tr> part in the code and the following type of code:
<th>
          @Html.DisplayNameFor(model => model.Document_date)
</th>
This code wont work with the PagedList so we are going to change all of this to the following:
<tr>
 <th>
     Document Date:
 </th>
 <th>
     Company Name:
 </th>
 <th>
     Mail Category:
 </th>
 <th>
     Costs Group:
 </th>
 <th>
     Payment Status:
 </th>
 <th>
     Reference:
 </th>
 <th>
     Note:
 </th>
 <th>
     Amount Ex VAT:
 </th>
 <th>
     VAT:
 </th>
 <th>
     Amount:
 </th>
 <th>
     URI;
 </th>
</tr>
When done go to the bottom of the page were it says </table> and add after that the following code:
<div>

Page @(Model.PageCount < Model.PageNumber ? 0 : Model.PageNumber)of @Model.PageCount
@if (Model.HasPreviousPage)
{
    @Html.ActionLink("<<", "Index", new { page = 1, sortOrder = ViewBag.CurrentSort, currentFilter=ViewBag.CurrentFilter })
    @Html.Raw(" ");
    @Html.ActionLink("< Prev", "Index", new { page = Model.PageNumber - 1, sortOrder = ViewBag.CurrentSort, currentFilter=ViewBag.CurrentFilter })
}
else
{
@:<<
@Html.Raw(" ");
@:< Prev
}
@if (Model.HasNextPage)
{
@Html.ActionLink("Next >", "Index", new { page = Model.PageNumber + 1, sortOrder = ViewBag.CurrentSort, currentFilter=ViewBag.CurrentFilter })
@Html.Raw(" ");
@Html.ActionLink(">>", "Index", new { page = Model.PageCount, sortOrder = ViewBag.CurrentSort, currentFilter=ViewBag.CurrentFilter })
}
else
{
@:Next >
@Html.Raw(" ")
@:>>
}

</div>
Now Go to the BUILD Menu Option in Visual Studio and Click on the Rebuild Solution Option and then hit F5 , if you have done the above steps and go to the Documents you will get this View:

I didn't add records yet to this sample but if you have more then two records in your Documents database then the Paging will work.
Adding paging involves as you have seen some work for all the pages you want it.
2. Add Search functionality
The Next step we are going to do is adding some Search functionality, the first step to do that is on the View Page so open the Index.cshtml page and Add the following code just above were the <table> parts starts:
@using (Html.BeginForm())
{
   <p> Find Relation: @Html.TextBox("SearchString")
   <input type="submit" value="Find" /> </p>
}
<table>...
This will show a Search Box on the Page and a Button with the Text Find in it. This is it for the Index.cshtml Page, go to the Solution Explorer again and open the DocumentController.cs file.

Change the ViewResult Index (The method that returns the Index page) so that it is as the following code:
public ViewResult Index(string sortOrder, string currentFilter , string searchString , int? page)
{
   ViewBag.CurrentSort = sortOrder;
   ViewBag.DateSortParm = sortOrder == "Date" ? "Date desc" : "Date";
if (Request.HttpMethod == "GET")
{
   searchString = currentFilter;
}
else
{
page = 1;
}
ViewBag.CurrentFilter = searchString;
var document = from d in db.Documents
select d;
if (!String.IsNullOrEmpty(searchString))
{
   document = document.Where(d => d.Company.Company_name.ToUpper().Contains(searchString.ToUpper()));
}
switch (sortOrder)
{
  case "Date":
  document = document.OrderBy(d => d.Document_date);
  break;
  case "Date desc":
  document = document.OrderByDescending(d => d.Document_date);
  break;
  default:
  document = document.OrderByDescending(d => d.Document_date);
  break;
}
//Pager
int pageSize = 2;
int pageNumber = (page ?? 1);
//Return content
return View(document.ToPagedList(pageNumber, pageSize));
}
When you Hit the F5 button and you go to the Documents Page you will see that the Search Box and Button are Added, type the name of one of your Relations or just a few first letters as I did (co for CodeProject) and you get only records from that relation:

TASK: OK this is the moment that you can Add the Paging and Search functionality into your pages and controllers, because I want this sample to Work I have done that in the Contacts, Companies and Documents Pages and Controllers in the provided sample but you can do the above steps yourself if you want.
3. Add Alphabetical Sorting
As you may have noticed in the previous Image the Documents are sorted on a Descending Date, so the most current record is on top and if there are documents were the time is entered such as 25/04/2014 14:57 the sorting will take also place based on the time so the most recent document will be on top.
For documents we want the sorting based on the Date but for Companies we want them to be presented Alphabetically.
When you open the CompaniesController.cs file
public ActionResult Index()
{
   var companies = db.Companies.Include(c => c.State).Include(c => c.Country);
   return View(companies.ToList());
}
And you add the following code behind the .Include(c => c.Country); part:
.OrderBy(c => c.Company_name)
So the code looks like this:
public ActionResult Index()

{
  var companies = db.Companies.Include(c => c.State).Include(c => c.Country).OrderBy(c => c.Company_name);
  return View(companies.ToList());
}
You will see that sorting based on the Alphabet takes place.
Note: In the above shown code we didn't add Search functionality to the CompanyController.cs and the Index.cshtml file of the Company View in the View folder, in the MVCDocuments Sample part 2 download Search functionality is added also.
TASK: The above shown code is the code before you added the Paging and Search functionality to it so your code should look different if you have done the previous TASK but you know were to look to Add the Sorting order to your code and in the provided Sample code this is implemented also.
4. Make it Private
The next thing we are going to do is make the pages private so only people who are logged in can view the page. We go back to the Solution Explorer and Open the Document folder and in that the Index.cshtml page. Just below the <h2>Index</h2> tag Enter the following line of code:
<h2>Index</h2>

@if(User.Identity.IsAuthenticated) {

<span>
Now go to the bottom of the page and below the closing tag of the </div> add the following code:
</span>
} else
{
  <span>You have to Login to View my Documents</span>
}
When you now hit F5 and you go to the Documents you get the following screen:

Note: If you see the documents most likely you are Logged In. Of course any one who registers can view your records in this sample but if you get rid of the Register option the records are private.
TASK: Now change all the pages and make them private, so not only the Index.cshtml pages but all pages per folder.
5 Create the Upload
The first thing we are going to do is create a folder were we are going to receive the uploaded files. Go to the Solution Explorer and Right Click with your mouse on that and select Add and then Select New Folder:
Give this folder the name: Assets , when done a new folder is added to the solution:

Now Right Click on the Assets Folder and Select Add again and Select New Folder and call this folder: Documents so it looks like this:

Now go to the Views Folder and go to the Document Folder and Right Click with your mouse on that and select Add View. Give this new View the Name: DocumentUpload and don't change anything else just Click on the Add button:

The DocumentUpload.cshtml file will be created and you will see this code:
@{
   ViewBag.Title = "DocumentUpload";
}
<h2>DocumentUpload</h2>
We are going to change this code to the following:
@@{
   ViewBag.Title = "Upload Document";
}
@if(User.Identity.IsAuthenticated) {
<span>
<h2>Upload Document</h2>
<form action="" method="post" enctype="multipart/form-data">
 <table>
  <td>
   <label for="file">Filename</label></td>
  <td>
   <input type="file" name="file" id="file" />
  </td>
  <td>
   <input type="submit" value="Upload" />
  </td>
 </table>
</form>
</span>
} else
{
 <span>You need to Login to View this page!</span>
}
The upload page will look like this:

That's it for this page, now open the Index.cshtml page in the Document folder and look for this part:
<p>
   @Html.ActionLink("Create New", "Create")
</p>
Change this part to:
<p>
  @Html.ActionLink("Create New", "Create") @Html.ActionLink("Upload Document", "DocumentUpload")
</p>
This will present the link to the upload Page:

Thats it for the pages, now go to the Controllers folder in the Solution Explorer and go to the DocumentController.cs file and open that. Go to the using part and Add the following using directive: using System.IO; , so it matches as shown below:
using System;
using System.Collections.Generic;
using System.Data;
using System.Data.Entity;
using System.Linq;
using System.Web;
using System.Web.Mvc;
using PagedList;
using System.IO;
using MvcDocuments.Models;
Now go to the bottom of all the code of this DocumentController and add the following code behind this part:
protected override void Dispose(bool disposing)
{
  db.Dispose();
  base.Dispose(disposing);
}
So after this closing: } (bracelet) you enter this code:
public ActionResult DocumentUpload()
{
  return View();
}
[HttpPost]
public ActionResult DocumentUpload(HttpPostedFileBase file)
{
  string path = null;
  if (file.ContentLength > 0)
  {
   var fileName = Path.GetFileName(file.FileName);
   path = AppDomain.CurrentDomain.BaseDirectory + "Assets\\Documents\\" + fileName;
   Response.Write(path.ToString());
   file.SaveAs(path);
  }
  return RedirectToAction("Index");
}
public ActionResult OpenFile()
{
 return View();
}
Now go to the Solution Explorer Folder and open the View folder and select the Index.cshtml file and look for this line of code:
<td>
  @Html.DisplayFor(modelItem => item.Document_uri)
</td>
Change this code so it matches as shown below:
<td>
 @Html.DisplayFor(modelItem => item.Document_uri)
 <a href="~/Assets/Documents/@Html.DisplayFor(model => item.Document_uri)"target="_blank">View Document</a>
</td>
This will add a Link to the uploaded document on the page. Be aware that the process intended is to scan a document you receive with the standard mail and save this document as .PDF format and upload it. You have to name the document as it is, so for example when you have a document called Manual1246.PDF you have to make sure that the .PDF file extension is behind the name of the .PDF document.
When Clicked on the link you will be presented with the Uploaded .PDF document:

There is one more thing I have done and that is changing this following code so pages are showing an other title:
@{
  ViewBag.Title = "Documents";
}
<h2>Documents</h2>
I have changed the Viewbag.Title into “Documents” so it shows that and I have changed the <h2> part so it shows “Documents” instead of “Index” and I did that with Contact and Company also so it's more clear on what page you are when using the application
6 Add Validation
There is one more thing I want to Add to the Application and that is making sure that all fields are filled in so no empty data will be passed to the database so I have changed the Classed. Have a look at the Document.cs Class (In the Models Folder in the Solution Explorer) and change it so it looks like this:
using System;
using System.Collections.Generic;
using System.Linq;
using System.Web;
using System.ComponentModel.DataAnnotations;
using System.ComponentModel.DataAnnotations.Schema;

namespace MvcDocuments.Models
{
 public class Document
 {
  //Identifier
  public int DocumentId { get; set; }
  //Document date
  [Required]
  public DateTime Document_date { get; set; }
  //Company
  public int CompanyId { get; set; }
  public virtual Company Company { get; set; }
  //Mail category
  public int Mail_categoryID { get; set; }
  public virtual Mail_category Mail_category { get; set; }
  //Costs group
  public int Costs_groupId { get; set; }
  public virtual Costs_group Costs_group { get; set; }
  //Payment status
  public int Payment_statusId { get; set; }
  public virtual Payment_status Payment_status { get; set; }
  //Bill
  [Required]
  public string Reference { get; set; }
  //Note
  [Required]
  public string Note { get; set; }
  //Financial
  [Required]
  public double AmoutExVat { get; set; }
  [Required]
  public double Vat { get; set; }
  [Required]
  public double Amount { get; set; }
  //.PDF Link
  [Required]
  public string Document_uri { get; set; }
 }
}
As you can see we have added the following Using Directives:
using System.ComponentModel.DataAnnotations;
using System.ComponentModel.DataAnnotations.Schema;
And we have added above the variables:
[Required]
If you have done the same and hit F5 you will get an Error that things have changed so we first have to update the database, to do that we go back to the Package Manager Console we used in Part One of this sample (TOOLS > NuGet Package Manager > Package Manager Console ) and type in:
PM> Add-Migration "DatabaseChanged"
Between the “” you can type in what you want it's just the name you give to this migration. Then hit Enter and the Migration will be created in the Migrations Folder in the Solution Explorer.
Now type in the Package Manager Console:
PM> Update-Database
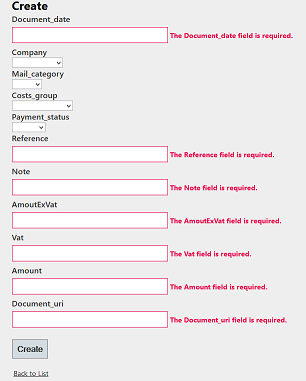
The database will be updated and when you now go to the Documents and select Create New and Click on the Create button you will get this screen:
To make it clear. When you make changes to the Classes in the Model folder you have to do these steps of Adding a migration otherwise it won't work, if something goes wrong and updating your Database fails just Delete the Migration and start over again. There is one other thing I want to make changes to and that is the sorting of the lists when you create a new document or contact or where ever you use Lists in your application.
Let's have a look at the Create Method in the DocumentController.cs file, it looks like this:
public ActionResult Create()
{
  ViewBag.CompanyId = new SelectList(db.Companies,"CompanyId", "Company_name");
  ViewBag.Mail_categoryID = new SelectList(db.Mail_categories, "Mail_category_name");
  ViewBag.Costs_groupId = new SelectList(db.Costs_groups, "Costs_groupId", "Cost_group_name");
  ViewBag.Payment_statusId = new SelectList(db.Payment_statusses, "Payment_statusId", "Payment_status_name");
  return View();
}
We have to change the code so it matches the following:
public ActionResult Create()
{
  ViewBag.CompanyId = new SelectList(db.Companies.OrderBy(x => x.Company_name), "CompanyId", "Company_name");
  ViewBag.Mail_categoryID = new SelectList(db.Mail_categories.OrderBy(x => x.Mail_category_name), "Mail_categoryId", "Mail_category_name");
  ViewBag.Costs_groupId = new SelectList(db.Costs_groups.OrderBy(x => x.Cost_group_name), "Costs_groupId", "Cost_group_name");
  ViewBag.Payment_statusId = new SelectList(db.Payment_statusses.OrderBy(x => x.Payment_status_name), "Payment_statusId", "Payment_status_name");
  return View();
}
This .OrderBy(x => x.Cost_group_name) takes care of presenting the List in a Alphabetical Order.

Thats it for this part of the MVCDocuments Sample. I hope you enjoyed my writings so far and perhaps this application is of some practical use for you.
Points of Interest
Thats it for this part of the MVCDocuments Sample. I hope you enjoyed my writings so far (I'm thinking about a next part about making it look much nicer with Html5 and JavaScript). I hope that this application is of some practical use for you. My personal version stores around one thousand documents in .PDF format and I use it regular to look things up.
History
This is the first version of the ASP.NET MVC Documents Sample