
Using Color to Perform Hit Testing
3.86/5 (3 votes)
Provide a Color Hit Testing User Control that supports hit testing using color
Introduction
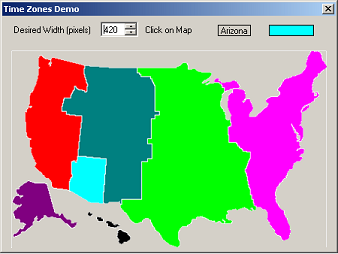
When visiting a web page that contained a colored map of US times zones, I was asked to provide the time zone in which I was located; but not by clicking on the map. Rather I was asked to use a Combo Box that contained the names of the US Time Zones. I thought that it might be useful to have a clickable map in WinForms applications. This article describes the resulting user control; how the control is invoked; and some lessons that I learned along the way.
Background
Performing hit tests is a computationally complex task. In its simplest form, the question asked is whether a point is inside some polygon. Note that I have added a circular shape to the following diagram. We can construct axis-aligned bounding rectangles around the polygons.
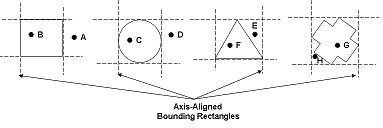
These bounding rectangles allow us to rapidly determine if a point (A or D) is not within the bounding rectangle. But, the fact that a point is in a bounding rectangle is not sufficient reason to claim that it is in the polygon. The points (E and H) are in the bounding rectangle, but are not in the polygon. A more complex computation is required. The reader is referred to the two "Point in polygon " references for a sampling of the calculations.
There is another objection to using polygons. Look more closely at an enlarged time zone map.

The pixels along the edge of a boundary defines that boundary. There would be hundreds, maybe thousands, of edges required to define a boundary using this method. Of course, we could cheat a little, using pairs of starting and ending coordinates that describe a boundary line. But even then, we are faced with a large number of edges to define the polygon. Lastly, things become dicey if curves are included as part of the boundary.
Suppose that we can fill each polygon with a color.

Now we only need to determine if there is a color at a point of interest. If there is a color, then we are inside a polygon; if not, we are outside the polygon. This type of hit testing is called color hit testing. It has application when the polygons of interest are static enough to be colored. For the time zone map, we could color the areas as follows.
If a mouse click occurs over a Magenta area, the time zone is Eastern; over a Lime area, the time zone is Central; and so forth.
Color Hit Test User Control

This ColorHitTest user control encapsulates two items: an image that it will display and a list of nodes, each containing data related to colors that appear within the image. ColorHitTest user control contains the following methods, properties, and events.
| Name | Description |
| Constructor | |
ColorHitTest |
public ColorHitTest ( )
Create an instance of the ColorHitTest user control |
| Methods | |
Add |
public void Add ( Color color,
                  string value )
Adds a color/value pair to the saved color/value pairs |
| Clear |
public void Clear ( )
Removes all color/value pairs |
| Contains (Overloaded) |
public bool Contains ( Color color )
Returns a public bool Contains ( string value )
Returns a public bool Contains ( string value )
bool case_sensitive )
Returns a |
| Get (Overloaded) |
public bool Get ( Color color )
Returns the value associated with the specified color in the saved color/value pairs public bool Get ( string value )
Returns the color associated with the specified case- sensitive value from the saved color/value pairs public bool Get ( string value )
bool case_sensitive )
Returns the color associated with the specified value (possibly case-insensitive) from the saved color/value pairs |
| Image (Overloaded) |
public void Image ( Bitmap bitmap,
                    int    width,
                    int    height )
Replaces the control's image with the specified bitmap with the specified public void Image ( Bitmap bitmap,
int width,
int height,
bool make_transparent )
Replaces the control's image with the specified bitmap with the specified |
| Remove (Overloaded) |
public bool Remove ( Color color )
Removes the saved color/value pair containing the specified color public bool Remove ( string value )
Removes the saved color/value pair containing the specified case-sensitive value public bool Remove ( string value )
bool case_sensitive )
Removes the saved color/value pair containing the specified value (possibly case-insensitive) from the saved color/value pairs |
| Properties | |
| Count |
public int Count
Returns the number of saved color/value pairs |
| Events | |
| OnColorHit | Returns a ColorHitEventArgs to its subscribers when a location in the image is clicked on by a user
public ColorHitEventArgs ( Color   color,
                           string  value )
|
The delegate and event are defined as:
// ******************************* delegate ColorHitHandler

public delegate void ColorHitHandler ( object  sender,
                                       ColorHitEventArgs e );

// ***************************************** event OnColorHit

public event ColorHitHandler OnColorHit;
Using the Control
There are five steps required to perform hit testing with the ColorHitTest user control:
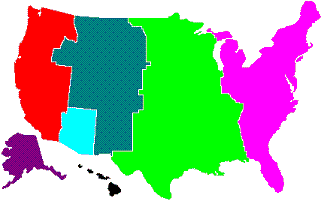
- Prepare a bitmap image that will be color hit tested
I started with the GIF on the left, and finished (after about ten hours of frustration) with the BMP on the right. I learned a lot during this manipulation and have described some of my lessons learned below.

- Invoke
ColorHitTestConstructorprivate ColorHitest. ColorHitest time_zones_CHT; time_zones_CHT = new ColorHitest. ColorHitest ( )
When the
ColorHitTestconstructor is invoked, the data structure used to contain color/value pairs is initialized. - Initialize the color/value pairs, for example:
time_zones_CHT.Add (   Color .Magenta ,   "Eastern"   );
time_zones_CHT.Add (   Color .Lime ,      "Central"   );
     :
time_zones_CHT.Add (   Color .White ,     "Boundaries"   );
Each color/value pair is placed into a
ColorNodeand theColorNodeis added to the list ofColorNodes. There is no practical limit to the number ofColorNodesthat may be placed on the list. - Load the image that is to be displayed by the user control:
time_zones_CHT.Image (  display_bitmap,
                        desired_width,
                        desired_height );
In the demonstration, the bitmap that contained the US Time Zones was sized 425 wide by 267 high. I wanted to display a much smaller image. To perform the resizing, I added the method
ScaleBitmap, extracted from the article Bitmap Manipulation Class With Support For Format Conversion, Bitmap Retrieval from a URL, Overlays, etc. (from CodeProject). It is very important that the displayed bitmap be scaled; otherwise, theMouseUp(used to trigger theonColorHitevent) location will be reported with respect to the original bitmap. This causes the color to be misinterpreted and an incorrect associated value to be returned. - Subscribe to the hit event
time_zones_CHT.OnColorHit +=
     new CH.ColorHitHandler ( revise_GUI );
The demonstration GUI is updated with the color/value pair of the location on the image. So the event handler
revise_GUIis invoked. The signature ofrevise_GUIis:private void revise_GUI ( object sender, ColorHitEventArgs e )ColorHitEventArgscontains the color and the value at the location of theMouseUpevent.
Lessons Learned for Programmers (like me) who are Graphically Challenged
This section contains some lessons that I learned while preparing the graphic for the control. It is by no means a complete discussion of drawing for programmers. I only hope that my limited experiences will help my readers.
- After much struggling with various graphic editors and output file types, I found that Microsoft Paint and bitmaps best met my needs. The time zone graphic that appears in this project was created using Microsoft Paint. The image was finally saved as a bitmap (.bmp). I spent fruitless hours working with JPEG images. I found that each time a JPEG image was loaded, its edges were blurred, and the single color that I had used to fill an area was no longer a single color. I now understand more thoroughly what "lossey" means.


- Release the left mouse button as soon as you obtain a desired effect (accidentally clicking the right mouse button undoes all the work you accomplished since you last released the left mouse button).
- Almost always, hold down the shift key when drawing lines. This forces the line to be drawn at an angle that is a multiple of 45°.
- Draw into the body of a shape. This avoids most accidental straying of the mouse.

- When drawing at the pixel level, always zoom into the image until individual pixels can be easily selected. In Paint, View?Zoom?Custom.... I used 600%
- Only use the brush when you can stay more than five pixels away from a boundary. Unless you are changing the color of a large area, do not use the brush at all. The advantage to using the brush in Microsoft Paint is its preview of what the color change will be when the left mouse button is clicked.
- Know how to perform an undo last operation (normally CTRL-Z). This is useful if you accidentally stray into an area you did not want to change.
- After I complete a color replacement on a complex shape, a few pixels remain that did not change to the color I wanted. To fix this most easily, I choose a contrasting color and flood fill the figure with the new color. Pixels that were missed can be easily identified and changed. Change the errant pixels to the new color and, when everything looks good, flood fill the area back to the desired color.
- I find it useful to use the line tool to change pixel colors.
-
The background color that I wanted was white (RGB 255, 255, 255). Unfortunately, there were splotches of a dirty white (RGB 255, 251, 240) in the background. To eliminate these splotches, I first used the Pick Color tool to select the splotch color. Then I used the Fill with Color tool to fill the entire background with the splotch color (making sure to pick up small areas that would not flood fill. (Because all water was connected, I modified the area northeast of Maine so that background was connected to the rest of the background.) Then I changed the color to black (RGB 0, 0, 0) and filled the entire background again using the Fill with Color tool. Now small areas that were not exactly the splotch color appeared. I filled those areas with black. Finally, I filled the background with white. The result is the graphic used in the demonstration.
It is very important that the fill color being chosen to flood the background is not a color that is adjacent to the background. When I performed the background splotch color repair, Hawaii was not black, so black could be used. If Hawaii was black, I would have chosen a color other than black to perform the background splotch color repair.
- I made the mistake of not properly joining the lines that separate the time zones. It is necessary to ensure that two segments share a pixel in order for flood fill operations to occur as expected.

- When you are choosing colors, select from the "known" colors. This is a limited palette but it allows color names and ARGB values to be easily identified. While following this rule, I found that Microsoft Paint was not very friendly. The Colors menu item displayed a color dialog box that did not contain the known colors and that did not even display a color name when the mouse hovered over the color.
Recall from above:
time_zones_CHT.Add ( Color .Lime , "Central" );
Color.Limeis easier to specify thanColor.FromArgb( 255, 0, 255, 0). But, the Microsoft Paint Color dialog is somewhat brain-dead. Although it displays a nice set of colors, they are not the known colors and there are no tool tips to indicate the color names is, if any.I struggled with the Microsoft Paint interface for a while and then decided to build the Known Colors Palette Tool. Although the tool cannot drop a chosen color directly into the Microsoft Paint color dialog, it does display all of the information needed to transfer the ARGB values to Microsoft Paint. When "ready for prime time", the tool will be provided through CodeProject.
References
- Most elegant 2D "point inside polygon" or Polygon. contains(p:Point) algorithm Stack Overflow
- Point in Polygon Strategies , Haines, Eric, "Point in Polygon Strategies," Graphics Gems IV, ed. Paul Heckbert, Academic Press, p. 24-46, 1994
- Multi-color DropDownList using C#, The Code Project
- A Bitmap Manipulation Class With Support For Format Conversion, Bitmap Retrieval from a URL, Overlays, etc, The Code Project