
Styling your FirstWebPage
5.00/5 (3 votes)
Basic syntax and usage of CSS to style your webpage
Introduction

What is CSS? Abbreviation for CSS:
The term cascading in Cascading Style Sheets refers to a specific way in which browsers determine which styles to apply to a specific part of the page. This method is called "the cascade", and it’s from the cascade that CSS takes its name.
Why use CSS?

Hope the image above on CSS is self-explanatory ;). CSS is used to design the layout and apply styles to various sections of a web page. To neatly and clearly distinguish boundaries of various sections in a page and to organise them in a presentable manner.
We will be covering the below topics in this article:Styling Your First Web Page
- Setting up a CSS document
- Basic CSS Syntax
- Id and Class Selectors
- Backgrounds, Text and Fonts
- Where and How to use CSS
CSS is used to design the layout and apply styles to various sections of a web page.
In order to write our first CSS we first need to know the basic CSS Syntax:
Any CSS files consists of one or many CSS rules. Lets see about the CSS Syntax here:
- A CSS rule is made up of two parts: the selector, which states which tag the rule selects, (or targets), and the declaration, which states what happens when the rule is applied.
- The declaration itself is made up of two elements: a property, which states what is to be affected, and a value, which states what the property is set to.

- Id and Class Selectors
Anyone who is familiar with CSS basics would know the difference between an Id selector and a class selector.
ID selector:
As the name indicates, the ID Selector is a unique selector and it can refer to only one such an ID in a page. To refer an element with ID attribute, we use "#" in CSS Selector.
For instance, lets take a DIV element with an ID "header"
<div
id="header">
to style this div, we write the following lines in CSS
#header{position:absolute;left:0;top:0;}
Class selector:
A class selector is mostly used when we need to apply a particular style to a group of elements in a page.
To refer an element with CLASS attribute, we use "." In CSS Selector
Lets take the same example, except that we style the content of the web page now.
<div
class="container">
to style this div, we write the following lines in CSS.
.container{border:solid
1px gray;color:black;}
The same class can repeat in a single page, on the contrary an ID can be called only once, since it is unique.
The ID and class selectors also have a main purpose in styling any webpage, which many of us may not know. Have you heard anything like "Specificity" in CSS?
Every selector has a specificity that determine the style application precedence. Selectors with higher specificity are called stronger and they overwrite the less specific ones. There is a simple formula to determine the specificity:
Specificity of 1: HTML elements, pseudo elements
Specificity of 10: classes, attributes
Specificity of 100: ids
Specificity of 1000: inline styles
Since the Specificity of IDs are more when compared to classes, if you call an element using ID in CSS, the priority given is more.
Setting up a CSS document
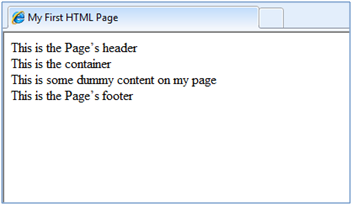
Let's take a sample HTML document, for which we shall write our new CSS file.
Please copy the below text in a notepad and save as "MyFirstHTML.html"
We got a simple web page with a header, container and a footer.
<!DOCTYPE html PUBLIC "-//W3C//DTD XHTML 1.0 Transitional//EN" "http://www.w3.org/TR/xhtml1/DTD/xhtml1-transitional.dtd">

<html xmlns="http://www.w3.org/1999/xhtml" >

<head>

<title>My First HTML Page</title>

</head>

<body>

<div id="header">This is the Page’s header</div>

<div class="container">This is the container</div>

<div id="footer">This is the Page’s footer</div>

</body>

</html>
I am assuming that we know the basics of a HTML document and hence proceeding with the CSS.
A CSS File is nothing but a text file with an extension .css
Open notepad and type some basic CSS as shown below:
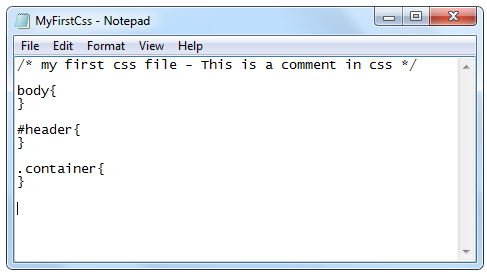
Now, try to save the file with .css extension along with enclosed with double quotes.

And that’s it, you have created your first CSS file :)
Now we put both the files (MyFirstHtml.html & MyFirstCSS.css) into one single folder (named probably "Styling a web page")
Backgrounds, Text and Fonts
In CSS, we can define the Background color of a particular element( DIV, SPAN, etc,.) using the background-color property.
EX:
#header{background-color:gray;} . The color is usually a hexa decimal code from
#000000 – black
To #ffffff – white. The
combinations may vary using numbers & alphabets to denote different colors
inbetween.
We can also apply background images to a particular section using the background-image property in css
For example, let us define a background image for the footer in the sample css we are writing here
#footer{background-image:url("../images/footer.jpg");}
Generally the background-image is associated with other properties like background-color, which defines the bg color if any; background-position, which mentions the position of the bg image; background-repeat, which says if the image is allowed to repeat within the section;
We can either write it in a single line like
#footer{background:transaparent url("images/footer.jpg") no-repeat 0 0;}
Or split and write individually like this
background-image: url("../images/footer.jpg");

background-postion: 0 0 ;

background-repeat:no-repeat;

background-color:transaparent;
Before that browse your html page in any browser and see how it looks:

It looks pretty simple without any styles added. Now, that we know the syntax for bg color and bg image, we can add them to header and footer to check how they appear in the webpage. Don’t worry about the layout now, since we are focusing only the css and its rules as of now.
Let us apply some background color and some background image for the header and footer respectively.
Edit the css file, open with notepad and edit the below lines:body{}
#header{
background-color:#eeeeee;
padding:10px;
}
.container{
border:solid 1px black;
padding:10px;}
#footer{background:transparent url("images/footer.jpg") no-repeat 0 0;}
In the above css file I have added 2 new CSS rules which are border and padding.
Border, as the name reveals, is nothing but a border we add to the element. The syntax goes like, border-type, border-width and border color.
Padding is nothing but the space between the container and the inner content. Otherwise the text looks cramped.
You can see the difference yourself, when u browse the html file now:
OOPS! What went wrong? It still looks the same. How does the HTML file know about the CSS we have added? In order to link the Stylesheet with your HTML document, you need to add the link to the HEAD section of your HTML document like this: Now Please edit the HTML with the updated lines below:
<head>

<title>My First HTML Page</title>

<link rel="Stylesheet" href="MyFirstCSS.css" />

</head>
Note that you have given correct path in "href" attribute here. Since the files are in a single folder, we need not worry about the path as of now.
Also, we need to add an Image called footer.jpg in a new folder called Images. Save the below image as footer.jpg and use it for your sample styling exercise.
![]()

Refresh the browser and check the html page now.
Hurray! I could see some better page now :)

But, the footer is sticking to the container and the bg image is not applied fully, so let us add some padding to it and let the image repeat along the X direction. Update the footer CSS shown below in the CSS file.
#footer{
background:transparent url(images/footer.jpg) repeat-x 0 0;
padding:10px;margin:10px;}
Margin gives a margin between the footer element and the container here.
Wow! now the HTML page looks like this:

Now, let us try to apply CSS for the text here and know about font properties in CSS.
The text can have various CSS properties like Text color, Text Alignment, Text Decoration & Text Indentation.
Lets apply all these properties to the container in our sample web page and check it out.
Text color : Its used to color the text with the specified color. With CSS, a color is most often specified by:
- a HEX value - like "#ff0000"
- an RGB value - like "rgb(255,0,0)"
- a color name - like "red"
ex: color:blue; or color:#00ff00; or
color:rgb(0,255,0);
Text align: The text-align property is used to set the horizontal alignment of a text.
Text can be centered, or aligned to the left or right, or justified.
Text Decoration: The text-decoration property is used to set or remove decorations from text.
The text-decoration property is mostly used to remove underlines from links.
Text Transformation: The text-transform property is used to specify uppercase and lowercase letters in a text.
It can be used to turn everything into uppercase or lowercase letters, or capitalize the first letter of each word.
Ex:
p.uppercase {text-transform:uppercase;}
p.lowercase {text-transform:lowercase;}
p.capitalize {text-transform:capitalize;}
Text Indentation: The text-indent property is used to specify the indentation of the first line of a text.
p {text-indent:50px;}
Next, let's talk about the Font Properties in CSS like font-weight, font-size, font-family, font-style.
Font Family: The font family of a text is set with the font-family property.
The font-family property should hold several font names as a "fallback" system. If the browser does not support the first font, it tries the next font.
EX: p{font-family:"Times New Roman",
Times, serif;}
Font Style: The font-style property is mostly used to specify italic text.
This property has three values:
normal - The text is shown normally
italic - The text is shown in italics
oblique - The text is "leaning" (oblique is very similar to italic, but less supported)
Font Size
The font-size property sets the size of the text.
Ex: h1
{font-size:40px;}
h2 {font-size:30px;}
Let's edit the CSS in the MyFirstCSS.css file, to add the text & font properties and see the difference.
The header will have Red color, with Font-size increased and Font-weight bold.
#header{

background-color:#eeeeee;

padding:10px;

color:Red;font-size:22px;font-weight:bold;/* text & font properties */

text-transform:uppercase;text-align:center;/* text & font properties */

}
The container will have
font-family: Verdana, font-size of 14px and the text will be aligned 50px from
the left.
There will be a link for which default behavior will be underline, and we are going to remove the underline using text-decoration property.
.container{

border:solid 1px black;

padding:10px;

font-size:14px;font-family:Verdana, Arial;text-indent:50px;/* text & font

properties */

}
The footer will also be center aligned like the header, of font-style
Italic and text color Black.
#footer{

background:transparent url(images/footer.jpg) repeat-x 0 0;

padding:10px;

font-size:14px;text-align:center;font-style:italic;color:Black;/* text & font properties */}
Now save the CSS and browse the html file.

Hope we have learnt the basics of CSS syntax through the above article
Where and How to use CSS
Let's see the various ways to use css.
How do you apply styles to your HTML Document?
- Inline
- Internal (Embedded)
- External
1. Inline styles
Inline styles (also known as local styles) are added to a tag using the XHTML style attribute, like this
<p>This paragraph simply takes on the browser’s default paragraph style</p>

<p style="font-size: 25pt; font-weight:bold; font-style:italic; color:red;">By adding inline CSS style to this paragraph, we can override
the default styles.</p>

<p>And now we are back to a regular default paragraph without any inline styles.</p>
An inline style only affects the tag to which it is attached.
Adding inline styles everywhere is bad for the portability and editability of your markup. Inline styles should be generally avoided.

2. Internal
You can place a group of CSS styles in the head of your XHTML document—these are known as embedded styles.
The scope of embedded styles is limited to the page that contains the styles. When you embed the styles in the head of the document, you are not truly separating the styles from the content; they are still in the same document.
<head>

<title>Embedded Styles Example</title>

<meta http-equiv="Content-type" content="text/html"; charset=iso-8859-1" />

<meta http-equiv="Content-Language" content="en-us" />

<style type="text/css">

h1 { font-size: 16pt; font-weight:bold; }

p { color: blue; }

</style>

</head>
3.External
You can place styles in a separate document (a style sheet) that links to multiple pages so that the styles have global (site-wide) scope —the styles defined in this style sheet can affect every page of your site, not just a single page or a single tag.
This is the only method of the three that truly separates the presentational styles from the structural markup.Using this method allows web site design and editing to become easier. If you need to make changes that affect the whole site, doing so is as quick and painless as modifying one CSS style.
You can link your style sheet to as many XHTML pages as you wish with a single line of code in the head of each XHTML page.
<link href="my_style_sheet.css" media="screen" rel="stylesheet" type="text/css" />
In our sample exercise here, we have used css in the head section as a link to an external css file, which is the best practice.
Hope you enjoyed working on the sample exercise and a lot more to come :) Thank you all, Happy coding :)