
Writing your first program for the Freescale Freedom platform in CodeWarrior
4.38/5 (7 votes)
This article shows how to create programs for the Freescale ultra-low-cost development board FRDM-KL25Z.
Introduction
Some time ago, Freescale introduced its Freedom development platform for Kinetis MCUs, which is a cheap (about $13) platform for their Kinetis L Series microcontrollers (which are built on ARM Cortex M0+ processor). The platform includes four boards with the same footprint but different MCUs. Of those four board the FRDM-KL25Z is probably the most popular and is also supported by the mbed community.
In this tutorial I will describe how to create and run your first program on the FRDM-KL25Z board using CodeWarrior, which is the board's 'native' IDE provided by Freescale itself. Note that there are other (and easier-to-use) options for developing your programs for this board, such as mbed or coocox. These options have their own documentation, so if you decide to use them, I don't have much to offer you in this tutorial. If you, however, prefer using the CodeWarrior IDE, I hope to make your first steps easier.
Background
One nice feature of the FRDM-KL25Z, appealing especially to the DIY community, is that it is possible to attach expansion boards (so called shields) for Arduino to this board. Given the wide range of such 'shields' available elsewhere, it makes it very easy to connect the FRDM-KL25Z with interesting pieces of hardware.
The downside is, that out-of-the-box it is very hard to start writing your own programs for this board - the documentation is not easy to find and not very good. Or maybe I am not good in searching. But I imagine there would be a step-by-step tutorial on writing some "hello world", blinking LED program. The manufacturers website promises such tutorial as a part of a sample code package for the board, but all I found in this package was small readme.txt which left me with many questions unanswered. It is a pity, because the sample code package contains some nice drivers which can make your programming much easier - if you take the time to find out how it all works. And it does take time to find this by trial and error. So after going through this process I decided to write a tutorial to make things easier for those who also want to develop their own program for this board.
The fact that the FRDM-KL25Z board is "Arduino compatible" may give some people the idea that this board could be used as a more powerful and yet cheaper alternative to the standard Arduino boards. However, it should be noted that the compatibility is only at the hardware level - you can connect expansion boards (shield) designed for Arduino to the FRDM-KL25Z - but there is no software compatibility. You cannot use the Arduino 'language' or libraries with this board. The closest you can get to the Arduino's ease-of-programming is probably the mbed platform, but its cloud principle with online compiler is hard to swallow for some people (including me).
If you prefer classical IDE and want to go the easy way, try coocox. It is free and I liked the IDE when I tried it about a year ago. As I saw recently, it also has some libraries for the FRDM-KL25Z in the form of 'components'. I am a bit suspicious about GUI interfaces for adding components into your programs, but I haven't tried it yet.
If you are brave enough (or perhaps serious enough about your embedded developer career) to deal with professional IDE and plain C language, Freescale's CodeWarrior is the 'native' option. This is not the easy way, but if you do choose it, I hope this tutorial will make the start easier.
The hardware
I will not describe the hardware here in detail as it is described elsewhere - for example, here. Just some important notes:
- The board actually contains two microcontrollers - one works as a programming interface (OpenSDA MCU) and the second one is the one into which you load your application (target MCU). In other words, it combines the target MCU and programming and debugging interface in one board.
- The MCU for your applications is Kinetis L series, MKL25Z128. At least on my board, which is named FRDM-KL25Z. There are other variants of the board with different MCUs.
- There are two USB connectors on the board; the one named OpenSDA is the one we will use for programming and debugging. The one named KL25Z is for user applications with USB.
- The programming and debugging is done through OpenSDA interface. This interface also works as a mass storage device (MSD) so when you connect the board to your computer, it will appear as a disk drive (named FRDM-KL25Z). And if you copy your program's binary (.srec file) into this disk, it will load the program into the target MCU. So you can actually load programs to the board just by copying them in any file manager!
- The program (firmware) running in the OpenSDA MCU is called OpenSDA application. If you are used to traditional MCU programming using a separate programmer device, you could say that the OpenSDA application is the programmer's firmware.
- There are (were) several OpenSDA applications, for example, one for flashing and debugging your program, one for virtual serial port and one for the MSD programming described above. Currently, all these three useful applications are merged into one. So you do not have to switch the OpenSDA applications depending on what you want to do. You can do everything with just one application.
- If you do need to change or update the OpenSDA application (which equals to updating your programmer's firmware), this is done by going into bootloader mode (hold down the reset button while plugging the USB cable into your computer) and copying the new OpenSDA application to the mass storage drive (named BOOTLOADER in this case).

Preparation
First, let's download the files we will need:- CodeWarrior IDE (version 10.5) from freescale website. Use the Special edition version which has some code-size limitations (not limiting in our case at all) and otherwise works without any expiration date. (about 1.2 GB)
- OpenSDA application (firmware) from P & E Micro. There is Open SDA firmware link at the top of the page.
- Sample code package for the FRDM-KL25Z.
Here is direct link. In case it does not work, you can start in the main page for FRDM-KL25Z: Freedom platform, scroll down to 'Jump start your design' section and follow 'Get Started with CodeWarrior Development Studio' link. This will open small window with some download links. One of them is the 'FRDM-KL25Z Sample Code Package'.
Alternatively, look for 'KL25_SC: FRDM-KL25Z and TWRKL25Z48M Sample Code Package' in the downloads section.
Note that the file you download is an .exe, but don't worry, it is just self-extracting archive.
Now install the programs:
- Installing CodeWarrior is straightforward. As you may have guessed from the download size, it is a huge program. You can save some disk space if you install only the Kinetis tools, but still it will take more than 2 GB of disk space.
- Then run the sample code package file, which will extract the sample code to your disk.
- Extract also the P&E micro OpenSDA firmware package. There is quite many applications in the package. We will need the file MSD-DEBUG-FRDM-KL25Z_Pemicro_v114.SDA which is the debugger, virtual serial port and mass storage all in one.
Update the OpenSDA firmware
- Hold down the reset button on your board and plug the USB connector into your computer.
- Soon you should see a new disk drive in your system with label BOOTLOADER.
- Copy the MSD-DEBUG-FRDM-KL25Z_Pemicro_v114.SDA file to this drive and wait a while.
- Then unplug the USB cable from your computer. Now the firmware of your debugger is up to date. You will be able to debug your applications and also use the virtual serial port to communicate with them.
Your first program for FRDM-KL25Z - using the example program
We will start by importing existing project from the sample code package. This project is called 'platinum' and shows how to receive and send data over serial port. I hope you are familiar a little with CodeWarrior or Eclipse.
- Start CodeWarrior IDE.
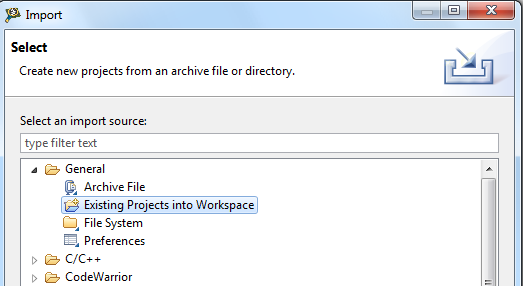
- Go to the File menu and select Import.... In the Import window which opens select General > Existing projects into workspace and click Next.
- Click the Browse button next to 'Select root directory' field and select the 'platinum' example program from [your_path_to_sample_code_package]\kl25_sc_rev10\klxx-sc-baremetal\build\cw\platinum.
- You should now see the platinum project in the list of projects to import.
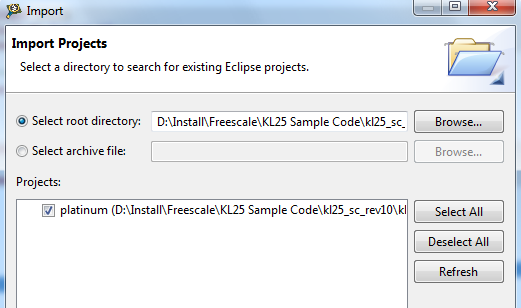
- Make sure the 'Copy projects into workspace' option is not checked. The project refers to the sample code using relative paths, so it would not work in a different location.
- Click Finish to import the project.
- Build the project.

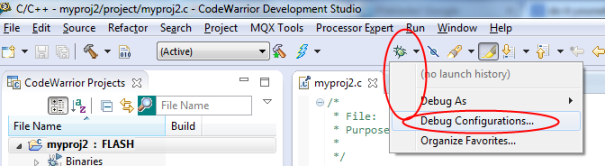
- Open the menu in the Debug (bug) icon in toolbar and select Debug Configurations...
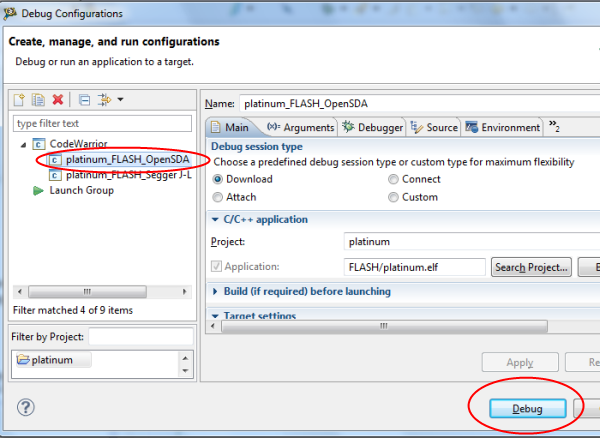
- In the window which opens select CodeWarrior > platinum_FLASH_OpenSDA and click Debug button below.
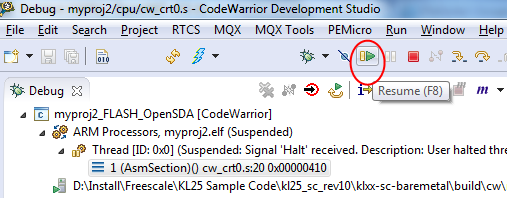
- After the program is loaded, run it using the Resume button.
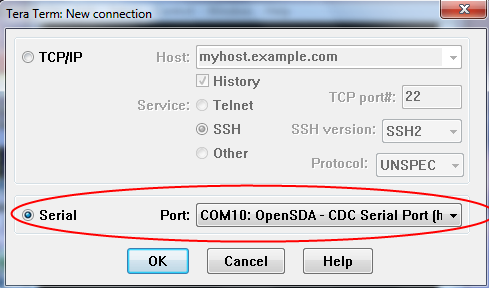
- Use any terminal emulator program (I use Tera Term) and open the virtual serial port created by the OpenSDA interface. To find out the COM port number you can look at available ports in your Computer > Manage > Device manager.
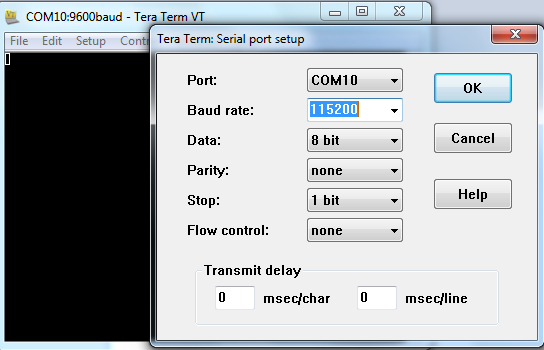
- Set up the communication speed to 115200.
- Type any text into the terminal window and the FRDM-KL25Z board should echo the characters back.
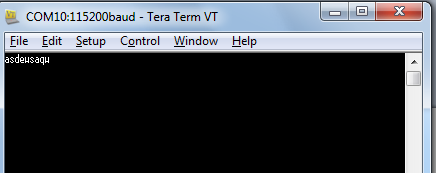
- The result looks rather simple - what you type just appears on the screen, like in normal text editor, but it is actually your programs in the board which receives the character you type and sends it back to the terminal. If you want to make sure, just add 1 to the received character before sending it back in your program:
ch = in_char();
out_char(ch+1);
Well, that was easy. Now how do I create my own project?
Probably the most intuitive way would be to create new project for the MKL25Z128 device using CodeWarrior's New Project wizard. But this would mean you will start with just the (almost) empty main function, without any drivers to help you control the hardware.
The sample code package which we installed earlier contains many interesting drivers, such UART, I2C or ADC and it would be pity not to use them. But note that you cannot easily use just one of the drivers. The code is more like a complete library than set of independent drivers. For example, the UART driver is initialized in startup code, so if you want to use it in your project created in CodeWarrior, you will have to dig into the startup code. The code is probably intended to be used as a complete package together in your application. There is even an .exe file which will generate new, pre-configured project for you.
This sound good, but there are some troubles. First one is the documentation. Although the description on Freescale website says the sample code package contains step-by-step tutorial, all I found was a simple readme file. The only part of this file which could resemble tutorial is about 4 lines and deals with creating new project using the .exe utility. I think it is worth quoting it here in full:
"The klxx-sc-baremetal\build\cw\make_new_cw_project.exe file can be used to clone the platinum project. The script will prompt you for a name to use for the new project, then creates copies of all needed compiler specific files and folders. The main source file and klxx-sc-baremetal\src\cw\{proj name} files will need to be manually created."
Maybe it sounds easy, but look at the steps below to see what it means in detail.
The second trouble I see with the package is that it is not easy to use. You are assumed to create your projects using the provided .exe tool and keep them inside the directory structure of the code package. If you want to do it otherwise, you are on your own to set up your project. And you can guess that it is not easy if it was worth writing an .exe utility for creating new projects rather than providing instructions on setting up the project in the IDE manually. Maybe it's just me, but I somehow do not like this approach. I like libraries which are easy to set up. And I like written instructions for configuring my project. This way I can understand what is going on and can place the project wherever I want on my disk.
Here is how to create a new project using the drivers in the sample code package.
Creating your own program
- Run the make_new_cw_project.exe tool from [your_path_to_sample_code_package]\kl25_sc_rev10\klxx-sc-baremetal\build\cw
- A console window will appear and prompt for name of the project. Enter something like myproj.
- After short time the program will inform you that the project was created. You can exit the tool now.
- Note that new directory with the name of your project was created in the location of the .exe tool.
- Start CodeWarrior and in the File menu select Import..... In the window which opens select General > Existing projects into workspace and click Next.
- Click the Browse button next to 'Select root directory' field and select the directory of the project you have just created in [your_path_to_sample_code_package]\kl25_sc_rev10\klxx-sc-baremetal\build\cw\
- You should now see your project in the list of projects to import.
- Make sure the 'Copy projects into workspace' option is not checked.
- Click Finish to import the project.
- In the CodeWarrior Projects tree view expand the project and the sub folder 'project'. You should see two files in this sub folder: isr.h and [your_project_name].c. If you try to open these files, there will be an error message. These are actually just links the .exe tool created but you are expected to provide the target files yourself.

- In your favorite file manager go to [your_path_to_sample_code_package]\kl25_sc_rev10\klxx-sc-baremetal\src\projects and create a sub folder with the name of your project (e.g. myproj). This is where the links in the generated project point to.
- Copy the files isr.h and platinum.c from the 'platinum' folder to your project's folder and rename the file platinum.c to [your_project_name].c.
Switch back to CodeWarrior and try to open the isr.h or the .c files again. Now you should get a different error message - resource is out of sync with file system. Press F5 to reload the file and now it should open. - If you used the platinum.c file as described in previous steps, you will now have a program which will echo characters received from serial line.
Alternative version of step 11
If you prefer to have the source files directly in the project folder instead of the .../src/projects folder assumed by the .exe tool, instead of creating the two missing files in the ...\src\projects folder, create them directly in the folder where your project is located (in ...\build\cw\myproj). To do this:
- In your file manager open the project folder created by the .exe tool and go to kl25_platinum\project\ sub folder. It should be empty for now.
- Copy the files isr.h and platinum.c from the platinum sample project (...src\projects ) to this folder and (optionally) rename the platinum.c to your project's name or main.c, if you prefer.
- Return to CodeWarrior and delete the links to the missing isr.h and myproj.c files from the project.
- Right-click the project sub folder and select Refresh from the context menu. The files you created in previous step should now appear.
Conclusion
The FRDM-KL25Z is a nice prototyping board which offers ARM based MCU together with some interesting peripherals, such as accelerometer and touch slider at really ultra-low price of about $13. Another plus is that its footprint is compatible with Arduino, which allows connecting expansion boards (shields) for Arduino to this board. However, there is not much documentation (or not easy to find) and when I started to play with this board, I had hard time getting my first program running. I hope this tutorial will make it easier for the others.Epilogue
Just as I finished this article, I happened to download the sample code package for another board from the Freedom platform - FRDM-KL05Z. And to my surprise this package contains tutorials in .pdf for several IDEs including CodeWarrior! I might have saved myself a lot of time if I knew this tutorial existed; well, if I knew I should search the sample code packages for other boards...
Anyway, I think my tutorial will still be useful, as it is targeted directly to the FRDM-KL25Z board and it uses the current version of CodeWarrior (10.5).
Updated information (March 2015)
Things are changing quickly; if you are starting with the FRDM-KL25Z board now, the way described in this article is little out-of date. There are some news:
- Freescale introduced new free IDE for the Kinetis MCUs, Kinetis Design Studio. This will be a better choice than CodeWarrior for your first projects. It has similar features, but is smaller.
- I wrote a library for the FRDM-KL25Z board which allows using the same basic functions as those available in Arduino. It is described in "Arduino-compatible software library for FRDM-KL25Z board" here on Codeproject.
History
2 April 2014 - First version.
17 March 2015 - New information about KDS and Arduino-compatible library.