
Sharing Experience of SSO Integration via SAML 2.0 Resources
4.62/5 (5 votes)
Sharing Experience of SSO Integration via SAML 2.0 Resources
1. Background
Despite the fact that Single Sign On (SSO) exists, is discussed and has been used for a long time, practice shows that it is not always easy to implement. The purpose of this article is to show how to implement a custom Service Provider¬ (SP) for SAML 2.0 identity provider (IdP) and use it to integrate SAML SSO into your Java Web application.
In one of our recent projects, we had to deploy a clustered portal solution for a major university. One of the tasks was to implement SSO for the following systems:
- Liferay portal
- Simple custom Java web application
- Google apps
Additional Requirements and Considerations Included
- Shibboleth was already chosen and used as an IdP. Shibboleth is an open source system that fully implements SAML 1.0 and SAML 2.0 protocols (http://shibboleth.net/about/index.html).
- SAML 2.0 was selected as the main protocol for SSO integration.
- Jasig CAS was already configured as Shibboleth authentication provider.
In addition to more flexible authentication user experience and flow configuration, such a setup also enabled CAS-compatible systems to participate in SSO without a need to implement.
LDAP was configured as an authentication provider for CAS and as an attributed provider for Shibboleth.
Challenges That We Faced Included
- The Shibboleth documentation from the manufacturer was not always current and complete.
- There are few comprehensive examples of SAML SP implementations for Java web application.
- Using Shibboleth integrated with CAS to enable both SAML and CAS SSO complicates SSO session management and requires special attention.
After resolving these difficulties, we couldn’t help but share our experience with the readers to make it easier for other developers to understand and use SAML 2.0.
2. Target Audience
- Developers who integrate SSO feature in their projects using SAML 2.0.
- Java developers who are looking for a practical example of SSO functionality integration using SAML 2.0 for their application.
- Java developers, who want to try Shibboleth as a SAML Identity Provider (IdP).
To better understand this article, basic knowledge of SAML 2.0 specification is recommended.
3. SSO Main Components
The diagram below shows generic operation of SSO in the system:

The diagram shows:
- 2 applications to participate in SSO:
- Java Web App – A java servlet-based web application deployed to Apache Tomcat
- Google Apps – Google cloud services
- SP Filter — Service Provider implementation. It interacts with SAML Shibboleth IdP via SAML 2.0 protocol
- Shibboleth IdP is the application for authentication and authorization tools via SAML 1.0 and SAML 2.0
- Tomcat AS is Java Application Server
- The interaction between the SP filter and Shibboleth IdP occur via secure HTTPS protocol
Please, note that the chart shows Shibboleth IdP and Java Web-application distributed to different Tomcat servers. However, you can deploy the environment on a single node using only one instance of Tomcat.
4. Setting Up the Environment for Shibboleth idP
Installing and Configuring Shibboleth idP:
- Download the latest IdP version from http://shibboleth.net/downloads/identity-provider/latest/ and unzip any directory; we will use
$shDistrto refer to the location - Check if the variable
JAVA_HOMEis set up correctly .Run $shDistr/install.sh (we assume that one of Linux flavors is used).
The installer will ask for the following information:
- installation path (for example: /opt/shib)
- IdP name server (for example: idp.local.com).
To test multi-domain SSO configuration on your local machine, you can use a simple trick with /etc/hosts – just add IdP server domain name in the list of aliases to localhost in the file/etc/hosts: 127.0.0.1 localhost idp.local.com
- password for java key store, which is generated during the installation (for example: 12345).
Next, check that the installation process is successfully completed.
We will use the following placeholders hereafter:
$shHome— the directory where Shibboleth was installed$shHost— idP server name$shPassword— the password for Java Key Store (JKS)
- Now, as a part of IdP configuration, we need to specify “an attribute provider” – a component within IdP responsible for retrieving user attributes. In our case, we will only need the IdP to share user login.
We add a description of the attribute to the file $shHome/conf/attribute-resolver.xml after the element.
<resolver:AttributeDefinition id="transientId" xsi:type="ad:TransientId">. <resolver:AttributeDefinition xsi:type="PrincipalName" xmlns="urn:mace:shibboleth:2.0:resolver:ad" id="userLogin" > <resolver:AttributeEncoder xsi:type="SAML1String" xmlns="urn:mace:shibboleth:2.0:attribute:encoder" name="userLogin" /> <resolver:AttributeEncoder xsi:type="SAML2String" xmlns="urn:mace:shibboleth:2.0:attribute:encoder" name="userLogin" /> </resolver:AttributeDefinition>Note: You can use this file to specify any additional attributes the IdP may potentially share with Service Providers; different data sources may be used, such as LDAP or DBMS via JDBC. Attribute provider configuration is described in more detail here.
- We will also need to modify a file $shHome/conf/attribute-filter.xml to make sure that the IdP can share this attribute with our SP:
<afp:AttributeFilterPolicy id="releaseUserLoginToAnyone"> <afp:PolicyRequirementRule xsi:type="basic:ANY"/> <afp:AttributeRule attributeID="userLogin"> <afp:PermitValueRule xsi:type="basic:ANY"/> </afp:AttributeRule> </afp:AttributeFilterPolicy>Note: Here you can specify more complex and precise rule. For example, you can specify that the attribute be transferred only to a certain SAML SP.
- Our Shibboleth IdP should know about the nodes that it can interact with – the so-called relying party (https://wiki.shibboleth.net/confluence/display/SHIB2/IdPUnderstandingRP). This information is stored in the $shHome/conf/relying-party.xml file.
Let’s open the file and add the following element:
<rp:RelyingParty id="sp.local.ru" provider="https://idp.local.ru/idp/shibboleth"
                                        defaultSigningCredentialRef="IdPCredential">
   <rp:ProfileConfiguration xsi:type="saml:SAML2SSOProfile"
       signResponses="never" signAssertions="never"
       encryptNameIds="never" encryptAssertions="never" />
</rp:RelyingParty>
Note that SAML specification requires all parties such as IdP and SP to be identified by a unique “entity id”. Often domain names or URL of corresponding components are used as entity IDs, although it is not required. We are using entity id=”sp.local.com” for the SP and entity id=" https://idp.local.com/idp/shibboleth " for the IdP.
We will test the whole configuration locally, so we will also need to add the SP domain name into the list of aliases for localhost in /etc/hosts: 127.0.0.1 localhost idp.local.com sp.local.com
“
ProfileConfiguration” element states that the relying party will need SAML 2.0 SSO services from this IdP, and that it will not sign or encrypt messages and responses. - At this step, we will specify how the IdP will retrieve detailed SP information. For this, we will add the SP metadata provider in the file $shHome/conf/relying-party.xml
next to the IdP metadata provider element:
<metadata:MetadataProvider id="IdPMD" xsi:type="metadata:FilesystemMetadataProvider" .. >

<metadata:MetadataProvider id="spMD" xsi:type="metadata:FilesystemMetadataProvider"
                            metadataFile="/opt/shib/metadata/saml-sp-metadata.xml"/>
Thus, we give Shibboleth IdP instructions to look up the definition of the SP in the file /opt/shib/metadata/saml-sp-metadata.xml. Let’s create this file with the following content:
<md:EntityDescriptor xmlns:md="urn:oasis:names:tc:SAML:2.0:metadata" entityID="sp.local.ru">
  <md:SPSSODescriptor AuthnRequestsSigned="false" ID="sp.local.ru"
     protocolSupportEnumeration="urn:oasis:names:tc:SAML:2.0:protocol">
    <md:AssertionConsumerService Binding="urn:oasis:names:tc:SAML:2.0:bindings:HTTP-POST"
       Location="https://sp.local.ru:8443/sso/acs" index="1" isDefault="true"/>
  </md:SPSSODescriptor>
</md:EntityDescriptor>
Here, we need to understand the following:
- Our SAML 2.0 SP has an identification «sp.local.ru»
- The address Location=" https://sp.local.ru:8443/sso/acs” where shibboleth IdP will be returning SAML 2.0 messages is specified in the element
md:AssertionConsumerService. - Finally, the parameter
Binding=”urn:oasis:names:tc:SAML:2.0:bindings:HTTP-POST”shows that the SP response will be sent from shibboleth IdP via browser redirect.
- What’s left now is to choose how shibboleth IdP will conduct a real user authentication – or define “authentication provider” in Shibboleth terms. In a production environment, there can be various configurations, including authentication via LDAP, DBMS, and even CAS. We will be using Remote User Authentication mechanism that’s already included (https://wiki.shibboleth.net/confluence/display/SHIB2/IdPAuthRemoteUser).
During the authentication request, shibboleth IdP will look for the
REMOTE_USERvariable. If such variable is found, shibboleth IdP will assume that the user has already been authenticated through an external system (for example, through Web Apache server).For our example, we are going to set the variable
REMOTE_USERfor each request by means of simple Tomcat configuration in order not to overcomplicate the article.Congratulations! The Shibboleth set-up is complete.
Downloading and Configuring Tomcat for Shibboleth IdP
- First, download Tomcat 6 from http://tomcat.apache.org/download-60.cgi, unzip to any folder $tomcatHome (for instance, in opt/shib-tomcat folder).
It is important to mention that at the moment Tomcat 7.* cannot be used when the communication between SP and idP is happening directly via SOAP. Although in this article’s examples, we will be using direct browser redirects to perform these communications, we still recommend using Tomcat version 6.
- Copy $shDistr/endorsed folder to $tomcatHome folder.
- Change the file $tomcatHome/bin/setenv.sh to specify minimal JVM memory parameters:
JAVA_OPTS="$JAVA_OPTS -Xmx512m -XX:MaxPermSize=128m"
- Download the library: (https://build.shibboleth.net/nexus/content/repositories/releases/edu/internet2/middleware/security/tomcat6/tomcat6-dta-ssl/1.0.0/tomcat6-dta-ssl-1.0.0.jar) to the folder $tomcatHome/lib for SOAP protocol support in the communication between the SP and IdP.
- Now let’s open the $tomcatHome/conf/server.xml and set up access to Tomcat via HTTPS. To do this, let’s define the following
Connectorelement:<Connector port="8443" protocol="org.apache.coyote.http11.Http11Protocol" SSLImplementation="edu.internet2.middleware.security.tomcat6.DelegateToApplicationJSSEmplementation" scheme="https" SSLEnabled="true" clientAuth="want" keystoreFile="$shHome/credentials/idp.jks" keystorePass="$shPassword" />Do not forget to replace the variables
$shHomeand$shPasswordwith their real values. - It’s time to deploy Shibboleth IdP application in Tomcat. To do this, let’s create a file $tomcatHome/conf/Catalina/localhost/idp.xml with the following content:
<Context docBase="$shHome/war/idp.war"
privileged="true"
antiResourceLocking="false"
antiJARLocking="false"
unpackWAR="false"
swallowOutput="true" />
Do not forget to replace the variable
$shHomewith the correct value. - Compile the following class and jar put it in a jar file tomcat-valve.jar:
  public class RemoteUserValve extends ValveBase{
    public RemoteUserValve() {
        }

        @Override
        public void invoke(final Request request, final Response response)
         throws IOException, ServletException {
           final String username = "idpuser";
        final String credentials = "idppass";
        final List<String> roles = new ArrayList<String>();
        final Principal principal = new GenericPrincipal(null, username, credentials,
                                                              roles);

        request.setUserPrincipal(principal);
        getNext().invoke(request, response);
      }
    }
Place the jar file in folder ${tomcatHome}/lib. Add the following line of code into the file server.xml:
<Valve ?lassName=”com.eastbanctech.java.web.RemoteUserValve” />
inside the element
<Host name=«localhost» appBase=«webapps» ...>This valve is only needed to make sure that Tomcat sets
REMOTE_USERvariable for each request thus modelling authentication process for the IdP.
5. Implementation of SP Filter for SAML 2.0 Protocol
Now, we will implement a SAML 2.0 Service Provider servlet filter responsible for the following tasks:
- The filter passes through public resources requests that do not need authentication.
- The filter caches authenticated user information to reduce the number of requests to Shibboleth IdP.
- The filter creates a SAML 2.0 authentication request message (
Authn) and passes it to Shibboleth IdP using browser redirect. - The filter processes a response message from Shibboleth IdP, and if user authentication is successful, the system displays initially requested resource.
- The filter removes local session when a user logs out from Java web application.
At the same time, the Shibboleth idP session remains active.
From a technical standpoint, the filter will be the implementation of a standard interface javax.filter.Filter. The scope of the filter will be set at a particular web-application.
Now when the filter functionality is clear, let's start the implementation:
- Create a maven project structure.
This may be done using maven archetype plugin:
mvn archetype:generate -DgroupId=ru.eastbanctech.java.web
-DartifactId=saml-sp-filter -DarchetypeArtifactId=maven-archetype-quickstart -DinteractiveMode=false
You may specify parameters
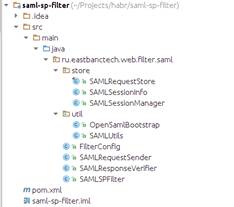
groupIdandartefactIdto your liking.The structure of our project in Intellij Idea will look like this:
- Main pom.xml:
<project xmlns="http://maven.apache.org/POM/4.0.0" xmlns:xsi="http://www.w3.org/2001/XMLSchema-instance" xsi:schemaLocation="http://maven.apache.org/POM/4.0.0 http://maven.apache.org/xsd/maven-4.0.0.xsd"> <modelVersion>4.0.0</modelVersion> <groupId>ru.eastbanctech.web</groupId> <artifactId>saml-sp-filter</artifactId> <name>${project.artifactId}</name> <version>1.0-SNAPSHOT</version> <packaging>jar</packaging> <properties> <!-- General settings --> <jdk.version>1.6</jdk.version> <encoding>UTF-8</encoding> <project.build.sourceEncoding>${encoding}</project.build.sourceEncoding> <project.reporting.outputEncoding>${encoding}</project.reporting.outputEncoding> </properties> <build> <pluginManagement> <plugins> <plugin> <groupId>org.apache.maven.plugins</groupId> <artifactId>maven-compiler-plugin</artifactId> <version>2.5.1</version> <configuration> <encoding>${encoding}</encoding> <source>${jdk.version}</source> <target>${jdk.version}</target> </configuration> </plugin> </plugins> </pluginManagement> </build> <dependency> <groupId>org.opensaml</groupId> <artifactId>opensaml</artifactId> <version>2.5.1-1</version> </dependency> <dependency> <groupId>javax.servlet</groupId> <artifactId>servlet-api</artifactId> <version>2.5</version> <scope>provided</scope> </dependency> <dependency> <groupId>org.slf4j</groupId> <artifactId>log4j-over-slf4j</artifactId> <version>1.7.1</version> </dependency> <dependency> <groupId>org.slf4j</groupId> <artifactId>slf4j-api</artifactId> <version>1.7.1</version> </dependency> </dependencies> </project> - Class
SAMLSPFilteris at the heart of our filter:public class SAMLSPFilter implements Filter { public static final String SAML_AUTHN_RESPONSE_PARAMETER_NAME = "SAMLResponse"; private static Logger log = LoggerFactory.getLogger(SAMLSPFilter.class); private FilterConfig filterConfig; private SAMLResponseVerifier checkSAMLResponse; private SAMLRequestSender samlRequestSender; @Override public void init(javax.servlet.FilterConfig config) throws ServletException { OpenSamlBootstrap.init(); filterConfig = new FilterConfig(config); checkSAMLResponse = new SAMLResponseVerifier(); samlRequestSender = new SAMLRequestSender(); } @Override public void doFilter(ServletRequest servletRequest, ServletResponse servletResponse, FilterChain chain) throws IOException, ServletException { HttpServletRequest request = (HttpServletRequest) servletRequest; HttpServletResponse response = (HttpServletResponse) servletResponse; /* Step 1: Ignore requests that are not addressed to the filter Step 2: If the answer comes from Shibboleth idP, we handle it Step 3: If you receive a request for logout, delete the local session Step 4: If the user has already been authenticated, then we can grant access to a resource Step 5: Create a SAML запрос на аутентификацию and send the user to Shibboleth idP */ } }FilterConfigspecifies basic filter parameters (the excluded resources, the IdP name, the path to IdP Metadata, SP name, etc.). Values of these variables are specified in configuration file web.xml of Java web-application.Objects
checkSAMLResponseandsamlRequestSenderare necessary for checking the validity of the SAML 2.0 messages and for sending an authentication request. We will get back to them later.public class FilterConfig { /** * The parameters below should be defined in web.xml file of Java Web Application */ public static final String EXCLUDED_URL_PATTERN_PARAMETER = "excludedUrlPattern"; public static final String SP_ACS_URL_PARAMETER = "acsUrl"; public static final String SP_ID_PARAMETER = "spProviderId"; public static final String SP_LOGOUT_URL_PARAMETER = "logoutUrl"; public static final String IDP_SSO_URL_PARAMETER = "idProviderSSOUrl"; private String excludedUrlPattern; private String acsUrl; private String spProviderId; private String logoutUrl; private String idpSSOUrl; public FilterConfig(javax.servlet.FilterConfig config) { excludedUrlPattern = config.getInitParameter(EXCLUDED_URL_PATTERN_PARAMETER); acsUrl = config.getInitParameter(SP_ACS_URL_PARAMETER); spProviderId = config.getInitParameter(SP_ID_PARAMETER); idpSSOUrl = config.getInitParameter(IDP_SSO_URL_PARAMETER); logoutUrl = config.getInitParameter(SP_LOGOUT_URL_PARAMETER); } // getters and should be defined below } OpenSamlBootstrap class initializes libraries to work with SAML 2.0 messages: public class OpenSamlBootstrap extends DefaultBootstrap { private static Logger log = LoggerFactory.getLogger(OpenSamlBootstrap.class); private static boolean initialized; private static String[] xmlToolingConfigs = { "/default-config.xml", "/encryption-validation-config.xml", "/saml2-assertion-config.xml", "/saml2-assertion-delegation-restriction-config.xml", "/saml2-core-validation-config.xml", "/saml2-metadata-config.xml", "/saml2-metadata-idp-discovery-config.xml", "/saml2-metadata-query-config.xml", "/saml2-metadata-validation-config.xml", "/saml2-protocol-config.xml", "/saml2-protocol-thirdparty-config.xml", "/schema-config.xml", "/signature-config.xml", "/signature-validation-config.xml" }; public static synchronized void init() { if (!initialized) { try { initializeXMLTooling(xmlToolingConfigs); } catch (ConfigurationException e) { log.error("Unable to initialize opensaml DefaultBootstrap", e); } initializeGlobalSecurityConfiguration(); initialized = true; } } }XML file selection specified in the
xmlToolingConfigsarray contains instructions on how to process elements of SAML 2.0 messages. The XML files themselves are located in the library opensaml-*.jar.
Step 1: Ignore requests that are not addressed to the filter.
The parameter excludedUrlPattern is a regular expression. If the requested resource URL matches the excludedUrlPattern, the filter ignores the request:
if (!isFilteredRequest(request)) {
  log.debug("According to {} configuration parameter request is ignored + {}",
      new Object[]{FilterConfig.EXCLUDED_URL_PATTERN, request.getRequestURI()});
  chain.doFilter(servletRequest, servletResponse);
  return;
}

// We add method to the filter class that will check if the request needs to be handled
private boolean isFilteredRequest(HttpServletRequest request) {
  return !(filterConfig.getExcludedUrlPattern() != null &&
            getCorrectURL(request).matches(filterConfig.getExcludedUrlPattern()));
   }
   // Also add the auxiliary method for receiving the correct URL
private String getCorrectURL(HttpServletRequest request) {
  String contextPath = request.getContextPath();
  String requestUri = request.getRequestURI();
  int contextBeg = requestUri.indexOf(contextPath);
  int contextEnd = contextBeg + contextPath.length();
  String slash = "/";
  String url = (contextBeg < 0 || contextEnd == (requestUri.length() - 1))
                    ? requestUri : requestUri.substring(contextEnd);
  if (!url.startsWith(slash)) {
      url = slash + url;
  }
  return url;
}
Step 2: If the answer comes from Shibboleth IdP, we handle it.
We are looking for "SAMLResponse" in the HTTP request and if it is found, it means that we have received a response from Shibboleth IdP for authentication request. Then we get to processing of SAML 2.0 messages.
log.debug("Attempt to secure resource  is intercepted : {}",
((HttpServletRequest) servletRequest).getRequestURL().toString());
/*
  Check if response message is received from identity provider;
  In case of successful response system redirects user to relayState (initial) request
*/
String responseMessage = servletRequest.getParameter(SAML_AUTHN_RESPONSE_PARAMETER_NAME);
if (responseMessage != null) {
  log.debug("Response from Identity Provider is received");
  try {
    log.debug("Decoding of SAML message");
    SAMLMessageContext samlMessageContext =
                    SAMLUtils.decodeSamlMessage((HttpServletRequest) servletRequest,
                                                (HttpServletResponse) servletResponse);
    log.debug("SAML message has been decoded successfully");
    samlMessageContext.setLocalEntityId(filterConfig.getSpProviderId());
    String relayState = getInitialRequestedResource(samlMessageContext);
    checkSAMLResponse.verify(samlMessageContext);
    log.debug("Starting and store SAML session..");
    SAMLSessionManager.getInstance().createSAMLSession(request.getSession(),
                                                                   samlMessageContext);
    log.debug("User has been successfully authenticated in idP. Redirect to initial
                                                   requested resource {}", relayState);
    response.sendRedirect(relayState);
    return;
  } catch (Exception e) {
       throw new ServletException(e);
  }
}
We need to decode SAML message using SAMLUtils.decodeSamlMessage(..) method, and verify included SAML assertions – checkSAMLResponse.verify(..). When everything is verified, we create an internal SAML session SAMLSessionManager.getInstance().createSAMLSession(..), and redirect the user to the originally requested resource response.sendRedirect (..).
In SAMLUtils class, we include useful auxiliary methods for SAML 2.0 message processing. One of them is decodeSamlMessage that decodes SAML 2.0 messages received via HTTPS.
public class SAMLUtils {
  public static SAMLMessageContext decodeSamlMessage(HttpServletRequest request,
  HttpServletResponse response) throws Exception {

    SAMLMessageContext<SAMLObject, SAMLObject, NameID> samlMessageContext =
                 new BasicSAMLMessageContext<SAMLObject, SAMLObject, NameID>();

    HttpServletRequestAdapter httpServletRequestAdapter =
                                          new HttpServletRequestAdapter(request);
    samlMessageContext.setInboundMessageTransport(httpServletRequestAdapter);
    samlMessageContext.setInboundSAMLProtocol(SAMLConstants.SAML20P_NS);
    HttpServletResponseAdapter httpServletResponseAdapter =
                     new HttpServletResponseAdapter(response, request.isSecure());
    samlMessageContext.setOutboundMessageTransport(httpServletResponseAdapter);
    samlMessageContext.setPeerEntityRole(IDPSSODescriptor.DEFAULT_ELEMENT_NAME);

    SecurityPolicyResolver securityPolicyResolver =
                                    getSecurityPolicyResolver(request.isSecure());

    samlMessageContext.setSecurityPolicyResolver(securityPolicyResolver);
    HTTPPostDecoder samlMessageDecoder = new HTTPPostDecoder();
    samlMessageDecoder.decode(samlMessageContext);
    return samlMessageContext;
  }

  private static SecurityPolicyResolver getSecurityPolicyResolver(boolean isSecured) {
    SecurityPolicy securityPolicy = new BasicSecurityPolicy();
    HTTPRule httpRule = new HTTPRule(null, null, isSecured);
    MandatoryIssuerRule mandatoryIssuerRule = new MandatoryIssuerRule();
    List<SecurityPolicyRule> securityPolicyRules = securityPolicy.getPolicyRules();
    securityPolicyRules.add(httpRule);
    securityPolicyRules.add(mandatoryIssuerRule);
    return new StaticSecurityPolicyResolver(securityPolicy);
  }
}
Let’s place an additional method of converting SAML objects into String in the same class. This will be helpful for logging SAML messages.
public static String SAMLObjectToString(XMLObject samlObject) {
  try {
    Marshaller marshaller =
        org.opensaml.Configuration.getMarshallerFactory().getMarshaller(samlObject);
    org.w3c.dom.Element authDOM = marshaller.marshall(samlObject);
    StringWriter rspWrt = new StringWriter();
    XMLHelper.writeNode(authDOM, rspWrt);
    return rspWrt.toString();
  } catch (Exception e) {
    e.printStackTrace();
  }
  return null;
}
Create a class SAMLResponseVerifier that will contain message verification functionality for SAML 2.0 messages received from Shibboleth IdP. In the main method, verify (..) we implement the following verifications:
- IdP SAML 2.0 message is a response to a certain SAML 2.0 request sent by our filter.
- The message contains a positive user authentication by Shibboleth IdP.
- The main assertions in the SAML 2.0 response are met (the message is not expired, the message is intended for our SP, etc.).
public class SAMLResponseVerifier {
  private static Logger log = LoggerFactory.getLogger(SAMLResponseVerifier.class);
  private SAMLRequestStore samlRequestStore = SAMLRequestStore.getInstance();

  public void verify(SAMLMessageContext<Response, SAMLObject, NameID> samlMessageContext)
    throws SAMLException {
    Response samlResponse = samlMessageContext.getInboundSAMLMessage();
    log.debug("SAML Response message : {}", SAMLUtils.SAMLObjectToString(samlResponse));
    verifyInResponseTo(samlResponse);
    Status status = samlResponse.getStatus();
    StatusCode statusCode = status.getStatusCode();
    String statusCodeURI = statusCode.getValue();
    if (!statusCodeURI.equals(StatusCode.SUCCESS_URI)) {
      log.warn("Incorrect SAML message code : {} ",
                   statusCode.getStatusCode().getValue());
      throw new SAMLException("Incorrect SAML message code : " + statusCode.getValue());
    }
    if (samlResponse.getAssertions().size() == 0) {
      log.error("Response does not contain any acceptable assertions");
      throw new SAMLException("Response does not contain any acceptable assertions");
    }

    Assertion assertion = samlResponse.getAssertions().get(0);
    NameID nameId = assertion.getSubject().getNameID();
    if (nameId == null) {
      log.error("Name ID not present in subject");
      throw new SAMLException("Name ID not present in subject");
    }
    log.debug("SAML authenticated user " + nameId.getValue());
    verifyConditions(assertion.getConditions(), samlMessageContext);
}

private void verifyInResponseTo(Response samlResponse) {
  String key = samlResponse.getInResponseTo();
  if (!samlRequestStore.exists(key)) { {
    log.error("Response does not match an authentication request");
    throw new RuntimeException("Response does not match an authentication request");
  }
  samlRequestStore.removeRequest(samlResponse.getInResponseTo());
}

private void verifyConditions(Conditions conditions, SAMLMessageContext samlMessageContext) throws SAMLException{
    verifyExpirationConditions(conditions);
    verifyAudienceRestrictions(conditions.getAudienceRestrictions(), samlMessageContext);
}
private void verifyExpirationConditions(Conditions conditions) throws SAMLException {
  log.debug("Verifying conditions");
  DateTime currentTime = new DateTime(DateTimeZone.UTC);
  log.debug("Current time in UTC : " + currentTime);
  DateTime notBefore = conditions.getNotBefore();
  log.debug("Not before condition : " + notBefore);
  if ((notBefore != null) && currentTime.isBefore(notBefore))
    throw new SAMLException("Assertion is not conformed with notBefore condition");

  DateTime notOnOrAfter = conditions.getNotOnOrAfter();
  log.debug("Not on or after condition : " + notOnOrAfter);
  if ((notOnOrAfter != null) && currentTime.isAfter(notOnOrAfter))
    throw new SAMLException("Assertion is not conformed with notOnOrAfter condition");
}

 private void verifyAudienceRestrictions(
 List<AudienceRestriction> audienceRestrictions,
            SAMLMessageContext<?, ?, ?> samlMessageContext)
            throws SAMLException{
// TODO: Audience restrictions should be defined below
}
}
The method verifyInResponseTo verifies that the SAML 2.0 response was preceded by a request from our filter. For implementation, an object from class SAMLRequestStore is used, which stores SAML 2.0 requests sent to the Shibboleth IdP.
final public class SAMLRequestStore {
  private Set<String> samlRequestStorage = new HashSet<String>();
  private IdentifierGenerator identifierGenerator = new RandomIdentifierGenerator();
  private static SAMLRequestStore instance = new SAMLRequestStore();

  private SAMLRequestStore() {
  }

  public static SAMLRequestStore getInstance() {
    return instance;
  }

  public synchronized void storeRequest(String key) {
    if (samlRequestStorage.contains(key))
     throw new RuntimeException("SAML request storage has already contains key " + key);

    samlRequestStorage.add(key);
  }
  public synchronized String storeRequest(){
     String key = null;
     while (true) {
       key = identifierGenerator.generateIdentifier(20);
       if (!samlRequestStorage.contains(key)){
         storeRequest(key);
         break;
       }
     }
    return key;
  }
  public synchronized boolean exists(String key) {
    return samlRequestStorage.contains(key);
  }

  public synchronized void removeRequest(String key) {
    samlRequestStorage.remove(key);
  }
}
To create a local session, we will use our own class SAMLSessionManager. Its purpose is to create/destroy local sessions represented by objects of SAMLSessionInfo class.
public class SAMLSessionInfo {
  private String nameId;
  private Map<String, String> attributes;
  private Date validTo;
  public SAMLSessionInfo(String nameId, Map<String, String> attributes, Date validTo) {
    this.nameId = nameId;
    this.attributes = attributes;
    this.validTo = validTo;
  }
   // getters should be defined below
}
The class SAMLSessionManager creates and destroys local SAML sessions in the servlet Session context using SAMLContext.
public class SAMLSessionManager {
  public static String SAML_SESSION_INFO = "SAML_SESSION_INFO";
  private static SAMLSessionManager instance = new SAMLSessionManager();

  private SAMLSessionManager() {
  }

  public static SAMLSessionManager getInstance() {
    return instance;
  }

  public void createSAMLSession(HttpSession session, SAMLMessageContext<Response,
         SAMLObject, NameID> samlMessageContext) {
    List<Assertion> assertions =
                       samlMessageContext.getInboundSAMLMessage().getAssertions();
    NameID nameId = (assertions.size() != 0 && assertions.get(0).getSubject() != null) ?
                     assertions.get(0).getSubject().getNameID() : null;
    String nameValue = nameId == null ? null : nameId.getValue();
    SAMLSessionInfo samlSessionInfo = new SAMLSessionInfo(nameValue,
                                      getAttributesMap(getSAMLAttributes(assertions)),
                                      getSAMLSessionValidTo(assertions));
    session.setAttribute(SAML_SESSION_INFO, samlSessionInfo);
  }

  public boolean isSAMLSessionValid(HttpSession session) {
        SAMLSessionInfo samlSessionInfo = (SAMLSessionInfo)
                              session.getAttribute(SAML_SESSION_INFO);
        if (samlSessionInfo == null)
            return false;
        return samlSessionInfo.getValidTo() == null || new
                 Date().before(samlSessionInfo.getValidTo());
  }

  public void destroySAMLSession(HttpSession session) {
    session.removeAttribute(SAML_SESSION_INFO);
  }

  public List<Attribute> getSAMLAttributes(List<Assertion> assertions) {
    List<Attribute> attributes = new ArrayList<Attribute>();
    if (assertions != null) {
      for (Assertion assertion : assertions) {
        for (AttributeStatement attributeStatement :
                                 assertion.getAttributeStatements()) {
          for (Attribute attribute : attributeStatement.getAttributes()) {
             attributes.add(attribute);
          }
        }
     }
   }
   return attributes;
 }

 public Date getSAMLSessionValidTo(List<Assertion> assertions) {
   org.joda.time.DateTime sessionNotOnOrAfter = null;
   if (assertions != null) {
     for (Assertion assertion : assertions) {
       for (AuthnStatement statement : assertion.getAuthnStatements()) {
         sessionNotOnOrAfter = statement.getSessionNotOnOrAfter();
       }
     }
   }

   return sessionNotOnOrAfter != null ?
           sessionNotOnOrAfter.toCalendar(Locale.getDefault()).getTime() : null;
 }
 public Map<String, String> getAttributesMap(List<Attribute> attributes) {
   Map<String, String> result = new HashMap<String, String>();
   for (Attribute attribute : attributes) {
     result.put(attribute.getName(), attribute.getDOM().getTextContent());
   }
   return result;
 }
}
Step 3: If you receive a request for logout, delete the local session.
if (getCorrectURL(request).equals(filterConfig.getLogoutUrl())) {
  log.debug("Logout action: destroying SAML session.");
  SAMLSessionManager.getInstance().destroySAMLSession(request.getSession());
  chain.doFilter(request, response);
  return;
}
Note: The session remains active on Shibboleth IdP and when prompted for authentication, Shibboleth IdP simply will return us to an active session. Implementation of a global logout requires additional configurations that were not supported by Shibboleth IdP before version 2.4.0. You can read more about it here.
Step 4: If the user has already been authenticated, then we can grant access to a resource.
If the user has an active SAML session in our filter, we give the user this resource:
if (SAMLSessionManager.getInstance().isSAMLSessionValid(request.getSession())) {
     log.debug("SAML session exists and valid: grant access to secure resource");
     chain.doFilter(request, response);
     return;
}
Step 5: Create a SAML authentication request and send the user to Shibboleth IdP.
log.debug("Sending authentication request to idP");
try {
  samlRequestSender .sendSAMLAuthRequest(request, response,
    filterConfig.getSpProviderId(), filterConfig.getAcsUrl(),
    filterConfig.getIdpSSOUrl());
} catch (Exception e) {
   throw new ServletException(e);
 }
SAMLRequestSender class creates, encodes (potentially encrypting and/or signing), and sends requests as SAML 2.0 messages.
public class SAMLRequestSender {
  private static Logger log = LoggerFactory.getLogger(SAMLRequestSender.class);
  private SAMLAuthnRequestBuilder samlAuthnRequestBuilder =
                                                   new SAMLAuthnRequestBuilder();
  private MessageEncoder messageEncoder = new MessageEncoder();

  public void sendSAMLAuthRequest(HttpServletRequest request, HttpServletResponse
     servletResponse, String spId, String acsUrl, String idpSSOUrl) throws Exception {
    String redirectURL;
    String idpUrl = idpSSOUrl;
    AuthnRequest authnRequest = samlAuthnRequestBuilder.buildRequest(spId, acsUrl,
                                   idpUrl);
    // store SAML 2.0 authentication request
    String key = SAMLRequestStore.getInstance().storeRequest();
    authnRequest.setID(key);
    log.debug("SAML Authentication message : {} ",
                            SAMLUtils.SAMLObjectToString(authnRequest));
    redirectURL = messageEncoder.encode(authnRequest, idpUrl, request.getRequestURI());

    HttpServletResponseAdapter responseAdapter =
                    new HttpServletResponseAdapter(servletResponse, request.isSecure());
    HTTPTransportUtils.addNoCacheHeaders(responseAdapter);
    HTTPTransportUtils.setUTF8Encoding(responseAdapter);
    responseAdapter.sendRedirect(redirectURL);
  }

  private static class SAMLAuthnRequestBuilder {

    public AuthnRequest buildRequest(String spProviderId, String acsUrl, String idpUrl){
      /* Building Issuer object */
      IssuerBuilder issuerBuilder = new IssuerBuilder();
      Issuer issuer =
                     issuerBuilder.buildObject("urn:oasis:names:tc:SAML:2.0:assertion",
                                                "Issuer", "saml2p");
      issuer.setValue(spProviderId);

      /* Creation of AuthRequestObject */
      DateTime issueInstant = new DateTime();
      AuthnRequestBuilder authRequestBuilder = new AuthnRequestBuilder();

      AuthnRequest authRequest =
                    authRequestBuilder.buildObject(SAMLConstants.SAML20P_NS,
                            "AuthnRequest", "saml2p");
      authRequest.setForceAuthn(false);
      authRequest.setIssueInstant(issueInstant);
      authRequest.setProtocolBinding(SAMLConstants.SAML2_POST_BINDING_URI);
      authRequest.setAssertionConsumerServiceURL(acsUrl);
      authRequest.setIssuer(issuer);
      authRequest.setNameIDPolicy(nameIdPolicy);
      authRequest.setVersion(SAMLVersion.VERSION_20);
      authRequest.setDestination(idpUrl);

      return authRequest;
    }
  }

  private static class MessageEncoder extends HTTPRedirectDeflateEncoder {
    public String encode(SAMLObject message, String endpointURL, String relayState)
                                         throws MessageEncodingException {
      String encodedMessage = deflateAndBase64Encode(message);
      return buildRedirectURL(endpointURL, relayState, encodedMessage);
    }
    public String buildRedirectURL(String endpointURL, String relayState, String message)
                                                        throws MessageEncodingException {
      URLBuilder urlBuilder = new URLBuilder(endpointURL);
      List<Pair<String, String>> queryParams = urlBuilder.getQueryParams();
      queryParams.clear();
      queryParams.add(new Pair<String, String>("SAMLRequest", message));
      if (checkRelayState(relayState)) {
         queryParams.add(new Pair<String, String>("RelayState", relayState));
      }
      return urlBuilder.buildURL();
    }
  }

}
SAML 2.0 message with user authentication instructions is built using buildRequest method and is actually an XML object:
<saml2p:AuthnRequest xmlns:saml2p="urn:oasis:names:tc:SAML:2.0:protocol"
     AssertionConsumerServiceURL="https://sp.local.ru:8443/sso/acs"
     Destination="https://idp.local.ru:8443/idp/profile/SAML2/Redirect/SSO"
     ForceAuthn="false"
     ID="_0ddb303f9500839762eabd30e7b1e3c28b596c69"
     IssueInstant="2013-09-12T09:46:41.882Z"
     ProtocolBinding="urn:oasis:names:tc:SAML:2.0:bindings:HTTP-POST" Version="2.0">
    <saml2p:Issuer
       xmlns:saml2p="urn:oasis:names:tc:SAML:2.0:assertion">sp.local.ru</saml2p:Issuer>
</saml2p:AuthnRequest>
The parameter AssertionConsumerServiceURL specifies the URL for Shibboleth IdP to return a response, and the parameter parametrProtocolBinding indicates how to return the response to our filter (HTTP POST in this case).
The parameter ID specifies the message identifier. We save it during sending messages String key = SAMLRequestStore.getInstance().storeRequest(); and verify when analyzing the message using method verifyInResponseTo of SAMLResponseVerifier class.
The element saml2p:Issuer specifies the name/entityId of our SP. Using the value saml2p:Issuer, Shibboleth IdP determines from which SP request for authentication is sent, and how it should be processed (via Metadata SP).
We will receive a SAML 2.0 message in XML format from the IdP in response to it:
<saml2p:Response xmlns:saml2p="urn:oasis:names:tc:SAML:2.0:protocol"
     Destination="https://sp.local.ru:8443/sso/acs"
     ID="_9c5e6028df334510cce22409ddbca6ac"
     InResponseTo="_0ddb303f9500839762eabd30e7b1e3c28b596c69"
     IssueInstant="2013-09-12T10:13:35.177Z" Version="2.0">
   <saml2:Issuer xmlns:saml2="urn:oasis:names:tc:SAML:2.0:assertion"
             Format="urn:oasis:names:tc:SAML:2.0:nameid-format:entity">
                     https://idp.local.ru/idp/shibboleth
   </saml2:Issuer>
<saml2p:Status>
    <saml2p:StatusCode Value="urn:oasis:names:tc:SAML:2.0:status:Success"/>
</saml2p:Status>
<saml2:Assertion xmlns:saml2="urn:oasis:names:tc:SAML:2.0:assertion"
    ID="_0a299e86f4b17b5e047735121a880ccb" IssueInstant="2013-09-12T10:13:35.177Z"
    version="2.0">
    <saml2:Issuer Format="urn:oasis:names:tc:SAML:2.0:nameid-format:entity">
          https://idp.local.ru/idp/shibboleth
    </saml2:Issuer>
    <saml2:Subject>
      <saml2:NameID Format="urn:oasis:names:tc:SAML:2.0:nameid-format:transient"
        NameQualifier="https://idp.local.ru/idp/shibboleth">
        _f1de09ee54294d4b5ddeb3aa5e6d2aab
      </saml2:NameID>
      <saml2:SubjectConfirmation Method="urn:oasis:names:tc:SAML:2.0:cm:bearer">
        <saml2:SubjectConfirmationData Address="127.0.0.1"
          InResponseTo="_0ddb303f9500839762eabd30e7b1e3c28b596c69"
          NotOnOrAfter="2013-09-12T10:18:35.177Z"
          Recipient="https://sp.local.ru:8443/sso/acs"/>
      </saml2:SubjectConfirmation>
    </saml2:Subject>
    <saml2:Conditions
         NotBefore="2013-09-12T10:13:35.177Z"
         NotOnOrAfter="2013-09-12T10:18:35.177Z">
        <saml2:AudienceRestriction>
            <saml2:Audience>sp.local.ru</saml2:Audience>
        </saml2:AudienceRestriction>
    </saml2:Conditions>
    <saml2:AuthnStatement AuthnInstant="2013-09-12T10:13:35.137Z"
              SessionIndex="_91826738984ca8bef18a8450135b1821">
        <saml2:SubjectLocality Address="127.0.0.1"/>
        <saml2:AuthnContext>
          <saml2:AuthnContextClassRef>
            urn:oasis:names:tc:SAML:2.0:ac:classes:PasswordProtectedTransport
          </saml2:AuthnContextClassRef>
        </saml2:AuthnContext>
    </saml2:AuthnStatement>
 <saml2:AttributeStatement>
        <saml2:Attribute Name="userLogin" NameFormat="urn:oasis:names:tc:SAML:2.0:attrname-format:uri">
            <saml2:AttributeValue xmlns:xs="http://www.w3.org/2001/XMLSchema" xmlns:xsi="http://www.w3.org/2001/XMLSchema-instance" xsi:type="xs:string">idpuser</saml2:AttributeValue>
        </saml2:Attribute>
    </saml2:AttributeStatement>
</saml2:Assertion>
</saml2p:Response>
The message will be processed in the SAMLResponseVerifier.verify(..) method.
That's about it - our filter is implemented!
Our project structure looks like this:

Let’s build the filter as a jar library in the local repository.
To do this, we run the command in the directory with c.pom.xml: mvn clean install.
6. Creating Java Web Application with SSO Support
Creating Java Web application
To illustrate this, we will create a simple Java web-application with private and public resources. The access to private resources requires user authentication via Shibboleth IdP web application. One of the private resources will be a page that displays information about the current user of the system.
The structure of our application project looks like this:

pom.xml
<project xmlns="http://maven.apache.org/POM/4.0.0"
  xmlns:xsi="http://www.w3.org/2001/XMLSchema-instance"
  xsi:schemaLocation="http://maven.apache.org/POM/4.0.0
  http://maven.apache.org/maven-v4_0_0.xsd">

<modelVersion>4.0.0</modelVersion>
<groupId> ru.eastbanctech.web</groupId>
<artifactId>SimpleSSOApplication</artifactId>
<packaging>war</packaging>
<version>1.0-SNAPSHOT</version>
<name>SimpleSSOApplication</name>
<url>http://maven.apache.org</url>

<!-- Determine the value for our application -->
<properties>
  <sp.id>sp.local.ru</sp.id>
  <acs.url>https://sp.local.ru:8443/sso/acs</acs.url>
  <idp.sso.url>https://idp.local.ru:8443/idp/profile/SAML2/Redirect/SSO</idp.sso.url>
  <logout.url>/logout</logout.url>
</properties>

<dependencies>
  <dependency>
    <groupId>javax.servlet</groupId>
    <artifactId>servlet-api</artifactId>
    <version>2.5</version>
   </dependency>
   <dependency>
     <groupId> ru.eastbanctech.web</groupId>
     <artifactId>saml-sp-filter</artifactId>
     <version>1.0-SNAPSHOT</version>
   </dependency>
   <dependency>
     <groupId>org.slf4j</groupId>
     <artifactId>slf4j-api</artifactId>
     <version>1.7.1</version>
   </dependency>
   <dependency>
     <groupId>org.slf4j</groupId>
     <artifactId>slf4j-log4j12</artifactId>
     <version>1.7.1</version>
   </dependency>
 </dependencies>

 <build>
   <finalName>sso</finalName>
   <plugins>
     <plugin>
       <artifactId>maven-war-plugin</artifactId>
       <configuration>
         <webResources>
           <resource>
             <filtering>true</filtering>
             <directory>src/main/webapp/WEB-INF</directory>
             <targetPath>WEB-INF</targetPath>
             <includes>
               <include>**/*.xml</include>
             </includes>
           </resource>
         </webResources>
       </configuration>
     </plugin>
   </plugins>
 </build>
 </project>
Now it is important to pay attention to session properties, where the basic parameters are set for our filter.
 <sp.id>sp.local.ru</sp.id> - the name/entityId of SAML 2.0 filter SP
 <acs.url>https://sp.local.ru:8443/sso/acs</acs.url> - URL of the filter to process SAML 2.0 messages from Shibboleth IdP
 <idp.sso.url>https://idp.local.ru:8443/idp/profile/SAML2/Redirect/SSO</idp.sso.url> - URL for our filter to send Shibboleth IdP messages
 <logout.url>/logout</logout.url> - logout URL
web.xml
In the web.xml file, we define the parameters of our filter and its scope. We open resources in format ".jpg" through the parameter excludedUrlPattern.
<!DOCTYPE web-app PUBLIC
 "-//Sun Microsystems, Inc.//DTD Web Application 2.3//EN"
 "http://java.sun.com/dtd/web-app_2_3.dtd" >
<web-app>
  <display-name>Simple SSO Java Web Application</display-name>7.
  <filter>
    <filter-name>SSOFilter</filter-name>
    <filter-class> ru.eastbanctech.java.web.filter.saml.SAMLSPFilter</filter-class>
    <init-param>
      <param-name>excludedUrlPattern</param-name>
      <param-value>.*\.jpg</param-value>
   </init-param>
   <init-param>
     <param-name>idProviderSSOUrl</param-name>
     <param-value> ${idp.sso.url}</param-value>
   </init-param>
   <init-param>
     <param-name>spProviderId</param-name>
     <param-value>${sp.id}</param-value>
   </init-param>
   <init-param>
     <param-name>acsUrl</param-name>
     <param-value>${acs.url}</param-value>
   </init-param>
   <init-param>
     <param-name>logoutUrl</param-name>
     <param-value>${logout.url}</param-value>
   </init-param>
 </filter>
 <filter-mapping>
   <filter-name>SSOFilter</filter-name>
   <url-pattern>/pages/private/*</url-pattern>
 </filter-mapping>

 <filter-mapping>
   <filter-name>SSOFilter</filter-name>
   <url-pattern>${logout.url}</url-pattern>
 </filter-mapping>

 <filter-mapping>
   <filter-name>SSOFilter</filter-name>
   <url-pattern>/acs</url-pattern>
 </filter-mapping>
</web-app>
private/page.jsp
The page simply shows the user id and attributes of the authenticated user.
<%@ page import=" ru.eastbanctech.java.web.filter.saml.store.SAMLSessionManager" %>
<%@ page import=" ru.eastbanctech.java.web.filter.saml.store.SAMLSessionInfo" %>
<%@ page import="java.util.Map" %>
<html>
<body>
<h2>Private Resource</h2>
<%
  SAMLSessionInfo info =
       (SAMLSessionInfo)request.getSession().getAttribute(SAMLSessionManager.SAML_SESSION_INFO);
  out.println("User id = " + info.getNameId() + "<BR/>");
  out.println("<TABLE> <TR> <TH> Attribute name </TH> <TH> Attribulte value </TH></TR>");

  for (Map.Entry entry : info.getAttributes().entrySet()) {
    out.println("<TR><TD>" + entry.getKey() + "</TD><TD>" + entry.getValue() + "</TD></TR>");
  }
  out.println("</TABLE>");
%>

<a href="<%=request.getContextPath()%>/logout">Logout</a>
</body>
</html>
Let’s build the application using command:mvn clean package.
Testing the Java Web application performance
Let’s deploy the application to Tomcat AS and test the SSO performance:
- We describe the application context in a file ${tomcatHome}/conf/Catalina/localhost/sso.xml:
<Context docBase="$pathToWebApp" privileged="true" antiResourceLocking="false"
        antiJARLocking="false"    unpackWAR="false" swallowOutput="true" />
or simply copying our
sso.warapplication in ${tomcatHome}/webapps. - For Tomcat application to connect to Shibboleth IdP via HTTPS protocol, it is necessary to add a Shibboleth IdP certificate in java trusted keystore.
We use Java keytool utility for that:
keytool -alias idp.local.ru -importcert -file ${shHome}/idp.crt -keystore ${keystorePath} - Launch Tomcat AS.
- Open the browser window and open a secured application resource https://sp.local.ru:8443/sso/pages/private/page.jsp
- Make sure that the page has opened and we can see the user id and user name:

- As an exercise, make sure that the filter allows requests for pictures in .jpg format in the folder /pages/private.
- Integration with Google Apps
It is time to make sure that our SSO really works. To do that, let’s use Google Apps as another service provider (http://www.google.com/enterprise/apps/business/).
- Register your domain name and a Super-administrator using a free trial version. Once everything is complete, log in to http://admin.google.com/ using those credentials (fully qualified domain name).
- Create idpuser user and assign the Super Administrator rights to him using administrative panel.
- On the bottom of the screen select "Add Controls" in the drop down menu, select “security”.

- Then select Advanced Settings -> Set-up SSO.
- Mark “Enable SSO” and set the following parameters:
Entry Page URL * = https://idp.local.ru:8443/idp/profile/SAML2/Redirect/SSO
Exit Page URL * =  gmail.com
Change Password URL * =  gmail.com
Click on Save Changes button.
- Download a certificate to work with Shibboleth IdP using HTTPS. The certificate is located in $shHome/credentials/idp.crt
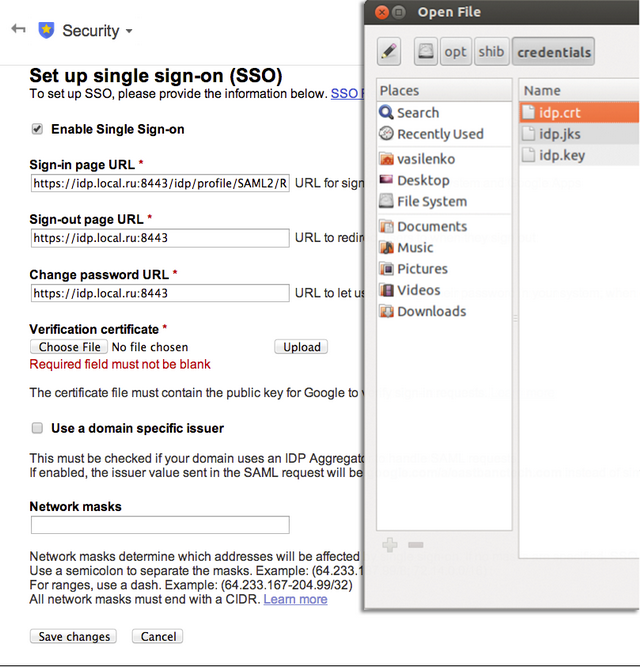
Click Save Changes button.
- Using the instructions here, configure Shibboleth IdP to work with Google Apps.
Note: Specify the schema name for the added elements, otherwise you will get an error at Shibboleth idP launch. For example, instead of
RelyingParty, you need to putrp: RelyingParty. - For the logger with the name
edu.internet2.middleware.shibboleth, set the DEBUG level:<!-- Logs IdP, but not OpenSAML, messages --> <logger name="edu.internet2.middleware.shibboleth" level="DEBUG"/> - Restart Shibboleth IdP and go to the page https://admin.google.com in a new browser session (you may need to delete cookies or use Incognito mode in Google Chrome).
- Type in idpuser@domain_name, where
domain_nameis the name of your registered domain and password. Press "Enter". - Accept un-Signed certificates and make sure that you are logged in google apps as idpuser.
In the Shibboleth log ${shHome}/logs/idp-process.log you should see how Shibboleth IdP is processing your request. There, you will see that the process of authentication is going via
RemoteUserLoginHandler.22:19:49.172 - DEBUG [edu.internet2.middleware.shibboleth.idp.authn.provider.RemoteUserLoginHandler:66] - Redirecting to https://idp.local.ru:8443/idp/Authn/RemoteUser
In general, all logs in Shibboleth IdP are quite simple and at the same time informative. We recommend spending some time to understand them.
- Then let’s open our app in URL https://sp.local.ru:8443/sso/pages/private/page.jsp and see in the logs that Shibboleth IdP is finding an available session for the user idpuser.
Well, that's all. Our simple system of SSO is functioning. We hope you have found this article useful.
Useful Links
- https://developers.google.com/google-apps/sso/saml_reference_implementation - SSO service for Google Apps. It explains how to integrate SSO with Google Docs using SAML.
- https://shibboleth.usc.edu/docs/google-apps/ - Instructions on Shibboleth and Google docs integration.
- http://stackoverflow.com/questions/7553967/getting-a-value-from-httpservletrequest-getremoteuser-in-tomcat-without-modify - How to implement your Tomcat Valve
- https://wiki.shibboleth.net/confluence/display/SHIB2/Home - Documentation of Shibboleth
¬Alternatively, you can often use generic Service Provider integration modules provided by IdP. In case of Shibboleth, it means that an additional Apache server needs to be installed with mod_shib module configured in front of the Application Server.
- At the time of writing this article, Shibboleth IdP 2.4.0 is the latest version.
- We used Java 7 in our environment.
- We used CentOS 6.3 as our OS. Also it was tested on Ubuntu 12.04. servlet-api 2.5 and ${tomcatHome}/lib/catalina.jar are required to compile.
- We suggest to implement it on your own as an exercise.
- Change the setting in red depending on your environment.