
Build and deploy ASP.NET Web API 2 service layer at the speed of thought!
4.95/5 (15 votes)
Learn how to develop WebAPI service layer using a simple example
Download source
Introduction
Lately I had to use Web API 2 for one of my projects. The need was to deploy a quick-n-dirty beta version into production and subsequently iterate it to fix bugs and data issues. I was looking for an article that would help me, take it from development onto production, but was unable to find one. The objective of this article is to attempt deploy a simple Web API 2 service onto production under 60 minutes. I strongly recommend you to refer to the quick references section for in-depth explanation of Web API and all the nitty-gritty details.
Pre-requisites
- Visual Studio 2013
- Unit Testing using SOAP UI
- Knowledge on how to use NuGet Packages to update your solution
- Willingness to see through all the technical issues
Quick References
(Must read for in-depth understanding, however its not required for this article)
- Introduction to ASP.NET Web API
- ASP.NET Web API Official Page
- ASP.NET Web Stack Open Source in CodePlex
- Unit Testing Web API
First things First
Step 1: Start Visual Studio 2013. From the File menu, select New and then select Project.
In the Templates pane, select Installed Templates and expand the Visual C# node. Under Visual C#, select Web, select Visual Studio 2012. In the list of project templates, select ASP.NET MVC 4 Web Application.
Name the project "VehicleStore". See screenshot below.

In the New ASP.NET MVC 4 Project dialog, select the Web API template. Check the create a unit test project checkbox. Click OK. See screenshot below.

Step 2: Manage NuGet Packages From the Tools menu, select 'NuGet Package Manager' and then select 'Manage NuGet Packages with Solution...' To read more about NuGet, refer to this link for more information - Installing NuGet. Install all the ASP.NET Web API 2.1 NuGet packages as shown in the screenshot below.

Configuration Files
Step 3:Global.asax
Add the following line in the Application_Start() method to enable Web API 2.
            GlobalConfiguration.Configure(WebApiConfig.Register);

            // NOTE: This commented code will NOT work for Web API 2.0.
            //WebApiConfig.Register(GlobalConfiguration.Configuration);
Step 4: WebApiConfig.cs
Add the following line in the Register(HttpConfiguration config) method to enable Web API 2.
            // Add this line for Web API 2 - Attribute Routing
            config.MapHttpAttributeRoutes();
Building a data class and domain specific models
Step 5: Create a VehicleInfo data class.
namespace VehicleStore.Models
{
    ///
    /// A Vehicle Info data class.
    ///
    public class VehicleInfo
    {
        public Guid Id { get; set; }
        public string Trim { get; set; }
        public string Make { get; set; }
        public string Model { get; set; }
        public int Year { get; set; }
        public System.Drawing.Color Color { get; set; }
        public string VIN { get; set; }
        public int SafetyRating { get; set; }
        public int EPAGreenScore { get; set; }
        public int Axles { get; set; }
     }
}
Step 6: Create a IVehicleRepository interface
namespace VehicleStore.Models
{
    interface IVehicleRepository
    {
        IEnumerable<VehicleInfo> GetAll();
        IEnumerable<VehicleInfo> GetVehiclesByYear(int year);
        IEnumerable<VehicleInfo> GetVehiclesByMake(string make);
        VehicleInfo Get(Guid Id);
        void Remove(Guid Id);
        bool Update(VehicleInfo item);
        VehicleInfo Add(VehicleInfo item);
    }
}
Step 7: Create a Vehicle repository concrete implementation.
NOTE: There are several ways to implement this, for the sake of clarity it has been simplified. The actual production implementation might use a data store like SQL server or an Entity Framework layer in between.
namespace VehicleStore.Models
{
    public class VehicleRepository : IVehicleRepository
    {
        /// <summary>
        /// This is not the right approach for production quality code.
        /// This is for demo purposes only.
        /// </summary>
        private List<VehicleInfo> vehicles = new List<VehicleInfo>();

        public VehicleRepository()
        {
            // This is used to populate initial data.
            // NOTE: This is not the right approach for production quality code.
            PopulateInitialData();
        }

        public IEnumerable<VehicleInfo> GetAll()
        {
            return vehicles;
        }

        public IEnumerable<VehicleInfo> GetVehiclesByYear(int year)
        {
            return vehicles.FindAll(p => p.Year == year);
        }

        public IEnumerable<VehicleInfo> GetVehiclesByMake(string make)
        {
            return vehicles.FindAll(p => p.Make == make);
        }

        public VehicleInfo Get(Guid Id)
        {
            return vehicles.Find(p => p.Id == Id);
        }

        public void Remove(Guid Id)
        {
            vehicles.RemoveAll(p => p.Id == Id);
        }

        public bool Update(VehicleInfo item)
        {
            if (item == null)
            {
                throw new ArgumentNullException("item");
            }

            int index = vehicles.FindIndex(p => p.Id == item.Id);
            if (index == -1)
            {
                return false;
            }

            // This form of update is to remove and add again.
            vehicles.RemoveAt(index);
            vehicles.Add(item);

            return true;
        }

        public VehicleInfo Add(VehicleInfo item)
        {
            if (item == null)
            {
                throw new ArgumentNullException("item");
            }
            // A new GUID is assigned every time a new item is added.
            item.Id = System.Guid.NewGuid();
            vehicles.Add(item);
            return item;
        }

        private void PopulateInitialData()
        {
            Add(new VehicleInfo { Make = "Infiniti", Model = "FX 35", Year = 2009, Trim = "Crossover" });
            Add(new VehicleInfo { Make = "Toyota", Model = "RAV44", Year = 2005, Trim = "Sport" });
            Add(new VehicleInfo { Make = "Audi", Model = "A5", Year = 2010, Trim = "Convertible" });
        }
    }
}
Step 8: The Controller class - VehiclesController
Delete the standard ValuesController class and create the new VehiclesController.cs
VehiclesController inherits from ApiController class.
Points to note
-
The attribute
Routeis used in Web API 2.0. It defines attributed based Routing. Routing is how Web API matches a URI to an action. Complex URI Routing can be unambiguously defined using the attributeRoute. -
The attribute
Routedefines the actual incoming URI. Its followed by the HTTP Verb attribute (for example:[HttpGet]). -
Route Constraints - This attribute
[Route("vehicles/{Id:guid}", Name="VehicleInfoById")]for instance specifies that a request with Id asGuidwould retrieve a particular vehicle with that value. Route constraint can act as a filter to route requests correctly. - Refer to the list of Route Constraints
namespace VehicleStore.Controllers
{
    public class VehiclesController : ApiController
    {
        // This is NOT a correct implementation. This is for demonstration purposes only.
        // NOTE: NOT for PRODUCTION USE.
        static readonly IVehicleRepository repository = new VehicleRepository();

        [Route("vehicles")]
        [HttpGet]
        public IEnumerable GetAllVehicles()
        {
            return repository.GetAll();
        }

        ///
        /// The route attribute with the data type of GUID
        ///
        ///
        ///
        [Route("vehicles/{Id:guid}", Name="VehicleInfoById")]
        public VehicleInfo GetVehicleInfo(Guid Id)
        {
            VehicleInfo item = repository.Get(Id);

            if (item == null)
            {
                //NOTE: Uncomment the following line of code to use HttpError object.
                //var message = string.Format("Product with id = {0} not found", id);
                //HttpError err = new HttpError(message);
                //return Request.CreateResponse(HttpStatusCode.NotFound, err);

                var resp = new HttpResponseMessage(HttpStatusCode.NotFound)
                {
                    Content = new StringContent(string.Format("No vehicle with ID = {0} exists", Id)),
                    ReasonPhrase = "The given VehicleID was not found."
                };
                throw new HttpResponseException(resp);
            }

            return item;
        }

        [Route("vehicles/{make:alpha}")]
        public IEnumerable GetVehiclesByMake(string make)
        {
            return repository.GetAll().Where(
                p => string.Equals(p.Make, make, StringComparison.OrdinalIgnoreCase));
        }

        [Route("vehicles")]
        [HttpPost]
        public HttpResponseMessage PostVehicle(VehicleInfo item)
        {
            item = repository.Add(item);
            var response = Request.CreateResponse(HttpStatusCode.Created, item);

            string uri = Url.Link("VehicleInfoById", new { id = item.Id });
            response.Headers.Location = new Uri(uri);
            return response;
        }

        [Route("vehicles")]
        [HttpPut]
        public void PutVehicle(Guid Id, VehicleInfo item)
        {
            item.Id = Id;
            if (!repository.Update(item))
            {
                throw new HttpResponseException(HttpStatusCode.NotFound);
            }
        }

        [Route("vehicles")]
        [HttpDelete]
        public void DeleteVehicle(Guid Id)
        {
            VehicleInfo item = repository.Get(Id);
            if (item == null)
            {
                throw new HttpResponseException(HttpStatusCode.NotFound);
            }

            repository.Remove(Id);
        }
    }
}
Step 9: Build the solution.
Step 10: Publish the solution to an external folder.
Right-click on the VehicleStore project and select "Publish..."

In the following screen, choose 'Folder' as the publish option and specify a local folder.

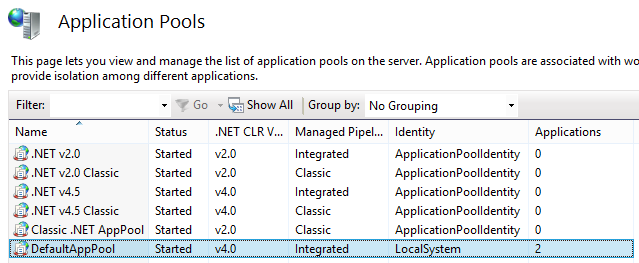
Step 11: Local Deployment: Open IIS Manager and create a new a web site for the Web API 2.0 project. The Port 8080 is being used instead of 80. See the screenshot for the actual configuration.

Notice the Application Pool DefaultAppPool settings in the following screen shot. Choose the Identity as LocalSystem.
Step 12: Unit Testing using SOAP UI
Create a new REST project in SOAP UI. Observe the end point in the screenshot below.

Conclusion
In this article, we created a Model, a Model repository and the Web API 2 configuration goes into the VehiclesController which inherits from ApiController. The rest of the configuration goes into Global.asax and the webApiConfig.cs file.
The entire code (Visual Studio 2013 solution) is available for download. Let me know your feedback and I shall update the article accordingly.
Further Reading
This is an article from my ASP.NET mentor Chander Dhall. There are two parts to this article, I strongly recommend you to read both the parts.