Inserting 3D Models in Expression Blend
5.00/5 (5 votes)
Inserting a 3D object into a WPF project in Expression Blend, with some help from Blender
Introduction
One of the great things about WPF is its 3D support which enables you to incorporate 3D content into your app. In this tutorial I will explain how you can go about adding 3D models into your WPF application in Expression Blend. I will also make use of Blender, the open-source 3D modeling application.
NB: This article assumes that you are familiar with Expression Blend, experience in using Blender is not necessary.
Requirements
To follow along with this tutorial you require the following,
Expression Blend & 3D
While it is possible to hand code your WPF 3D models Expression Blend (EB)
enables you to more easily create and manipulate 3D objects. In case your 3D
design skills are not up-to-par you can search for preexisting 3D models and
import them into EB in the form of .obj files. The 3D content can then be
inserted into a layout container and EB will create the necessary WPF controls
like the Viewport3D, Camera and Lights.
The 3D Model
In this tutorial you're not going to be designing any 3D models. Instead you are going to make use of a preexisting, free, 3D model of a XA-20 Razorback Strike Fighter.

You can download the .7z file containing the model files you'll use in this tutorial here. Once you have completed downloading the .7z file extract its contents. In the folder containing the extracted files you should have seven files: a materials (.mtl) file, a objects (.obj) file, and five image files that will be used in the .mtl file.

The WPF Project
Start Expression Blend and create a new WPF application project named XA-20 Razorback.

Next we shall change the dimensions of the application window so that it can
adequately accommodate the 3D model so set the width and height of the Window object to 770 and 550 respectively
and save the changes.
Add a new folder to the project and rename it as Razorback.

Next we are going to import the .mtl, .obj, and related image files that you downloaded earlier so right click the Razorback folder, select Add Existing Item from the context menu and look for and select all the required files. When you click on Open in the Add Existing Item dialog box you'll get a dialog box asking you whether you want to copy some of the image files to your project because of their size. Select No.

The Razorback folder now contains all the required files. The next step is just a simple affair of right-clicking the .obj file and selecting Insert from the context menu.

Unfortunately if you attempt to insert the 3D model EB crashes due to a System.IndexOutOfRangeException. This seems to be a bug but the situation can be remedied so click on Close the Program.

Blender
To remedy the previous situation we are going to make use of Blender so make sure you have downloaded and installed it. When you run Blender you will be presented with a window that contains a splash screen. To get rid of the splash screen left-click outside the splash screen.

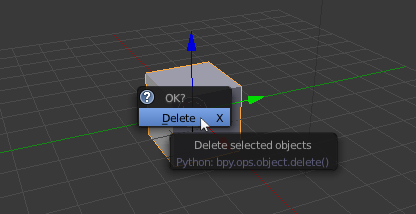
Once you have gotten rid of the splash screen you are left with a view of the default cube. We have to delete this cube so make sure that it is selected; you can do this by right-clicking on the cube. Press the X key and select Delete from the context menu.

Next we are going to import the .obj that is giving us a problem in EB. Go to File > Import > Wavefront (.obj) and navigate to the folder containing the .obj file. Double-click the file to import it into Blender.

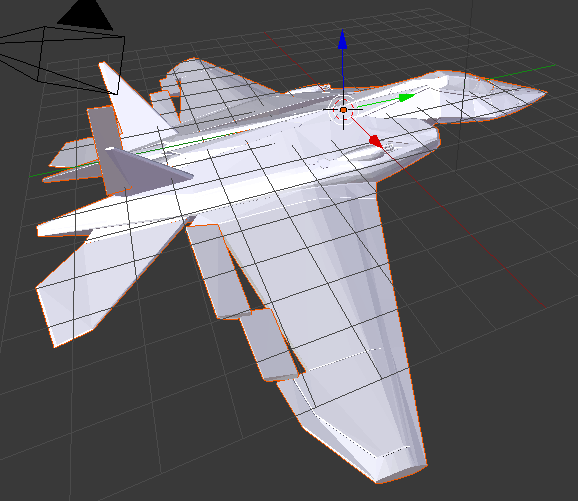
Once you have imported the 3D model it is added to the scene with all of its mesh objects selected. The orange lines on the exterior of the model indicate that it is the selected object.

Next you are going to rotate the model around the x-axis, indicated by the red arrow. (This step is not absolutely necessary so you can skip to the next step if you want to). Press the R key then the X key and type -90 and press Enter. This changes the orientation of the model .

If you are curious as to how the model looks like with textures you can click on the Texture button in the Viewport Shading context menu from the Header strip.

Next deselect the model by pressing the A key. After deselection go to File > Export > Wavefront (.obj) and navigate to the folder containing the files you extracted earlier. Change the default name of the object file, Untitled.obj, to XA-20_Razorback_Strike_Fighter.obj and click on the Export OBJ button. This name is similar to the name of the .obj file you imported.

Back to Expression Blend
Since you closed EB because it crashed earlier restart it and open the XA-20 Razorback project. In the Projects panel expand the Razorback folder and delete XA-20_Razorback_Strike_Fighter.mtl and XA-20_Razorback_Strike_Fighter.obj. Once that is done re-import the .obj file and .mtl, which you have just edited in Blender.
Once you have re-imported the two files right-click the object file in and
select Insert from the context menu. EB will add a Viewport3D object to the
root layout container. The Viewport3D object contains various WPF 3D objects
including a PerspectiveCamera, Lights and various ModelVisual3D objects that
make up the 3D model.

The Viewport3D object currently occupies a small portion of the
application window so we need to increase its size. Right click the Viewport3D
object in the Objects and Timeline panel and select Reset Layout >
All. The Viewport3D object should now occupy the whole of the
root layout container making the 3D model more visible.

To get a better view of the 3D model select the Camera Orbit tool
![]() and use
it to change the view of the 3D model.
and use
it to change the view of the 3D model.

Conclusion
Being able to import 3D models into your WPF project with the free tools highlighted here is certainly a big plus so I hope you have learnt something useful from this tutorial. If you have taken the time to read the whole tutorial up to this point thank you for doing so.
History
- 7th June 2013: Initial post
- 21st June 2013: Updated source file
