
CityPulse: Facebook events can be so much more
4.93/5 (16 votes)
An Azure based software solution allowing users to discover events around them on a massive scale. Features ASP.net MVC4, Entity Framework and a large importing backend utilizing Azure virtual machines

Please note: We've recently rebranded as 'CityPulse' (and added new features to the site!). Text and links within this article have been updated but the original images with the logo 'whatsonglobal' remain. Enjoy reading!
The Idea
Facebook is the biggest event database in the world. It has everything from a single person's birthday gathering with a handful of people, to the biggest festivals and worldwide gatherings with thousands in attendance.
So how do you use Facebook events? Most of us send personal invites to birthday bashes, or indicate to our friends list that we're attending this week's sporting event. What most people don't realize is that Facebook events can be so much more. Every day, evening, weekend and month there are thousands of Facebook events in every city around the world just itching to promote a new film, start the next obscure craze or publicize a new weekly pub quiz just round the corner from where you live.
But there is one problem - events are isolated. The shortcomings in Facebook's very own platform means there's little easy way to log in and find out what amazing things are happening in your area this coming weekend. This is where CityPulse steps in.
With a single view, the CityPulse web application will show you on an interactive map the top events that are taking place, the location that they are in, the dates that they are on and how many people are going.
Wondering what to do on a Friday night? Look no further than CityPulse.
How?
This is made possible through Facebook's handling of people's events. As long as a Facebook event is marked as public by the owner then under the terms and conditions those events can be exported and consumed by 3rd party applications. As long as the event information is kept up to date, and no personal information is sold - then applications such as CityPulse are permitted to use and display the data.
There is a surprising amount of public events available to those who search it. Marketers, event promoters and venue owners are more than happy to use the Facebook platform to reach the largest target audience possible.
It isn't all birthdays and house parties!
Contents
- The Scope of this Article
- The Architecture
- The Technology
- The Importing Process with Azure Virtual Machines
- The Storage
- The Website
- Going Mobile
This Article
Now before we put on our favorite developer hat and get down to some serious code, let's lay out the expectations.
This article's target audience is that of those passionate about technology, and are already fairly competent with Microsoft based programming languages and technologies. We're not going to analyse every line of code because:
- It would take a long time to read. There is a lot of code, so it is in everyone's interest to keep the article as succinct and interesting as possible.
- That's not what this article is about. We're going take you with us as we solve some fairly complex technology challenges using the very latest in technology and software platforms. That means we will be keeping at an architectural level for the most part, and getting down to the metal when it gets interesting or relevant to solving the crux of the problems.
What this article will show you :
- The technologies involved in developing a website with a complex Azure-based backend.
- How to programatically control cloud deployments, both effectively and elegantly.
- How to set up Azure VMs/Cloud Services to import large amounts of data from Facebook, process it and deliver it as website content.
- How to set up a job based scheduling component, to manage maintainance tasks within the cloud.
- The design patterns involved in queue based cloud processing.
- How to use Facebooks FQL API to extract event information.
- How to use artifical intelligence to solve a real world problem.
- How to rapidly develop databases in the cloud with Entity Framework Code-First.
- How to set up an ASP.net MVC4 with the Web Api to deliver and render content.
- How responsive design can make a site friendly to as many devices as possible.
Hope you enjoy!
So what do we need?
Well firstly we need access to Facebook Events. This will be made possible through crawling the event archives of Facebook.
Second of all we need an Importing Mechanism. All those events aren't going to download themselves. Events will need to be imported, categorized, filtered and updated on a regular basis. This is no easy job - we need something that will scale out to meet any heavy demand, and an infrastructure environment with a high level of reliability, requires little or no maintenance and can spin up and do our heavy lifting when we need it to. This is where Azure comes in and we will explore this in more depth later in the article.
Thirdly we need some Storage. Those imported events need a home, and we will need a place to manage and monitor the importing process. Additionally events will need to be categorized and users logging into our application will need to be logged for security reasons. For this we will be using SQL Azure. This is pretty much your standard SQL, but it lives on the cloud.
Lastly we need a Website. This is where it will all come together. The website will be serving up those amazing events to a global audience. We need scale, security and performance. Azure websites will fit the bill just fine.
The Architecture
At the utmost high level, the architecture looks as follows:

Let's have a look at some of the entities within the diagram:
 Windows Azure
The hosting environment. We will get into this in detail but for now let's just say Azure hosts all the infrastructure that CityPulse will run on.
 Facebook
The event provider. As CityPulse will be crawling and storing events there is a connection here between Facebook and Azure.
 CityPulse administrator
We need somewhere to administrate the importing processes. What imports are we going to run? When are they scheduled? Has there been any errors, and how was the throughput? A desktop application connecting to the maintenance database will give us the answers, and allow us initialize the importing sessions running on the worker nodes.
 Website User
The loyal user. They just want to load up the website and find something great to do in their lives. They are oblivious to how the events got there, they just want to go to them!
The Technology
Microsoft Azure
- Azure Websites : Hosts the website in the cloud
- Azure Cloud Services : Supports the infrastructure that will drive the importing process (Paas)
- Azure Storage : Blob storage containing Virtual Machine data used in the importing process. Queue messages are stored here.
- Azure SQL : Hosts the SQL databases used in importing, and the event information
Microsoft ASP.net MVC 4 : A Model View Controller approach to MVC
ASP.net Web API : RESTful implementation of a webservice delivering Json content. Important for interoperability.
Entity Framework : Database abstraction enabling rapid development within the Data Access Layer
- Code first - create database models from C# Code
- Database first - create C# code from database models
Web Libraries
- Javascript - enables AJAX on the website, crucial for a fluid interface
- Typescript - strongly typed library that sits on top of javascript. Great for C# developers.
- JQuery - THE library for javascript
- Google maps - API to enable google maps on the website
- Richmarker - allows rich HTML content for markers
- Google autocomplete - used for lookups on the users address
- Less - dynamic stylesheets
- Knockout - MVVM implementation in javascript. Fantastic for databinding
- Modernizr - cater for all browsers and screen resolutions
- Moment - great datetime handling in javascript
Azure Fluent Management - a 'fluent' API for managing the azure platform
Quartz.net - Enterprise job scheduler within .net
Prowl - automated phone notifications
Json.Net - Fast Serilization in .Net to and from Json
Telerik Radcontrols - comprehensive UI suite for WPF
Why Azure?
I think every developer would answer this differently. For me the choice of Azure falls into the following 4 categories.
Hassle free infrastructure.
For this solution we need hardware. We need servers to host the websites, the databases and run the event importing service. It is very important that the externally facing hardware stay secure, so we would need to stay on top of security patching alongside the regular Windows updates that need to be applied to keep safe. To the run the website we would need to configure and maintain IIS, and the platform that runs the importing process would need constant love just to keep up and running.
On Azure we don't need to worry about any of this stuff. The infrastructure itself is kept by Microsoft, so that we can spend our precious developer time creating software that is awesome. From the security side of things we can concentrate on tasks such as securing the ASP.net Web API that will deliver events to our website, instead of getting boiled down in securing the newest OS exploit. On the development side we can put the time into nailing the importing service and creating a solid service that will drive our solution.
Scale, scale, scale!
Scaling is what Azure does brilliantly. Scaling enables us to cope with heavy loads from an expanding user base, and allows us to handle hefty tasks such as importing a large batch-job overnight to ensure maximum events are exposed the next day. 
In most cases scaling can be achieved via the Azure management API, or via PowerShell Commands. I will be covering in more detail typical scaling patterns within a cloud environment later in the article.
Reliability
Microsoft SLAs (availability obligations) states anywhere between a 99.5% and 99.9% up-time depending on what service you use. That's a pretty good obligation, and is certainly a lot better than what could be expected if we were maintaining the infrastructure ourselves. That said, Azure has been known to go down before - but luckily options such as ‘Geo-replication' allows us to mirror infrastructure across locations and to fail over if we run into any difficulty.
Heavy Integration for Microsoft Tooling
Up until now, the functionality that Azure offers can be somewhat matched by other cloud based hosting services, such as Amazon EC2. Integration is where Azure comes into its own. If you live and breathe in Visual Studio - then the cloud based programming for Azure will have you feeling right at home.

Publishing a worker process to cloud infrastructure, or the newest build of your website can usually achieved with a single click, whilst code-first Entity Framework allows us maximum efficiency when creating and maintaining our Azure based SQL databases.
The Importing Process with Azure Virtual Machines
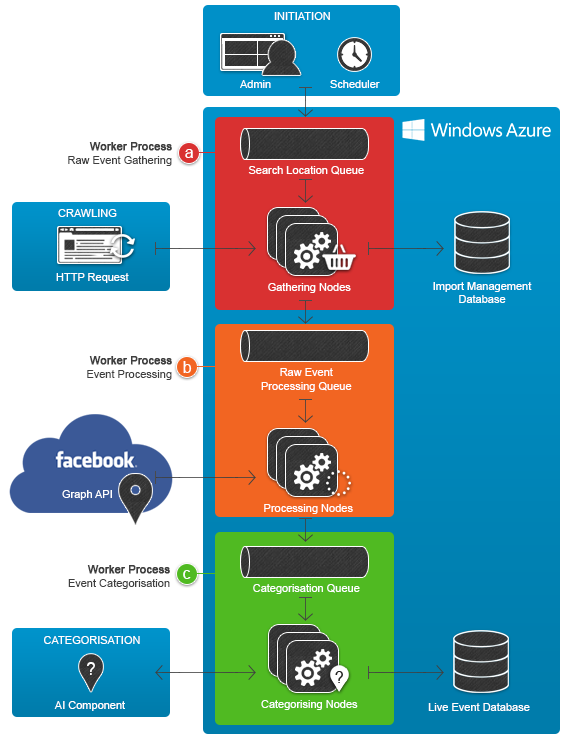 The importing process consists of three jobs in order to mine an event from Facebook, process the information and store it in our Live event database so it can be served up to our website users. These jobs are run using a queue based design pattern so they can be scaled, and are initiated either by user interaction or by scheduled jobs via Quartz.net.
Each job is referred to as a 'worker process'. This is a module of code that will run independantly, and can be pushed up to the cloud to run under the domain of our importing process. When running in Azure, the worker code is run as a 'Cloud Service', which is essentially a Virtual Machine in which we do not directly control. We can use the Azure SDK plugin for Visual Studio to develop the worker, and to use the one-click publishing method to push the code to Azure. In the cloud this code will be provisioned and run until we tell it to stop via the management portal, it fails or we send a command to take it down. 
Now before we dive into the code itself, there are 3 key concepts of our importing process that require an explanation :
- Scheduling Jobs with Quartz.net : Due to the large scale nature of the importing requirement, initializing jobs and tasks needs to be automated. Quartz.net offers a very powerful job scheduling engine that will do just fine.
- Automating the deployment of VMs within the cloud : The management portal is great, but not sufficient for a fully automated solution. Elastaclouds open source 'Fluent Management' library will help us with this.
- Queue based design pattern: Making use of scale in the cloud to deal with varying size of workload is crucial. Queues are the key.
Scheduling Jobs with Quartz.net
Extracting, processing and storing Facebook events on a global scale can require a lot of administration, so a small WPF application has been developed that handles some of the automation required to initialize the importing process. The application uses Quartz.net, a comprehensive job scheduling library to allow us to plan out when certain parts of the importing process are run. The objective here is to have it running like clockwork, utilizing Prowl.net, prowldotnet and automated emails to send some metrics around the success of the importing, and where attention is needed (if any).

/// <summary>
/// Schedule a job to run based on a cron string
/// </summary>
/// <param name="job" /> The job abstraction to be fired
/// <param name="cronString" /> An expression representing when and how often to fire job
public ScheduledJobViewModel ScheduleJob(ImporterJobBase job, string cronString)
{
    	//use quartz.net to create a job and assign a UI
    	IJobDetail jobDetail = JobBuilder.Create(job.GetType())
    	  	.WithIdentity("Job - " + Guid.NewGuid().ToString(), job.Name)
    	  	.Build();

    	//create a trigger for the event to fire, using a cron string
    	ICronTrigger trigger = (ICronTrigger)TriggerBuilder.Create()
    	    	    	    	.WithIdentity("Trigger - " + Guid.NewGuid().ToString(), job.Name)
    	    	    	    	.WithCronSchedule(cronString)
    	    	    	    	.Build();

    	//schedule the job to run
    	_scheduler.ScheduleJob(jobDetail, trigger);

    	//return a UI representation of the job so it can be shown on the form
    	return new ScheduledJobViewModel()
    	{
    	  CronExpression = cronString,
    	  JobType = job.GetType().ToString(),
    	  Name = job.Name
    	};
}
The above code describes how to use Quartz.net to schedule a job. Cron expressions allow a succinct and powerful way to describe when and how often a job should run.
- Live Events Database Cleanup has an expression of '0 00 06 * * ?'
- Job will delete redundant events every day at 6am.
- Initialize Data Gathering (queue adding to worker process A) has an expression of '0 0 0 ? MON,THU,SAT'
- Job will initialize the queues for a new data gathering session in Azure every Monday, Thursday and Saturday at 12 midnight.
- Full Import Process (Worker process A - C) has an expression of '0 10 0 ? MON,THU,SAT'
- Job will execute a new data gathering session in Azure every Monday, Thursday and Saturday at 10 minutes past midnight.
- Live Events Updater has an expression of '0 10 06 * * ?'
- Existing events will be refreshed with new data every day at 6:10 am.
The jobs themselves range from running stored procedures against the live database to packaging and deploying a worker process to Azure. As long as they implement the IJob interface they can be scheduled by Quartz.
an abstract class has been developed (ImporterJobBase) to encapsulate some common functionality that jobs can offer such as email/phone notification, error & message logging and allowing configuration that can be passed to the UI.

Elastaclouds Azure Fluent Management
The Azure Fluent Management library (fluentmanagement.elastacloud.com) is a particularly useful component in managing the Azure cloud, wspecially when it comes to provisioning and deploying storage alongside cloud services.
Typically, automated control of tasks such as deployment of Azure SQL databases, provisioning virtual machines and deleting redundant storage containers would be achieved via Powershell cmdlets, a RESTful API or the UI that is provided via the Azure Management Portal. But what is the best way to automate these tasks in code? Fluent Management provides a .Net friendly way to achieve these tasks and more. This was particularly attractive to this project, as we have already developed a job scheduling engine which Fluent Management will fit perfectly into. We simply create the IJobs, create the code that provisions the worker processes to the cloud and schedule them to fire whenever we want. And this is exactly what is about to be demonstrated.
First we declare a helper method to encapsulate the deployment process
public static async Task DeployAzureWorkerAsync(
    string name,
    string roleName,
    string cspkgEndPoint,
    X509Certificate2 cert,
    string subscriptionId,
    DeploymentSlot deploymentSlot,
    string location,
    int instanceCount)
{
    await Task.Run(() =>
    {
        //get an azure friendly name
        var storageName = new RandomAccountName().GetPureRandomValue();

        //deploy storage (used to host worker process)
        var subscriptionManager = new SubscriptionManager(subscriptionId);
        subscriptionManager.GetStorageManager()
                        .CreateNew(storageName)
                        .AddCertificateFromStore(cert.Thumbprint)
                        .WithDescription(name)
                        .WithLocation(location)
                        .Go()
                        .Commit();

        //deploy worker process
        var deploymentManager = subscriptionManager.GetDeploymentManager();
        deploymentManager
                .AddCertificateFromStore(cert.Thumbprint)
                .ForNewDeployment("deployment" + storageName)
                .SetCspkgEndpoint(cspkgEndPoint)
                .WithNewHostedService(name)
                .WithStorageAccount(storageName)
                .AddDescription("automated deployment" + name)
                .AddEnvironment(deploymentSlot)
                .AddLocation(location)
                .AddParams(DeploymentParams.StartImmediately)
                .ForRole(roleName)
                .WithInstanceCount(instanceCount)
                .WaitUntilAllRoleInstancesAreRunning()
                .Go()
                .Commit();
    });
}
And the usage:
/// <summary>
/// Running inside of a Quartz.net IJob
/// </summary>
public override async Task OnExecute(IJobExecutionContext context)
{
    //define where to deploy to
    var locationsToDeploy = new List<string>()
    {
        LocationConstants.EastAsia,
        LocationConstants.NorthEurope,
        LocationConstants.WesternEurope,
        LocationConstants.WestUS,
        LocationConstants.EastUS
    };

    //set the end point - this is the directory in which your packaged worker process was outputted to
    string endPoint = @"[The root directory of your project packages ]";

    //your azure subscription ID
    var subscriptionId = "[You Azure Subscription ID - get this from .publishsettings]";

    //Open the publish settings (you can download these from the Azure Management Portal)
    using (var reader = new StreamReader(@"D:\Dev Apps\PublishSettings\settings.publishsettings"))
    {
        //extract an X509 certificate for security validation
        string xml = reader.ReadToEnd();
        var cert = PublishSettingsExtractor.AddPublishSettingsToPersonalMachineStore(xml);

        //for every location specified, sequentially deploy a cloud service.
        foreach (var location in locationsToDeploy)
        {
            //get an azure friendly name for the deployment
            var nodeManage = new RandomAccountName();

            //deploy
            await DeploymentHelper.DeployAzureWorkerAsync(
                name: "datagather" + locationsToDeploy.IndexOf(location),
                roleName: "EventProcessing",
                cspkgEndPoint: endPoint,
                cert: cert,
                subscriptionId:  subscriptionId,
                deploymentSlot: DeploymentSlot.Production,
                location: location,
                instanceCount: 1);
        }
    }
}
When this job executes it will loop the available locations and deploy a worker process. Each worker process runs in a Virtual Machine, so a storage container must be allocated first.
If you are wondering why we deploy to 5 different data centres it is because we want to use as many IP addresses as possible when querying the Facebook API as to not get blocked. Too many requests from the same IP address can lead to throttling which will limit the throughput of our importing process. For different solutions it would usually be preferable to run multiple processes from the same location/datacentre.
Queue processing pattern

If you haven't developed cloud based processing before, the left hand side diagram will be the most familiar. We have a single threaded process that gets data, does some processing and stores the result - perhaps so it can be reviewed by the user later. Typically this pattern works just fine for small amounts of data that can be processed quickly.
But what if we have a lot more data? What if we have hundreds of thousands of records to process, and each record takes a while to process? One approach would be to get better hardware - maybe you want a better server to deal with the extra load.

The problem with this is at some stage you will need to scale out, rather than up. Either you'll run out of processing power and the number of cores in your hardware will need to increase, forcing you to use multithreading to leverage the extra power - or you may choose to have multiple servers and split up the workload across each server. This is where queues fit in and it works perfectly for Azure where we can initiliaze multiple virtual machines to deal with extra load.
You can think of a queue as a shared to-do list but it has special functionality in that it allows a to-do list entry to be locked to a single person. Let's think of life without queues for a second, you might choose to have your servers access a SQL table containing the list of data that needs to be processed, but how would you ensure that servers don't start accessing and processing the exact same list? If the servers start up at the same time there is every chance that without some sort of elaborate concurrent locking system each server will end up storing the same results, nullifying the point of scaling out in the first place.
Queues solve this problem in an elegant way. When a worker process accesses a message within the queue, the message gets hidden for a small amount of time. This gives the worker time to process the message, and prevents any other workers from accessing and processing duplicate data.
One more thing to note - queues are lightweight and are designed towards speed of execution. This means that they only deal in small messages, and usually have size restrictions on the size of the message that can be added. For CityPulse we only need to add eids or URLs, but for other cases it can be worth adding just an ID or a key to the message, then saving the actual larger payload in blob storage or in an SQL row so it can be retrieved by the worker node.

In the queue above, if worker process 5 & 6 request messages simultaneously, the queue based design will ensure that one worker process will get message 7 and the other will get message 8. These messages will then be locked from other worker processes.
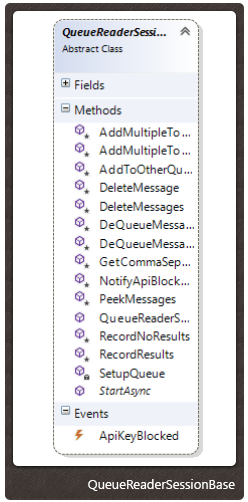
QueueReaderSessionBase
Most of our worker processes on the cloud make use of queues to manage and scale the workload. To encapsulate some common functionality such as sending messages to other queues, logging, dealing with API key issues (see worker process B) an abstract class has been created for the workers to inherit.
The Worker Process code
 Worker Process a - Raw Event Gathering
This worker is concerned with crawling Facebook for event Ids so that they can be added to the processing queue and eventually added to the event database.

EventIds (hereby referred to as eid) are unique identifiers for Facebook events, and are particularly important for Worker Process B when we use the Facebook API (FQL) to convert the eid into meaningful information.
Data Flow

Adding to the search location queue
At the very top the diagram, the process starts off with a CityPulse admin, or a scheduled event adding the initial list of URLs to the search location queue.
Adding to a queue can be achieved either by using .net with the Azure SDK, or via a RESTFUL web service. the Azure SDK method will be demonstrated :
string[] urls = new[]
{
    "http://facebook.com/myurl",
    "http://facebook.com/myur2",
    "http://facebook.com/myurl3"
};

string storageAccountUrl = "Your provided Azure Storage URL";
string queueName = "dataimporter1";

CloudStorageAccount account = CloudStorageAccount.Parse(storageAccountUrl);
CloudQueueClient queueClient = account.CreateCloudQueueClient();
CloudQueue queue = queueClient.GetQueueReference(queueName);

queue.CreateIfNotExist();
Parallel.ForEach(QueueHelper.SplitInto64K(urls), url =>
{
    _queue.AddMessage(new CloudQueueMessage(url));
});
First of all we create a storage account and a queue client, using the storage account URL that is provided when a new storage account is created in Azure.
Then we get our queue (creating a new one if it doesn't exist).
Finally we take our URLs and push them up to the queue as messages. We tend to stay away from uploading lots of small messages as accessing, reading and deleting operations come at a small performance cost. Azure currently limits queue messages to 64K, so QueueHelper.SplitInto64K(urls) is there to concatenate messages into a csv style format. This means our three URLs are compressed into a single message. We use the Task Parallel Libraries Parallel.ForEach to speed up the operation and to push messages in parallel - this is especially useful for large amounts of messages.
Once this code has run, we can check that it has successfully pushed the messages to the queue. You could do this by writing a simple method, or a test - but I prefer to use a storage explorer. There are a few explorers to choose from, but the one I use is Azure Storage Explorer (azurestorageexplorer.codeplex.com). By downloading the app and inputting my storage account details we can see the content of the queue, and we can see that the URLs have been joined and added.

Reading from the search location queue
Utilising our importing application and Quartz.net we can schedule a job to spin this worker up in Azure datacenters around the globe and benefit from parallel computing at whatever scale is deemed necessary for the amount of URLs added to the queue.
public class RawEventImporterQueueSession : QueueReaderSessionBase
{
    private readonly RawEventContext _dbContext;
    private bool _continue = true;
    private List<string> _addedSearchTermsToBuffer = new List<string>();
    public int ImportedCount { get; set; }

    public RawEventImporterQueueSession(RawEventContext dbContext, string queueUrl, string queueName)
        : base(queueUrl, queueName)
    {
        //the event import database (code first EF will be covered later in the article)
        _dbContext = dbContext;
    }

    public override async Task StartAsync()
    {
        try
        {
            while (_continue)
            {
                //this will pull 40 events
                List<CloudQueueMessage> urlsToSearch = this.DeQueueEvents(1).ToList();
                if (urlsToSearch.Any())
                {
                    //start by deleting the messages
                    this.DeleteEvents(urlsToSearch);

                    //get urls
                    IEnumerable<string> splitUrls = this.GetCommaSeperated(urlsToSearch);

                    //inform import database that we are gathering
                    RecordResults();

                    //Save the URLs in the import database
                    //(this will us to block certain URLs that do not provide results)
                    var urls = splitUrls.Select(x => _dbContext.GetOrCreateURL(x));

                    //start the gathering process (an encapsulation of the actual website crawling)
                    var session = new EventGatheringSession(_dbContext, urls.ToList());
                    session.ExtractedEventIds += (facebookEvents) =>
                    {
                        //we have found some events!
                        ImportedCount += facebookEvents.Count();

                        //add to buffer which pushes the eids to the event processor queue
                        AddToImportedBuffer(facebookEvents.Select(x => x.Id));

                        //inform if a URL resulted in eids or not, block non relevent URLs
                        UpdateURLs(facebookEvents);
                    };
                    await session.StartAsync();

                    //we have completed this batch, sleep as to throttle the server
                    Thread.Sleep(2500);
                }
                else
                {
                    //nothing in the queue, stop processing and shut down
                    _continue = false;
                }
            }
        }
        catch (Exception queueException)
        {
            //we have encountered an error, log so it can be analysed after the processing is complete
            ImportException exception = new ImportException();
            exception.ExceptionString = "Raw Event Import Queue Exception : "
                                        + queueException.Message;
            exception.ExceptionStackTrace = queueException.StackTrace;
            var rawExceptionContext = new RawEventContext();
            rawExceptionContext.ImportExceptions.Add(exception);
            rawExceptionContext.SaveChanges();
        }
    }

    private void AddToImportedBuffer(IEnumerable<string> eids)
    {
        _toImportBuffer.AddRange(eids);

        //if the buffer is full, add to the event processor queue asyncronously
        if (_toImportBuffer.Count > 30)
        {
            Task.Run(() =>
            {
                this.AddMultipleToOtherQueue(Settings.Default.EventProcessingQueueName,
                                             _toImportBuffer);
                _toImportBuffer.Clear();
            });
        }
    }
}
Once the processing is complete and the eids have been added to Worker B's queue - the VMs are shut down and removed from the production environment as to not incur any additional costs from the Azure billing model.
 Worker Process B - EID Processing
Once Worker Process A has extracted and added the eids to the Raw Event Processing queue, the messages will look as follows:

Objective of the Worker Process B : To convert eids to meaningful events with all the information that we need.
Facebook FQL
Facebook FQL (Facebook Query Language) is an API that allows applications the ability to interact with objects in Facebook using a SQL-style syntax. This is what we will use to extract our event information.
Once you have signed up to be a Facebook developer, and have registered an application with them you are given an OAuth authentication token that you can use to query their APIs (guide here). By heading over to the Facebook tools explorer we can use a great tool that Facebook provides to query their API on the fly - this is great for debugging or investigating API operations.
Lets say we have an public event eid that we want to resolve via FQL. That eid is:
162478390590630
By studying the Facebook FQL reference documentation we can deduce that the FQL to retrieve the information we need about this event will be:
SELECT eid, name, start_time, description, end_time, attending_count, declined_count, venue, timezone, version, all_members_count, update_time FROM event WHERE eid = 162478390590630

This returns a JSON object representing the event and some of its information. We can see here that we have an event that is starting on the 28th of June and 39 people are currently planning on attending.
But we’re missing one thing. Remember our overall objective? It’s to extract facebook events and show them on a map. We need longitude and latitude.
The venue id of this event is 10647924275034 which we can use this to resolve the geo-coordinates.
This time the FQL is:
SELECT page_id, type, were_here_count,location.latitude, location.longitude FROM page WHERE page_id IN (SELECT venue.id FROM #event_info)
Which returns the JSON object:
{
  "data": [
    {
      "eid": 162478390590630,
      "name": ">* Dub Theories - Part 2 ! *<",
      "start_time": "2013-06-28T09:00:00+0100",
      "description": "DUB THEORIES RETURNS FOR PART 2...\n''SHOWCASING DUB INFLUENCED
                      PRODUCTIONS''\n\n
                      ***FRIDAY 28TH OF JUNE @  Cosies! ONLY £3***\n
                      *REGGAE DUB & JUNGLE*\n\n-> DUB INVASION (Live mix!)\n(Silverback recordings!)
                      \n\n-> MESSENJAH YOUTH\n(Swindon massive!)\n\n-> JONNY FISHA\n(Dubwise
                       theorist!)\n\n
                       -> J - MAN\n(Badman Junglist!)\n",
      "end_time": null,
      "attending_count": 39,
      "declined_count": 22,
      "venue": {
        "id": 106479242750341
      },
      "timezone": "Europe/London",
      "version": 2,
      "all_members_count": 757,
      "update_time": 1370464550
    }
  ]
}
There is one final optimisation we can make, currently to get the information we need to make 2 API calls, but Facebook throttles API calls which will limit us to how many API calls we can make sequentially. By using FQL Batch Queries we can roll this operation into a single FQL call and then serialize the result into a single Json object.
The FQL for this would be:
{"event_info":"SELECT eid, name, start_time, end_time, attending_count, declined_count, venue, timezone, version, all_members_count, update_time FROM event WHERE eid = 162478390590630","event_venue":"SELECT page_id, type, were_here_count,location.latitude, location.longitude FROM page WHERE page_id IN (SELECT venue.id FROM #event_info)"}
This returns us a single json object representing an array of results (one for event, one for its venue):
{
  "data": [
    {
      "name": "event_info",
      "fql_result_set": [
       {
          "eid": 162478390590630,
              "name": ">* Dub Theories - Part 2 ! *<",
          "start_time": "2013-06-28T09:00:00+0100",
          "end_time": null,
          "attending_count": 39,
          "declined_count": 22,
          "venue": {
            "id": 106479242750341
          },
          "timezone": "Europe/London",
          "version": 2,
          "all_members_count": 757,
          "update_time": 1370464550
        }
     ]
    },
    {
       "name": "event_venue",
       "fql_result_set": [
        {
            "page_id": 106479242750341,
            "type": "ARTS/ENTERTAINMENT/NIGHTLIFE",
            "were_here_count": 1493,
            "location": {
            "latitude": 51.460999084183,
            "longitude": -2.5862773472242
        }
        }
      ]
    }
  ]
}
Great – we have all the information we need to store these objects into SQL so they can be delivered to our website users.
First we have to automate this process, as using the developer explorer tool is only for debugging and will not be sustainable for us to integrate into our cloud worker process.
HttpClient
The FQL Api provided by Facebook responds to Http requests which we will need to manually build. We will also need a client to send these requests, which is where HttpClient fits in. HttpClient was introduced in the .net Framework 4.5 and is perfectly suited to making HTTP requests and storing the results.
public event Action<RawEventProcessingResult> ProcessedEvent;

public async Task MakeFQLCall(string fql, string authToken)
{
    //build URL
    string url = "https://graph.facebook.com/fql?q=" + fql + "&format=json&access_token="
                    + authToken;

    //create client and call FQL
    HttpClient client = new HttpClient();
    var response = await client.GetAsync(url);

    //get the response
    var text = await response.Content.ReadAsStringAsync();

    //deserialize the JSON into POCO objects
    var results = JsonConvert.DeserializeObject<RawEventProcessingResult>(text);

    //Signal to queue reader that we have extracted the event
    ProcessedEvent(result);
}
RawEventProcessingResult is a holding class for the json results. It is structured in the exact same way the Json object is returned so that we can use the JsonConvert class to deserialise the json into the object.
The following is the object hierarchy for the Json result:

This isn’t the format that we want to store our events so some more intuitive classes were created to hold the event information. Built with the future in mind the LiveEvent base class was created (Facebook information agnostic) with an FacebookLiveEvent containing Facebook specific data.

The following is the worker process code for processing eids and storing the returned events:
public class EventProcessingQueueSession : QueueReaderSessionBase
{
    private readonly ApiKeySession _apiSession;
    private readonly ImportManagementContext _dbContext;
    private LiveEventsContext _liveContext;
    private List<EventCategory> _categories;
    private bool _continue = true;
    private EventProcessingSession _importSession;
    private LiveEventsContext _liveEventsContext = new LiveEventsContext();

    public EventProcessingQueueSession(ApiKeySession apiSession, ImportManagementContext dbContext,
                                                                 string queueUrl,
                                                                 string queueName)
    : base(queueUrl, queueName)
    {
        _apiSession = apiSession;
        _dbContext = dbContext;
        _liveContext = new LiveEventsContext();
        _categories = _liveContext.Categories.ToList();
    }

    public override async Task StartAsync()
    {
        try
        {
            while (_continue)
            {
                //retrieve block of eids in a comma seperated format
                var messages = this.DeQueueMessages(1).ToList();
                var idsToParse =  this.GetCommaSeperated(messages);
                if (idsToParse.Any())
                {
                    //start an importing process to return event information from
                    //the Facebook FQL
                    _importSession = new EventProcessingSession(_liveContext,
                                                                _categories,
                                                                _apiSession.ApiKey.Key,
                                                                idsToParse.ToList());
                    _importSession.LiveEventProcessed += newEvent =>
                    {
                        //we have process a facebook event, store into the live database
                        FacebookLiveEvent fbEvent = newEvent;
                        _liveEventsContext.Events.Add(fbEvent);

                        //add the newly added live event ID so it can be categorised
                        this.AddToOtherQueue("categorisationQueue", newEvent.Id);
                    };
                    _importSession.ApiKeyBlocked += () =>
                    {
                        //the api key we are using for facebook has been temporary blocked due to
                        //throttling.this won't happen very often as we buffer the calls as to
                        // not strain the server, but handle anyway.
                        _continue = false;
                        this.NotifyApiBlocked();
                    };
                    await _importSession.StartAsync();

                    //delete the messages as we have processed them
                    this.DeleteMessages(messages);
                    _liveContext.SaveChanges();
                    Thread.Sleep(2000);
                }
                else
                {
                    _continue = false;
                }
            }
        }
        catch (Exception queueException)
        {
            //an exception has been thrown, save details to the database so it can be investigated
            ImportException exception = new ImportException();
            exception.ExceptionString = "Event Processing Queue Exception : "
                                         + queueException.Message;
            exception.ExceptionStackTrace = queueException.StackTrace;
            var rawExceptionContext = new ImportManagementContext();
            rawExceptionContext.ImportExceptions.Add(exception);
            rawExceptionContext.SaveChanges();
        }
    }
}
At this point the events have been added to the database, but we are still missing one last requirement. Event Categorization.
 Worker Process C – Event Categorization
There are a lot of music events on Facebook. Trust me. Club and nightlife promoters are a dominating presence as they try to reach every student or young person to attend their night of entertainment. Great for the young student users of CityPulse – but what about the other users? They might not be interested in any nightlife, but would get a great use of the tool discovering this weekend's festivals or community events in their area.
This is where event categorization fits in, and is an import requirement of the application but there are complications. Facebook does not categorize events in this manner meaning we must approach the categorization process in a more manual fashion.
A custom artificial intelligence component has been created to analyze an event to give an indication into what category it may fit into.
The event categories
- Music & Nightlife
- Comedy
- Theatre & The Arts
- Festivals
- Family & Community
- Sport
- Shows and Fairs
- Social & Meetups
- Personal (hidden)
These are the categories in which the website users will be able to filter events. Some events are categorised into personal (Mike’s 21st Birthday bash etc) which are made hidden from the website.
Where Artificial intelligence fits in
A simple approach to categorisation could be to draw up a list of keywords that will be applied to each category. Music & Nightlife may have ‘music’, ‘drinks’, ‘dub-step’ and ‘reggae’, whilst Sport might have ‘match’, ‘pitch’ and ‘kick-off’.
The problem with approach is that it’s far from comprehensive. A festival may have plenty of keywords related to music, but that doesn’t make it a Music & Nightlife event. A nightclub may have a ‘birthday’ relating to the year the venue was created, but that also doesn’t mean it should be filtered into Personal and hidden from the website results.
The approach we have chosen (as with many artificial intelligence algorithms) is to keep among similar lines of maintaining a keyword list but to introduce a training dataset, and a real dataset. We build the training dataset manually, then let the algorithm take over and use fuzzy logic to guess the events for the ‘real’ set of data, updating the keyword dictionaries as they progress.
The training dataset
Building the training dataset is manual process. A CityPulse administrator will use the import management tool to manually categorize obvious events into their respective categories to build up the computers knowledge of each category. 
After approximately 50 events have been added to each category we have enough information to proceed to the real dataset. Each category is then assigned a dictionary of the keywords that are most commonly occurring within the events assigned to it.
We can query the top occurring events for each category using the following code:
Dictionary<string, int> result = new Dictionary<string, int>();

//get category from live database
EventCategory liveCategory = new LiveEventsContext().Categories.Single(x => x.Name.Contains("Music"));

//use the import management database
using (var _dbContext = new ImportManagementContext())
{
    //get a list of common words so they can be excluded from extraction
    List<CommonWord> excluded = _dbContext.CommonWords.ToList();

    //for every event in category, build up a list of occuring words
    foreach (var anEvent in liveCategory.Events)
    {
        var extracted = KeywordExtractor.Extract(new[]
                        {
                            anEvent.Name,
                            anEvent.Description
                        }, excluded);

        //add single extracted word list to 'result' list
        foreach (var extract in extracted)
        {
            if (!result.ContainsKey(extract.Key))
            {
                result[extract.Key] = 0;
            }

            result[extract.Key]++;
        }
    }
}

foreach (var topKeyWord in result.OrderByDescending(x => x.Value))
{
    Debug.WriteLine("Keyword {0} Occurs {1}", topKeyWord.Key, topKeyWord.Value);
}
This results in the output :
Keyword band Occurs 8
Keyword music Occurs 7
Keyword sound Occurs 4
Keyword incredible Occurs 4
Keyword scene Occurs 4
Keyword debut Occurs 4
Keyword pub Occurs 3
Keyword feel Occurs 3
Keyword real Occurs 3
Keyword steve Occurs 3
Keyword folk Occurs 3
Keyword songs Occurs 3
Not bad, these are certainly Music & Nightlife related keywords. We can make this better by manually assigning even more events to the category.
You may also have noticed the line of code
var excluded = _dbContext.CommonWords.ToList();
CommonWords is a table in the database that contains common words such as ‘the’ and ‘as’. These are excluded from the keyword extraction process as they don’t tell us anything about the event. They are created by a hybrid model of manually adding in the terms, and extracting words that occur in ALL events.
Let’s take a look at the ‘Family & Community’ category. All we need to change is:
var liveCategory = new LiveEventsContext().Categories.Single(x => x.Name.Contains("Family"));
This results in the output :
Keyword charity Occurs 64
Keyword raise Occurs 26
Keyword good Occurs 13
Keyword aid Occurs 12
Keyword raffle Occurs 12
Keyword family Occurs 11
Keyword cancer Occurs 11
Keyword show Occurs 10
Keyword music Occurs 10
Keyword band Occurs 8
Keyword entertainment Occurs 7
Keyword inn Occurs 7
Keyword holding Occurs 7
Keyword funds Occurs 7
Keyword team Occurs 7
Perhaps a little too weighed towards charity events, but we can fix that later by adding in more manual entries from other types of community events.
‘Real’ dataset
This is where the algorithm kicks in and we let automation take over. We use the training set dictionary of keywords to allow the computer to give a best judgement of where an event might fit into. If it can’t determine the correct category it moves on, if it can then it assigns the event to the correct category and updates the dictionary with that events keywords.
Therefore, as we continue down the categorisation process, the matching should get better over time.
PseudoCode for the algorithm is the following:
For 1.. n events
    extract event keywords
    compare against each categories keyword dictionary
    if 1 or more categories keywords match over a certain threshold value
       add event and update category keywords
    else
       Add event to ‘social & meetups’
    continue
Note that if an event cannot be categorized it is added to the ‘Social’ category. This will ensure that the events still get shown on the map in the website.
Categorization Worker Process Code
public class CategorisationQueueSession : QueueReaderSessionBase
{
    private bool _continue = true;
    private readonly LiveEventsContext _liveEventContext = new LiveEventsContext();

    public CategorisationQueueSession(string queueUrl, string queueName)
        : base(queueUrl, queueName)
    {

    }

    public override async Task StartAsync()
    {
        while (_continue)
        {
            //get the live database event block
            IEnumerable<CloudQueueMessage> messages = this.DeQueueMessages(5);
            var liveEventIds = this.GetCommaSeperated(messages);

            //grab the actual events in the message from the live database
            List<FacebookLiveEvent> liveEvents = new List<FacebookLiveEvent>();
            foreach (var liveEventId in liveEventIds.Select(x=>int.Parse(x)))
            {
                liveEvents.Add(_liveEventContext.Events.OfType<FacebookLiveEvent>()
                                                .SingleOrDefault(x=>x.Id == liveEventId));
            }

            //run the categorisation session, start by injecting the non hidden categories
            var nonHiddenCategories = _liveEventContext.Categories.Where(x=>x.Name != "Personal");
            var runCategorisationSession = new CategorisationSession(nonHiddenCategories);

            runCategorisationSession.Categorised += (categories, liveEvent) =>
            {
                //we have categorised an event, update the database row
                foreach (var matchedCategory in categories)
                {
                    liveEvent.Categories.Add(matchedCategory);
                }
            };

            //start the process
            await runCategorisationSession.StartCategorisationsAsync(new ImportManagementContext(),
                                                                     liveEvents);

            //categorisation ended for these events, update the database
            _liveEventContext.SaveChanges();
        }
    }
}
Results

The algorithm seems to have done a good job at categorization. Particularly pleasing is it's handling of the event - ‘Dagenham Dog Soldiers Bike and Band Night’ . It has been categorised both into ‘Family and Community’ and ‘Music & Nightlife’ considering it features bands but is also primarily a charity event.
Recap
So that’s it for the Azure importing process. To recap we have:
- Crawled facebook for event ids
- Added event ids to the EID processing queue
- Processed eids using Facebooks FQL api into real events
- Stored the events into the Live Events database
- Added the database ids into the categorisation queue
- Categorized the events using a custom artificial intelligence algorithm
The Storage
Entity Framework Code First
Abstracting the complexities of maintaining a persistent Data Access Layer is terribly attractive to any developer as we can spend more time writing our applications than writing the boilerplate code that surround any standard CRUD operations. The databases in the CityPulse solution have been created from Entity Framework (EF) code-first models. The Code First variant of EF allows us to model the entities and their relationships using Plain Old C# Objects (POCO objects). At run-time the EF library will build the model and if neccessary, will create the database for us. The power that this gives is that as a developer we never really need to leave the .net world.
Linq-to-Entities allows to interact with the database without writing SQL, again reducing down the size and complexity of the Data Access Layer.
Going deeper into Entity Framework Code First is out of scope of this article, but if you are new to the concept the article is certainly worth a read
Code First with Entity Framework 5
As per the main architecture diagram we have two main database that will be used to store the information in the cloud:
Import Management Database
This database is for everything importing related. The end user will never see this database as it is used by the Import Management WPF Tool alongside the Worker Processes in Azure. Crawled URLs exist here, as do any statistics, api keys, reports, exceptions and logging so it can be used to investigate any complications that may occur within the importing. Common or category specific words exist here to aid the categorization algorithm in Worker Process C.

Live Event Database

The Live Events database is used primarily by the website. It hosts the live events, alongside any categories the events exist within.
Code-first generation and updates in Azure
Code-first in Azure is remarkably easy, and doesn't require any variations from normal usage outside of Azure. Once the connection strings are added to the app/web.config the application will start interacting with the database. Code first migrations are handled the same too, simply use the built in Visual Studio Package Manager :
PM > Enable-Migrations
This command creates a configuration file that we can use to control specific use-cases when deploying migrations. We can use it for seed data, or to use the Fluent Api to describe relationships that exist inside our model.
The following is a demonstation of using Code-First migrations to add in the ability to store 'Feedback' entries in our database, for when a user wants to send his or her opinion to the website creators
This is what the database looks like before the migration :

And this is the state of the code model :
public class LiveEventsContext : DbContext
{
    public DbSet<LiveEvent> Events { get; set; }
    public DbSet<EventCategory> Categories { get; set; }
}
We'll start off by creating a feedback entity in the form of a POCO :
public class SiteFeedback
{
    public int Id { get; set; }
    public DateTime Created { get; set; }
    public string Description { get; set; }
    public string Email { get; set; }
}
Creating a property named Id allows Entity Framework to work out that it is the primary key when the model gets translated into a SQL table. We could have used the [Key] attribute over the property to explicitly state this, but EF is smart enough to know that and Id field is the key.
Let's add it to the model :
public class LiveEventsContext : DbContext
{
    public DbSet<LiveEvent> Events { get; set; }
    public DbSet<EventCategory> Categories { get; set; }
    public DbSet<SiteFeedback> Feedback { get; set; }
}
By creating a DbSet<T> collection and typing it to our new entity we are signifying our intention to map this entity type to a database table.
Now we can create the migration file to run against the database, simply type the following command in the Package Console Manager:
Add-Migration addFeedbackMigration
This automatically generates a migration file and opens it in Visual Studio.
public partial class addFeedback : DbMigration
{
    public override void Up()
    {
        CreateTable(
            "dbo.SiteFeedbacks",
            c => new
                {
                    Id = c.Int(nullable: false, identity: true),
                    Created = c.DateTime(nullable: false),
                    Description = c.String(),
                    Email = c.String(),
                })
            .PrimaryKey(t => t.Id);

    }

    public override void Down()
    {
        DropTable("dbo.SiteFeedbacks");
    }
}
Now running the command in the Package Console Manager :
PM > Update-Database
results in our intended database update:

The Website
The website is how CityPulse users will interact with the application. Before they connect the Azure import process will have done its work and we will have a multitude of categorised events available for visualization on the map. The map is the 'public' element of the solution, and is what brings it all together. Let's see how it works.
The Technology
For the website we have opted for a ASP.net MVC4 to serve up the HTML to the browsers, and the Web Api to serve the events in a json format. For the best possible user experience, the website primarily acts as a Single Page Application and as such relies quite heavily on javascript to render the front-end.
Serving the events – The Web Api
The ASP.net Web API provides a quick and easy way to deliver RESTful Web Services. Whilst the term REST (Representational State Transfer) spans several principles - what this means to us is good accessibility. There are no platform specific dependancies in the Web Api implementation, so our use of the technology can be accessed from mobiles & desktops, far and wide.
The disadvantages to this is that there is no client-side code generation for the Data Transfer Objects (as in technologies such as WCF) but we think this is an acceptable trade off. The Web Api is also stateless, enabling us to scale it easily to higher loads.
Let's have a look at how to write the Api Controller that will serve our events.
The Event API controller
We can start by adding the controller, creating a connection to the live database via a Database-First Entity Framework context, we'll call this LiveEventsEntities. It's worth noting that this has been created within Controllers/api/EventsController. The /api/ part isn't essential, but it helps in keeping it seperate from the normal MVC controllers should you wish to run in a single site.
As a basic requirement we're going to want to deliver the information for a specific event, by providing the Id of the event requested
public class EventsController : ApiController
{
    /// <summary>
    /// Queryable storage of the live event table.
    ///    - IQueryable as to not load the entire table into memory in the constructor
    /// </summary>
    private IQueryable<LiveEvent> _liveEvents;

    public EventsController()
    {
        //create an instance of the database context
        var liveEventContext = new LiveEventsEntities();

        //The WebApi doesn't like to serialize dynamic proxy objects, turn off lazy loading
        liveEventContext.Configuration.LazyLoadingEnabled = false;
        liveEventContext.Configuration.ProxyCreationEnabled = false;

        //lazy loading is disabled so manually load in the categories
        //so they get delivered in the results too
        _liveEvents = liveEventContext.LiveEvents.Include("EventCategories");
    }

    /// <summary>
    /// Retrieve an event by its Id
    /// </summary>
    public HttpResponseMessage Get(int id)
    {
        var foundEvent = _liveEvents.SingleOrDefault(x => x.Id == id);

        if (foundEvent == null)
        {
             return Request.CreateErrorResponse(
                    HttpStatusCode.NotFound,
                    String.Format("Event {0} wasn't found", id);
        }

        return Request.CreateResponse(HttpStatusCode.OK, foundEvent); ;
    }
}
The HttpResponseMessage Get(int id) is the key here, and is what the website will use to retrieve the event information. the routing engine takes care of the accesss to this method which would be make via an Http request to /api/Event/{event id}
There are also a few things to note here, firstly is the handling of dynamic proxy objects. To enable json serialization, dynamic proxying (enables lazy loading in EF) must be switched off if the EF entities are being used as the return object, or embedded within an HttpResponseMessage.
Secondly, the HttpResponseMessage itself - this isn't really required as we could just return a LiveEvent, but it is deemed as best practice because we can then leverage the HttpStatusCode and embrace Http the way it was designed to be used.
Lastly, the above code will return xml by default. To ensure that it is only json that is returned, add the following code to the WebApiConfig.cs class.
    //ensure only json is returned from the Api
    var appXmlType = config.Formatters.XmlFormatter.SupportedMediaTypes.FirstOrDefault(t =>
                                      t.MediaType == "application/xml");
    config.Formatters.XmlFormatter.SupportedMediaTypes.Remove(appXmlType);
By running the site we can now query the API to ensure it is returning the event information. Fiddler is a great web debugging tool (fiddler2.com) that we can use to see the results
A request of
http://localhost:8671/api/events/3
results in a json reply of
{
    "Id": 3,
    "Name": "Hip Route",
    "Description": "“Hip Route have a universal sound that should appeal to all lovers of real music”,
    "ImageNormal": "https://profile-a.xx.fbcdn.net/hprofile-ash4/261164_136561216508726_1794165337_s.jpg",
    "ImageSmall": "https://profile-a.xx.fbcdn.net/hprofile-ash4/261164_136561216508726_1794165337_t.jpg",
    "ImageCoverUrl": null,
    "Start": "2013-12-21T21:00:00",
    "End": null,
    "Updated": null,
    "Longitude": -1.74417424,
    "Latitude": 51.54513,
    "Street": null,
    "City": null,
    "State": null,
    "Country": null,
    "Zip": null,
    "Created": "2013-06-09T15:16:27.57",
    "IsHidden": false,
    "FacebookId": "136561216508726",
    "AttendingCount": 7,
    "InvitedCount": 399,
    "FacebookPrivicyType": 1,
    "Discriminator": "FacebookLiveEvent",
    "EventCategories": [{
	    "Id": 1,
	    "Name": "Music & Nightlife"
    }]
}
Great, that works fine. Though The next requirement is slightly more complex :
when we supply some geo-coordinates, a start date and an end date we want to return all the events that match that criteria
Geocoordinates can be modelled by taking the bounds of the users map, measured in Latitude and Longitude.
Start and End dates allows us to provide a filter on the events, so the user can see what events are happening today, or perhaps this weekend.
The code looks as follows :
/// <summary>
/// Retrieve an event by specifying geocoordinates
/// </summary>
    [HttpGet]
public HttpResponseMessage Get(DateTime startTime, DateTime startEndTime, float neLat, float neLong, float swLat, float swLong)
{
    try
    {
        var foundEvents = _liveEvents.Where(liveEvent =>
                             liveEvent.Start >= startTime &&
                             liveEvent.End <= startEndTime &&
                             liveEvent.Longitude >= swLong && liveEvent.Longitude <= neLong &&
                             liveEvent.Latitude >= swLat && liveEvent.Latitude <= neLat);

        return Request.CreateResponse(HttpStatusCode.OK, foundEvents);
    }
    catch (Exception e)
    {
        return Request.CreateErrorResponse(HttpStatusCode.NotFound, e);
    }
}
This time the request takes a few more parameters, but it can still be handling by the same defined route. Now by requesting :
//Area in London on the week starting 16th June
Events? startTime=2013-06-16T23:00:00.000Z&
	    startEndTime=%202013-06-23T22:59:59.000Z&
	    neLat=51.5195&
	    neLong=-0.143411&
	    swLat=51.506520&
	    swLong=-0.184609
we get a response back of :

The Api has returned a list of several events matching that location, Great stuff! But to make use of this new API, first we're going to have to present some UI to the user on the client :
Further Reading
ASP.net Web Api Basics with MVC4
Client-side Google Maps with Typescript
To show the newly retrievable events on the users browser, we need to complete the following tasks:
- 1. Load in a google map using their API
- 2. Respond to the users interaction with the map (user pan, user zoom)
- 3. Get the current map bounds in Lat/Long and query the API using the calls demonstrated above
- 4. De-serialize the json response into events and add them as markers to the map
To achieve this, we will be using a healthy mixture of Typescript, Html & Javascript.
Typescript
Typescript is the brainchild of Microsoft, and extends javascript by providing optional static typing and class-based object orientated programming. This means as a developer we get some lovely intellisense support within Visual Studio due to the type definitions being supplied for most commmonly used javascript libraries. That means less time looking up APIs on third party websites, and more time coding. Additionally from a maintance perspective it's much easier to use namespaces, which complements a solution that relies heavily on javascript such as CityPulse. 
For those who still love their javascript, and wish to continue basking in the dynamic nature of the language can rejoice : Javascript can be developed in harmony with typescript as they both compile down to javascript under the hood. This gives us the benefits of static typing, but only when we want it.
Display a google map
First we create a standard Asp.net MVC4 application in Visual Studio. Ensuring that we have the typescript plugin installed, lets start of by creating a mapManager. Abstracting the code into modules, instead of having everything at the bottom page is usually a good idea - especially in a web application which likely to use a lot of type/javascript. Typescript makes this particularly easy, as classes get converted into a commonly used javascript design pattern - a revealing module.
Start by creating a typescript file, under Scripts/lib/mapManager.ts.
//Make sure we have the google typings referenced or we wont get intellisense
/// <reference path="../../typings/google.maps.d.ts" />

module My {

    export class mapManager {

        _map: google.maps.Map;

        constructor () { }

        public init() {

            //standard options, center the map over the world by default
            var mapOptions = {
                center: new google.maps.LatLng(30.23804, -70),
                zoom: 3,
                panControl: false,
                streetViewControl: false,
                maxZoom : 18,
                minZoom : 2,
                mapTypeControl: false,
                zoomControlOptions: {
                    position: google.maps.ControlPosition.RIGHT_CENTER
                },
                mapTypeId: google.maps.MapTypeId.ROADMAP
            };

            //create map on the canvas
            this._map = new google.maps.Map(document.getElementById("map_canvas"),
                        mapOptions);
        }
    }
}
Note the reference to the google maps type definitions. Since google maps is a javascript implementation, the static type definitions have to be adorned to the library. You can download them by using the Nuget package manager in Visual Studio
PM> Install-Package google.maps.d.ts
Next we can create the html graph element and initialize the manager.
When an MVC4 application is set up, Visual Studio typically creates a Home/Index.html view for us to us. Clear the standard content in that and add:
<div id="map_canvas" style="width: 100%; height:100%;"></div>

<script type="text/javascript">
    $(document).ready(function () {
        //initialise the map manager
        var mapManager = new My.mapManager();
        mapManager.init();
    });
</script>
This jQuery function ready waits until the page is loaded, locates the javascript generated mapManager that has come from our typescript file, and initializes it.
Lastly, we make sure all the right scripts are referenced in the Layout.cshtml file:
<script src="https://maps.googleapis.com/maps/api/js?v=3.exp&sensor=true"></script>
<script type="text/javascript" src="http://maps.googleapis.com/maps/api/js?libraries=places&sensor=true"></script>
<script src="~/Scripts/lib/mapManager.js"></script>
One of the benefits of using MVC4 is it's ability to bundle scripts and minify them. The above example hasn't done this for brevity, but bundling and minification acts to obfusticate the code and improve browser loading times. see ASP.NET MVC4: Bundling and Minification
Note the mapManager is referencing the mapManager.js file, this is the compiled javascript that typescript gets converted into upon save.

Ok! We have a working map!
Lets move on and hook some events on the map so we can pass the information to our Api upon user input:
public init() {

    var self = this;

    //(code suppressed) Create map

    google.maps.event.addListener(this._map, 'zoom_changed', () => {
        self.loadEvents();
    });

    google.maps.event.addListener(this._map, 'mouseup', () => {
        self.loadEvents();
    });
}


public loadEvents() {
    //get bounds of map viewport
    var bounds = this._map.getBounds();

    //get events for the next week
    var today = new Date();
    var weekFromNow = new Date();
    weekFromNow.setDate(today.getDate() + 7);

    //create url request to Api
    var jsonRequest =
        "/api/Event?" +
        "startTime=" + today.toISOString() +
        "&startEndTime= " + weekFromNow.toISOString() +
        "&neLat=" + bounds.getNorthEast().lat() +
        "&neLong=" + bounds.getNorthEast().lng() +
        "&swLat=" + bounds.getSouthWest().lat() +
        "&swLong=" + bounds.getSouthWest().lng();

    //just log to console for now
    console.log(jsonRequest);
}
We create a function that retrieves the current viewport of the map and builds up an API request, built in Json and sent to the server. This keeps the UI responsive as there is no full page postback.
the function toISOString() is called on the date objects before they are sent to the webApi. This keeps in them in a format that can be directly injected into the api controllers parameter list
Pressing F5 to run the code, and moving the map around a little results in the following being sent to the browser console window:
/api/Event?startTime=2013-06-21T07:19:22.775Z&startEndTime= 2013-06-28T07:19:22.775Z&neLat=78.54&neLong=180&swLat=-49.8820&swLong=-180
/api/Event?startTime=2013-06-21T07:19:33.819Z&startEndTime= 2013-06-28T07:19:33.819Z&neLat=71.72&neLong=180&swLat=-6.38316&swLong=-180
/api/Event?startTime=2013-06-21T07:19:34.421Z&startEndTime= 2013-06-28T07:19:34.421Z&neLat=59.38&neLong=91.19&swLat=18.3684&swLong=-94.60
/api/Event?startTime=2013-06-21T07:19:34.645Z&startEndTime= 2013-06-28T07:19:34.645Z&neLat=50.64&neLong=48.037&swLat=29.7178&swLong=-44.86
/api/Event?startTime=2013-06-21T07:19:36.777Z&startEndTime= 2013-06-28T07:19:36.777Z&neLat=60.34&neLong=42.80&swLat=43.47777&swLong=-50.09
/api/Event?startTime=2013-06-21T07:19:38.185Z&startEndTime= 2013-06-28T07:19:38.185Z&neLat=57.65&neLong=19.45&swLat=49.43960&swLong=-26.99
/api/Event?startTime=2013-06-21T07:19:38.414Z&startEndTime= 2013-06-28T07:19:38.414Z&neLat=55.95&neLong=7.761&swLat=51.87276&swLong=-15.46
/api/Event?startTime=2013-06-21T07:19:38.953Z&startEndTime= 2013-06-28T07:19:38.953Z&neLat=55.07&neLong=1.916&swLat=53.032449&swLong=-9.69
Now we just need to send them to the api controller, and read the response - adding in the map markers for each event that is sent back to us :
Loading the events to the map as markers
To take the results from the WebApi, and add the collection of events (represented in json), we need to make some ammendments to the code:
public loadEvents() {
    var thisObject = this;

    //clear any existing markers
    this.clearEvents();

    //get bounds of map viewport
    var bounds = this._map.getBounds();

    var today = new Date();
    var weekFromNow = new Date();
    weekFromNow.setDate(today.getDate() + 7);

    //create url request to Api
    var jsonRequest =
        "/api/Events?" +
        "startTime=" + today.toISOString() +
        "&startEndTime= " + weekFromNow.toISOString() +
        "&neLat=" + bounds.getNorthEast().lat() +
        "&neLong=" + bounds.getNorthEast().lng() +
        "&swLat=" + bounds.getSouthWest().lat() +
        "&swLong=" + bounds.getSouthWest().lng();

    //make ajax request to the server
    $.getJSON(jsonRequest, (eventCollection) => {

        //response received, iterate events
        $.each(eventCollection, (index, event) => {

            //add each event as a map marker
            thisObject.addEventToMap(event);
        });
    });
}
Instead of outputing the Api requests to the console window, we have make an AJAX request to the server. $.getJson() is an asyncronous function that requires a callback function, which in this case iterates the results and calls our very own addEventToMap function. We can see the composition of the server results from the screenshot below, captured from developer tools within the Google Chrome browser.
Note the browser will only show us the compiled javascript from the typescript file, this is signified from the .js extention on the shown file

Also note that the size of the returning array is 100. This is because we have limited the number of events that can be returned from the server. At the time of writing there is over 100,000 events in our LiveEvents database. Allowing them all to be loaded in (even with filtering by geolocation and a weeks timescale) would likely block the server too long to provide a fluid user experience.
The last two functions add some very important functionality to our mapManager.
//takes an event and adds it as a marker to the map
public addEventToMap(eventJson) {
    var eventId = eventJson.Id;
    var longitude = eventJson.Longitude;
    var latitude = eventJson.Latitude;
    var eventName = eventJson.Name;

    //create a google LatLng representation
    var eventLatLong = new google.maps.LatLng(latitude,longitude);

    //create the marker containing the LatLng & the name of the event
    var marker = new google.maps.Marker({
        position: eventLatLong,
        title: eventName
    });

    //add to local instance, so it can be cleared later
    this._markerArray.push(marker);

    //add to the map
    marker.setMap(this._map);
}

//clears all events from the map
public clearEvents() {

    //iterate current markers and remove from map
    $.each(this._markerArray, (index, marker) => {
        marker.setMap(null);
    });

    //clear the array
    this._markerArray = [];
}
The addEventToMap function then accepts one of the json events as a parameter, creates a google.map.Marker object from the geocoordinates contained within and adds it to our map. The clearEvents function is called before every ajax requests as to not add in events twice.
And finally this results in a lovely render of our google map, populated with all the fun events that we have imported.

Of course it's also very useful to know some excellent website designers, so after some impressive css/html styling and some tweaks we end up with our finished solution!

That works great on a desktop, but we're not quite done yet!
Going mobile
With the meteoric rise in different types and sizes of devices capable of accessing the internet brings CityPulse another challenge. We need to provide everyone with an engaging, seamless and enjoyable experience no matter where they are or what device they are using, from tiny old phones with a questionable roaming connection to super high speed broadband 42" high definition TV screens. Luckily there is a fantastic way of achieving this without having to develop and maintain multiple code bases for a variaty of native platforms, we can do this using Responsive Design.
So what is Responsive Design?
Well in a nutshell, Responsive Design allows us to use a single website with a fluid layout which adapts depending on the screen dimensions, we can do this by taking advantage of HTML5 & CSS3 media queries to target specific screen dimensions with different CSS styles. If you are new to Responsive Design there is a great tutorial which covers everything concisely by Shay Howe.
Is it that simple?
Well yes and no, Responsive Design will help us optimise the viewing experience for each size of device, but what about whether it is a touch screen device, whether the connection speed is slow or the different expectations users may have on different devices? We will need to bring in a few different techniques and technologies to cover everything. Let me explain how we have created CityPulse to adapt to each scenario point by point:
1. Devices with different sized screens
2. Touch screen devices
3. Varying / intermittent bandwidth
4. Different user journeys/expectations
1. Devices with different sized screens
Responsive design addresses the multitude of screen size and pixel ratios an application can be exposed to in a real world environment. The layout is created with fluid percentage based widths and heights which expand and contract with different sized screens (you can give it a go by visiting CityPulsel and resizing your browser, go on give it a try!) Text also resizes to keep it readable, and some images have alternative sizes so mobiles won’t have the unnecessary annoyance of loading in any huge images. Even with our layout acting fluidly as the screen resizes there are dimensions at which our design breaks (called a ‘breakpoint’) and this is where we intervene with our CSS3 media queries.
One thing first before we get stuck in with the break points, css media queries are not supported in Internet Explorer 8 and below so we will also use the JavaScript Plug-in ‘css3-mediaqueries’ to maintain cross browser support. This is only loaded in to IE versions below 9 using the following code in the html <head> tags.
!--[if lt IE 9]>
<script src="/css3-mediaqueries.js"></script>
<![endif]-->
The plug-in is created by Manish Salunke and can be accessed on his website cssmatters . It cleverly does all the work for you by converting the CSS media queries to JavaScript recognisable by IE.
The Breakpoints
We have three main width breakpoints at: less than 764px, less than 1024px and more than 1024px. In best practice the breakpoints of a design are determined by the design and not common device sizes, but by a happy co-incidence the break points for this particular design sat very near to the main device groups of phone, tablet and widescreen (with just a slight tweak!). The changes we have implemented are deliberately subtle as to not upset the overall user experience, but enough to accomodate the shift in available space and layout. We also have some minor break points: widths greater than 1200px, greater than the gastronomic 1650px, heights less than 360px and 500px.
So to get into some detail at how our design adapts for each of these main break points let me show you a diagram of main responsive design layouts by device size and then go into further detail with code examples below:

A. The most challenging breakpoint is where the screen width goes below 764px (approximately mobile phone sized or a small tablet). At this size there is not enough usable space to have the information panel and the map side by side, so instead both of these become full width views accessed alternatively via buttons on each side of the screen. The side navigation and the top filters compress into pop out menus so they free up valuable space when not needed. There are also certain design decisions which have been made based on how people interact with mobiles which will be covered in the ‘different user journeys/expectations' section.
All of the styles for CityPulse have been created using LESS which is an extension of CSS that adds new features and dynamic behaviour to CSS, you can read more on the LESS website. Here is the first line of LESS/CSS we use to start our media query:
@media all and (max-width: 764px){
This first line declares that these styles apply to all the media types (screen, print, etc) and it states the maximum width. All the non-media query styles we have declared outside of these styles will still apply, but any targeting the same element will be overridden unless they include !important or are more specific (see this Smashing Magazine article on CSS specificity).
Here are some of the main styles we then apply within this media query to the design :
.map-button {
    display:block;
    position:absolute;
    bottom:0;
    right:0;
    z-index:250;
}
This map button is set to 'display:none;' in the main styles and only becomes visible for screens less than 764px wide by setting the property to 'block'. As at this width the map and the event list cannot be shown together, so the button allows the user to flip between them by using a JavaScript function to animate the map sliding in.
#smalldevice-intro {
    display: block;
    text-align: center;

    h5 {
        max-width:70%;
        margin: 0 auto;
        color:@accentcolor3;
        font-weight:normal;
        text-shadow:1px 1px 1px #000;
    }
}
At this small size we do not show the standard splash screen that loads the top global events in, so instead of these users missing out on seeing our tagline we include it within the first screen they see. It is hidden like the map button using the display setting and then set to visible for this particular size.
#sidemenu-tablet-refine-search {
    display: block;
}

#header-right.tabletmenuopen {
    //when menu is active change refine button colour
    #tablet-refine-search.button-type2 {
        background: url(/Images/dark-texture.png) repeat #212121;
    }
}

#arrow-left-close {
    display: none;
}


#header-left {
    height: 40px;
    background: none;
    width: 100%;

    .site-title {
        display: none;
    }
}

#tablet-refine-search {
    display: none;
}

#sidenavbar-wrapper {
    width: 100%;
}

.sidemenu-scrollinner {
    margin-top: 110px;
}

// hide rhs header - but raise z-index for menu button
#header-right {
    width: 100%;
    z-index: 200;
    height: 0px;

    .whatsonselect {
        z-index: 200;
        margin-top: 0px;
        background: url(/Images/dark-texture.png) repeat #212121;

        .whatsonlocation {
            top: 60%;
        }

        #clickmenu-date {
            top: 30%;
            padding:3px 0;
        }

        #clickmenu-category {
            top: 45%;
            padding:3px 0;
        }
    }
}

.whatsonselect-choose {
    .BOX-SHADOW(0, 0, 5px, 0, 0.7) !important;
}
This extract of code does several things: it sets our side panel width to take up the full screen, it displays a new button in the side navigation strip which toggles between the filter view and the list view and it tidies up the filter dropdowns by setting them a reasonable percentage distance from the top of their container.
The following screenshots demonstrates the affects of the change in screen dimensions:

B. For device sizes between 764 and 1024px (approximately standard tablet or small monitor size), the side panel and map are both now styled to be 50% of the screen width. This is to keep the side panel text with an optimum number of words per line for clear readability. We also compress the filters menu into a single 'Refine' button instead of spreading out the filters as it would on wider devices/screens. When the width becomes too small the filter buttons start to fall out of their containers and when the height becomes too small the filter dropdowns disappear off the bottom of the screen, so instead they are arranged into their own panel with scrollbars which appear by setting overflow to ‘auto’ if the screen height is too short for the contents.
@media (min-width: 765px) and (max-width:1024px), (max-height:500px) {
The media query declaration applies to screen sizes greater than 765px but less than 1024px and also screen sizes with a height less than 500px.
#tablet-refine-search {
        display: block;
        position: absolute;
        top: 10px;
        right: 20px;
        padding: 10px;
        cursor: pointer;
    }

    #header-left {
        width: 50%;
    }

    #sidenavbar-wrapper {
        width: 50%;
    }

    #whatsonsearch {
        display: none;
    }

    #header-right {
        width: 50%;
    }
}
The lines of LESS/CSS set the width of the side panel to be 50% which is within the container '#header-left' & '#sidenavbar-wrapper'. It also displays a new button which is hidden from larger and smaller screen sizes, which toggles the filters menu by sliding in from the left.
.whatsonlocation {
    width: 80%;
    position: absolute;
    top: 50%;
    right: 20%;
    display: block;
}

#clickmenu-date {
    width: 80%;
    position: absolute;
    top: 10%;
    right: 20%;
}

#clickmenu-category {
    width: 80%;
    position: absolute;
    top: 30%;
    right: 20%;
}

#whatsonsearch {
    width: 100%;
    display: block;
    position: absolute;
    bottom: 0;
    background: url(/Images/dark-texture.png) repeat #212121;

    button {
        width: 60%;
        margin: 10px auto;
        // float: right;
        padding: 0 5px;
        .button-type2;
        color: @accentcolor3;
        text-shadow: none;

        &:hover {
            .SELECTEDMENU;
        }
    }
}
This will give the filter buttons a new layout which suits the new 50% width of the menu. For the button with ID 'whatsonsearch' which is normally displayed at the top right of the screen as a black 'GO' button, we give it a more prominent background container, a brighter colour of blue and we style the button element to be much larger so it will be easier/more accurate to press with a finger on a touch screen device.

C. For devices with a width greater than 1024px our content now has room to spread out. The filters which for smaller sizes are located within a sliding out panel are now visible all the time along the top right of the header. When any of these filters are clicked its menu pops out over the map. The width of the side panel is now styled to be 35% so with the extra space the map and markers can now have more prescence in the design.
All the styles for this screen size are not included within a media query as they are set as the general website styles. Rather than including all of the styles within this article (of which there are loads!) I will just include a couple of snippets which set the main layout we have discussed for this size.
#header-left {
    position: absolute;
    top: 0;
    left: 0;
    width: 35%;
    height: 60px;
    background: url('/images/header-lbg.png') repeat-x #313131;
    z-index: 120;
}

#header-right {
    width: 65%;
    height: 60px;
    background: url('/images/header-lbg.png') repeat-x #313131;
    position: absolute;
    top: 0;
    right: 0;
    height: 60px;
    z-index: 110;
}

.whatsonselect {
    float: right;
    width: 92%;
    padding: 0;
    margin: 0;

    .whatsonlocation {
        float: left;
        width: 31%;
        max-width: 550px;
        min-width: 175px;
        color: @accentcolor3;
        line-height: 16px;
        margin-top: 10px;
        height: 35px;
        font-size: 14px;
        cursor: pointer;
        position: relative;
        border-radius: 0 6px 6px 0;
        text-align:right;
    }

    #whatson-icon-location {
        position: absolute;
        top: 0px;
        right: 0px;
        border-radius: 0 5px 5px 0;
    }
Here we are setting the width of the side panel and left header to be 35%. The right header size is set to 65% which matches the width of the map. Within the right header the Filter buttons are located with their container set to be 92% of the width of the 65% right header wrapper. We are also setting the width of each of the filter buttons to be roughly one third of the width of their container, a maximum and minimum width for each of these are also set to prevent their layout from breaking.

2. Touch screen devices
With a touch screen device comes the inability to carry out some functions a user can do with a mouse such as ‘hover’, but it brings in a whole new set of gestures such as pinching, swiping etc. To optimise for a touch screen device we firstly detect whether the device is touch screen capable by using the plug-in ‘Modenizr’. We then use the outcome of this to decide which style sheets and JavaScript functions to run, relative to being touch friendly or not. If we find the device is touch screen capable we also load the plug-in ‘TouchSwipe’ which allows us to utilise many of the touch screen gestures, such as using the ‘swipe’ gesture to swipe between the map and list view when on a mobile.
So to detect whether the device is capable of touch we run the following script
if ( Modernizr.touch ) {
...
}
Within this if statement we load in our plug-in which enables the swipe gesture for sliding in the map. One of the draw backs of using this method is that the touch screen capability of some versions of browsers and some devices may not answer correctly, and for this reason as a fall back we also have a click capability for the map button.
3. Varying / intermittent bandwidth
When the site is accessed from a mobile phone we generalize that the connection speed will be slower than other devices and do several different things to optimize for this. The filters menu is the first screen the user will see before the map and all its data is loaded in. This is great because it allows the user to choose their location, date and types of events they want so only the events suiting their requirements will be called from the server, keeping our users on 3G connections with limited data allowances happy.

Another way in which we keep the data requested from the server lower for smaller devices is by lowering the number of top event markers displayed on the map. This also makes sense visually, a smaller map has a smaller surface area to show the markers, so where our widescreen monitors show roughly 100 top event markers per view the phone will show 30.
For users who are 'on the go' who may experience disruptions to their internet connections we make use of in memory caching to ensure that events previously loaded can temporarily still be accessed.
4. Different user journeys/expectations
Whilst designing and coding the website to adapt to different types of devices with different sizes of screens, thought was also given to the different ways in which our users may want to interact with the site.
Our mobile device users may be 'on the go' looking for events which are near by, happening right now. And thus, our filters menu also doubles as a 'quick picker' as well as a bandwidth protector. Our users who are using laptops and desktop devices may be accessing the site from home or work, perhaps looking for an event in advance. These users are presented with a different experience, the prominent map will be the first thing they see with the top events down the side, this encourages them to explore events around them. The filters are also obvious to these users, being situated within the header but we have the date preset for these users to show all events in the coming week.
Conclusion
So there you have it! We have created a fully functional website delivering facebook events from around the world with a single click.
The automated importing process in Azure keeps the event database up to date, the website provides a fluent user experience by running as a Single Page Application & responsive design enables the global accessibility to each every user no matter what device they are using.
But don't take our word for it, get yourself onto the website and have a good poke around - You might even find out what you're doing this weekend!
Discover local upcoming events at CityPulse 
Back to the top
History
08/06/13 - Draft of 'The Idea', 'The Architecture', 'The Technology' & 'The Importing Process' added
09/06/13 - Draft of the 'The Importing Process with Azure Virtual Machines; worker nodes A B & C' added
16/06/13 - Beta website live
17/06/13 - Draft of 'Storage' added, draft of 'The Website' added.
23/06/13 - 'Going Mobile' added, 'The Website' has been completed, some other updates