
Gelid Icy Vision Rev 2- GPU Cooler
Replacement GPU Cooler - Icy cool or hot and bothered?
Introduction
Picture the scene. You sat at your computer for whatever reasons, and you hear an occasional grinding noise coming from it. On opening the case and having a poke about, you identify that one of the GPU fans is occasionally stalling and making the noise. This may be due to excessive bearing wear or possibly a buildup of dust and muck. Given the fact I am forever having to clean the intakes and hoover out the innards, the dust option is a good candidate.
Now the problem is, the GPU fans don't appear to be very standard, and look pretty customised to fit specifically to this GPU cooling fins. After much searching around, I cannot find a direct replacement fan, so opted to find a replacement cooler.
The GPU Card
The card in question is a Gainward GTX 580 3GB Phantom. Another quick search around shows there are limited replacement coolers readily available (in the UK at least) or perhaps my Google-fu was just having a bad day. I did however find one cooler that clearly stated it was GTX580 compatible and was available in stock. So, into the shopping basket it went, followed by a quick checkout and less than 24 hours later, it was on my doorstep.
The Replacement Cooler
The cooler purchased was a Gelid Icy Vision Rev 2. A dual 85mm fan arrangement mounted onto twin heat exchange grills connected by five heat pipes to the core gpu block.
The packaging was well presented as can be seen in the images below:


As you can see in the images above, there are a good selection of both Nvidia and AMD GPUs listed on the compatibility list, along with an infamous '*'. Searching the packaging, the asterisk leads to a statement that says, "The compatibility list is based on ATI & Nvidia's reference board layout only". This statement is of course not much help, as I haven't a clue if my GPU card is 'as per the reference design'!
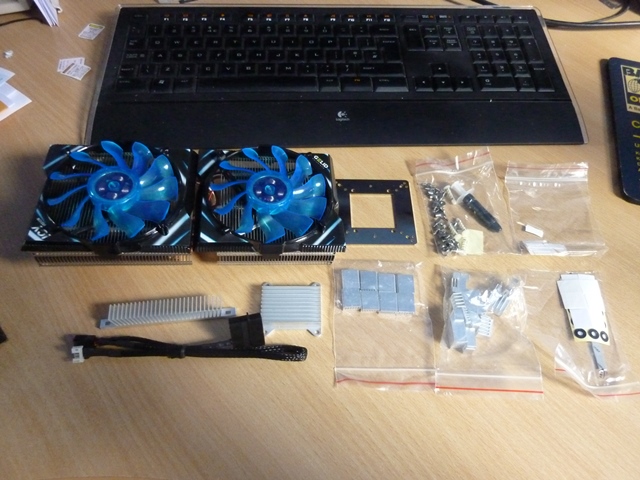
What Is in the Box?
It is safe to say there are lots of bits in the box. A selection of screws, stand offs, heat sinks of different sizes, sticky pads, a tube of thermal compound, 4-pin to 3-pin to Molex adapter, a case sticker and the most important thing of all, a multi-language instruction sheet! I fear there will be a sad loss of man-points for having to use the instructions, but given the amount and varied combination of bits supplied, I feel it is inevitable.
Let the Surgery Begin!
After first powering down the computer, disconnecting the DVI connector, both 8-Pin and 6-Pin power cables, the GPU card was extracted from the computer.
Lying gracefully on the desk with its under belly in the air, first, the 13 screws holding the lower heat shield onto the PCB were removed, followed by the 4 spring loaded screws holding the gpu heat sink onto the PCB.
Carefully prising the whole lot apart with the assistance of a flat blade screwdriver, starting at one end and moving towards the GPU, the whole lot started to separate until with a gentle pop, it was in two parts.

You can see in the upper half of the picture all the individual rubbery thermal pads that kept an even contact with all the memory chips, clocks and vrms, and the main GPU core with the silvery thermal compound on it. There was some dust as well coating the edges of the various components, so next up was to give everything a good clean. I used to have a natural hair bristled paint brush (less like to produce static) for cleaning components, but it looks like the kids have made off with it, so had to make do with a vacuum cleaner with brush attachment.
The Rebuild
The next phase was to start to fit the new cooler. Having referred to the instruction sheet, it told me which set of holes and which screws I needed to use for the particular type of GPU. Without this, it would have been a nightmare and probably ended up with wrecked GPU through lack of contact between heatsink and core.
The next thing to do was to use the sticky pads to attach the heat sinks onto the memory chips. This went reasonable, although they didn't seem to be sticky enough and I had my doubts if they would stay attached when flipped over. The instruction sheet did say to hold them in place firmly for 10 seconds, but still was not convinced.
The remaining heatsinks just did not appear to be compatible or suitable for any of the components, which gave me some concern, in fact I thought I was heading for trouble. In the end, I didn't fit any more heatsinks to anything, primarily because they were not going to fit correctly and did not cover the chips correctly or bridged some of the SMT capacitors, etc.
Trouble Ahead!
After lining up the replacement cooler with the GPU mounting holes, it became very obvious that there was a clash. One of the heat pipe tips was coming directly into contact with the DVI socket shield as you can see in the photos below:


I decided to open up the DVI socket shield to see what was underneath, that way, it may be possible to 'make it fit', after a bit of persuasion with a flat bladed screwdriver, it was clear that there was empty space under the shield, sufficient space in fact that a 'make it fit' option was feasible'.

First, after marking the clash area with a pen, I used a heavy flat bladed screwdriver and a hammer to dent in the shield edge to weaken it. Then using the round shaft of the same screwdriver, pressed in the shield far enough to accept the heat pipe tip.
After this was done, the new cooler was secured onto the card and now you can see the heat pipe tip sitting nicely into the shield recess that had just been formed:

With the card assembled, it was time to connect up the fan connector, which didn't need the supplied adapter cable and put the card back into the computer.

The Power Up!
Well, it didn't go bang! That was the good news. The bad news however was that one of the fans was not turning, turns out it was coming into contact with the SATA sockets on the motherboard and jamming. Yes, the sockets are probably the worse placed design ever. I had problems with them before the card was modified.
After forcing and bending, I managed to get enough space to allow the fan to turn.
Remember the not so sticky heat sinks I mentioned earlier? While trying to solve the jamming fan issue, a few of the heatsinks fell off and needed to be re-attached. I still didn't think they were sticky enough.
Windows booted up fine, ran happily for approximately 3 minutes and then locked up and died with a horrible pixelated screen. Yes, I think it is safe to say the lack of cooling on some of the other GPU components was taking its toll.
In the end, I decided to just undo everything I have done and revert back to the original cooler with the dodgy fan for the time being. I gave it a good clean and a blow with a can of compressed air. This appears to have improved it slightly, but still makes the noise and periodically stalls. It will keep it going until I decide what the next plan of attack is!
Conclusion
A very comprehensive collection of parts, however, you need to be spot on sure of the compatibility with your GPU card.
Finally, to answer the question in the article one liner, I think it is safe to say this experience left me hot and bothered. Wish I hadn't started. (Given me an excuse to upgrade! More of that in a future article maybe...)
History
- 2nd May, 2013 - First published
- 7th May, 2013 - Minor revisions