
Writing Games With Unity 3D in JavaScript and C# – Part 1
5.00/5 (1 vote)
How to write games with Unity 3D in JavaScript in C# - Part 1
Unity is a development environment for creating professional-level games. It is built on top of MonoDevelop, and utilizes it to achieve the deployment of the same code to many platforms. Unity comes in two versions, but this post will focus on the free version with no add-ons.
The free version (which is the one I use) supports out-of-the-box deployment to Mac, Windows, Linux, Web, and Google Native (a Chrome technology for deploying without plugins). Additionally (as of this writing), for $400 each deployment to Android and iOS (both iPhone and iPad) is available. If you are part of a team, a team license that adds collaboration capabilities to share assets is available for $500. The free version supports multiplayer games, physics, 3D audio, animation, Direct3D 11, shaders, light mapping, and terrains among other useful features. If you happen to be an XBox360, PS3, or Wii developer, you can deploy to those platforms as well, although I don’t know the licensing details.
Unity Pro is a $1,500 license and extends Unity with many high-end capabilities like level of detail (LOD), automatic path finding, high end audio filters, video playback and streaming, IK animation, 3D textures, realtime shadows, and many other professional features. The Android and iOS licenses for the pro version are $1,500 apiece and support features that the $400 versions do not.
Introduction to KeyShot
My creation, KeyShot, came about when I showed the guys I work with a game I created following the excellent free tutorials available from the Walker Boys Studio. There are 70+ hours of video training available covering the basics, writing code in JavaScript, and step-by-step instructions on how to create four different genres of games. KeyShot is based on the second game in this tutorial series, although it extends it a lot. Additionally, I converted all of the JavaScript classes to C#. The project includes the same functionality for both languages, which are easily swappable inside Unity.
So, I was asked if I could make a game for the Kansas City Developer Conference that is coming up. The reasons for this are currently shrouded in secrecy, and will only be revealed on this blog after the conference is over. ![]() Incidentally, after the conference, you can come back to this blog to download the zipped project and try it out for yourself.
Incidentally, after the conference, you can come back to this blog to download the zipped project and try it out for yourself.
KeyShot is a (very) basic Galaga clone. The objective is to get the highest score possible in 30 seconds without running out of lives. The top 10 scores are saved, which gives players motivation to beat the high score.

Implementation
I’m going to cheat a bit here and send you straight to the tutorials to find out how to implement the base of the game. The Walker Boys Studio does a fantastic job of covering these details in their video tutorials, so if you are interested, head on over here for some great instruction!
Features that I will cover that aren’t in the Walker Boys Tutorial
- Using multiple cameras to implement a background logo
- JavaScript and C# implementations, including how to use nested generics in JavaScript and how to call C# scripts from JavaScript
- How to use 3D models with axes that don’t line up with normal “Y-up” Unity standards
- Implementing a high score table using PlayerPrefs (coming in Part 2!)
- How to implement a dialog with text fields to collect user data (coming in Part 2!)
- How to implement cheat codes in Unity (coming in Part 2!)
Using Multiple Cameras to Implement a Background Logo
Alright, let’s find out how to display that Keyhole logo behind the playfield.
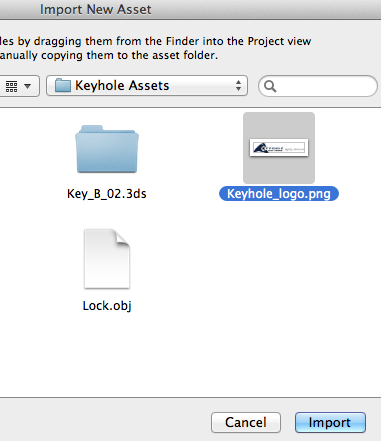
- From the Assets –> Import New Asset… menu, I selected the PNG to import. This pulls the asset into Unity and makes it available for use.

- Next, load Scene1 by double-clicking on it:

To get the image behind the other assets, we will use a layer and a camera.
- In the upper right of the Unity window, there is a Layers drop down. Select “Edit Layers” from that drop down. You’ll see a list of Tags, then Builtin Layers, then User Layers.
- If you click to the right of User Layer 8, you can set a name for that layer. I chose Background Image for my layer name (possibly a confusing choice…but we’ll work with it).

- In the Hierarchy drop-down, use the Create menu and select “GUI Texture.” Name it Background Image.
- Drag the logo asset to the
Textureproperty of the GUI Texture (in order to tell it that we want to use the logo as the texture). - Now select the Background Image GUI Texture in the Hierarchy to see its property sheet. To get the size correct, use the Pixel Insert fields. I looked at the properties of the image to find it is 512×128. To center the image, set X to -256 and Y to -64, then set width to 512 and height to 128.
- Set the Layer of the Background Image to…Background Image.

To display the image properly, we need to create a second camera.
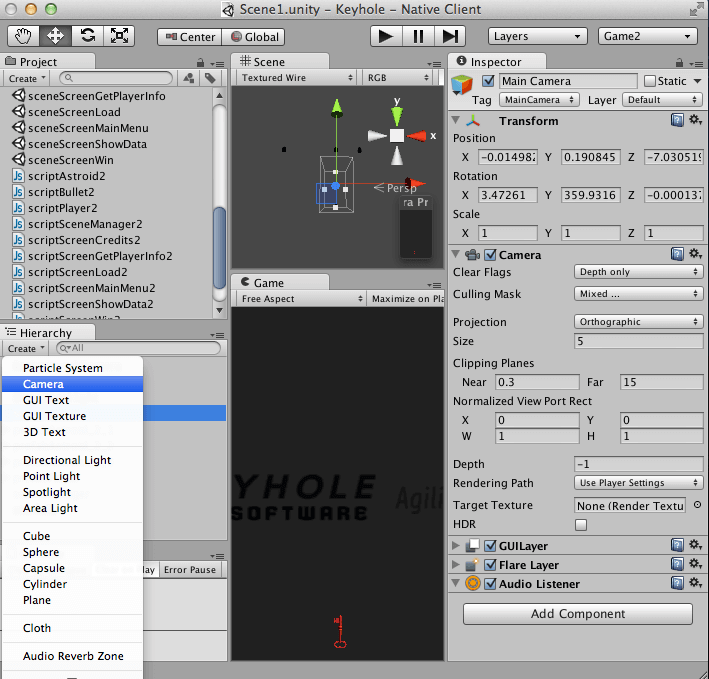
- Click on “Main Camera” in the Hierarchy view. Then select the “Create” drop down on the Hierarchy and choose “Camera.” I named mine Background Camera. By default, the new camera will have the same viewport as the camera that was selected when we created our new one, so we don’t have to adjust that.
- Now click on the Background Camera and set the Culling Mask of the Background Camera to use only the Background Image layer.
To do this, click on the Culling Mask, select Nothing. Then select Background Image. At this point, I also set the background color of the Background Camera to match the background of the Keyhole logo.
- Finally, we need to tell the main camera to ignore the Background Image layer.
To do this, click on the Main Camera, then the Culling Mask.
Un-select the Background Image layer.


It is quite a few steps, but the results are pretty cool, with a watermark showing behind all the other elements in the game.
JavaScript and C# Implementations
Including how to use nested generics in JavaScript and how to call C# scripts from JavaScript
In the Walker Boys tutorials, they chose JavaScript to code all of their games, which works just fine. However, if you’re like me, you might like to code in C# rather than JavaScript. So, I converted all of the JavaScript to C# and I’ll include both in the source code for the project, which again will be available after Part 2.
There are a few things to point out when choosing the language for your games in Unity:
- If you code in JavaScript, it will be converted to C# before compilation. This is why you must use
#pragmastrict when coding in JavaScript. Each JS file is implemented as a C# class with the same name as the JS file. So, why not go with C# since that is the target language anyway? - You can call C# from JS or vice versa, but not both in the same project. This is because one set of files is compiled before the other. The files in the special folder “Standard Assets” are compiled before the files that are located anywhere else. In my project, I have all of my C# files in the Standard Assets folder, and all of my JS files in the base folder. This means I can call C# from JS in my project. For tutorial purposes I don’t, but I’ll give an example so you know what to do if this is necessary for your project. Note for this example all of my JS files end with 2, whereas their equivalent C# files have the same names but without the 2. To call the C# version instead of the JS version, just remove the 2s from
scriptSceneManager2andscriptAstroid2. Once the files are located in the proper places, it really is that easy.function OnTriggerEnter(other:Collider) { if (other.gameObject.tag == scriptSceneManager2.TAG_ASTROID) { var astroidScript = other.GetComponent(scriptAstroid2); astroidScript.ResetPosition(); } ... } - Generics in JavaScript use a funky syntax. This can be especially frustrating with nested generics such as the following:
C#: List<KeyValuePair<int, string>> highScores = new List<KeyValuePair<int, string>>();
JS: var highScores:List.<KeyValuePair.<int, String> > = new List.<KeyValuePair.<int, String> >();
Take special note of the space between the closing brackets in JS, because if this is not present it will not compile.
- The type name of
stringis “string” in C# and “String” in JavaScript. - You can make C# calls directly inside your JavaScript code, and often you have to. This is just another reminder that JS is converted to C# at compile time.
- Even though the conversion is made, the JS syntax is checked before the conversion. Therefore, scope is different in JS than C#. For example:
C#:
-
    for (int i = 0; i < 10; i++) {
        print("i = " + i);
    }

    // i was only in scope during the for loop, so i must be redefined for the next for loop
    for (int i = 0; i < 10; i++) {
        print("another i loop. i = " + i);
    }
JS:
for (var i:int = 0; i < 10; i++) { print("i = " + i ); } // in JS, once a variable is defined it stays defined. Scope is at the function level for (i = int 0; i < 10; i++) { print("another i loop. i = " + i); } - JavaScript coerces a lot of values that C# will not, even in JS strict mode. Coercion (automatically converting from one type to another) causes a lot of side effects that can cause bugs that are not easy to find. For this reason, when coding in JS, I pay very close attention to the specified parameter types and ensure that I specifically use the types that are expected.
- JavaScript functions are always accessible, but C# obeys scope rules. If one script is going to call another, in C# make sure those methods that will be called by other scripts are
public.
How to Use 3D Models with Axes That Don’t Line Up with Normal “Y-up” Unity Standards
When importing 3D models from other programs (Blender, 3Ds, Lightwave, etc.), many of these models do not have their axes set with Y being “up”, which is what Unity expects. Using these models can be seemingly impossible until you learn how to wrap them so that their axes are not getting in the way.
You can read this and look at the pics, but it was a bit confusing for me: http://docs.unity3d.com/Documentation/Manual/HOWTO-FixZAxisIsUp.html
So, I’ll show you with some screen shots and discussion. Follow along now, then after Part 2 is release (with the source code), you can try it out.
- Create an empty
GameObject:
- Rename the
GameObject“Key2” and drag it to be a child ofprefabPlayer. Since I’m duplicating my Key to illustrate how to do it, I’ll leave the current Key alone and show you how to match what is there.

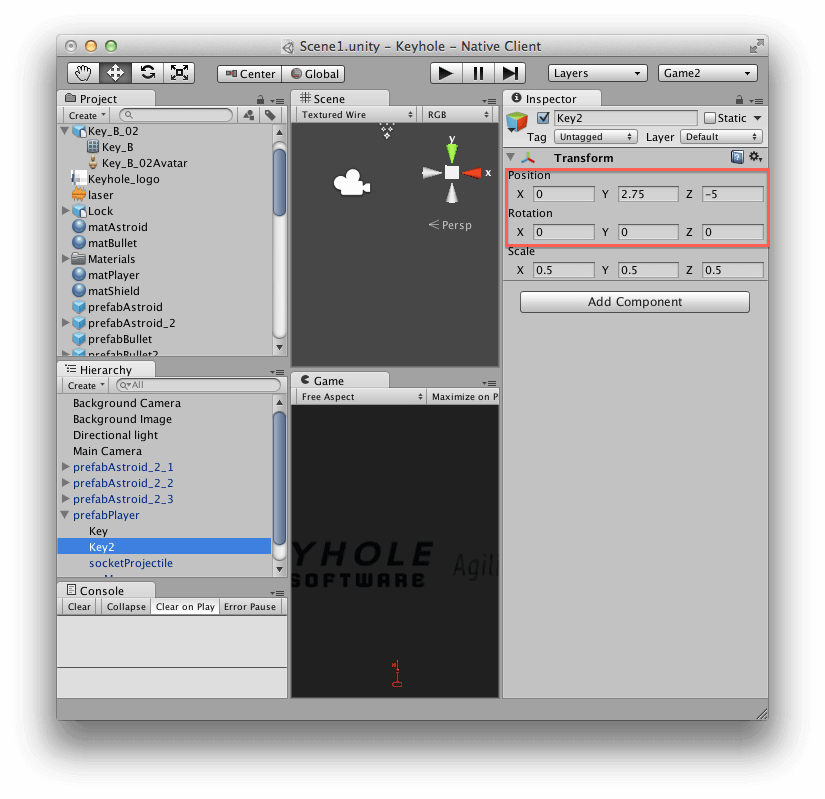
Note how Unity places the object in the scene at a fairly random location. Change the location (i.e., the Transform) to 0, 0, 0 so it will be fairly close to the existing key. Now drag the Key_B mesh and matPlayer to the Key2 object.
You’ll end up with something like this:

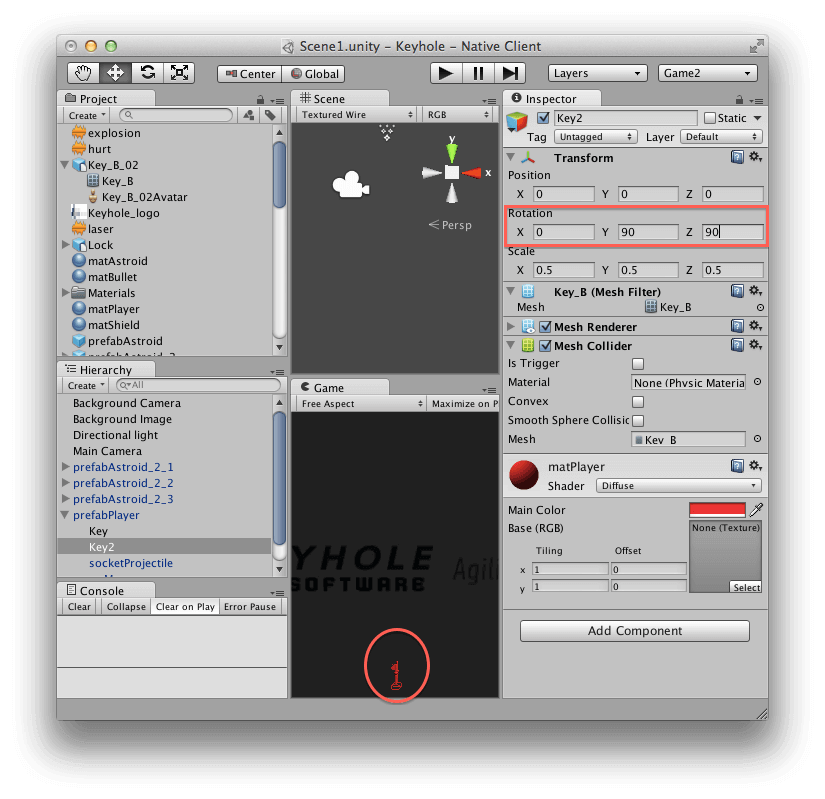
Note that the new key is in its default orientation, which has the rotation wrong. Since we have a GameObject holding the mesh instead of adding it directly to the prefabPlayer object, we can reset the rotation of the Key2 GameObject without affecting the rotation of the prefabPlayer (which would create havoc-like bullets shooting the wrong way, “left” and “right” moving anything but left and right, and so on).
Setting the Y and Z rotation of the Key2 GameObject to 90 and 90 respectively (for this particular mesh) corrects the orientation of the key so we have an upright, side-viewed key that we can use for the player.
I hope you have enjoyed Part 1 of this post. I’ll try to answer any questions as best I can. Be sure to come back next Monday, May 6th to download the project and check out high scores, dialogs, and cheat codes!
– John Boardman, asktheteam@keyholesoftware.com