
An Introduction to ASP.NET Core MVC through an Example (Part 5)
5.00/5 (1 vote)
In Part 4, we added basic support for the shopping cart, and now we'll enhance and refine that functionality.
Introduction
In Part 4, we added basic support for the shopping cart, and now we'll enhance and refine that functionality.
In this article, we are going to use the services feature that sits at the heart of ASP.NET Core to simplify the way that Cart objects are managed, freeing individual components from needing to deal with the details directly.
Background
This article is a continuation of the previous 4 articles. If you haven't read them yet, here are the parts:
Using the code
Creating a Storage-Aware Cart Class
The first step in organizing the usage of the MyCart class would be to create a specialized class that knows how to store itself using session state. To prepare, we apply the virtual keyword to the MyCart class so that its members can be overridden. Apply the virtual keyword in the MyCart.cs file in the BooksStore/Models directory:
public class MyCart
    {
        public List<CartLine> Lines { get; set; } = new List<CartLine>();
        public virtual void AddItem(Book book, int quantity)
        {
            CartLine line = Lines
                  .Where(b => b.Book.BookID == book.BookID)
                  .FirstOrDefault();
            if (line == null)
            {
                Lines.Add(new CartLine
                {
                    Book = book,
                    Quantity = quantity
                });
            }
            else
            {
                line.Quantity += quantity;
            }
        }
        public virtual void RemoveLine(Book book) =>
            Lines.RemoveAll(l => l.Book.BookID == book.BookID);
        public decimal ComputeTotalValue() =>
            Lines.Sum(e => e.Book.Price * e.Quantity);
        public virtual void Clear() => Lines.Clear();
    }
Next, we add a class file named MySessionCart.cs to the Models directory and use it to define the class as shown in the following code:
using System;
using System.Text.Json.Serialization;
using Microsoft.AspNetCore.Http;
using Microsoft.Extensions.DependencyInjection;
using BooksStore.MyTagHelper;

namespace BooksStore.Models
{
    public class MySessionCart : MyCart
    {
        public static MyCart GetCart(IServiceProvider services)
        {
            ISession session = services.GetRequiredService<IHttpContextAccessor>()?
                .HttpContext.Session;
            MySessionCart mycart = session?.GetJson<MySessionCart>("MyCart")
                ?? new MySessionCart();
            mycart.Session = session;
            return mycart;
        }
        [JsonIgnore]
        public ISession Session { get; set; }
        public override void AddItem(Book book, int quantity)
        {
            base.AddItem(book, quantity);
            Session.SetJson("MyCart", this);
        }
        public override void RemoveLine(Book book)
        {
            base.RemoveLine(book);
            Session.SetJson("MyCart", this);
        }
        public override void Clear()
        {
            base.Clear();
            Session.Remove("MyCart");
        }
    }
}
The MySessionCart class subclasses the MyCart class and overrides the AddItem, RemoveLine, and Clear methods to call their base implementations and then store the updated state in the session by using extension methods on the ISession interface. The static GetCart method is to create MySessionCart objects and provide them with an ISession object so they can store themselves.
Accessing the ISession object is somewhat complex. We obtain an instance of the IHttpContextAccessor service, which gives us access to an HttpContext object, which in turn gives us access to ISession. This indirect method is necessary because sessions are not provided as a regular service.
Registering the Service
The next step is to create a service for the MyCart class. Our goal is to fulfill requests for MyCart objects with MySessionCart objects that will seamlessly self-store. Creating the MyCart service in the Startup.cs file in the BooksStore directory as follows:
public void ConfigureServices(IServiceCollection services)
  {
     ...
     services.AddScoped<IBooksStoreRepository, EFBooksStoreRepository>();
     services.AddRazorPages();
     services.AddDistributedMemoryCache();
     services.AddSession();
     services.AddScoped<MyCart>(sp => MySessionCart.GetCart(sp));
     services.AddSingleton<IHttpContextAccessor, HttpContextAccessor>();
  }
The AddScoped method specifies that the same object will be used to handle related requests for instances of the MyCart class. How related requests are scoped can be configured, but by default, this means that any MyCart requested by components processing the same HTTP request will receive the same object.
Instead of providing the AddScoped method with a type mapping, as we did for the repository, we specify a lambda expression that will be invoked to fulfill MyCart requests. The expression receives a collection of registered services and passes it to the GetCart method of the MySessionCart class. As a result, requests for the MyCart service will be handled by creating MySessionCart objects, which will persist as session data when modified.
We've also added a service using the AddSingleton method, which specifies that the same object will always be used. The service we've created requires ASP.NET Core to use the HttpContextAccessor class when implementing the IHttpContextAccessor interface. This service is necessary for us to access the current session in the MySessionCart class.
Simplifying the Razor Cart Page
The benefit of creating this type of service is that it allows us to simplify the code where MyCart objects are used. We'll refactor the page model class for MyCart to take advantage of the new service. Use the MyCart service in the MyCart.cshtml.cs file in the BooksStore/Pages directory
using Microsoft.AspNetCore.Mvc;
using Microsoft.AspNetCore.Mvc.RazorPages;
using BooksStore.MyTagHelper;
using BooksStore.Models;
using System.Linq;

namespace BooksStore.Pages
{
    public class MyCartModel : PageModel
    {
        private IBooksStoreRepository repository;
        public MyCartModel(IBooksStoreRepository repo, MyCart myCartService)
        {
            repository = repo;
            myCart = myCartService;
        }
        public MyCart myCart { get; set; }
        public string ReturnUrl { get; set; }
        public void OnGet(string returnUrl)
        {
            ReturnUrl = returnUrl ?? "/";
        }
        public IActionResult OnPost(long bookId, string returnUrl)
        {
            Book book = repository.Books
                .FirstOrDefault(b => b.BookID == bookId);
            myCart.AddItem(book, 1);
            return RedirectToPage(new { returnUrl = returnUrl });
        }
    }
}
The page model class indicates that it requires a MyCart object by declaring a constructor argument, which allows the removal of session loading and storing commands from the handling methods. As a result, a simpler page model class focuses on its role in the application without worrying about how MyCart objects are created or exist. And, since services are available throughout the application, any component can hold the user's cart using the same technique.
Completing the Shopping Cart Functionality
We've introduced the MyCart service, and now it's time to complete the shopping cart functionality by adding two new features. The first feature allows customers to remove an item from the shopping cart, and the second feature will display summary information about the cart at the top of the page.
Removing Books from the Cart
To remove books from the cart, we need to add a "Remove" button to the content displayed by the Cart page, which will send an HTTP POST request. Remove the MyCart items in the MyCart.cshtml file in the BooksStore/Pages directory as follows:
@page
@model MyCartModel

<h2>Your cart</h2>
<table class="table table-bordered">
    <thead class="thead-light">
        <tr>
            <th>Quantity</th>
            <th>Item</th>
            <th class="text-right">Price</th>
            <th class="text-right">Subtotal</th>
        </tr>
    </thead>
    <tbody>
        @foreach (var line in Model.myCart.Lines)
        {
        <tr>
            <td class="text-center">@line.Quantity</td>
            <td class="text-left">@line.Book.Title</td>
            <td class="text-right">@line.Book.Price.ToString("c")</td>
            <td class="text-right">
                @((line.Quantity * line.Book.Price).ToString("c"))
            </td>
            <td class="text-center">
                <form asp-page-handler="Remove" method="post">
                    <input type="hidden" name="BookID"
                           value="@line.Book.BookID" />
                    <input type="hidden" name="returnUrl"
                           value="@Model.ReturnUrl" />
                    <button type="submit" class="btn btn-sm btn-danger">
                        Remove
                    </button>
                </form>
            </td>
        </tr>
        }
    </tbody>
    <tfoot>
        <tr>
            <td colspan="3" class="text-right">Total:</td>
            <td class="text-right">
                @Model.myCart.ComputeTotalValue().ToString("c")
            </td>
        </tr>
    </tfoot>
</table>
<div class="text-center">
    <a class="btn btn btn-info" href="@Model.ReturnUrl">Continue shopping</a>
</div>
The button requests a new handling method in the page model class to receive the request and modify the shopping cart. Remove an item in the MyCart.cshtml.cs file in the BooksStore/Pages directory as follows:
public class MyCartModel : PageModel
    {
        private IBooksStoreRepository repository;
        public MyCartModel(IBooksStoreRepository repo, MyCart myCartService)
        {
            repository = repo;
            myCart = myCartService;
        }
        public MyCart myCart { get; set; }
        public string ReturnUrl { get; set; }
        public void OnGet(string returnUrl)
        {
            ReturnUrl = returnUrl ?? "/";
        }
        public IActionResult OnPost(long bookId, string returnUrl)
        {
            Book book = repository.Books
                .FirstOrDefault(b => b.BookID == bookId);
            myCart.AddItem(book, 1);
            return RedirectToPage(new { returnUrl = returnUrl });
        }
        public IActionResult OnPostRemove(long bookId, string returnUrl)
        {
            myCart.RemoveLine(myCart.Lines.First(cl =>
                cl.Book.BookID == bookId).Book);
            return RedirectToPage(new { returnUrl = returnUrl });
        }
    }
The new HTML content defines an HTML form. The handling method will receive the specified request with the asp-page-handler tag helper attribute, as follows:
...

<form asp-page-handler="Remove" method="post">

...
The name provided has the "On" prefix and is supplemented with an appropriate suffix corresponding to the type of request, so the value "Remove" selects the handling method OnRemovePost. The handling method uses the value it receives to locate the item in the shopping cart and remove it.
Run the application. Click the "Add To Cart" button to add books to the cart, and then click the "Remove" button. The cart will be updated to remove the item you specified.
Adding the Cart Summary Widget
We may have a functioning cart, but there's an issue with how it's integrated into the interface. Customers may only know what's in their cart by viewing the cart summary screen. And they can only view the cart summary screen by adding a new item to the cart.
To address this issue, we'll add a widget to summarize the contents of the cart, which can be clicked to display the cart contents throughout the application. We'll do this similarly to how we added the navigation widget — as a view component with output that we can include in the Razor layout.
Adding the Font Awesome Package
As part of the cart summary widget, we'll display a button allowing users to proceed to checkout. Instead of displaying the word "Checkout" on the button, we want to use a shopping cart icon. You could draw a shopping cart yourself, but to keep things simple, we'll use the Font Awesome package — an excellent open-source icon set integrated into applications as a font, where each character in the font is a different image.
To install the Font Awesome package in Visual Studio 2019, follow these steps:
Right-click on the BooksStore project and select 'Add > Client-Side Library...'
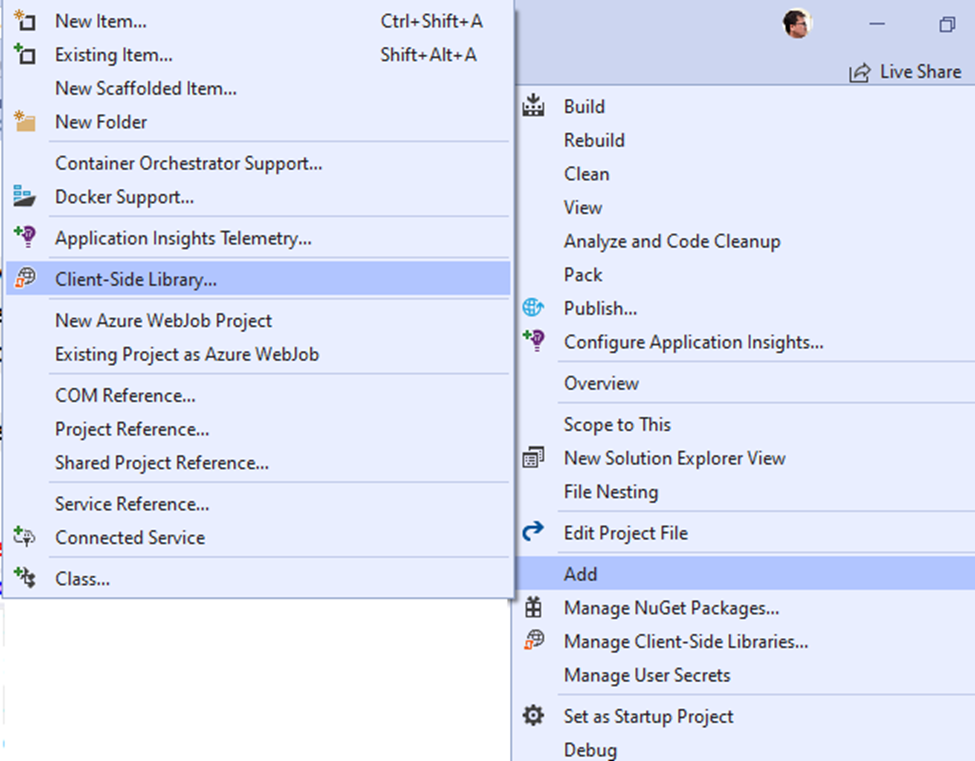
From the Add Client-Side Library window, select 'cdnjs' as the Provider and type 'font-awesome@6.1.1' (which is the latest version at the time of writing this. You can access it at https://fontawesome.com/) in the Library field, then press Enter
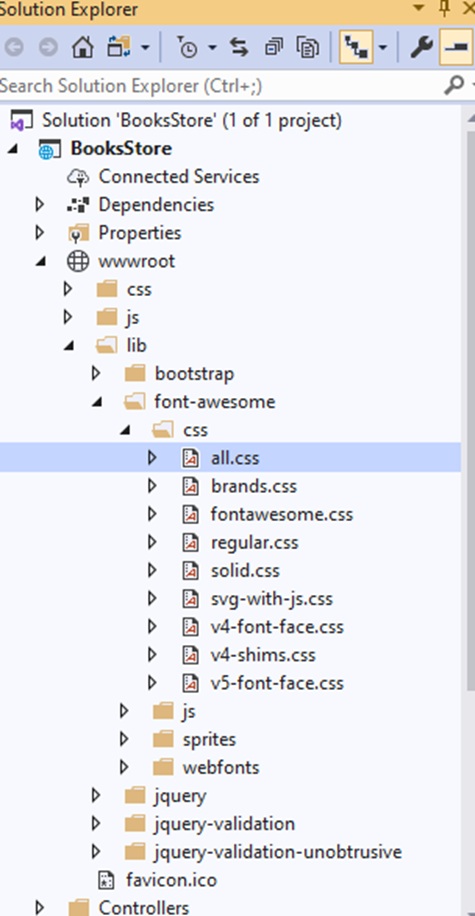
Click on 'Install'. The Font Awesome package will be installed in the wwwroot/lib directory
Creating the View Component Class and View
We will add a class file named CartSummary.cs in the ViewComponents directory and use it to define the view component. The content of the CartSummary.cs file in the BooksStore/ViewComponents directory is as follows:
using Microsoft.AspNetCore.Mvc;
using BooksStore.Models;

namespace BooksStore.ViewComponents
{
    public class CartSummary : ViewComponent
    {
        private MyCart cart;
        public CartSummary(MyCart cartService)
        {
            cart = cartService;
        }
        public IViewComponentResult Invoke()
        {
            return View(cart);
        }
    }
}
This view component can leverage the service we created earlier in this article to receive a Cart object as a constructor parameter. As a result, a simple view component class passes the Cart to the View method to generate HTML content to be included in the layout. To create a view for the component, we create a directory Views/Shared/Components/CartSummary and add a Razor View named Default.cshtml there. The Default.cshtml file in Views/Shared/Components/CartSummary is as follows
@model MyCart
<div class="">
    @if (Model.Lines.Count() > 0)
    {
    <small class="navbar-text">
        <b>Your cart: </b>
        @if (Model.Lines.Sum(x => x.Quantity) >= 2)
        {
            <text>@Model.Lines.Sum(x => x.Quantity) books</text>
        }
        else
        {
            <text>@Model.Lines.Sum(x => x.Quantity) book</text>
        }
    </small>
    }
    <a class="btn btn-sm btn-info navbar-btn" asp-page="/Cart"
       asp-route-returnurl="@ViewContext.HttpContext.Request.PathAndQuery()">
        <i class="fa fa-shopping-cart"></i>
    </a>
</div>
The view displays a button with a Font Awesome shopping cart icon and, if there are items in the cart, provides a quick snapshot image of the number of books. Now that we have a view component and a view, we can modify the layout so that the cart summary widget is incorporated into the responses generated by the Home controller. Adding Cart Summary in the _Layout.cshtml file in the Views/Shared directory
<!DOCTYPE html>
<html>
<head>
    <meta name="viewport" content="width=device-width" />
    <title>BooksStore</title>
    <link href="~/lib/bootstrap/dist/css/bootstrap.min.css" rel="stylesheet" />
    <link href="~/lib/font-awesome/css/all.min.css" rel="stylesheet" />
</head>
<body>
    <div>
        <div class="bg-dark text-white p-2">
            <div class="container-fluid">
                <div class="row">
                    <div class="col navbar-brand">BOOKS STORE</div>
                    <div class="col-6 text-right">
                        <vc:cart-summary />
                    </div>
                </div>
            </div>
        </div>
        <div class="row m-1 p-1">
            <div id="genres" class="col-3">
                <p>The BooksStore homepage helps you explore Earth's Biggest Bookstore without ever leaving the comfort of your couch.</p>
               <vc:genre-navigation />
            </div>
            <div class="col-9">
                @RenderBody()
            </div>
        </div>
    </div>
</body>
</html>
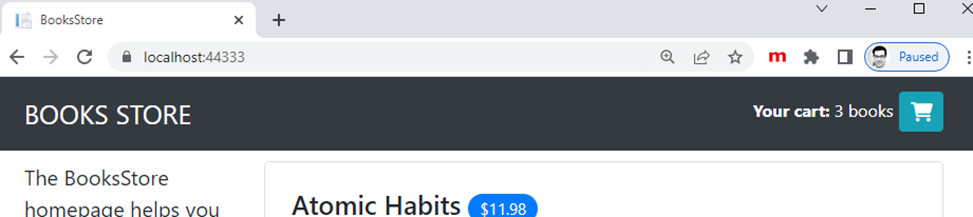
Run the application. You can view the cart summary by launching the application. When the cart is empty, only the checkout button is displayed

If you add a book to the cart, then the number of items and the cart summary are displayed

If there are multiple books (plural):
Submitting Orders
Up to this point, we've reached the final customer feature in BooksStore: the ability to checkout and complete an order. In the following sections, we'll expand the data model to provide support for capturing shipping details from users and add application support to handle those details.
Creating the Model Class
We'll add a class file named Order.cs to the Models folder, which is the class we'll use to represent shipping details for customers. The content of the class is as follows:
using System.Collections.Generic;
using System.ComponentModel.DataAnnotations;
using Microsoft.AspNetCore.Mvc.ModelBinding;

namespace BooksStore.Models
{
    public class Order
    {
        [BindNever]
        public int OrderID { get; set; }
        [BindNever]
        public ICollection<CartLine> Lines { get; set; }
        [Required(ErrorMessage = "Please enter a name")]
        public string Name { get; set; }
        [Required(ErrorMessage = "Please enter the first address line")]
        public string Line1 { get; set; }
        public string Line2 { get; set; }
        [Required(ErrorMessage = "Please enter a city name")]
        public string City { get; set; }
        [Required(ErrorMessage = "Please enter a state name")]
        public string State { get; set; }
        public string Zip { get; set; }
        [Required(ErrorMessage = "Please enter a country name")]
        public string Country { get; set; }
    }
}
Adding the Checkout Process
The goal is to allow users to input their shipping details and submit an order. To begin, we need to add a Checkout Now button to the cart view by adding content in the MyCart.cshtml file in the BooksStore/Pages directory as follows:
<div class="text-center">
    <a class="btn btn-info" href="@Model.ReturnUrl">Continue shopping</a>
    <a class="btn btn-info" asp-action="Checkout" asp-controller="Order">
        Checkout Now
    </a>
</div>
Run the application and click an Add To Cart button

Creating the Controller and View
Now we need to define the controller that will handle the order. We add a class file named OrderController.cs to the Controllers folder and use that file to define the class with the following content:
using Microsoft.AspNetCore.Mvc;
using BooksStore.Models;

namespace BooksStore.Controllers
{
    public class OrderController : Controller
    {
        public ViewResult Checkout() => View(new Order());
    }
}
The Checkout method returns the default view and passes a new Order object as the view model. To create the view, we create a folder named Views/Order and add a Razor View named Checkout.cshtml with the following content:
@model Order

<p>Please enter your details:</p>
<form asp-action="Checkout" method="post">
    <h3>Ship to</h3>
    <div class="form-group">
        <label>Name:</label><input asp-for="Name" class="form-control" />
    </div>
    <h3>Address</h3>
    <div class="form-group">
        <label>Line 1:</label><input asp-for="Line1" class="form-control" />
    </div>
    <div class="form-group">
        <label>Line 2:</label><input asp-for="Line2" class="form-control" />
    </div>
    <div class="form-group">
        <label>City:</label><input asp-for="City" class="form-control" />
    </div>
    <div class="form-group">
        <label>State:</label><input asp-for="State" class="form-control" />
    </div>
    <div class="form-group">
        <label>Zip:</label><input asp-for="Zip" class="form-control" />
    </div>
    <div class="form-group">
        <label>Country:</label><input asp-for="Country" class="form-control" />
    </div>
    <div class="text-center">
        <input class="btn btn-primary" type="submit" value="Order" />
    </div>
</form>
For each property in the model, we've created a label and input elements to capture user input, styled with Bootstrap and configured with tag helpers. The asp-for attribute on the input elements is processed by the built-in tag helper, generating attributes like type, id, name, and value based on the specified model property.
Run the application, add an item to the shopping cart, and press the Checkout Now button (or directly access http://localhost:44333/order/checkout)

Implementing Order Processing
We will handle orders by recording them in the database. Of course, most e-commerce websites won't stop there, and we don't need to provide support for credit card processing or other payment methods. But we want to keep everything focused on ASP.NET Core, so a simple database entry will suffice.
Extending the Database
Adding a new model type to the database is straightforward because of the initial setup we've gone through in previous sections. First, we add a new property to the database context class by adding a property to the BooksStoreDbContext.cs file in the BooksStore/Models directory
using Microsoft.EntityFrameworkCore;

namespace BooksStore.Models
{
    public class BooksStoreDbContext : DbContext
    {
        public BooksStoreDbContext(DbContextOptions<BooksStoreDbContext> options)
            : base(options) { }
        public DbSet<Book> Books { get; set; }
        public DbSet<Order> Orders { get; set; }
    }
}
This change is sufficient for Entity Framework Core to generate a database migration that will allow Order objects to be stored in the database. To create a migration, go to Tools, select NuGet Package Manager > Package Manager Console (PMC). In the PMC, enter the following command:
Add-Migration Orders
Update-Database
This command instructs Entity Framework Core to take a new snapshot of the application's data model, figure out how it differs from the previous database version, and create a new migration called "Orders". The new migration will be automatically applied when the application starts because the SeedData calls the Migrate method provided by Entity Framework Core.
Creating the Order Repository
We'll follow the same pattern we used for the product repository to provide access to Order objects. We've added a new class file named IOrderRepository.cs to the Models directory and used it to define the interface. The content of the IOrderRepository.cs file in the BooksStore/Models directory is as follows:
using System.Linq;

namespace BooksStore.Models
{
    public interface IOrderRepository
    {
        IQueryable<Order> Orders { get; }
        void SaveOrder(Order order);
    }
}
Implement the interface by adding a class file named EFOrderRepository.cs to the Models directory with the following content:
using Microsoft.EntityFrameworkCore;
using System.Linq;

namespace BooksStore.Models
{
    public class EFOrderRepository : IOrderRepository
    {
        private BooksStoreDbContext context;
        public EFOrderRepository(BooksStoreDbContext ctx)
        {
            context = ctx;
        }
        public IQueryable<Order> Orders => context.Orders
                            .Include(o => o.Lines)
                            .ThenInclude(l => l.Book);
        public void SaveOrder(Order order)
        {
            context.AttachRange(order.Lines.Select(l => l.Book));
            if (order.OrderID == 0)
            {
                context.Orders.Add(order);
            }
            context.SaveChanges();
        }
     }
}
This class implements the IOrderRepository interface using Entity Framework Core, allowing access to the collection of stored Order objects and enabling the creation or modification of orders.
We register the order repository as a service in the ConfigureServices method of the Startup class as follows:
public void ConfigureServices(IServiceCollection services)
 {
   ...
   services.AddScoped<IBooksStoreRepository, EFBooksStoreRepository>();
   services.AddScoped<IOrderRepository, EFOrderRepository>();
   services.AddRazorPages();
   ...
 }
Completing the Order Controller
To complete the OrderController class, we need to modify its constructor to make it receive the services it requires to handle orders and add an action method that will handle the POST request from the HTTP form when the user clicks the Order button. Complete the Controller in the OrderController.cs file in the BooksStore/Controllers directory as follows:
using Microsoft.AspNetCore.Mvc;
using BooksStore.Models;
using System.Linq;

namespace BooksStore.Controllers
{
    public class OrderController : Controller
    {
        private IOrderRepository repository;
        private MyCart cart;
        public OrderController(IOrderRepository repoService, MyCart cartService)
        {
            repository = repoService;
            cart = cartService;
        }
        public ViewResult Checkout() => View(new Order());
        [HttpPost]
        public IActionResult Checkout(Order order)
        {
            if (cart.Lines.Count() == 0)
            {
                ModelState.AddModelError("", "Sorry, your cart is empty!");
            }
            if (ModelState.IsValid)
            {
                order.Lines = cart.Lines.ToArray();
                repository.SaveOrder(order);
                cart.Clear();
                return RedirectToPage("/Completed", new { orderId = order.OrderID });
            }
            else
            {
                return View();
            }
        }
    }
}
The Checkout action method is marked with the HttpPost attribute, meaning it will be used to handle POST requests — in this case, when the user submits the form.
In previous sections, we've used ASP.NET Core model binding feature to receive simple data values from the request. A similar feature is used in the new action method to receive a completed Order object. When a request is processed, the model binding system attempts to populate values for the properties defined by the Order class. This works on a best-effort basis, meaning we might receive an Order object with missing property values if there are no corresponding data items in the request.
To ensure we have the data we require, we'll apply validation attributes to the Order class. ASP.NET Core checks the validation constraints we apply to the Order class and provides details about the result through the ModelState property. We can check if there are any issues by examining the ModelState.IsValid property. We also call the ModelState.AddModelError method to register error messages if there are no items in the cart.
Displaying Validation Errors
ASP.NET Core uses the validation attributes applied to the Order class to authenticate user data, but we need to make a simple change to display any issues. This relies on another built-in tag helper to check the authentication status of user-provided data and add warning messages for each detected issue. Add a Validation Summary to the Checkout.cshtml file in the BooksStore/Views/Order directory
@model Order
<p>Please enter your details:</p>
<div asp-validation-summary="All" class="text-danger"></div>
<form asp-action="Checkout" method="post">
    <h3>Ship to</h3>
...
With this simple change, validation errors are communicated to the user. To see the effect, restart ASP.NET Core, access http://localhost:44333/Order/Checkout, and click the Order button without filling out the form. ASP.NET Core will process the form data, detect that the required values are not found, and generate authentication errors as shown below:

Displaying a Summary Page
To complete the checkout process, we'll create a Razor page to display a thank-you message along with a summary of the order. Add a Razor page named Completed.cshtml to the Pages directory with the following content:
@page
<div class="text-center">
    <h3>Thanks for placing order #@OrderId</h3>
    <p>We'll ship your goods as soon as possible.</p>
    <a class="btn btn-info" asp-controller="Home">Return to Store</a>
</div>
@functions {
    [BindProperty(SupportsGet = true)]
    public string OrderId { get; set; }
}
Although Razor Pages often have page model classes, they're not a strict requirement, and simple features can be developed without them. In this example, we've defined a property named OrderId and marked it with the BindProperty attribute, indicating that the value for this property will be retrieved from the system's model binding request.
Now, the customer can complete the entire process, from selecting products to checkout. If they provide valid shipping details (and have items in their cart), they'll see the summary page when they click the Order button, as shown in the image below:

Points of Interest
We have completed all the major parts of the customer-facing portion of the BooksStore application. We have a product catalog that can be browsed by category and page, a neat shopping cart, and a simple checkout process. In the next article, we will add the features required to administer the BooksStore application.
History
Keep a running update of any changes or improvements you've made here.