
Using Arm64EC with Windows 11
0/5 (0 vote)
This article demonstrates how to use Arm64EC in a C++ application. The application you will implement performs the multiplication of two pseudo-randomly generated square matrices.
With the advent of complex machine learning and artificial intelligence models, you need fast and energy-efficient hardware. For fast, efficient hardware, Arm has introduced an architecture used by most chips in embedded and mobile systems. It has been adopted for laptops, desktops, and servers and enables you to accelerate your applications.
Traditionally, apps were compiled for a specific platform and required third party libraries that are generally out of your control. For this reason, it was often difficult to port Intel-based (x86 or x64) applications to Arm processors. You had to recompile the entire application with all the dependencies, and many apps have dependencies (static or dynamic) that have not yet been ported, making it very difficult to move the complete app to Arm64.
To help solve some of these problems, Windows 11 offers Arm64EC (Emulation Compatible). Arm64EC is an application binary interface (ABI) for applications running on Arm devices running Windows 11. Using Arm64EC you can choose which components to port and which not to port making it much easier to move apps to Arm64 devices.
Arm64EC enables you to port x64 apps to Arm-powered devices to take advantage of the native speed and performance. Contrary to compilation targeting Arm64 only, you can mix Arm64 with x64 binaries in the same process. As a result, you can gradually port your applications to benefit from Arm-powered devices. This includes lower power consumption, longer battery life, and accelerated artificial intelligence (AI) and machine learning (ML) processing.
This article demonstrates how to use Arm64EC in a C++ application. The application you will implement performs the multiplication of two pseudo-randomly generated square matrices. You will run the algorithm for different matrix dimensions and repeat the calculations several times to measure app performance. Finally, to compare performance, you will run the app using different configurations: x86, x64, and Arm64EC.
App Porting with Arm64EC
This section explains how to port an application with Arm64EC. This introductory article uses a relatively simple application. However, you can find a real-world scenario here. It also explains how the Arm64EC ABI works, demonstrates Arm64EC in action, and explains porting step by step to give you an idea of how straightforward this can be for any real-world scenario.
How It Works
The Arm64EC ABI enables transparent and direct interoperability with your existing x64 dependencies, meaning you can use x64 and Arm64EC in the same process. This is possible because Arm64EC code is compiled with the same pre-processor architecture definitions as x64 code, and the Arm64EC ABI is compatible with the X64 ABI. Consequently, you can gain performance by speeding up the computation of intense code by employing Arm architecture without porting everything simultaneously to Arm64.
An example of performance improvement is shown in the figure below. You can shorten the computation time by nearly 10 percent (on average) by switching the build target from x86 to x64. You can gain another performance boost by changing the build target to Arm64EC and recompiling. Arm64EC provides the best performance boost for the smallest matrices, with a matrix size of 100x100 elements.
You get a performance benefit without any code changes when you switch from x64 to ARM64EC. Switching to Arm64EC means there will be a load time reduction, memory load and performance improvement because Arm64 system libraries will be used directly without emulation.

This implementation uses a straightforward algorithm. So, you can make further optimizations by using Arm-specific processor instructions.
- The application can reference x64 dependencies in the CMake file. The dependencies load into the same process. You can use this feature to gradually transition your computationally intense dependencies to Arm64EC to improve your overall app performance.
After running the application, you should see Arm64 (x64 compatible) in the Task Manager window, as shown below.

Arm64EC ABI in Windows 11
To enable interoperability between Arm64 and x64, Windows 11 introduced four changes to the classic Arm64 ABI. These include:
Register mapping and blocked registers use the CONTEXT structure, which defines the CPU state at a given time. The structure includes x64 and Arm64EC codes. The shared structure implies that Arm64 registers are effectively mapped as x64 registers. The mapping is defined under ARM64EC_NT_CONTEXT. In other words, those structures emulate x64 as Arm64.
Call checkers are used to verify the architecture of the function being called. Call checkers verify whether the function to be invoked is x64 or Arm64EC. The x64 functions are invoked under the emulation.
Arm64EC and x64 use different stack checkers for validating the area allocated for functions in the stack.
While Arm64EC otherwise follows the Classic Arm64 ABI calling convention, variadic functions (also known as varags) follow a calling convention similar to x64 variadic. For example, following x64 variadic calling convention, only the first four registers — x0, x1, x2, and x3 — are used for parameter passing. Read more about the key rules in the Arm64EC documentation on variadic calling convention.
Arm64EC in Action
Now, you port an Intel app to Arm64EC and run it on Windows Dev Kit 2023, also known as the Volterra device. You build the project natively to see how to include x64 dependencies that you cannot port to Arm64EC. For clarity, the article uses a relatively simple application to demonstrate the steps you must take when porting.
Prerequisites
This tutorial uses Windows Dev Kit 2023 and Visual Studio 2022 17.4 with Desktop development and the C++ workload installed. Note that the Windows Dev Kit 2023 comes with Windows 11 pre-installed. You can use it like any other Windows-based desktop. After installing Visual Studio 2022, you can use Volterra as your development environment.
To see the final project, review the complete code.
Building the Project Natively
Create the new project using the CMake Project template in Visual Studio. Alternatively, you could also use the Console App C++ project template. The source code is the same. The only difference is in platform configuration.

On the next screen, configure the project as follows:
- Project name: Volterra.Matrix
- Location: Any local folder
- Solution: Create new solution
- Solution name: Volterra.Matrix
After creating the solution, there are four essential files. Two standard files implementing the app: Volterra.Matrix.h and Volterra.Matrix.cpp. And two CMake files, CMakeList.txt and CMakePresets.json (if Visual Studio did not generate this file, use this one). Visual Studio uses the latter to configure the app so that it can be built and executed directly from Visual Studio. Of course, you can also use the command line: cl /arm64EC main.cpp.
Here, you used the CMake Project template. So, you have CMake files. Alternatively, you could use the Console Application template with MSBuild.
Implementation
To implement the app, start by adding several functions to Volterra.Matrix.cpp. Specifically, you must create generateRandomSquareMatrix, which uses a random number generator to generate a square matrix whose elements are real numbers uniformly distributed within the range 0 to 1.
This function is defined right after the includes and using namespace statements:
#include "Volterra.Matrix.h"
#include <chrono>
#include <random>

using namespace std;

double** generateRandomSquareMatrix(int size) {
    // Initialize random number generator
    random_device random_device;
    default_random_engine engine(random_device());

    // Prepare uniform distribution
    uniform_real_distribution uniform_distribution;

    // Generate matrix
    double** matrix = new double*[size];

    for (int i = 0; i < size; i++) {
        matrix[i] = new double[size];

        for (int j = 0; j < size; j++) {
            matrix[i][j] = uniform_distribution(engine);
        }
    }

    return matrix;
}
Then, implement matrix multiplication using a straightforward algorithm:
double** squareMatrixProduct(double** matrix1, double** matrix2, int size)
{
    double** result = new double*[size];

    for (int i = 0; i < size; i++) {
        result[i] = new double[size];

        for (int j = 0; j < size; j++) {

            result[i][j] = 0;

            for (int k = 0; k < size; k++) {
                result[i][j] += matrix1[i][k] * matrix2[k][j];
            }
        }
    }

    return result;
}
Subsequently, you must add two helper functions: printSquareMatrix and releaseSquareMatrix. The first prints all the matrix elements, while the second deletes the underlying memory allocated for a given matrix.
To test the code, you need to implement another method, simpleTest, which generates two small matrices (3x3), prints them to the console, and then calculates their product:
void simpleTest() {
    const int size = 3;

    double** matrix1 = generateRandomSquareMatrix(size);
    double** matrix2 = generateRandomSquareMatrix(size);

    cout << "Matrix1:" << endl;
    printSquareMatrix(matrix1, size);

    cout << endl << "Matrix2:" << endl;
    printSquareMatrix(matrix2, size);

    cout << endl << "Product:" << endl;
    double** product = squareMatrixProduct(matrix1, matrix2, size);
    printSquareMatrix(product, size);

    releaseSquareMatrix(matrix1, size);
    releaseSquareMatrix(matrix2, size);
    releaseSquareMatrix(product, size);
}
After adding the simpleTest function to the main function:
int main(int argc, char** argv)
{
    simpleTest();

    return 0;
}
You should see the following output:

x86 and x64 dependencies
To include any of the remaining x64 dependencies, you can use CMakeLists.txt and add them as libraries using the CMake documentation.
Arm64EC
Assuming everything is in place, compile the app for Arm4EC. With the dependencies included as libraries, they will be untouched. By default, the project template contains four platform configurations:
- x86-debug
- x86-release
- x64-debug
- x64-release
They are defined in the CMakePresets.json file. To add the Arm64EC platform, supplement the CMakePresets.json file as follows:
{
  "version": 3,
  "configurePresets": [
    {
      "name": "windows-base",
      "hidden": true,
      "generator": "Ninja",
      "binaryDir": "${sourceDir}/out/build/${presetName}",
      "installDir": "${sourceDir}/out/install/${presetName}",
      "cacheVariables": {
        "CMAKE_C_COMPILER": "cl.exe",
        "CMAKE_CXX_COMPILER": "cl.exe"
      },
      "condition": {
        "type": "equals",
        "lhs": "${hostSystemName}",
        "rhs": "Windows"
      }
    },
    {
      "name": "x64-release",
      "displayName": "x64 Release",
      "inherits": "windows-base",
      "architecture": {
        "value": "x64",
        "strategy": "external"
      },
      "cacheVariables": {
        "CMAKE_BUILD_TYPE": "Release"
      }
    },
    {
      "name": "x86-release",
      "displayName": "x86 Release",
      "inherits": "windows-base",
      "architecture": {
        "value": "x86",
        "strategy": "external"
      },
      "cacheVariables": {
        "CMAKE_BUILD_TYPE": "Release"
      }
    },
    {
      "name": "Arm64EC-release",
      "displayName": "ARM64EC Release",
      "inherits": "x64-release",
      "architecture": {
        "value": "Arm64EC",
        "strategy": "external"
      },
      "environment": {
        "CXXFLAGS": "/arm64EC",
        "CFLAGS": "/arm64EC"
      }
    }
  ]
}
This adds the Arm64EC-release configuration. Additionally, you added two environment variables: CSSFLAGS and CFLAGS. After these changes, Visual Studio adds the Arm64EC build platform, which builds the app for the Arm64EC architecture.
Performance Testing
To evaluate the performance gain, you must implement two helper functions for measuring the code execution time:
double msElapsedTime(chrono::system_clock::time_point start) {
    auto end = chrono::system_clock::now();

    return chrono::duration_cast<chrono::milliseconds>(end - start).count();
}
Then, add the function performanceTest. It calculates a product of two pseudo-randomly generated matrices and measures the execution time. The execution time is then printed to the console:
void performanceTest(int size, int trialCount) {
    double** matrix1, ** matrix2, ** product;

    auto start = now();

    for (int i = 0; i < trialCount; i++) {
        matrix1 = generateRandomSquareMatrix(size);
        matrix2 = generateRandomSquareMatrix(size);

        product = squareMatrixProduct(matrix1, matrix2, size);

        releaseSquareMatrix(matrix1, size);
        releaseSquareMatrix(matrix2, size);
        releaseSquareMatrix(product, size);
    }

    auto elapsedTime = msElapsedTime(start);

    cout << "Matrix size: " << size << "x" << size
        << ", Trial count: " << trialCount
        << ", Elapsed time [s]: " << fixed << setprecision(2) << elapsedTime / 60 << endl;
}
The performanceTest function accepts the additional parameter, trialCount. The latter specifies how many times to repeat the calculations.
Finally, you invoke the performanceTest method in the main function. Note that trialCount is read from the command arguments:
int main(int argc, char** argv)
{
    //simpleTest();

    // Performance testing
    if (argc < 2)
    {
        cout << "Trial count is missing." << endl;
        return 0;
    }

    const int szCount = 5;
    int size[szCount] {100, 200, 300, 400, 500};

    int trialCount = stoi(argv[1]);

    for (int i = 0; i < szCount; i++) {
        performanceTest(size[i], trialCount);
    }

    cout << endl;

    return 0;
}
The above code runs matrix multiplications the number of times specified by trialCount for matrices of different sizes:
- 100x100
- 200x200
- 300x300
- 400x400
- 500x500
After running the app for different build targets (x86, x64, Arm64EC), you should see the following results:
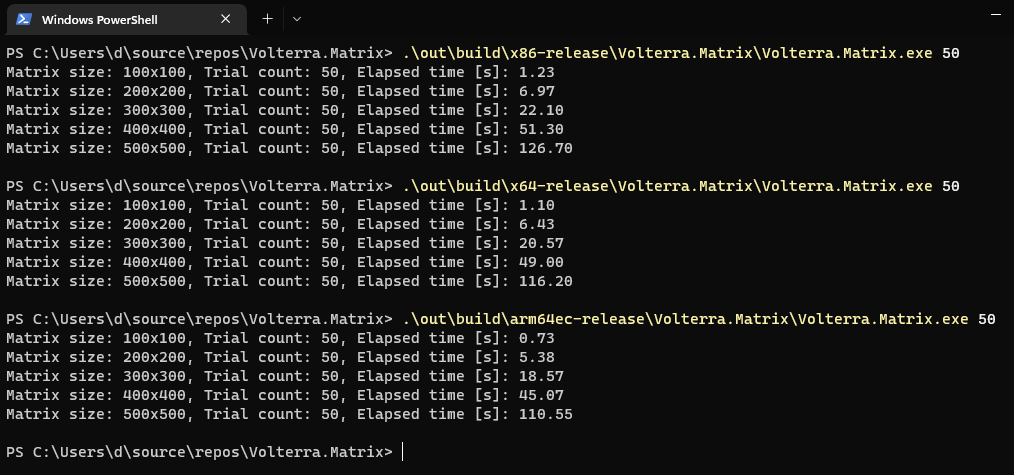
There is a noticeable computation time reduction by switching architectures from x64 to Arm64EC. The best performance improvement is noticeable for the smallest matrices (close to 50 percent). For large matrices (500x500), you get around a 5 percent improvement in speed.

You can start porting over the dependencies you need to improve performance. For example, any computationally intense dependency can be ported to improve performance.
In practice, you must modify your CMakeLists.txt file only to build the source code being ported for Arm64EC. All other dependencies are included as shared libraries.
Summary
This article described the Arm64EC architecture, then demonstrated how to configure the Windows Dev Kit 2023 for Visual Studio development. It also showed how to use this environment to implement a C++ application and then how to implement it on an Arm64EC device. Finally, it confirmed the performance boost by switching from x64 to Arm64EC on an Arm-powered device.
Naturally, you achieve the best performance if you switch entirely to Arm64 native. However, this is only sometimes possible as the app might contain many dependencies. Arm64EC enables making an intermediate step that uses your existing x64 dependencies and only ports critical parts of the app to Arm. For a more general description, you can read this blog post, Load x64 Plug-ins (like VSTs) from your Arm Code using Arm64EC.
Of course, Arm64 will provide the best performance boost. Switching to Arm64 is straightforward, provided your app and dependencies can be compiled for Arm64.
Try Arm64EC on Windows 11 and use the Windows Dev Kit 2023 as a cost-effective way to test your app on Arm64 devices running Windows.