
How to Setup CodeProject.AI Server on a Raspberry Pi with Home Assistant OS
5.00/5 (12 votes)
In this article, I'm going to set up Home Assistant OS on a Raspberry Pi 4, then use CodeProject.AI Server to detect a person, and then have Home Assistant send a notification with an image to a mobile phone.

In a previous article, I demonstrated how to install Home Assistant Container on Windows. In that article, I discuss how both installing Home Assistant Container and installing on Windows are not the optimal choices for Home Assistant. The ideal setup for Home Assistant is on a dedicated Linux device. So that's what I'm going to do. In this article, I'm going to set up Home Assistant OS on a Raspberry Pi 4, then use CodeProject.AI Server to detect a person, and then have Home Assistant send a notification with an image to a mobile phone.
- Setting up the Miuzei Case
- Setting Up Home Assistant OS on Raspberry Pi 4
- Setting up CodeProject.AI Server and a Wyze Cam
- Setting up CodeProject.AI Server on Home Assistant OS
- Detecting a Person and with CodeProject.AI Server, and Sending a Snapshot to Your Phone
My Setup
This setup is a little unusual. When I started writing this article, I wanted to put absolutely everything on the Raspberry Pi: Home Assistant OS, CodeProject.AI Server, Debian, Agent DVR, and Docker. And you can "almost" do that. The problem lies within the Home Assistant setup. If you want to use Home Assistant OS (which is by far, the most widely used version), you have to flash the microSD to put the Home Assistant Operating System on there. And then that's it. You aren't installing anything else on there that you can't incorporate as an integration in Home Assistant.
Because Home Assistant OS is so widespread, this time, I want to install Home Assistant OS on my Raspberry Pi 4. This means that CodeProject.AI Server will be installed on my Windows machine, and I'm also going to run Docker Desktop on my Windows machine to include docker-wyze-bridge, so I can use my Wyze Cam v3. I actually already wrote part of the article to set up Debian on a Raspberry Pi, do a headless install of CodeProject.AI Server on the Pi, install Docker on the Pi, and install Agent DVR on the Pi. These will be broken up into future articles. You can also run CodeProject.AI Server on Docker on the Raspberry Pi, it just isn't the most ideal setup. But I'll demonstrate that in another article. I'll also probably do an article where I set up Home Assistant Core in a Python virtual environment.
But for this article, I'm using:
- CodeProject.AI Server. If you need help installing CodeProject.AI Server, please see my guide to Installing CodeProject.AI Server.
- A Wyze Cam v3. If you need help installing a Wyze Cam v3, please see my guide to Setting up your Wyze Cam.
- Docker Desktop. If you need help setting up Docker, please see my guide to installing Installing Docker Desktop.
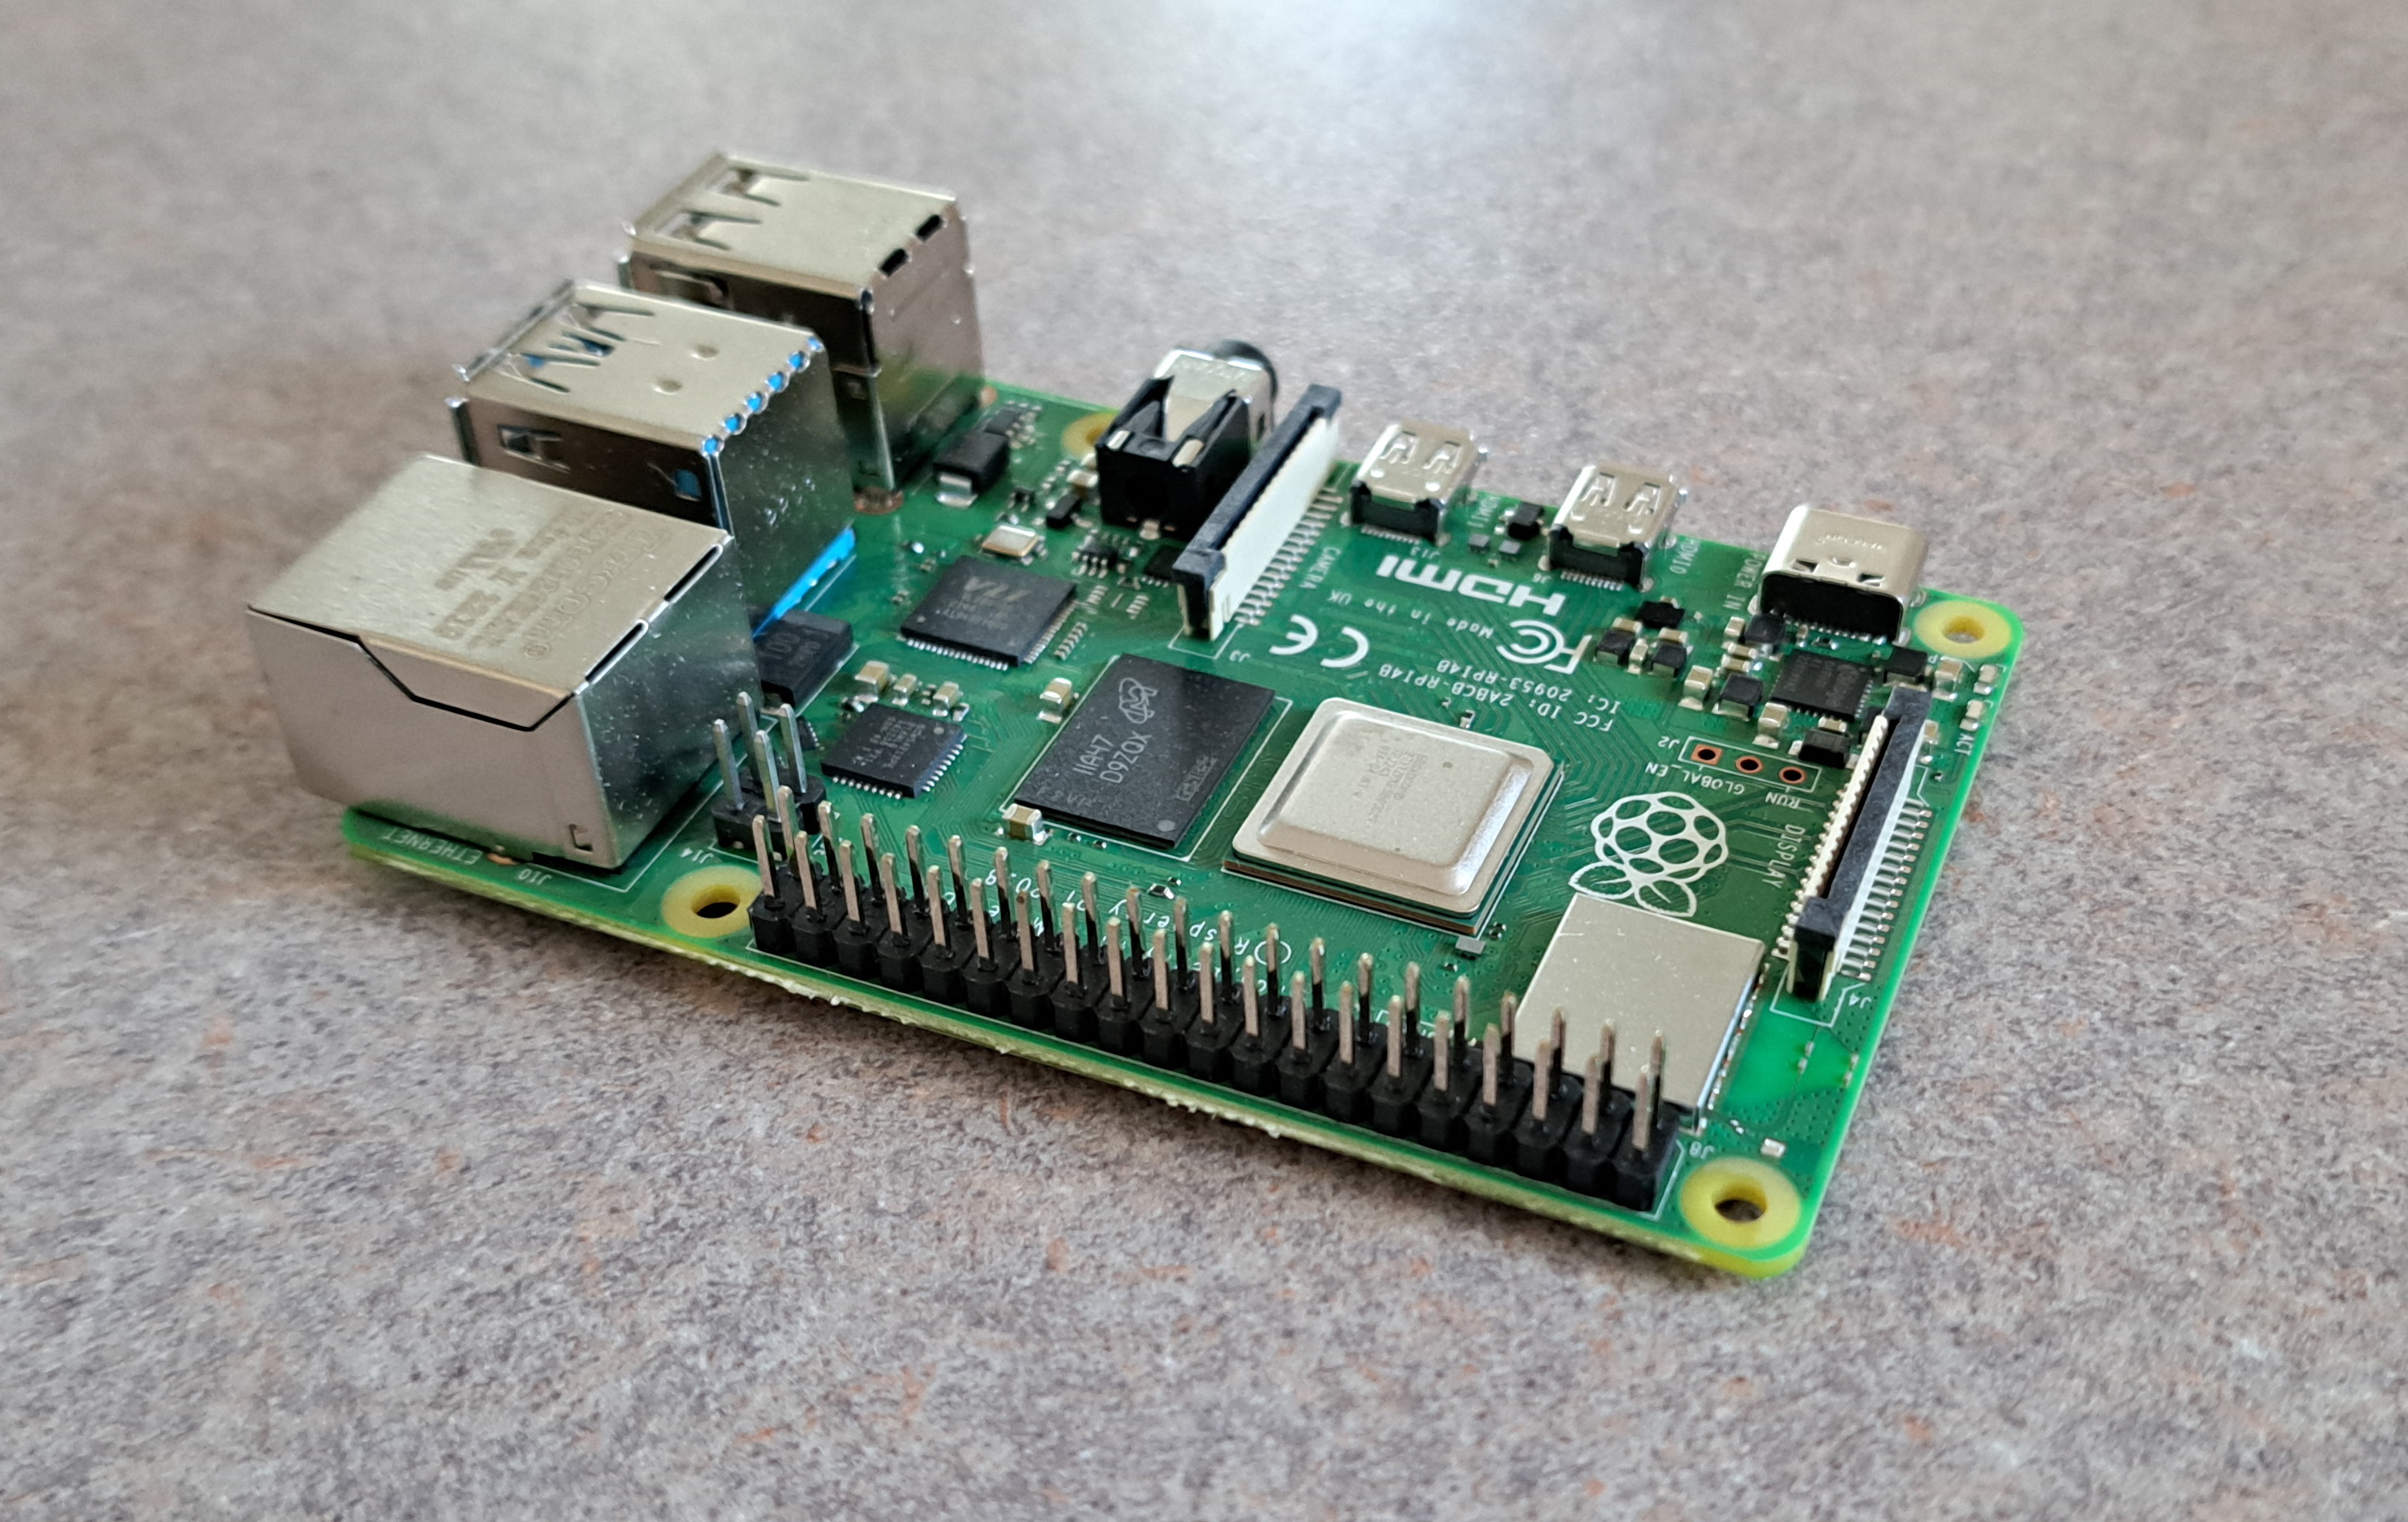
- Raspberry Pi 4. I am using Model B, Quad Core 64-Bit (4 GB). I got mine off Amazon.ca for $270.33 CAD.
- Miuzei Case for Raspberry Pi 4. I got mine off Amazon.ca for $17.00 CAD.
- A microSD storage card - You might have a camera that has one of these, but I didn't. I got mine off of Amazon for $9 USD.
- A microSD Card Reader - Most microSD cards come with an adapter, but you will also need a microSD card reader because you need to write to it. Got mine off Amazon for $8 USD.
- An ethernet cable.
Setting up the Miuzei Case
The Miuzei Case comes with a small Installation Instructions sheet, but in this article, I provide my own step by step guide. If you prefer video, this YouTube video by Steven Wang is quite good.
One reason for getting a case with a fan for your Raspberry Pi 4 is the same reason why any computer processor has a fan on it -- it gets hot. The other reason for getting a case accessory is that the Raspberry Pi 4 doesn't come with a power supply, and a Pi case typically does.

The first step in the installation guide is to remove the protective film off the top and bottom layer. This actually skips a couple of steps. First, remove the case from the packaging. Then because the case comes assembled, remove the screws and washers from the case. The Miuzei case comes with a little screwdriver, in case you don't have one. Each screw has a washer at the base. Simply turn the screw until the washer is free, then you can pull the screw out. I actually held the washer with my finger while unscrewing, it's not tightly secured.

You'll notice the case is in layers, like a pillow fort. The order of these layers actually matters, so try to keep the order in mind as we proceed. The next step is to remove the protective film from the top and bottom layers. Only remove those layers from the stack, then peel off the protective films on both and discard the film.

The piece that has the slits in it that kind of look like a face is the bottom. Now take the next two layers and place them on top of the bottom piece. You'll know which piece is the next piece because it has styrofoam stuck in it.

Now place the Raspberry Pi 4 in the layers. Notice how that second layer kind of builds a little platform for the Pi to rest on. Place the Raspberry Pi so that the side of the Pi with the USB and ethernet ports rests on top of the slits in the case (for ventilation, I assume).

Put on the next layer. This one is a little tricky, but there's only one way where it will fit on the Pi. If it looks like you can put it on that way, then it's correct. If it looks like some of the plastic is going to hit something, that's the wrong way.

It's heat-sink time. There should be four heat-sinks in a little baggy. The big one is for the CPU (that's the big metal square in the middle, next to the Raspberry Pi logo), the RAM (the black rectangle next to the CPU), and then two little ones for the Ethernet Controller and USB chips (the two little black squares next to the ports). Each heat-sink has adhesive on the back. The Amazon picture is much more descriptive than my own, so it's displayed above. Simply peel off the adhesive and stick the heat-sinks to their appropriate slots as shown above. The adhesive part is actually quick thick, so take care when you peel off the plastic. Don't rip off the adhesive. This might actually be tricky if you have big, thick fingers. I have dainty, piano fingers and I had trouble placing the heats sinks. Good luck.

Now add the next layer. There's only one correct way to place this on as well, with the big hole going over the ethernet port.

The next layer is clear, and connects the fan. Remove the fan and its screws from the little baggy. There's only one way for the layer to fit, and you want to put the side of the fan with the sticker that says "fan cooling" on it, face down. Shove the wires through that round hole. Put the screws through the holes, then put each washer in from the bottom one at a time, which pops the screw up a bit, then hold the washer while you tighten the screw.

OK, it's connector time. This part is a little tricky. Here's a screenshot of the video by Steven Wang. I like his image the best. Notice how in the image, the Raspberry Pi symbol is upside down. The Raspberry Pi site actually has a great GPIO Pinout Diagram if you want to see what each of these pins are, but for now, understand that we're putting the black wire on the third pin from the right on the bottom row, which is a Ground, and the red wire on the second pin from the right on the bottom row, which is the 5V power. I'm not actually sure what to say about what to do with the wires themselves, once you've plugged into the pins. No matter what you do, the wires are kind of in the way. I tried to shove them under the layer the fan is connected to, but it didn't work very well. They're just a pain.
Now put the next two layers on the stack. There's only one way for them to go on.

Finally, put on the top layer, put in the screws, put the washers at the bottom then finger-tighten them on, and hold the washer with your finger as you tighten the screws. The correct way to put on the last layer is to line up the long rectangular space with the GPIO pin board, so you can easily plug other things in here in the future.
And that's it! You've assembled the Miuzei Case for Raspberry Pi 4. You can also put those little nubs on the bottom of the case - I'm assuming - so the Pi doesn't slide around or damage any surfaces. But that's not how I roll, so I'm leaving the nubs alone.
Setting Up Home Assistant on Raspberry Pi 4
There are several installation possibilities for Home Assistant: Home Assistant Operating System (Home Assistant OS, or HAOS), Home Assistant Container, Home Assistant Supervised, and Home Assistant Core. In previous articles, I've installed Home Assistant Container. My impression is that with Home Assistant Container and other installs of Home Assistant, you can do everything Home Assistant OS can do (the recommended installation method), it just may take more steps to do what you want. Home Assistant OS comes with Supervisor, which is an integration that allows you do easily install other add-ons. This is where the Raspberry Pi 4 comes in, because the ideal setup for HAOS is on a dedicated Linux system. So let's get started.
One note: This is not the most ideal hardware setup for Home Assistant OS on a Raspberry Pi 4. Ideally you would use an SSD with USB 3.0 Adapter, a decent USB-C to SATA cable, and possibly a better Raspberry Pi power supply, and you'll have a much more efficient setup. I'm simply using what I had on hand for demonstrative purposes.

The first step is take the microSD and plug it back into the microSD reader.
Then go to the Home Assistant installation page, and click Raspberry Pi.
In order to install Home Assistant OS to the Pi, we need to flash the OS image to the microSD card. A popular program for this is called balena Etcher. Go to the balena Etcher page. I'm on Windows so under the "Download Etcher" table of assets, I click "Etcher for Windows (x86|x64) (Installer). For me, this downloads the file balenaEtcher-Setup-1.18.4.exe. Right-click on file and select Run as Administrator.

Accept the license and balena Etcher automatically installs.

Click Flash from URL.

Go back to the Home Assistant installation page, scroll down to the section Writing the image with Balena Etcher and copy the URL of the Raspberry Pi 4 image. For me, this is https://github.com/home-assistant/operating-system/releases/download/10.0/haos_rpi4-64-10.0.img.xz and paste it into balena Etcher. Then hit OK.

balena Etcher downloads the image, then asks where you want to put it. Plug the microSD reader into the PC and click Select target. For me, this is the 32 GB microSD. Hit Select 1.

Finally, hit Flash!.
balena Etcher Error - Attention Something Went Wrong
*Sigh*. The road to Home Assistant is not always easy, my friends. The first time I tried to install Home Assistant, I spent a week trying to set up a virtual machine so I could install Home Assistant OS "on Windows." I failed. While installing Home Assistant Container, I could not find my haconfig folder after I created the Docker container. Now balena Etcher won't copy the Home Assistant OS image to my microSD card.
It says:
Attention. Something went wrong. if it is a compressed image,
please check that the archive is no corrupted. Command failed: cmd /c
"C:\Users\AppData\Local\Temp\etcher\balena-etcher-electron-78afb6aee66.cmd"
Some of you lucky few may not experience errors or blocks while setting up Home Assistant. For the rest of us, Google the error. If that fails, there are some great resources with oddly kind and dedicated people to help. For Home Assistant, I use:
- The Home Assistant subreddit - I find gets the fastest and best help.
- The Home Assistant Community forums - Great resource. Super knowledgeable people. Slightly less responsive in my limited experience.
I Googled this error. On the balena forums, I found a long thread from 2020 filled with people with a similar / the same issue. Seven days prior to my query, one user responded that they downloaded the first image instead of pointing to the Git URL. Let's try that.

Take the URL https://github.com/home-assistant/operating-system/releases/download/10.0/haos_rpi4-64-10.0.img.xz and put it into a browser window. It automatically downloads. Go back to balena Etcher. Only this time, select Flash from a file instead of from a URL. Select the haos_rpi4-64-10.0.img.xz that downloads automatically.

Bam! Worked automatically. Thank you, user DirkJam from the balenaEtcher forums. Thank you. As soon as balena Etcher says, "Flash Completed!" the Home Assistant OS image has been successfully flashed to the microSD.

As a quick aside, after you put a Linux OS on the microSD, whenever you plug the microSD reader into the PC, a Windows warning pops up. "You need to format the disk before you can use it." If you look at the drive in Windows explorer, the size of the disk will also be wildly incorrect. Windows simply doesn't understand the Linux file system and is freaking out. You can safely close the window.

Remove the microSD card from the reader, and insert it into the microSD slot at the bottom of the Raspberry Pi. Make sure the side with the writing on the microSD card is facing up, then insert.

Now connect the ethernet cable and the adapter that came with the Miuzei case. The adapter gets plugged into the USB-C port. You can't really get this wrong, it won't plug in anywhere else. Turn the Raspberry Pi on.
Go back to the PC and put http://homeassistant.local:8123/ into the browser.
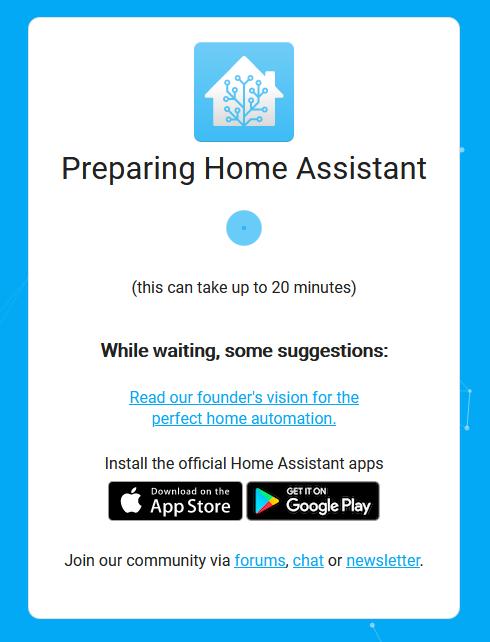
Success! Home Assistant OS is preparing. Just sit tight, it says 20 minutes, but it never takes that long (unless it's not working).

Now it's time to set up Home Assistant OS. Put in a name which also server as a username. I'm calling mine "piha". Then input a password and save both the username and password for later because you'll need them. Then click Create Account.

In the next screen, input what you want to call your home. I call mine, "Home". Then put in the Country, Language, Time/Zone, and Currency. Then hit Next.

The next screen asks what data you want to share. For me, nothing. I hit Next.
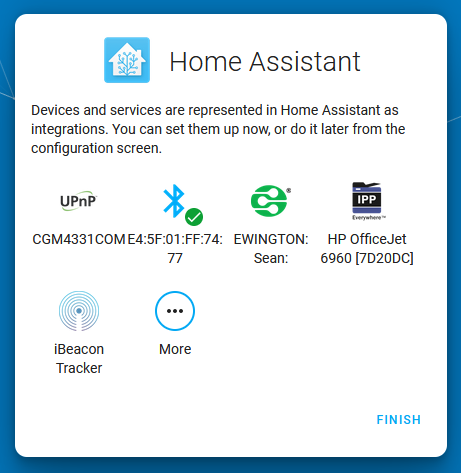
Now Home Assistant wants to know what devices on your network you want to integrate. We can do that later. Probably in another article. Hit Finish.

The first thing we want to do is set up a static IP for Home Assistant. However you decide to install Home Assistant on your Pi, it's a good idea to set up a static IP. Home Assistant's purpose is to connect to multiple devices and services and many times this connection process requires an IP address, because http://homeassistant.local:8123/ isn't going to work every time. To set up a static IP for Home Assistant, go to the Settings on the left-hand panel. Then go to System.

Then click Network.

Because I'm connected over ethernet, I'm looking under the eth0 tab. If you were using a wireless connection, you would be looking in the wlan0 tab. Click IPv4 to show the IPv4 network interfaces options.
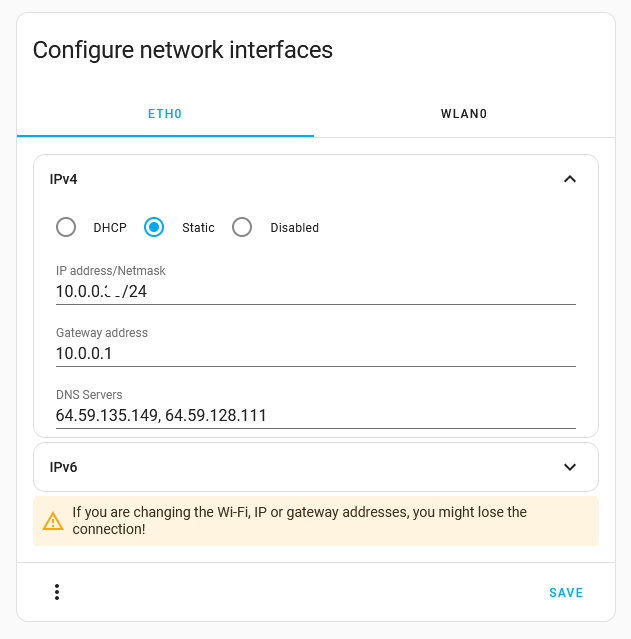
Click Static. This is where you can input the static IP address in the IP address/Netmask field. For most people, this is something like 192.168.0.001. You can change the 001 to whatever you want, though it is recommended to choose a number higher than 100 in case your router has chosen smaller numbers for other items.
For me, I'm going to use the IP address that popped up automatically. The /24 simply indicates the IP address is running 24 hours. Next is the Gateway address field. For most people, it is something like 192.169.0.1. I can see that Home Assistant has inputted this correctly already. I'm also going to leave the DNS Servers field the same, because Home Assistant is clearly a good guesser. Hit Save.
Now close the tab, and input staticIP:8123 into your browser, where staticIP is the static IP we just established. And use your credentials to log in.
Setting up CodeProject.AI Server and a Wyze Cam

Before we set up CodeProject.AI Server in Home Assistant OS, we need to make sure CodeProject.AI Server (and in my case, a Wyze Cam v3) are already set up to be used with Home Assistant OS. As I mentioned at the start of the article, in this article, I'm going to set up CodeProject.AI Server on Windows, and then use Docker Desktop to run docker-wyze-bridge from that same Windows machine. You could install CodeProject.AI Server on the Raspberry Pi directly, or install Docker on the Raspberry Pi and run both CodeProject.AI Server and docker-wyze-bridge in containers there, but for this article, I wanted to use Home Assistant OS, which means Home Assistant OS is the only thing I can install on the Raspberry Pi 4 that isn't a Home Assistant add-on or integration. Everything is on the same network, so it all works fine. Some services are simply running on different devices.
Installing CodeProject.AI Server, setting up Docker Desktop, and setting up docker-wyze-bridge are all things I have done in previous articles. So I won't repeat them in this article. But here are the links to set them all up, if you need them.
- How to Install CodeProject.AI Server on Windows
- How to Install Docker Desktop on Windows
- How to Create a docker-compose.yml File for docker-wyze-bridge
- Setting Up docker-wyze-bridge with Docker Compose
In the next section where we set up CodeProject.AI Server on HAOS, all these items need to be switched on and running at some point or another, so you might as well start running them all now.
Setting up CodeProject.AI Server on Home Assistant OS
One quick step we need to do first is set up my Wyze Cam v3 in Home Assistant. In the previous section, I created a container on my Windows machine for docker-wyze-bridge, which is how to use a Wyze Cam with any version of Home Assistant. Obviously if you don't have a Wyze Cam, you don't need to do any of this. But I do have a Wyze Cam, so here goes.

Go to Settings -> Devices & Services -> + Add Integration.

Start typing "camera" and then select Generic Camera.
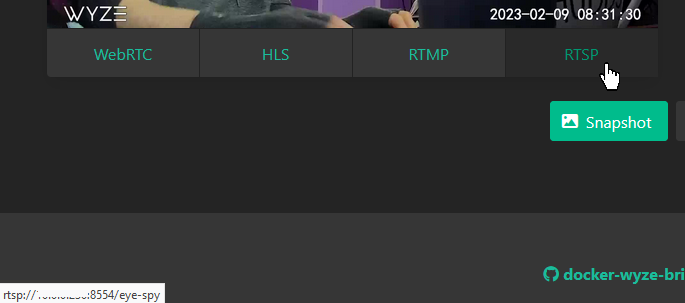
Now go back to the docker-wyze-bridge tab. Hover over RTSP, right-click, and Copy Link. It should look something like rtsp://ipaddress:8554/cameraname. That's what you need for the Stream Source field in Home Assistant.

Now go back to the docker-wyze-bridge tab. Click on the Camera details icon.

Scroll down to snapshot_url. You should see snapshot/cameraname.jpg. But this is just the end of the URL. It should actually be http://ipaddress:5001/snapshot/cameraname.jpg. That's what you need for the Still Image field in Home Assistant.

Back to the Home Assistant tab. This is what your final Generic Camera settings looks like. For RTSP transport protocol, choose TCP. For Authentication, choose basic. Under Username, put the username you created for the Wyze Cam itself, not your Wyze email account, and then for Password put in this same password. Uncheck Verify SSL certificate. Hit Submit.

If all goes well, a Preview shows up, asking if the image looks good. Check the box, hit Submit, then Finish.

Now click Overview in the Home Assistant settings on the left, and there we go. The Wyze Cam v3 is now added to Home Assistant OS. This is important to do first because later, we need the camera entity for setting up CodeProject.AI Server. So let's start setting up CodeProject.AI Server with Home Assistant OS.
CodeProject.AI Server is available in Home Assistant as a custom repository. In order to add a custom repository to Home Assistant, you need the Home Assistant Community Store (HACS). However, when you install Home Assistant OS (unlike Home Assistant Container or Home Assistant Core) it's not so easy to add HACS because you don't have a command line. So in order to get CodeProject.AI Server working as a custom repository, we need to install an SSH add-on, configure it, then get to the SSH command line, then run the HACS download script.
These extra steps to get the Home Assistant Community Store on Home Assistant OS are amusing because one of the reasons you install HAOS is because Supervisor and the Add-on store make most things easier.

The first step is to go to the Add-on store. Under Settings, click Add-ons. Then click on the Add-on Store button in the bottom-right.

In the Search bar, type "ssh". Then select SSH & Web Terminal.

Then hit Install.

Once the display changes to show the settings options, it's installed. Then click the Configuration tab at the top.
This add-on does not expose configuration for you to mess with...
When I clicked this the first time, I got an error: "This add-on does not expose configuration for you to mess with..." If this happens, refresh your browser tab.

In username, put the username you use for Home Assistant. For me, this is piha. Then remove the quotations from the password field and put in the password for Home Assistant. You can also generate an SSH key and put it in the authorized_keys field, but I'm not going to do that here. If someone needs help with that, please let me know in the comments below. Hit Save. Then click on the Log tab, then hit Refresh.

Now go back to the Info tab and hit Start. If it works, a Hostname, CPU and RAM usage displays.

From here, you can either click Open Web UI to open the terminal, or if Show in sidebar is turned on (which it is for me), you can click Terminal in the left navigation menu. I'm clicking Terminal. Finally. We made it to the command line.
wget -O - https://get.hacs.xyz | bash -
Now it's time to run the HACS download script. In the now open terminal, input wget -O - https://get.hacs.xyz | bash -, where -O is an "O" as in "Open", not a zero.

If everything goes well, HACS is successfully installed.

In order to use it, we need to restart Home Assistant. So go to the Developer Tools in the left navigation pane, then click Restart.

A dialogue appears asking if you simple want a quick reload, or to restart Home Assistant. Click Restart Home Assistant, and hit Restart again.
From here, click on Settings, then Devices & Services. Then click on the button in the bottom-right + Add Integration.

Now the Home Assistant Community Store is available from the search. Type in "HACS" then select it.

This window appears that asks you to acknowledge a series of items. Check all the boxes and hit Submit.

A waiting for device activation screen pops up. Make sure you are logged into GitHub, then click the link https://github.com/login/device and copy the activation key.

In the next window, paste in the activation key.

Then click Authorize hacs.

That's it! We should be all set for HACS.

Go back to the Home Assistant tab and you should see a success screen. Select the Area you want to use HACS for. My only camera is in my Office so I added an area called "Office" and hit Finish.
Now we need to restart Home Assistant again. Go to the Developer Tools in the left navigation pane, then click Restart. Then Restart Home Assistant, and hit Restart again.

Now we can finally integrate CodeProject.AI Server into Home Assistant. Click on the new HACS tab in the left-hand navigation, then click Integrations.

On the top right-hand corner, click on the three dots to bring down the integrations dropdown, and select Custom repositories.

In the Repository field, input the URL for the CodeProject.AI-HomeAssist-ObjectDetect repository, which is https://github.com/codeproject/CodeProject.AI-HomeAssist-ObjectDetect. Then from the Category dropdown, select Integration. Then click Add.

Now under the Integrations tab in HACS, a new repository appears. That's us! Click CodeProject.AI Server object custom integration.

Then, in the bottom-right, click Download to install it.

A dialog appears that kindly reminds, "Remember that you need to restart Home Assistant before changes to integrations (custom_components) are applied." Thanks Home Assistant HACS Integrations! But not just yet. Click Download to finish the download and install of the repository.

Before we restart Home Assistant again, we need the File Editor add-on to edit the configuration.yaml file to get CodeProject.AI Server working. We're going to have to restart Home Assistant to use the File Editor, so we might as well save ourselves one restart. Go to the Settings on the left navigation pane, then select Add-ons. Then click on Add-on Store button in the bottom right, and type "File Editor" into the Search field. Click on File editor when it appears. Then click Install.
When the installation is complete, now we can restart Home Assistant again. Go to the Developer Tools in the left navigation pane, then click Restart. Then Restart Home Assistant, and hit Restart again.

Now go back to Settings -> Add-ons -> Add-on Store and select File editor from the list, or type it in the Search field if you can't see it. Make sure that Start on boot, and Show in sidebar are toggled on, then click File Editor in the left pane.

First, click on the folder icon, which is the Browse Filesystem button. While we're here, before editing the configuration.yaml file, we need to create a www folder, which is where we store the snapshots that we'll use to send to Home Assistant app on our phone, when a person has been detected.

To do this, click the New Folder button.

Input "www" as the New Folder Name, then hit OK. Now select configuration.yaml.
# Loads default set of integrations. Do not remove.
default_config:

# Load frontend themes from the themes folder
frontend:
  themes: !include_dir_merge_named themes

# Text to speech
tts:
  - platform: google_translate

automation: !include automations.yaml
script: !include scripts.yaml
scene: !include scenes.yaml
This is the default configuration.yaml for Home Assistant. In order to set up CodeProject.AI Server in Home Assistant, we need to add to this file. Here are the additions we want to add to configuration.yaml.
image_processing:
  - platform: codeproject_ai_object
    ip_address: localhost
    port: 32168
    # custom_model: mask
    # confidence: 80
    save_file_folder: /config/www/
    save_file_format: png
    save_timestamped_file: True
    always_save_latest_file: True
    scale: 0.75
    # roi_x_min: 0.35
    roi_x_max: 0.8
    #roi_y_min: 0.4
    roi_y_max: 0.8
    crop_to_roi: True
    targets:
      - target: person
      - target: vehicle
        confidence: 60
      - target: car
        confidence: 40
    source:
      - entity_id: camera.local_file
A few of notes about this. First, you'll note that ip_address is set to localhost. This might work, but I doubt it. Home Assistant OS is running on its own static IP, which we established earlier. It may default to that static IP, but we need ip_address to be the IPv4 address our router is using. If you do not know your IP address, go to the Start button in Windows and start to type "CMD" then select Command Prompt. Then, type ipconfig. The address you want is the IPv4 Address. Next, you need to change the entity_id to the entity for your camera. I'll show you how to do that. Finally, traditionally save_file_folder: /config/www/ should be save_file_folder: /config/snapshots/. But later in the article, we're sending a snapshot from the camera to our phone and www is the folder that's required to make the image available to the internet, so we might as well save ourselves a step now.
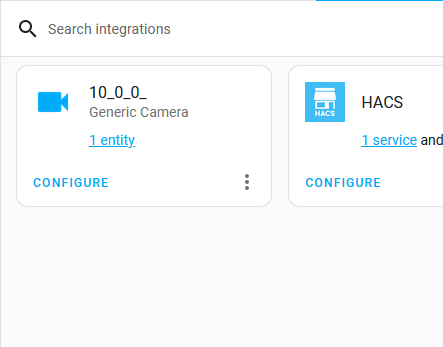
This is why we started this section adding our Wyze Cam to Home Assistant OS. Go back to your Home Assistant tab in your browser. Then go to Settings, Devices & Services, and look for your Generic Camera. Click on the entity link. For me this says 1 entity.

Your camera Entity ID is listed under Entity ID. For me this is camera. then some variation of my IP address, so camera.ipaddress. Copy this value, go back to Visual Studio Code and paste it in to configuration.yaml replacing camera.local_file.

So knowing all that, make sure ip_address and entity_id are updated in configuration.yaml then hit the Save button.
Now we need to restart Home Assistant again. Go to the Developer Tools in the left navigation pane, then click Restart. Then Restart Home Assistant, and hit Restart again.
OK! With the exception of setting up Home Assistant Companion, the Home Assistant phone app, we've done everything we need to set up CodeProject.AI Server in Home Assistant, and prepare it to detect a person, and send a notification and image to our phone when a person is detected.
Detecting a Person and with CodeProject.AI Server, and Sending a Snapshot to Your Phone
Now that we've set up CodeProject.AI Server with Home Assistant OS, let's use it for a very practical application. In this section, we'll use CodeProject.AI Server to detect a person, and then send a notification to Home Assistant Companion (the Home Assistant phone app) that includes an alert message, and a picture of the person detected.
I actually already have an article where I demonstrate how to perform this notification with Home Assistant Container, running in a Docker container on Windows. I created this article because the original version of this article was getting exceedingly long, and I wasn't even sure when I started writing it, 'if' I could detect a person, and send an image and notification to my phone. So I created that article to test the concept before using it here. You can read that article if you want, but I'm going to be copying the relevant images and text here, so you don't have to.
But because I already wrote that article, I don't want to copy out the section where you set up Home Assistant Companion on your phone. Maybe you already have it set up on your phone. If you don't, simply follow the section of that article Setting Up the Home Assistant Phone App. Of all the things we do with Home Assistant in the article, it's the simplest. The point of this process is to give Home Assistant OS your phone as an entity, which you can use as a Device and Action in Home Assistant.
First, we need to establish the codeproject_ai_object service in Home Assistant. I'm not actually sure if we have to do this. But the first time you call the image_processing service, which is the service you use to get CodeProject.AI Server to detect objects from an image, the targets_found summary comes back blank. To make sure I get the notification on my phone, I want to make sure image_processing is working properly.

To start this process, open CodeProject.AI Server if you haven't already by putting http://localhost:32168/ in your browser. Remember, in this example, CodeProject.AI Server is installed and running on my Windows machine. For this, all we really need is Object Detection (YOLOv5 6.2), so I click the ... next to all the other services, and select Stop.

Now go back to the Home Assistant tab and go to Developer Tools, then click on the Services tab. In the Service field, type "image" and then select Image processing: Scan. Then click on the Choose entity button and select codeproject_ai_object from the list. Finally, hit Call Service. A little green check mark appears, indicating an attempt to call the service has occurred.
But alas, when I went to the States tab to see if image_processing.codeproject_ai_object was working, there was nothing targets_found: summary: {}, no matter how many times I called the service. Once again, I started troubleshooting the error.
socket.gaierror: [Errno -2] Name does not resolve
Here is the full log error from Home Assistant, home-assistant.log, which can be found from File Editor in the left navigation pane, in the same place we edited configuration.yaml, by clicking the Browse Filesystem button.
2023-04-28 09:33:30.468 ERROR (MainThread) [homeassistant.helpers.entity] Update for image_processing.codeproject_ai_object_10_0_0 fails
Traceback (most recent call last):
  File "/usr/local/lib/python3.10/site-packages/urllib3/connection.py", line 174, in _new_conn
    conn = connection.create_connection(
  File "/usr/local/lib/python3.10/site-packages/urllib3/util/connection.py", line 72, in create_connection
    for res in socket.getaddrinfo(host, port, family, socket.SOCK_STREAM):
  File "/usr/local/lib/python3.10/socket.py", line 955, in getaddrinfo
    for res in _socket.getaddrinfo(host, port, family, type, proto, flags):
socket.gaierror: [Errno -2] Name does not resolve

During handling of the above exception, another exception occurred:

Traceback (most recent call last):
  File "/usr/local/lib/python3.10/site-packages/codeprojectai/core.py", line 103, in post_image
    return requests.post(url, files={"image": image_bytes}, data=data, timeout=timeout)
  File "/usr/local/lib/python3.10/site-packages/requests/api.py", line 115, in post
    return request("post", url, data=data, json=json, **kwargs)
  File "/usr/local/lib/python3.10/site-packages/requests/api.py", line 59, in request
    return session.request(method=method, url=url, **kwargs)
  File "/usr/local/lib/python3.10/site-packages/requests/sessions.py", line 587, in request
    resp = self.send(prep, **send_kwargs)
  File "/usr/local/lib/python3.10/site-packages/requests/sessions.py", line 701, in send
    r = adapter.send(request, **kwargs)
  File "/usr/local/lib/python3.10/site-packages/requests/adapters.py", line 565, in send
    raise ConnectionError(e, request=request)
requests.exceptions.ConnectionError: HTTPConnectionPool(host='http', port=80): Max retries exceeded with url: //10.0.0:32168/v1/vision/detection (Caused by NewConnectionError('<urllib3.connection.HTTPConnection object at 0x7f9fd21990>: Failed to establish a new connection: [Errno -2] Name does not resolve'))

During handling of the above exception, another exception occurred:

Traceback (most recent call last):
  File "/config/custom_components/codeproject_ai_object/image_processing.py", line 365, in process_image
    predictions = self._cpai_object.detect(image)
  File "/usr/local/lib/python3.10/site-packages/codeprojectai/core.py", line 209, in detect
    response = process_image(
  File "/usr/local/lib/python3.10/site-packages/codeprojectai/core.py", line 122, in process_image
    response = post_image(url=url, image_bytes=image_bytes, timeout=timeout, data=data)
  File "/usr/local/lib/python3.10/site-packages/codeprojectai/core.py", line 108, in post_image
    raise CodeProjectAIException(f"CodeProject.AI Server connection error, check your IP and port: {exc}")
codeprojectai.core.CodeProjectAIException: CodeProject.AI Server connection error, check your IP and port: HTTPConnectionPool(host='http', port=80): Max retries exceeded with url: //10.0.0:32168/v1/vision/detection (Caused by NewConnectionError('<urllib3.connection.HTTPConnection object at 0x7f9fd21990>: Failed to establish a new connection: [Errno -2] Name does not resolve'))

During handling of the above exception, another exception occurred:

Traceback (most recent call last):
  File "/usr/src/homeassistant/homeassistant/helpers/entity.py", line 550, in async_update_ha_state
    await self.async_device_update()
  File "/usr/src/homeassistant/homeassistant/helpers/entity.py", line 755, in async_device_update
    raise exc
  File "/usr/src/homeassistant/homeassistant/components/image_processing/__init__.py", line 193, in async_update
    await self.async_process_image(image.content)
  File "/usr/src/homeassistant/homeassistant/components/image_processing/__init__.py", line 174, in async_process_image
    return await self.hass.async_add_executor_job(self.process_image, image)
  File "/usr/local/lib/python3.10/concurrent/futures/thread.py", line 58, in run
    result = self.fn(*self.args, **self.kwargs)
  File "/config/custom_components/codeproject_ai_object/image_processing.py", line 366, in process_image
    except cpai.CodeProjectAIServerException as exc:
AttributeError: module 'codeprojectai.core' has no attribute 'CodeProjectAIServerException'
I started Googling. I created threads on Home Assistant subreddit and the Home Assistant Community page. No response. Alone and afraid, I sent the error to Matthew. He said, "You may need to open port 32168 on your Windows machine. Or simpler would be to configure CPAI to run on port 80."
Because in my configuration CodeProject.AI Server is running as a service on my Windows machine and not locally on the Raspberry Pi 4, I need to open port 32168 so it can communicate with the Pi. Here's how to you do that on Windows 10.
From the Windows Start button, select Settings. Then select Update and Security. Then select Windows Security from the left navigation pane and click the Open Windows Security button. Then select Firewall and nework protection from the left navigation pane, then Advanced Settings. Click Yes to allow the app to make changes. Now click Inbound Rules.

From here, click New Rule....

We want to create a rule for port 32168, so select Port then hit Next.

Make sure TCP is selected, then in Specific local ports type "32168" and hit Next.

The default selection is Allow the connection which is correct. Hit Next.

Networking is not my forte. I hate it, and it hates me. I'm not 100% sure what the correct selection is here for which networks apply. I'm fairly certain it's just Private which is likely the safest selection and the only one necessary, but I just want this to work, so I checked all these boxes and hit Next.

You can name the rule whatever you want. Probably best to name it something you'll recognize later. I called mine "CPAI Rule". Hit Finish. All right! Now CodeProject.AI Server can be called from Home Assistant OS on my Raspberry Pi 4.

Let's go back to the Home Assistant tab in our browser. If we click Call Service. Now click on the States tab. If this worked, in the Attributes column, there is targets_found: summary: {} and all_objects: - person: 68.036. The first few times you call this service, the summary is blank, but the more you do it, it says something like targets_found: - person: 83.589 and summary: person: 1. It works!
Now it's time for the money. Next we'll set up Home Assistant to send a snapshot to my phone when a person is detected. To do this, we'll set up what Home Assistant calls an Automation. Automations are going to be the cornerstone of everything we do with CodeProject.AI Server. Automations are a series of triggers and actions based on triggers like the date, a device, an MQTT message, a change in state on a device, a webhook, etc. that allow Home Assistant to create an action like, turning off the lights. In this case, we want Home Assistant to trigger when CodeProject.AI Server detects a person, then tells the camera to take a snapshot, which is then sent to the Home Assistant phone app.

In Home Assistant, go back to the Settings tab on the left and click Automations & Scenes. Then click + Create Automation.

Then select Create new automation.

Click +Add Trigger then select Event.

There's actually two ways to create these automations. Home Assistant provides a visual editor if the user doesn't like code, but there's also an option to Edit in YAML if you right-click the three dots in the top-right corner of the Trigger, Condition, or Action. Or you click on the dropdown menu in the top-right of the New Automation to set up the whole automation in YAML. Unfortunately, to send an image to your phone, we're going to have to Edit in YAML every step of the way. So click Edit in YAML.
platform: event
event_type: ""
When you get into the YAML, it is blank because we haven't selected anything. This is what we want to enter:
platform: event
event_type: codeproject_ai.object_detected
event_data:
  name: person
Spacing is important. That's two spaces before name: person. Not one, not three -- two. If you don't put two spaces, it won't work. YAML is very specific. From the CodeProject.AI-HomeAssist-ObjectDetect GitHub, there's a description of what codeproject_ai.object_detected includes in its payload. In this YAML, I've simply indicated the event is looking for a person, but we can also specify the object_type (person, vehicle, animal, etc.), the confidence (the percentage certainty CodeProject.AI Server is about the detection), save_file (the path to the saved annotated image), and more. Check the GitHub page for more information on what is available with codeproject_ai.object_detected for other automation ideas.

Now we need some actions. First, we need to save a snapshot from the Wyze Cam to Home Assistant. So click + Add Action then select Call service.

From the Service drowndown, select Camera: Take snapshot. Then from the Targets field, click Choose entity and from the dropdown select the camera entity for the Wyze Cam we created with docker-wyze-bridge. Finally, in the filename, put /config/www/snapshot.jpg. This is why earlier we created the www folder, so the images could be saved here, and accessed from our phone. This is actually the only Trigger / Action where we can only use the visual editor. If you want it in YAML, it looks like this:
service: camera.snapshot
data:
  filename: /config/www/snapshot.jpg
target:
  entity_id: camera.10_0_0
Where entity_id is the entity id for my Wyze Cam v3, which I got from docker-wyze-bridge in the previous section.

Lastly, we need to send this snapshot to Home Assistant Companion, with a message. So click + Add Action then select Device. From the Device dropdown, select your camera. For me, this is SM-A536W. Then in Message type the message you want to receive when a person is detected. I want something alarmist, so I put "Person detected!" Then under Title put the heading under which you want this message to appear as a push notification on your phone. I'm calling mine "Home Assistant Alert".

Now we need to edit this Action in YAML, so click the dropdown for the Send a notification and select Edit in YAML.
device_id: 656692a0734a65d3ce3df19b31783698
domain: mobile_app
type: notify
message: Person detected!
title: Home Assistant Alert
data:
  image: /local/snapshot.jpg
Add the two lines below title: Home Assistant Alert. Again, there are two spaces before image: /local/snapshot.jpg. There isn't actually a local folder in our Home Assistant config folder, what local denotes is the www, where our images are saved.
That's everything! Hit Save.

Home Assistant then prompts you to name your Automation. I called mine "Person detected", but you can call whatever you want. Hit Save again.
One final automation you might want to add if you're using a Wyze Cam like me is to trigger image_processing on a timer. If you're using software like Agent DVR or Blue Iris, the camera is probably continuously scanning for images. But with our docker-wyze-bridge setup, the camera is just sitting there. Traditionally, you'd use a motion sensor entity that comes with your camera, and set up image_processing to trigger an image scan when motion is detected. But this setup for the Wyze Cam doesn't include a motion sensor entity, so we can create an automation to run image_processing at set intervals.
Click + Create Automation. Then click + Add Trigger.

I'm not sure how often you want to check if there's a person at your door, so I'm arbitrarily selecting 30 seconds.

Now we want to create an action for image_processing. Click + Add Action. Then from the dropdown select Call service. Then, from the Service dropdown, select Image processing: Scan. Then from the Targets field, click Choose entity and from the dropdown select the codeproject_ai_object_camera_ip_address.
If you want to do this in YAML, it looks like this:
service: image_processing.scan
  entity_id: image_processing.codeproject_ai_object_10_0_0
OK, now we're ready. Hit Save, give your Automation a name, then hit Save again. If you created this automation to scan every 30 seconds, just wait 30 seconds. Otherwise, you can go back to the Services tab in Developer Tools to call Image Processing.

Go to the File Editor in the left navigation pane, in the same place we edited configuration.yaml, Browse Filesystem and the www folder, then open up one of the images in there to make sure these snapshots are getting saved. Look at that! Person detected!

Now to check the phone. YES! There's the alert exactly as we wrote it.

Click the little arrow dropdown and you'll see a bigger version of the snapshot.
Well we did it. In this article, we set up Home Assistant Operating System on a Raspberry Pi 4, then added CodeProject.AI Server as a custom repository and used it to detect a person and send a notification to our phone.
There are a lot more applications of CodeProject.AI Server we could do, and a number of automations to set up. This is simply the one I envisioned for this article. In future articles, I'll demonstrate how to setup Home Assistant on the Raspberry Pi 4 using a Python virtual environment, how to set up CodeProject.AI Server directly on the Pi with a headless install, as well as in a Docker container, and I'll try to create different Home Assistant automations along the way. I've also already written articles where I setup CodeProject.AI Server with Home Assistant Container on Windows and on Home Assistant Windows Portable (HassWP).
But since Home Assistant OS is the most popular setup for Home Assistant, I wanted to demonstrate how to set up CodeProject.AI Server on it. And now I have. If you have any questions, please ask them in the comments below.