
Hello World on the PlayStation® Vita: Deploying code to the Vita
4.92/5 (22 votes)
An introduction to the process of deploying code to a PlayStation® Vita
Introduction
On 19 November 2012 Sony announced that its PlayStation Mobile Developer program was out of beta and was officially launching. The program allows developers to make applications and games that target a range of PlayStation certified devices. These include the PlayStation Vita and a number of other Android based devices.
My intention here is to only write a "Hello World" application and get it running on a PS Vita. While I talk about some of the code that is presented with this article this article doesn't focus on the code. Instead my goal is to get document what I needed to do to get a Hello world program running on the Vita, including meeting Sony's requirements for deploying to a device. I encountered a few obstacles to this task. But from a documentation standpoint this is a good thing since this may help other developers more easily avoid the obstacles I ran into.
Requirements
- Windows 7 (Windows 8 not supported)
- PlayStation Mobile SDK (PSM SDK)
- (Optional)PlayStation Certified device
- Familiarity with C#
- Some familiarity with pixel and vertex shaders
- Residence in one of the countries where the SDK is supported
To get started you'll need to have a Windows PC running Windows 7. At the time of this writing Windows 8 is not yet supported. Though Windows 8 is the operating system that I'm using. Having actually PlayStation hardware is somewhat optional. If you are reading this article it's likely you intend to target the Vita. But there are also a number of Android devices that could be targeted as well. Programs written with the PM SDK are written in C#. The PM SDK makes use of Mono; a build of the .Net framework that runs on several non-Microsoft platforms.
Like most app stores, PSM is only supported in a limited number of countries in its initial state. Those countries include USA, Japan, Canada, UK, France, Germany, Italy, Spain, and Australia.
Signing Up
Before getting started you need to have a Sony Entertainment Network account (aka PlayStation Account). I'm skipping over how to sign up for an account since I signed up for mine 5 years ago and don't remember the process (even if I did I don't know that it would be the same). If you already have been using a device in the PlayStation series of hardware chances are you already have an account. Using your account you'll need to sign up for the PlayStation developer program. This is where I encountered my first obstacle. The day I decided to sign up the PlayStation network was down for maintenance. The end time for the maintenance window was pushed forward every few hours and the network didn't actually come back online until Saturday around 2am local time. Once the network was back up I was able to sign up.
Navigate to http://playstation.com/psm and select the option that says "PlayStation® Mobile Developer Program." The "Register" button will be on the next page.

Enter the information requested on the pages that follow and accept the agreement and you'll be ready to download the SDK.
Download and Installation
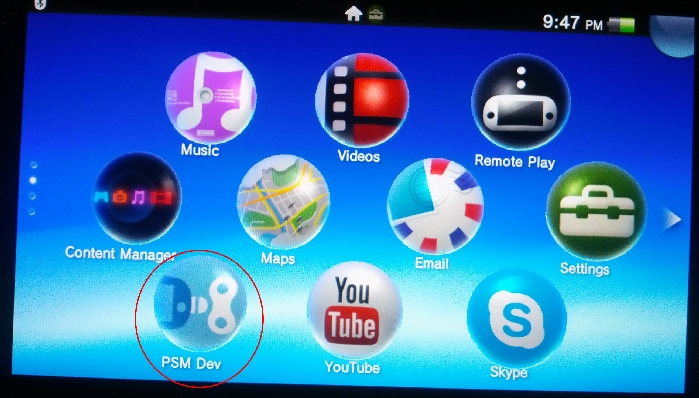
On your PlayStation Vita search for the PSM Mobile Developer Assistant. Any time you are deploying to your device you'll need to ensure that this program is running. I don't mention this explicitly elsewhere. So remember to have it running when you are working with the device.
To download the SDK go to http://playstation.com/psm and click on the link for the PlayStation® Mobile Developer link. Then click on "Sign-in" in the upper-right corner. After signing in you'll be able to download the SDK. The "Create" link

Scroll down a little to see the button for agreeing to the SDK license and to download the software. The software installation is for the most part like any other. You'll need to click on the "Next" button several times.
If you are running Windows 8 this is where you may encounter an obstacle. When I attempted the installation everything went well except the installation of the driver that is needed to deploy to the PlayStation Vita.
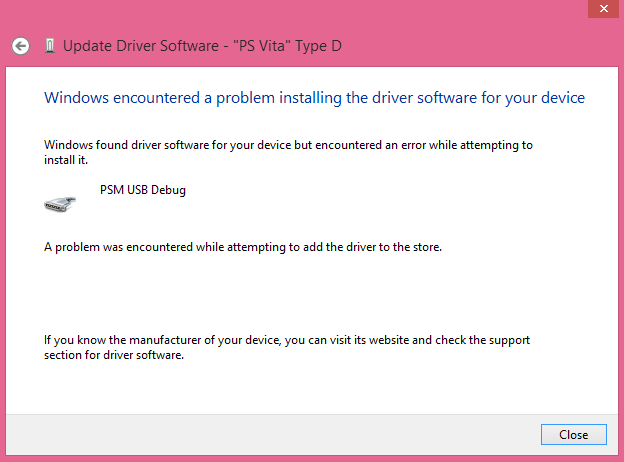
The only error message returned is that the driver installation failed. I attempted to do the driver installation by itself. The driver files will be copied to C:\Program Files (x86)\SCE\PSM\tools\vita\driver. But the driver installation continued to fail. Upon searching on the Internet I found some
solutions
that were composed on the release candidate of Windows 8.
Those didn't work for me in the RTM version. I didn't understand what was going on until I looked at the installation log in
From c:\windows\dpinst.log
INFO:   Install option set: legacy mode on.
INFO:   Found driver package: 'C:\Program Files (x86)\SCE\PSM\tools\vita\driver\vita_usbser.inf'.
INFO:   Preinstalling 'c:\program files (x86)\sce\psm\tools\vita\driver\vita_usbser.inf' ...
INFO:   ENTER:  DriverPackagePreinstallW
INFO:   RETURN: DriverPackagePreinstallW  (0xE0000247)
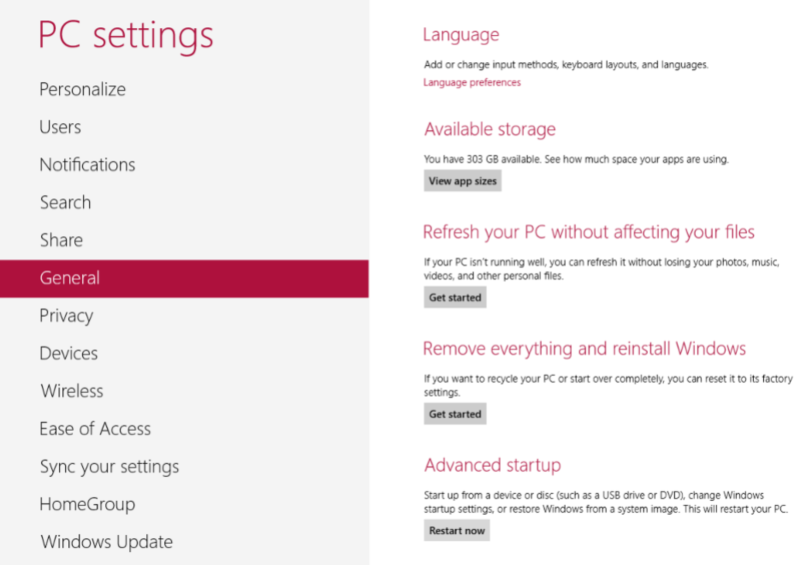
Searching for the error number (0xE0000247) yielded "Missing or incorrect Trusted Root Certification Authorities/Certificates." The driver installation was failing because it's unsigned. To get around this one must turn off driver signing enforcement in Windows 8. The option for doing this is buried a little deep.
In Windows 8 open the settings application and select "General." Under the last setting, "Advanced" is a button labeled "Restart now." This will restart your computer and put you in an interface that will let you disable the enforcement of driver signing.
With the driver signing disabled I tried to run the driver installation again. This time I got a warning about the driver being unsigned.
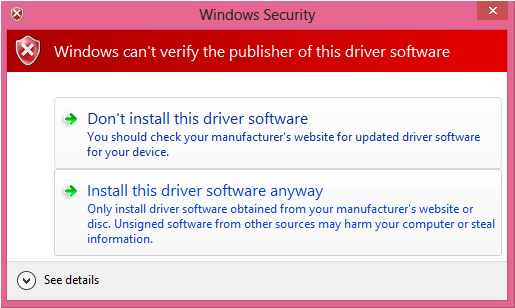
I selected "Install this driver software anyway" After that the software installation is done. When you perform your installation you may be able to save some time by turning off driver signing before you install any of the PlayStation development software.
A Glance at What Instaled
UI Composer
The UI Composer lets you construct widget based user interfaces. At first glance it works similar to other drag-and-drop UI builders. This tool isn't necessary for the task at hand so I won't be talking about it further.
PlayStation® Mobile Studio (PSM)
This will be the main tool that you'll use. PSM will be used for managing your projects and editing the source code. You'll use this tool for debugging and deploying your software.
Publishing Utility

You'll need the publishing utility for managing certificates for your programs, code signing, and as its name implies for publishing to the store.
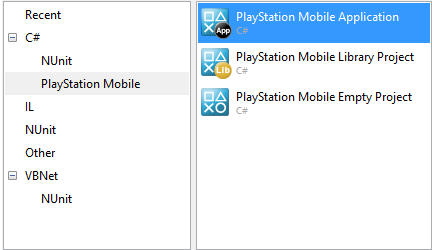
Creating a New Project
Start PSM Studio. On the welcome page select the option to "Start New Solution." In the "New Solution" windows you'll find the project template for "PlayStation Mobile Application" under the C# node. Note that while there is also a VB Node that you cannot use VB to make PSM applications.
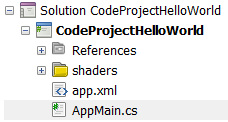
Give your application a name and select "OK". The end result is a program that will render a black screen. If you press [F5] the program will run in the Simulator. Just to make sure the program is really doing something let's change the background color that it is filling the screen with. The source code for your program is in the solution explorer on the left. Navigate down to the file AppMain.cs and double-click on it.
Look for the Render method at the end of the source code. The call to SetColor() is given all zero values. These parameters are for values of red, green, blue, and alpha. Change these to 1.0 and the screen will render white (or play around with values between 0.0 and 1.0 until you find a color you like. Press F5 to run the program again and you should see the screen render in a different color.
Before we move on let's look at the actual code. The Initialize() method is for creating objects that your program needs before the game loop begins. Here it is only being used to make the graphicsContext object, which is the object that will perform all of our rendering. The Main function runs a loop that will continually call the Update() function for executing your game logic and reading user input and then Render() for updating the screen. The call to SystemEvents.CheckEvents() must occur once per frame. It is for checking for system events and will trigger a call to OnRestored() when the application is restored from a minimized state.
public static void Main (string[] args)
{
	Initialize ();

	while (true) {
		SystemEvents.CheckEvents ();
		Update ();
		Render ();
	}
}
Displaying an Image
While PSM supports several graphic formats the only format that it supports with transparency is PNG. We are going to add a PNG file to the project and display it on the screen. Right-click on your project and select "Add"->"New Folder" to create a new folder within the project. Name the folder "resources." Right-click on this new folder and select "Add"->"Add Files." Select an image to be displayed. I'm not the best artist in the world, so for the sake of this article I grabbed a sprite sheet of an old game and took a sprite from it.

Just to make sure the image was imported with the right settings right-click on it and select "Properties." When the build window opens ensure that the build action is set to "Content"
To display the image on the screen we are going to create a rectangle that has a texture on it (that texture being our image). Then we will draw the rectangle to the screen. To define a rectangle we need to define the four points of its corners. The points by themselves don't make a rectangle. We need to tell the rendering engine how these points are connected. The rendering engine actually draws triangles. So we are going to be drawing two triangles by telling the rendering engine which corners are a part of which triangle in a connect-the-dots type fashion. There's several pieces of data that we need to define to do this. The corners of the rectangle (vertices), how each one of those corners maps to our image (texture coordinates), the order that the dots will be connected (index list), and the tent that should be applied to each corner. If you don't want a tent then the color white should be selected.
Screen Coordinates
If you are familiar with OpenGL this will be old news to you. If you are used to using one of the Microsoft APIs this will be different then what you may be used to. In most of the Microsoft graphical APIs the pixel in the upper left corner of the screen is (0,0). In open GL the upper left corner is (-1, 1). The coordinate (0,0) is the center of the screen, and (1, -1) is the lower right corner. If you are working with sprites you'll probably want to work in terms of pixels instead of the OpenGL coordinate system. So we'll need to make a conversion matrix to convert the coordinate system for our sprites to screen coordinates.
Let's declare the variables that will be needed for all of these items.
static Texture2D mySprite;
static Matrix4 screenMatrix;
static Vector3 CurrentPosition = new Vector3();
static VertexBuffer myVertexBuffer;
We also need the data for the rectangle's corner coordinates, texture coordinates
#region vertex data
static float[] vertices = new float[]
{
	0f, 	0f, 	0f,
	0f, 	1f, 	0f,
	1f,		0f, 	0f,
	1f, 	1f, 	0f,
};

static float[] textureCoordinates = new float[]
{
	0.0f, 	0.0f,
	0.0f, 	1.0f,
	1.0f, 	0.0f,
	1.0f, 	1.0f,
};

static float[]	colors = new float[]
{
	1.0f, 	1.0f, 	1.0f, 1.0f,
	1.0f, 	1.0f, 	1.0f, 1.0f,
	1.0f, 	1.0f, 	1.0f, 1.0f,
	1.0f, 	1.0f, 	1.0f, 1.0f
};

static ushort[] indexList =
{
	0, 1, 2, 3,
};
#endregion
After you've added the above to the program try to run it again. You should see no difference. It will only display the blank background. But try to compile and run anyway just to help find compilation errors earlier.
We need to get the vertex data into an object that can be consumed by the rendering engine, initialize our coordinate conversion matrix, and load the image. All of this will be done in the Initialize() method. I've defined a method for the screen conversion matrix since we'll need to use it more than once. This is the method we need for the screen conversion matrix.
static void UpdatePositionMatrix(Vector3 p)
{
		ImageRect rectScreen = graphics.Screen.Rectangle;

	float xOffset = (p.X )/(rectScreen.Width/1.0f);
	float yOffset = (p.Y )/(rectScreen.Height/1.0f);
		screenMatrix = new Matrix4(
		myPicture.Width*2.0f/rectScreen.Width,	0.0f,	0.0f,	0.0f,
		0.0f,	myPicture.Height*(-2.0f)/ rectScreen.Height, 0.0f, 0.0f,
		0.0f, 0.0f, 1.0f, 0.0f,
		-1.0f + xOffset, 1.0f - yOffset, 0.0f, 1.0f
		);
}
The initialize method should be updated to look like the following.
public static void Initialize ()
{
	// Set up the graphics system
	graphics = new GraphicsContext ();
	UISystem.Initialize(graphics);


	myPicture = new Texture2D("/Application/resources/Thermostat.jpg",false);
	myShader = new ShaderProgram("/Application/shaders/Simple.cgx");
	mySound = new Sound("/Application/resources/LOZ_Get_Item.wav");
	mySoundPlayer = mySound.CreatePlayer();

	myShader.SetUniformBinding(0, "WorldViewProj");

	myVertexBuffer = new VertexBuffer(4, indexList.Length,VertexFormat.Float3, VertexFormat.Float2, VertexFormat.Float4);
	myVertexBuffer.SetVertices(0, vertices);
	myVertexBuffer.SetVertices(1, textureCoordinates);
	myVertexBuffer.SetVertices(2, colors);

	myVertexBuffer.SetIndices(indexList);

	graphics.SetVertexBuffer(0, myVertexBuffer);

	UpdatePositionMatrix(new Vector3());
	return;
}
Last of all we need to update the render code.
public static void Render ()
{
	// Clear the screen
	graphics.SetClearColor (0.0f, 0.0f, 1.0f, 1.0f);
	graphics.Clear ();

	graphics.SetShaderProgram(myShader);
	graphics.SetTexture(0, mySprite);
	myShader.SetUniformValue(0, ref screenMatrix);
	graphics.SetVertexBuffer(0,myVertexBuffer);

	graphics.DrawArrays(DrawMode.TriangleStrip, 0, indexList.Length);

	// Present the screen
	graphics.SwapBuffers ();
}
Try to run the program. You'll notice that something is wrong; the program renders a black rectangle instead of our sprite. The problem is with the vertex shader. We are using the default vertex shader which isn't what we need. Let's take a look at the shader. Open the Shader folder and double-click on Simple.vcg.
void main( float4 in a_Position  : POSITION,
		   float4 out v_Position : POSITION,
		   uniform float4x4 WorldViewProj
		   )
{
	v_Position = mul( a_Position, WorldViewProj );
}
Look back where the vertex buffer was declared. It contains some of the information that we need.
myVertexBuffer = new VertexBuffer(4, indexList.Length,VertexFormat.Float3, VertexFormat.Float2, VertexFormat.Float4);
myVertexBuffer.SetVertices(0, vertices);
myVertexBuffer.SetVertices(1, textureCoordinates);
myVertexBuffer.SetVertices(2, colors);
According to this our vertex buffer is 4 vertices long. Each vertex will have a Float3 (a structure composed of three float numbers), a Float2, and a Float4. The Float4 is the vertex's position. The Float2 is the texture coordinate, and the Float4 is a 4 component color. This is a total mismatch from what the default vertex shader is expecting. The default vertex shader was expecting vertex information without color information. So we need to change the parameters declared for the shader. The default shader is only outputting positional information. Instead I want it to output the updated position, color (tint), and texture coordinate information. This information will be processed further in the pixel shader.
The vertex shader should look like the following instead.
void main( float3 in in_Position  : POSITION,
			 float2 in in_TextCoord : TEXCOORD0,
			 float4 in in_Color: COLOR0,

		   float4 out v_Position : POSITION,
		   float2 out v_TextCoord: TEXCOORD0,
		   float4 out v_Color: COLOR0,

		   uniform float4x4 WorldViewProj
		   )
{
	v_Position = mul( float4(in_Position, 1.0f), WorldViewProj );
	v_TextCoord = in_TextCoord;
	v_Color = in_Color;
}
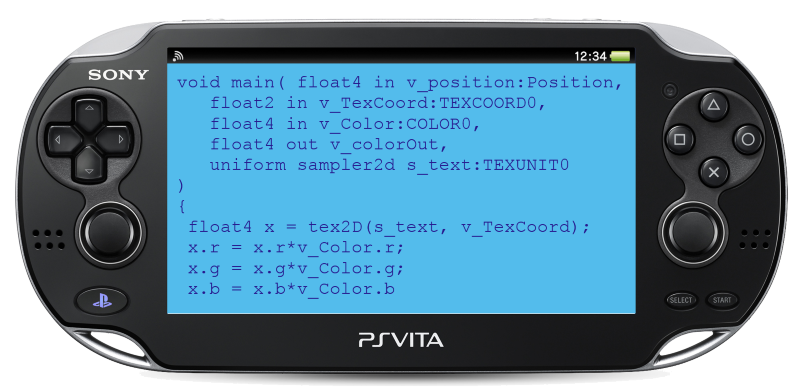
The pixel shader in its default form will not correctly interpret this information. Let's look at the default shader.
void main( float4 out Color : COLOR,
		   uniform float4 MaterialColor )
{
	Color = MaterialColor;
}
In its default form it is only expecting color information and plans to display the color for the pixel unmodified. Let's update it to handle
void main(
			float4 in v_Position : POSITION,
		   float2 in v_TextCoord: TEXCOORD0,
		   float4 in v_Color: COLOR0,
		   float4 out finalColor: COLOR,
		   uniform sampler2D s_Texture : TEXUNIT0 )
{

	float4 x = tex2D(s_Texture, v_TextCoord);
	x.r = x.r*v_Color.r;
	x.g = x.g*v_Color.g;
	x.b = x.b*v_Color.b;
	x.a = x.a*v_Color.a;

	if(x.a==0.0f)
	  discard;
	finalColor=x;
}
With the shaders updated if you run the program now you'll see the sprite render in the upper left corner.

User Input and Moving the Sprite
The PSM SDK supports two modes of user input. One is for input from the touch screen the other is for input from the control buttons. Devices that run PSM games include some phones which do not have the control stick or buttons available for input. The PlayStation® Vita has support for both the touch screen and the controls. For this hello world program I will only be making use of the game pad. I want the sprite to move around the screen in response to using the directional pad or the left analog stick.
The state of the buttons and analog stick are all gathered at once with a single call to GamePad.GetData(0). This method returns a GamePadData object. When you are
debugging on your local PC keep in mind that the simulator does not simulate any of the analog inputs. You must have a PS Vita to test anything with the analog inputs. For now let's do the modifications for responding to the user pressing the 8-way directional pad. If the user presses a button I want the sprite to move by 5 pixels in that direction. The variable CurrentPosition is what needs to be modified to modify the sprite's position. After this variable is updated the matrix that converts our coordinates to screen space must be updated with the UpdatePositionMatrix() method; This will all be done in the Update() method. The default code in the Update() method is already acquiring the gamepad state. We only need to act on it.
The new Update() method will look like the following.
public static void Update ()
{
	var gamePadData = GamePad.GetData (0);

	if( (gamePadData.Buttons & GamePadButtons.Left) !=0)
		CurrentPosition.X-=5;
	if( (gamePadData.Buttons & GamePadButtons.Right) !=0)
		CurrentPosition.X+=5;
	if( (gamePadData.Buttons & GamePadButtons.Up) !=0)
		CurrentPosition.Y-=5;
	if( (gamePadData.Buttons & GamePadButtons.Down) !=0)
		CurrentPosition.Y+=5;

	UpdatePositionMatrix(CurrentPosition);
}
Run the program now and if you use the arrow keys on your keyboard you'll see the ship move accordingly. Even though we can't yet run the code on a real device (because I haven't covered the steps for doing that yet) let's put in the code for responding to the analog stick.
Plating Sound
Next I want the program to play a noise whenever the user presses a button. Find a wave files with the sound that you want to play and add it to the resources folder the same way that you did with the image. Ensure that the Build Action property is set to "Context" for the wave file. Declare a variable of type Sound in the program (to hold the sound data) and SoundPlayer (to hold an instance of the sound playing).
I only want the sound to play when a button is pressed and then released. To know that the button has gone from a released state to a pressed state I'll need to remember what the button's previous state was. I'm going to keep track of the entire previous state of the controller with another GamePadData instance.
static Sound mySound;
static SoundPlayer mySoundPlayer;
static GamePadData previousState;
In the Initialize method load the sound.
public static void Initialize ()
{
	// Set up the graphics system
	graphics = new GraphicsContext ();
	//--------------------
	// Rest of Initialize() method omitted for clarity
	//-------------------
	mySound = new Sound("/Application/resources/LOZ_Get_Item.wav");
	mySoundPlayer = mySound.CreatePlayer();

}
The Update() method must be modified to look for the button that we'll use for triggering the sound to play.
if(  (( gamePadData.Buttons & GamePadButtons.Cross) != 0)
   	&& ((previousState.Buttons&GamePadButtons.Cross) == 0)
   )
	mySoundPlayer.Play();
previousState = gamePadData;
In the code above I'm using the Cross button as the one that will trigger sound. This will be mapped to the "S" key on the keyboard. Run the program again and press the "S" button. You should hear the sound play.
Running on a Real Device
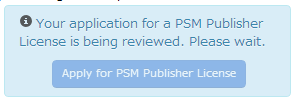
Your code will need to be signed to run on a real device. To perform code signing you will need to have a paid account. Once signed an application can run for up to 90 days. For this process you'll need to have be ready to pay 99 USD for developer license. When you log into the development portal you'll see a button for purchasing a developer license. Click on this button to start the process. You'll be asked to enter your name, address, and phone number and after clicking on "submit" you'll need to wait for someone to verify the information you entered. I entered this information on a Saturday before a holiday on Monday. So it was not until the next business day (Tuesday) that this information was verified.
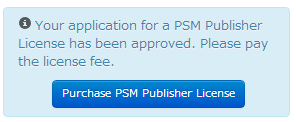
After the information is verified you'll get an e-mail telling you so and then you can log back in the portal the button will now be changed to allow you to pay for your registration.
This is where I ran into another obstacle. While I had been using the same card number for a number of years this transaction was not successful. I already had a few dollars in my PlayStation® wallet. So at the purchase page I see a confirmation that 88.95 would be applied to my card.
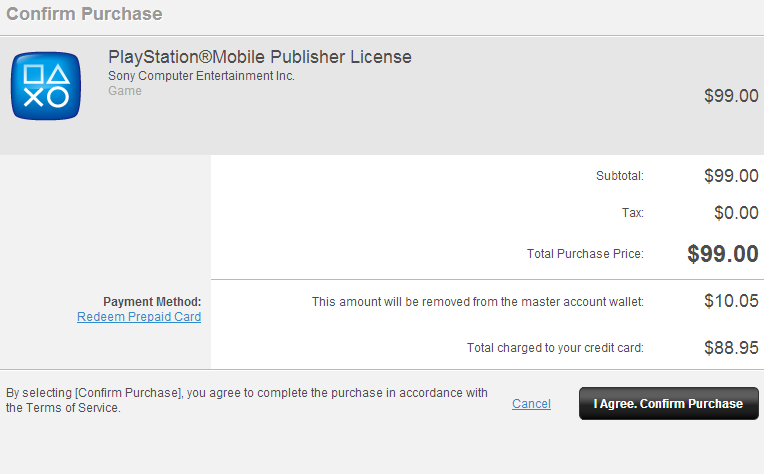
On clicking on "I Agree…" the page refreshed and was the same. Not sure what was going on I decided to log into my PlayStation® 3 and add more funds to my wallet. I received a more meaningful response on the PlayStation® 3. The credit card could not be processed. So I decided to try a different card and received the same response on the second and third card that I tried. After the third failure I got in my car and drove to a GameStop to purchase PlayStation® credits. Later I remembered I could have also purchased these at online retailers such as Amazon and would have receive the card number online. It wasn't until a few days later when I received an explanation for why the purchases would not go through with Sony Directly. One of my cards was being denied at other places and a few minutes after one attempted transaction my bank called me to verify my last transactions. After restoring my ability to use the card my bank informed me that Sony had attempted a transaction of 0.00 USD and that was taken as suspicious and raised a fraud alert. Now, to get back on track.
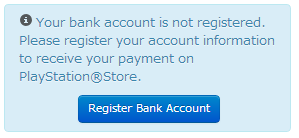
After redeeming the PlayStation® credits the button in the portal will change to allow you to register bank information for receiving payments from your application. I won't cover this process since that's not necessary for deploying the HelloWorld program
Using the PSM Publishing Utility
Start the PSM Publish Utility. You'll need to use this to make a license for your application so that it will run on a real device. Connect your device to your computer. You'll start off on the Metadata section.

Most of the defaults here can on the first page can be left unchanged. But you'll need to enter something for the Application ID. I encourage you to explore the other tabs. The walk-through in the ratings check tab is especially interesting. Click on the "Save" button to save your entries to an XML file.
Your device has a unique value associated with it that will be used in making the key that is used to sign the code. Start the PSM Dev Assist on your Vita. Connect your device to your computer and go to the Key Management portion section of the publishing utility. The device should automatically be recognized and you should see the device's seed key on the right side. Click on the button with the following icon to add a new Application to the key ring.

You'll be asked for the applications XML file. Select the XML file you had created from the previous section. When you click on OK you'll need to log in with your Sony Entertainment ID. You'll see your application added to the App Key Ring.
Go back to PSM Studio and open the app.xml. In the
<?xml version="1.0" encoding="utf-8"?>
<application project_name="CodeProjectHelloWorld" version="1.00" default_locale="en-US">
   <runtime_config>
      <memory managed_heap_size="32768" resource_heap_size="65536" />
   </runtime_config>
   <feature_list>
      <feature value="GamePad" />
      <feature value="Touch" />
   </feature_list>
</application>
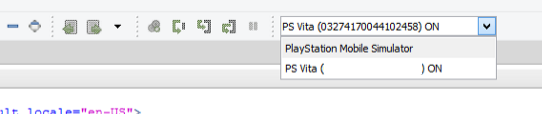
Once this is changed you are at a point where you may be able to run your program on the device. Start up the PlayStation® Mobile Development Assistant on your device, connect it to your computer, and then in PSM Studio change the deployment target from the Simulator to the PS Vita. You may need to expand the size of the window for this drop down to be shown.
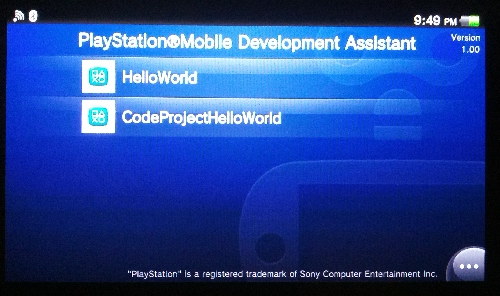
Press [F5] and the application should run on your device. There have been instances where people encounter an error here. The one that I encountered was "Failed to Install application on device. ExistAppKey: -2147418102"
There's a
message in the PlayStation® development forums about getting around this error. The suggestion that worked best for me was
disconnecting the device, killing the process psmdevice.exe, and then reconnecting the device. After that I was able to run the program
and step through the code.
Removing Programs
After getting Hello World running on your Vita you might wonder how to remove it. There's not yet any way to delete individual programs that you've deployed. The only way to get rid of them is to remove the PSM Developer Assistance (which will remove its data) and then reinstall the PSM developer Assistant.
Closing
I'd like to write something with some more substantial code. But after seeing how involved the process was of getting the code deployed to the device (and it felt challenging at times). So I think this is enough for now. Though I do plan on writing other articles on PSM development as the tools evolve.History
- 27 January 2013 - Initial Publication