
iOS Cocoa Layout - The Difference between Nib and Xib
1.40/5 (3 votes)
On easy example shown how to implement UIKit and SwiftUI TableView auto resizable cells and explained difference between Nib and Xib, how to load nib file and what exactly owner parameter of the load nib file method.
Some job interview questions will be explained with a very easy example called MyRecipes where you can manage your favorite recipes.
1. What the Difference Is Between Xib and Nib Files?
Let’s create a new Xcode project called MyRecipes:

Enter into the project navigator. Rename ViewController to RecipesViewController. Open main.storyboard. Select ViewController. Chose RecipesViewController on the Identity Inspector. Add UITableView to the view controller. Make sure the table view has just one Prototype Cell. Let’s call it ‘cell’:

Add to the project a new Cocoa Touch Class RecipeItemView:

Create Xib file with RecipeItemView name:

Open the Xib file and update it according the picture:

There are two files with same name with Swift and Xib extensions.
But where is the Nib file?
Nib file is a file which Xcode creates during Xib file compilation.
Nib has some common format which is used for restoring view at run time.
Xcode saves it in the built app folder. Open a folder with path like this:
˜/Library/Developer/Xcode/DerivedData/MyRecipes-…./Build/Products/Debug-iphonesimulator/MyRecipes
Then open context menu (by right mouse button click) and select Show Package Contents:

At the picture, you can see the Nib file. Here you are!
2. How to Use Xib File?
Xib is associated with user interface. In our case, RecipesItemView.xib is associated with RecipesItemView UIView class.
We will use the view as a content view for the UITableViewCell. So we need to download the Nib, parse it to the RecipesItemView class and add it as a subview to the cell Content view.
There are two ways to get view class from Nib file.
- Downloading Nib file content as an array. Xib file can have one and more of
UIViewor evenUIViewControllerelements. To get them, callloadNibNamed:let elementsOfNib = Bundle.main.loadNibNamed ("RecipeItemView", owner: nil, options: nil)The function returns Optional value. To get the participate view from array use index or methods like this:
let recipesItemView = elementsOfNib?.first
recipesItemViewis an optional instance of theRecipesItemViewclass with initialized outlets. - Another method to get element from Nib file is to call
loadNibNamedwithownerparameter:Bundle.main.loadNibNamed("RecipeItemView", owner: self, options: nil)
What is the self parameter here and why are we not assigning the result to anything? Let’s consider that step by step.
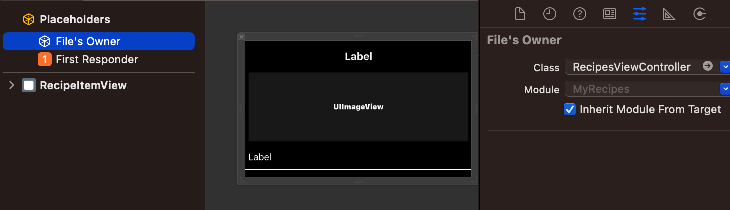
Open the RecipeItemView.xib file and assign Placeholders — File’s Owner as RecipesViewController:
Open RecipesViewController.swift. Add @IBOutlet var:
class RecipesViewController: UIViewController {
…
@IBOutlet var itemView: RecipeItemView!
Let’s return to the Xib edit screen. Select File’s Owner. Press and hold the mouse right button. Drag to the RecipesItemView.
Select itemView from the context menu. Since now we bound File owner and element of the Xib.

Let’s return to the loadNibNamed:
Bundle.main.loadNibNamed("RecipeItemView", owner: self, options: nil)
The self is RecipesViewController. When this function returns this function, the var itemView will get a value autumatically. It’s RecipeItemView instance.
3. How to Make Table View Cell Auto Resizable?
Bind Height Constraints of the RecipeItemView’s’ titleLabel, imageView and descriptionLabel with the NSLayoutConstraints outlets:

Open RecipesViewController. Configure UITableView from the viewDidLoad method:
func tableView(_ tableView: UITableView,
                 heightForRowAt indexPath: IndexPath) -> CGFloat {
  return UITableView.automaticDimension
}

func tableView(_ tableView: UITableView, willDisplay cell: UITableViewCell,
               forRowAt indexPath: IndexPath) {
  cell.layoutIfNeeded()
}
Open RecipeItemView.swift. Compute height constraints:
func configure(with cell: UITableViewCell, model: ReceipeData?, width: CGFloat) {
   guard let model else { return }
   titleLabel.text = model.title
   imageView.image = model.image
   descriptionLabel.text = model.description
   let h1 = model.title?.height(for: width, font: titleLabel.font) ?? 0
   let h2 = model.image?.height(for: width) ?? 0
   let h3 = model.description?.height(for: width, font: descriptionLabel.font) ?? 0
   titleLabelHeight.constant = h1
   imageViewHeight.constant = h2
   descriptionLabelHeight.constant = h3
   let height: CGFloat = h1 + h2 + h3 + 5.0 * 4
   translatesAutoresizingMaskIntoConstraints = false
   NSLayoutConstraint.activate([
     leadingAnchor.constraint(equalTo: cell.leadingAnchor),
     trailingAnchor.constraint(equalTo: cell.trailingAnchor),
     topAnchor.constraint(equalTo: cell.topAnchor),
     bottomAnchor.constraint(equalTo: cell.bottomAnchor),
     heightAnchor.constraint(equalToConstant: height)
   ])
}
Next and last step is to prepare UITableViewCell. Override two methods of the UITableViewDataSource delegate:
func tableView(_ tableView: UITableView, numberOfRowsInSection section: Int) -> Int {
  viewModel.count
}

func tableView(_ tableView: UITableView, cellForRowAt indexPath: IndexPath) ->
                 UITableViewCell {
  let cell = tableView.dequeueReusableCell(withIdentifier: "cell", for: indexPath)
  Bundle.main.loadNibNamed("RecipeItemView", owner: self, options: nil)
  // itemView is laded now. We can use it.
  cell.addSubview(itemView!)
  itemView!.configure(with: cell, model: viewModel[indexPath.row],
                      width: tableView.frame.width)
  return cell
}
The table view cells should change their height according to the content.
Let's consider the same answer just for SwiftUI. Create new Xcode project with Interface SwiftUI. Replace main content view by the following code:
struct RecipesContentView: View {
    @EnvironmentObject var viewModel: RecipesFakeData
    var body: some View {
        GeometryReader { geometry in
            VStack {
                NavigationBar()
                List {
                    ForEach(0..<viewModel.count, id: \.self) { index in
                        RecipeRow(index: index, width: geometry.size.width - 30.0)
                            .frame(width: geometry.size.width - 30.0,
                             height: rowHeight(index: index,
                             width: geometry.size.width - 30.0))
                            .background(.black)
                    }
                 }
                .background(.black)
                .scrollContentBackground(.hidden)
            }
            .background(.black)
        }
    }

    private func rowHeight(index: Int, width: CGFloat) -> CGFloat {
        if let model = viewModel[index],
           let view = Bundle.main.loadNibNamed("RecipeItemView",
                      owner: nil, options: nil)?.first as? RecipeItemView {
            var height = model.title?.height(for: width,
                         font: view.titleLabel.font) ?? 0
            height += model.image?.height(for: width) ?? 0
            height += model.description?.height(for: width,
                      font: view.descriptionLabel.font) ?? 0
            return height + 5.0 * 3  // see RecipeItemView.xib layout
        }
        return 0.0
    }
}
struct RecipeRow: UIViewRepresentable {
    @EnvironmentObject var viewModel: RecipesFakeData
    typealias UIViewType = RecipeItemView
    private let index: Int
    private let width: CGFloat

    init(index: Int, width: CGFloat) {
        self.index = index
        self.width = width
    }

    func makeUIView(context: Context) -> RecipeItemView {
        if let model = viewModel[index],
           let view = Bundle.main.loadNibNamed
           ("RecipeItemView", owner: nil, options: nil)?.first as? RecipeItemView {
            view.titleLabel.text = model.title ?? ""
            view.imageView.image = model.image
            view.descriptionLabel.text = model.description ?? ""
            view.titleLabelHeight.constant = model.title?.height
                                  (for: width, font: view.titleLabel.font) ?? 0
            view.imageViewHeight.constant = model.image?.height(for: width) ?? 0
            view.descriptionLabelHeight.constant = model.description?.height
                            (for: width, font: view.descriptionLabel.font) ?? 0
            return view
        }
        return RecipeItemView()
    }
}
As you can see at this time, we use loadNibNamed method with owner = nil. It returns array with view components.
Conclusion
MyRecipes app has been developed with using MVVM pattern. ViewModel publishes data with Combine PassthroughSubject and the View subscribes on it. View sends message to the ViewModel about to produce a new recipe data, then gets data and updates the tableView. At the result, you should see something like this:

Source Code
History
- 17th February, 2023: Initial version
- 21st February, 2023: SwiftUI version auto resizable table view was added