
Design a Windows Explorer Extension with SharpShell
4.98/5 (13 votes)
How to extend the context menu of Windows Explorer
Introduction
This document provides a detailed overview on how to implement Windows Explorer shell extensions into your Windows environment. It touches on the development and installation practices.
Purpose
This document provides a comprehensive technical overview on how to integrate your own custom extension into your own Windows environment – what components are involved and how they are related to each other.
Scope
The scope of this document is to convey the concepts needed to produce a Windows extension using the SharpShell assembly.
Prerequisites
- A good understanding in OOD (especially inheritance)
- A good understanding of the .NET Framework (4.0+)
- Knowledge on how to register assemblies
- Knowledge on using Visual Studio
- An understanding of Microsoft COM
What We Are Trying To Achieve
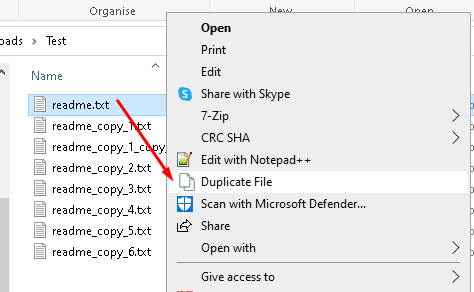
Below you can see in the context menu for a file in Windows Explorer, a new (custom) menu option called Duplicate File. This option will duplicate the select file(s), so you don’t have to copy and paste.
Code and Environment Setup
Codebase
Clone the code-repo using this link https://github.com/Bert0Neill/Extensions.git.
Or download source code as a zipped file.
ShellExView
Navigate to the following location, download and unzip the ShellExView application. Once unzipped, you simply run the executable file shexview.exe. This will load all your registered assemblies (within your local environment).
You can use this application (after refreshing it) to find you newly created assembly, and verify that it got registered correctly.

Server Manager
Navigate to the following location, download and unzip the ServerManager.zip file (take the latest version):

Server manager is extremely useful to install\uninstall your Windows Explorer Shell extension from a GUI perspective, plus you can easily see if it’s a x64 or x86 assembly and where it has installed your extension.
Design Custom Windows Explorer ContextMenu Extension
Load the project (link above) in Visual Studio and you can use this as a guide when developing your own extension.
- Create an Empty Solution and add a new Class Library Project (targeting .NET 4.8 framework) to it.
- Rename the default Class.cs file to reflect the feature(s) of your new extension.
In my case, I am going to create an extension that will duplicate a file, by using Windows Explorer’s context menu.

I’ve added a resource file to hold any strings and Icons that I wish to render in the UI:

Add the following references to your Class project:
System.Windows.FormsSystem.Drawing
System.Windows.Forms is needed, because we're going to use the WinForms ContextMenuStrip to define the context menu.
System.Drawing is needed as we're going to want to use Icons.

Add SharpShell Nuget Package
Add the SharpShell Nuget package to your Class Library project. This assembly does a lot of the plumbing for us, and you can create much more, than just a ContextMenu option using this package.

Take a look at the SharpShell Git Hub site, and the specific ContextMenu link to see what else your extensions can do.
- https://github.com/dwmkerr/sharpshell
- https://github.com/dwmkerr/sharpshell/blob/main/docs/context-menu.md
- https://github.com/dwmkerr/sharpshell/blob/main/SharpShell/SharpShell/SharpContextMenu/SharpContextMenu.cs
Code Explanation
At line 12, you will inherit the SharpContextMenu abstract class and override the ContextMenuStrip function (line 31) and the CanShowMenu function (line 20).
Within the CanShowMenu function, you can place your custom logic to whether you want to display the menu option (maybe you do not wish to duplicate large files, or files created by a certain user for e.g.)
At line 45 within the SharpContextMenu function, your wiring up the click event action for your menu option, which in this case makes a call to our custom function to duplicate the file.
Also note at line 11, I have set the association property to all files, as I wish to duplicate all file types (not folders etc.) – but you can restrict this to .txt or .docx file extensions.
At line 10, we tell the compiler to make this class visible to the COM registry.

The one thing to note in the DuplicateFiles function is the public SelectedItemPaths IEnumerable<string> property (line 70), this will hold all the selected file objects.

Strongly Sign Your Project
Before you can register your assembly, it must be strongly typed by creating a unique identity for the assembly, and can prevent assembly conflicts.
Bring up the properties pane of your project, select Signing and then select New from the Choose String Name dropdown.

Enter in a key name (this can be anything) and in this example, I have not chosen to use a password, but if you are registering your extension within your network domain, it should be password protected.
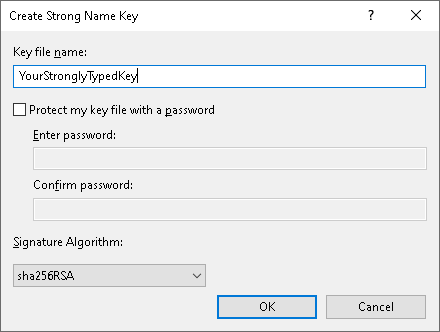
Below, you can see that I called my key name SignedKey.

Compile Project for Debugging
When you are happy with your code and you have the strongly typed key added, you are ready to compile and test your extension – do this in debug mode.

Registering and Unregistering Assembly
Open Server Manager and select Load Server option. Navigate to your Debug folder and load your newly compiled shell extension.

To register\unregister you assembly (Shell Extension), simply click your uploaded file within the main window pane, then select the Server menu option and select to Install or Uninstall.
NB: You must select your file in the window pane, before installing or uninstalling the assembly.

You will get a prompt to indicate that your assembly was registered\unregistered successfully.

If you now click on the shell extension file within the window pane, you will see more information regarding the installation location and version and when you unregister, these fields will be reset.

To uninstall your shell extension (so you can make modifications to your code and retest), simply click on the Uninstall option (once again, if you click the assembly, you will notice that the installation folder has been reset).

Verify Assembly Registered
If you want to see more information on your registered assembly, open the ShellExView application (refresh if already open), and search for the newly added extension. If it is not present, then it didn’t register correctly.

NB: You will notice that some rows are coloured red, that is because they are not Microsoft developed assemblies (so your custom assembly will also be in red).
Testing Your Windows Explorer Shell Extension
Once you have installed your extension (through Server Manager), open Windows Explorer and right click on a file, this will display the context menu and you should now see your custom extension.
If you click on the Duplicate File context menu option, a new file will be created. A prompt is displayed just for completeness (not necessary in a live version).

The readme.txt file has been duplicated a number of times (taking care not duplicate the filename).

Debug Shell Extension in Visual Studio
- Open Windows Explorer (you will use this to test with).
- Within Visual Studio, attach your project to the Explorer process.
- Place breakpoints within your code, at sections you wish to debug.


Within Windows Explorer, right click on a file and select the context menu option Duplicate File, this will then fire the debugger to hit your breakpoint.

History
- 21st January, 2023: Initial draft