
BookCars - Car Rental Platform with Mobile App
4.98/5 (81 votes)
Car Rental Platform with a mobile app
Table of Contents
- Introduction
- Features
- Live Demo
- Prerequisites
- Quick Overview
- Background
- Installing (Self-hosted)
- Installing (VPS)
- Installing (Docker)
- Setup Stripe
- Change Currency
- Add New Language
- Demo Database
- Build Mobile App
- Run from Source
- Run Mobile App
- Unit Tests and Coverage
- Logs
- Using the Code
- Points of Interest
- History
Introduction
BookCars is a car rental platform, supplier-oriented, with a backend for managing car fleets and bookings, as well as a frontend and a mobile app for renting cars.
With the following solution, you can build a fully customizable car rental website optmized for multiple suppliers with an operational Stripe payment gateway at very low cost by hosting it on a Docker droplet with at least 1GB of RAM.
BookCars is designed to work with multiple suppliers. Each supplier can manage his car fleet and bookings from the backend. BookCars can also work with only one supplier and can be used as a car rental aggregator.
From the backend, admins can create and manage suppliers, cars, locations, customers and bookings.
When new suppliers are created, they receive an email prompting them to create an account in order to access the backend and manage their car fleet and bookings.
Customers can sign up from the frontend or the mobile app, search for available cars based on pickup and drop-off points and time, choose a car and complete the checkout process.
A key design decision was made to use TypeScript instead of JavaScript due to its numerous advantages. TypeScript offers strong typing, tooling, and integration, resulting in high-quality, scalable, more readable and maintainable code that is easy to debug and test.
BookCars can run in a Docker container. In this article, you can find how to build BookCars Docker image and run it in a Docker container.
In this article, you will learn how BookCars was made including a description of the main parts of the source code and the software architecture, how to deploy it, and how to run the source code. But before we dig in, we'll start with a quick overview of the platform.
Features
- Supplier management
- Ready for one or multiple suppliers
- Car fleet management
- Location, country, parking spots and map features
- Booking management
- Payment management
- Customer management
- Multiple payment methods (Credit Card, PayPal, Google Pay, Apple Pay, Link, Pay Later)
- Operational Stripe Payment Gateway
- Multiple language support (English, French)
- Multiple pagination options (Classic pagination with next and previous buttons, infinite scroll)
- Responsive backend and frontend
- Native Mobile app for Android and iOS with single codebase
- Push notifications
- Secure against XSS, XST, CSRF and MITM
- Supported Platforms: iOS, Android, Web, Docker
Live Demo
Frontend
- URL: https://bookcars.dynv6.net:3002/
- Login: jdoe@bookcars.ma
- Password: B00kC4r5
Backend
- URL: https://bookcars.dynv6.net:3001/
- Login: admin@bookcars.ma
- Password: B00kC4r5
Mobile App
You can install the Android app on any Android device.
Scan this code with a device
Open the Camera app and point it at this code. Then tap the notification that appears.

How to install the Mobile App on Android
-
On devices running Android 8.0 (API level 26) and higher, you must navigate to the Install unknown apps system settings screen to enable app installations from a particular location (i.e. the web browser you are downloading the app from).
-
On devices running Android 7.1.1 (API level 25) and lower, you should enable the Unknown sources system setting, found in Settings > Security on your device.
Alternative Way
You can also install the Android App by directly downloading the APK and installing it on any Android device.
- Download APK
- Login: jdoe@bookcars.ma
- Password: B00kC4r5
Prerequisites
- TypeScript
- Node.js
- Express
- MongoDB
- React
- Vite
- MUI
- React Native
- Expo
- JWT
- MVC
- Docker
- NGINX/Apache
- Git
Quick Overview
In this section, you'll see a quick overview of the main pages of the frontend, the backend and the mobile app.
Frontend
From the frontend, customers can search for available cars, choose a car and checkout.
Below is the main page of the frontend where the customer can choose pickup and drop-off points and time, and search for available cars.

Below is the search result of the main page where the customer can choose a car for rental.

Below is the checkout page where the customer can set rental options and checkout. If the customer is not registered, he can checkout and register at the same time. He will receive a confirmation and activation email prompting him to set his password if he is not registered yet.

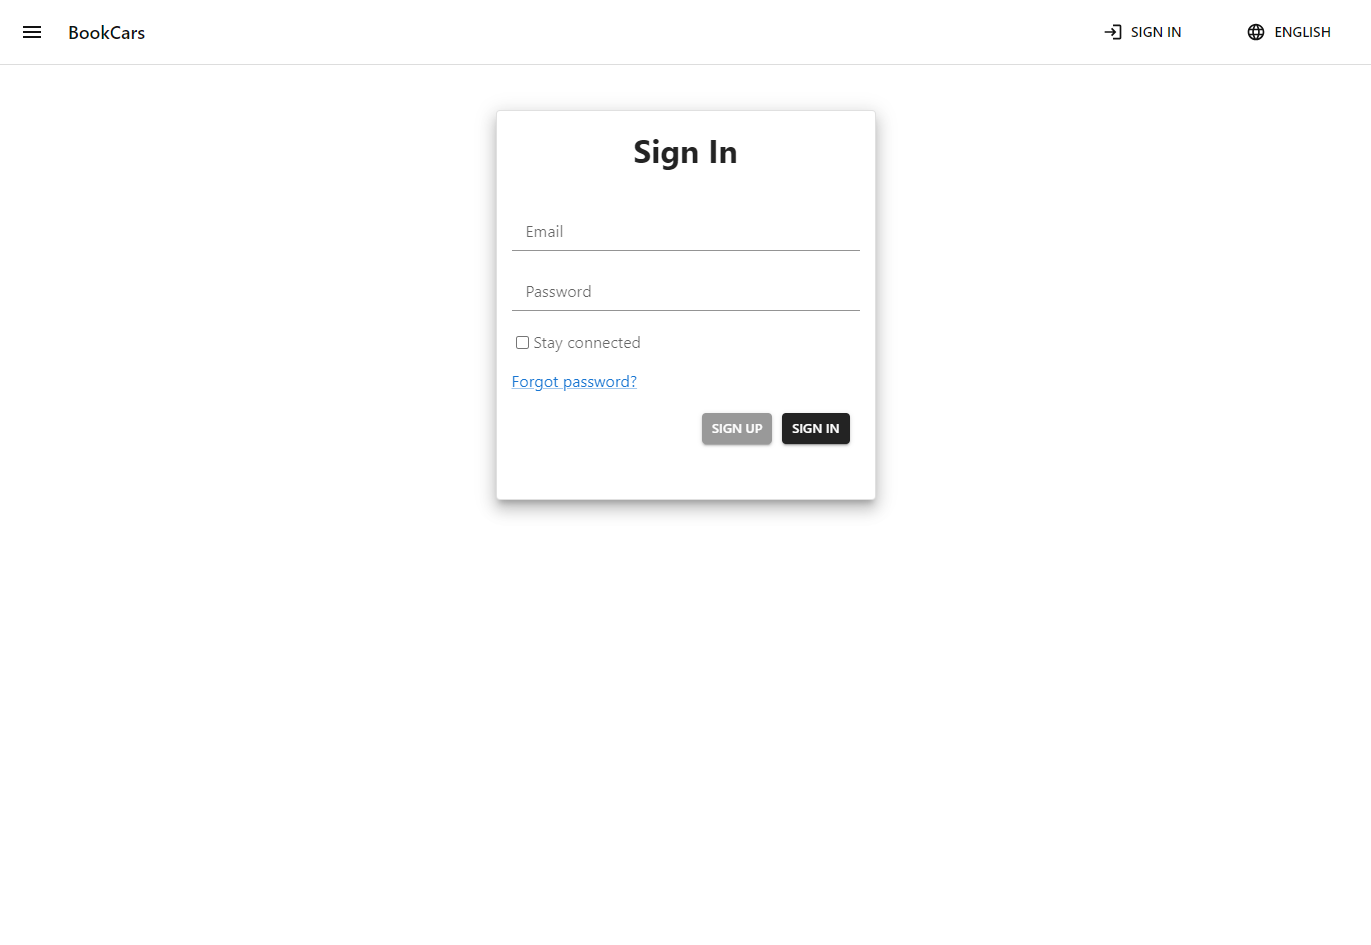
Below is the sign in page. On production, authentication cookies are httpOnly, signed, secure and strict sameSite. These options prevent XSS, CSRF and MITM attacks. Authentication cookies are protected against XST attacks as well via a custom middleware.
Below is the sign up page.

Below is the page where the customer can see and manage his bookings.

Below is the page where the customer can see a booking in detail.

Below is the contact page.

Below is the car rental locations page.

Below is the page where the customer can see and manage his notifications.

There are other pages but these are the main pages of the frontend.
Mobile App
From the mobile app, customers can search for available cars, choose a car and checkout.
The customer can also receive push notifications, if the status of his booking is updated from the backend.
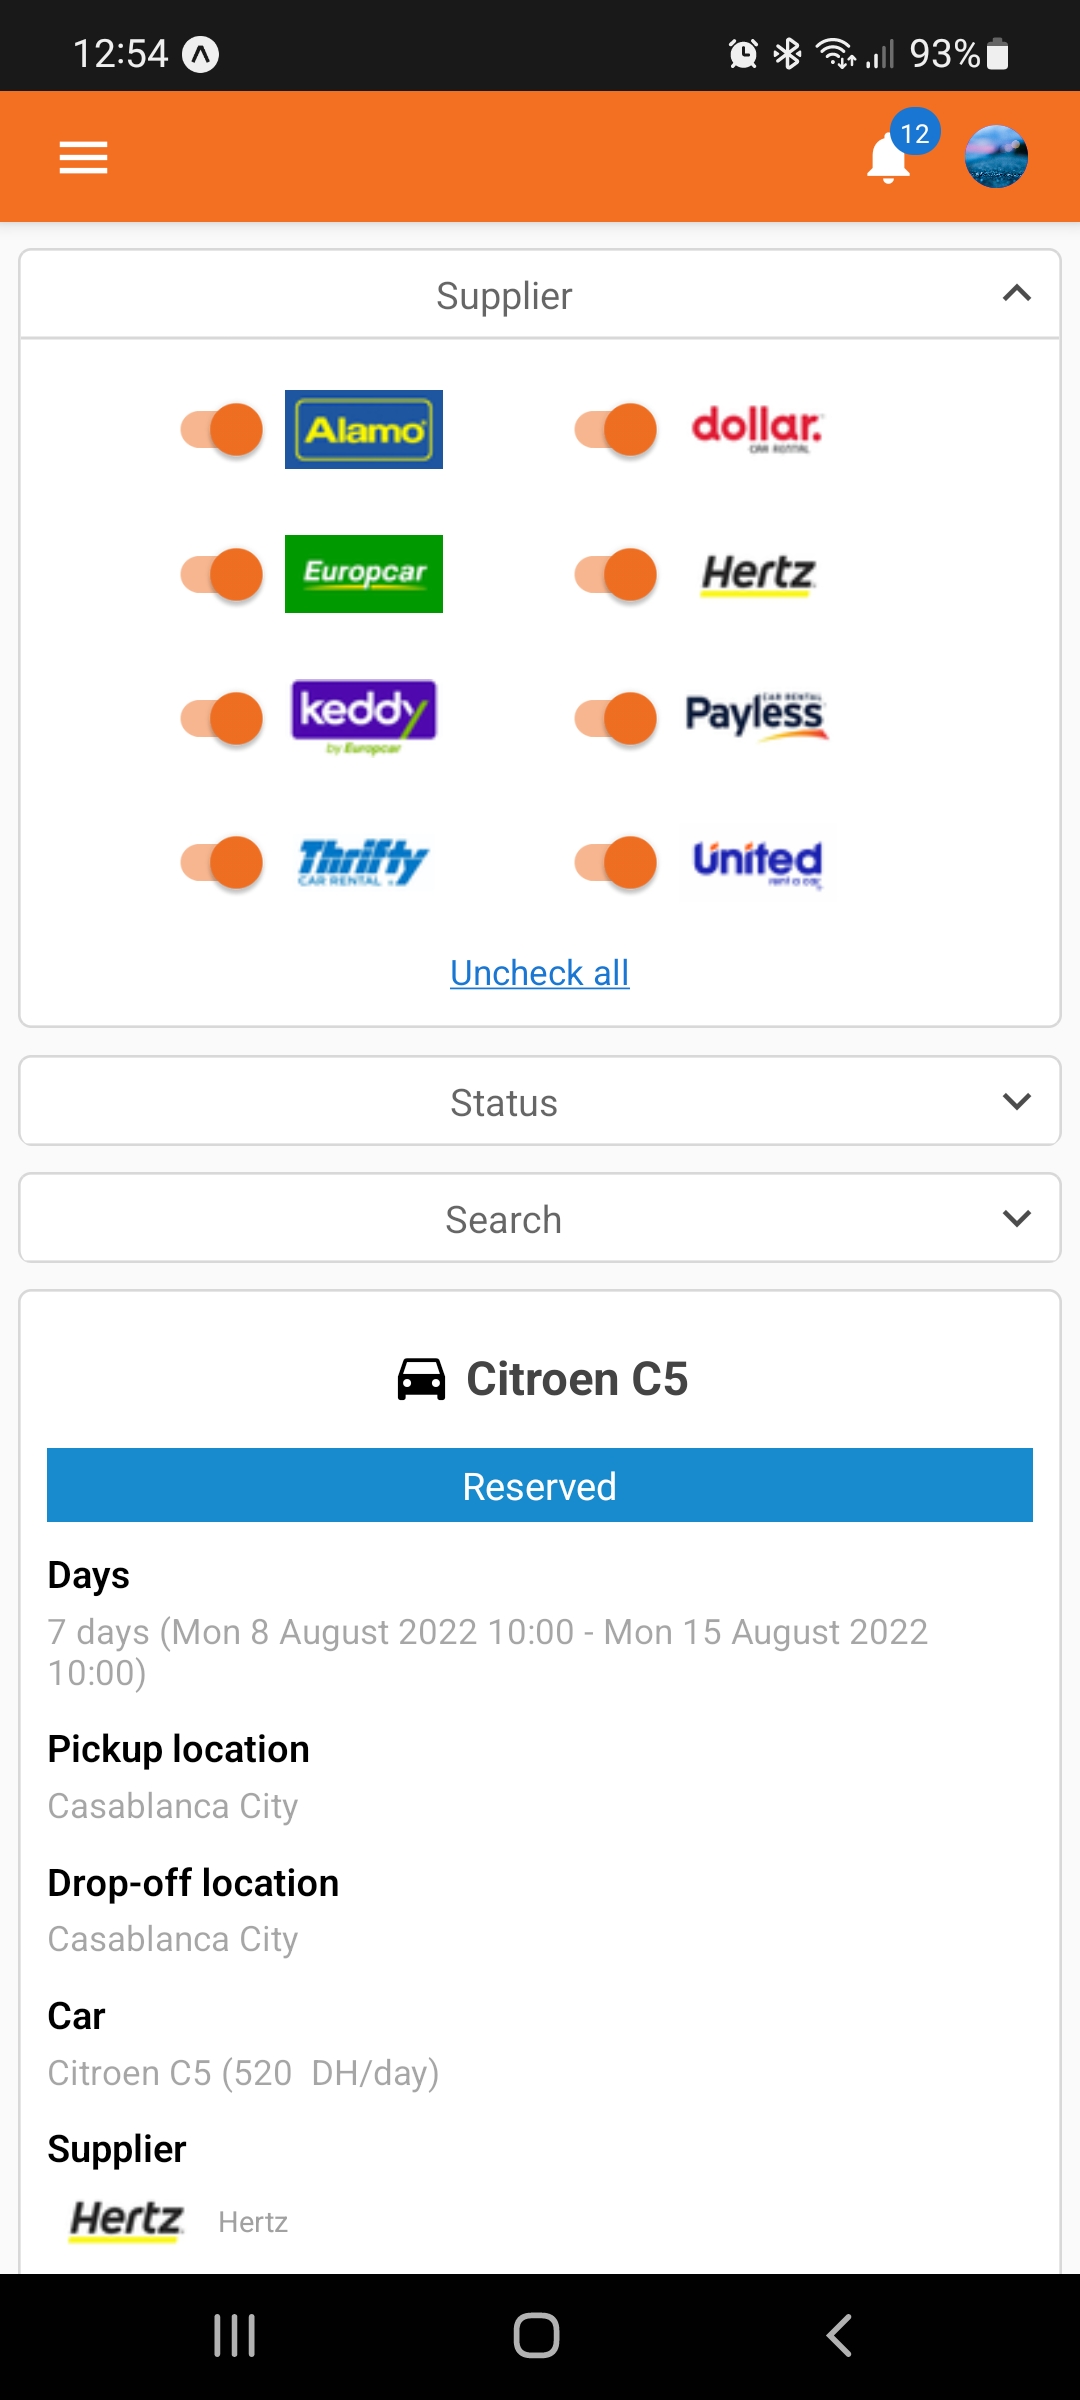
Below are the main pages of the mobile app where the customer can choose pickup and drop-off points and time, and search for available cars.


Below is the search result of the main page where the customer can choose a car for rental and checkout.


Below are sign in and sign up pages.


Below are the pages where the customer can see and manage his bookings.


Below are the pages where the customer can update his profile information, change his password and see his notifications.


That's it for the main pages of the mobile app.
Backend
BookCars is supplier-oriented. This means that there are three types of users:
- Admin: He has full access to the backend. He can do everything.
- Supplier: He has restricted access to the backend. He can only manage his car fleet and bookings.
- Customer: He has access only to the frontend and the mobile app. He cannot access the backend.
BookCars is designed to work with multiple suppliers. Each supplier can manage his car fleet and bookings from the backend. BookCars can also work with only one supplier as well.
From the backend, admins can create and manage suppliers, cars, locations, customers and bookings.
When new suppliers are created, they will receive an email prompting them to create an account in order to access the backend and manage their car fleet and bookings.
Below is the sign in page of the backend.

Below is the dashboard page of the backend where admins and suppliers can see and manage bookings.

Below is the page where car fleet is displayed and can be managed.

Below is the page where admins and suppliers can create new cars by providing an image and car info. For car options to be included for free, set 0 for the corresponding car option. Otherwise, set the price of the option or leave it empty if you don't want to include it.

Below is the page where admins and suppliers can edit cars.

Below is the page where admins can manage users.

Below is the page where to edit bookings.

There are other pages but these are the main pages of the backend.
Background
The basic idea behind BookCars is very simple:
- A backend: From which admins create new suppliers. Each supplier will receive an automatic email to activate his account and have access to the backend so he can manage his car fleet, bookings and customers.
- A frontend and a mobile app: From which customers can see available cars depending on pickup and drop-off points and time. Then, they can proceed to checkout in order to book their cars.
Installing (Self-hosted)
BookCars is cross-platform and can run and be installed on Windows, Linux and macOS.
Below are the installation instructions on Linux.
Prerequisites
-
Install git, Node.js, NGINX, MongoDB and mongosh. If you want to use MongoDB Atlas, you can skip installing and configuring MongoDB.
-
Configure MongoDB:
mongosh
Create admin user:
db = db.getSiblingDB('admin')
db.createUser({ user: "admin" , pwd: "PASSWORD",
roles: ["userAdminAnyDatabase", "dbAdminAnyDatabase", "readWriteAnyDatabase"]})
Replace
PASSWORDwith a strong password.Secure MongoDB:
sudo nano /etc/mongod.conf
Change configuration as follow:
net:
port: 27017
bindIp: 0.0.0.0

security:
authorization: enabled
Restart MongoDB service:
sudo systemctl restart mongod.service
sudo systemctl status mongod.service
Instructions
- Clone BookCars repo:
cd /opt
sudo git clone https://github.com/aelassas/bookcars.git
- Add permissions:
sudo chown -R $USER:$USER /opt/bookcars
sudo chmod -R +x /opt/bookcars/__scripts
- Create deployment shortcut:
sudo ln -s /opt/bookcars/__scripts/bc-deploy.sh /usr/local/bin/bc-deploy
- Create BookCars service:
sudo cp /opt/bookcars/__services/bookcars.service /etc/systemd/system
sudo systemctl enable bookcars.service
- Create /opt/bookcars/api/.env file:
NODE_ENV=production
BC_PORT=4002
BC_HTTPS=false
BC_PRIVATE_KEY=/etc/ssl/bookcars.ma.key
BC_CERTIFICATE=/etc/ssl/bookcars.ma.crt
BC_DB_URI=mongodb://admin:PASSWORD@127.0.0.1:27017/bookcars?authSource=admin&appName=bookcars
BC_DB_SSL=false
BC_DB_SSL_CERT=/etc/ssl/bookcars.ma.crt
BC_DB_SSL_CA=/etc/ssl/bookcars.ma.ca.pem
BC_DB_DEBUG=false
BC_COOKIE_SECRET=COOKIE_SECRET
BC_AUTH_COOKIE_DOMAIN=localhost
BC_JWT_SECRET=JWT_SECRET
BC_JWT_EXPIRE_AT=86400
BC_TOKEN_EXPIRE_AT=86400
BC_SMTP_HOST=smtp.sendgrid.net
BC_SMTP_PORT=587
BC_SMTP_USER=apikey
BC_SMTP_PASS=PASSWORD
BC_SMTP_FROM=admin@bookcars.ma
BC_CDN_USERS=/var/www/cdn/bookcars/users
BC_CDN_TEMP_USERS=/var/www/cdn/bookcars/temp/users
BC_CDN_CARS=/var/www/cdn/bookcars/cars
BC_CDN_TEMP_CARS=/var/www/cdn/temp/bookcars/cars
BC_CDN_LOCATIONS=/var/www/cdn/bookcars/locations
BC_CDN_TEMP_LOCATIONS=/var/www/cdn/bookcars/temp/locations
BC_DEFAULT_LANGUAGE=en
BC_BACKEND_HOST=http://localhost:3001/
BC_FRONTEND_HOST=http://localhost/
BC_MINIMUM_AGE=21
BC_EXPO_ACCESS_TOKEN=EXPO_ACCESS_TOKEN
BC_STRIPE_SECRET_KEY=STRIPE_SECRET_KEY
BC_ADMIN_EMAIL=admin@bookcars.ma
BC_RECAPTCHA_SECRET=RECAPTCHA_SECRET
-
You need to configure the following options:
BC_DB_URI=mongodb://admin:PASSWORD@127.0.0.1:27017/bookcars?authSource=admin&appName=bookcars
BC_COOKIE_SECRET=COOKIE_SECRET
BC_AUTH_COOKIE_DOMAIN=localhost
BC_JWT_SECRET=JWT_SECRET
BC_SMTP_HOST=smtp.sendgrid.net
BC_SMTP_PORT=587
BC_SMTP_USER=apikey
BC_SMTP_PASS=PASSWORD
BC_SMTP_FROM=admin@bookcars.ma
BC_BACKEND_HOST=http://localhost:3001/
BC_FRONTEND_HOST=http://localhost/
BC_STRIPE_SECRET_KEY=STRIPE_SECRET_KEY
BC_RECAPTCHA_SECRET=RECAPTCHA_SECRET
If you want to use MongoDB Atlas, put you MongoDB Atlas URI in
BC_DB_URIotherwise replacePASSWORDinBC_DB_URIwith your MongoDB password. ReplaceJWT_SECRETwith a secret token. Finally, set the SMTP options. SMTP options are necessary for sign up. You can use sendgrid or any other transactional email provider.If you choose sendgrid, create an account on sendgrid.com, login and go to the dashboard. On the left panel, click on Email API, then on Integration Guide. Then, choose SMTP Relay and follow the steps. You will be prompted to create an API Key. Once you create the API Key and verify the smtp relay, copy the API key in
BC_SMTP_PASSin ./api/.env. Sendgrid's free plan allows to send up to 100 emails/day. If you need to send more than 100 emails/day, switch to a paid plan or choose another transactional email provider.COOKIE_SECRETandJWT_SECRETshould at least be 32 characters long, but the longer the better. You can use an online password generator and set the password length to 32 or longer.The following settings are very important and if they are not set properly, authentication won't work:
BC_AUTH_COOKIE_DOMAIN=localhost
BC_BACKEND_HOST=http://localhost:3001/
BC_FRONTEND_HOST=http://localhost/
Replace
localhostwith an IP or FQDN. That is if you access the backend from http://<FQDN>:3001/.BC_BACKEND_HOSTshould be http://<FQDN>:3001/. The same goes forBC_FRONTEND_HOST. AndBC_AUTH_COOKIE_DOMAINshould be FQDN.If you want to enable push notifications in the mobile app, follow these instructions and set the following option:
BC_EXPO_ACCESS_TOKEN=EXPO_ACCESS_TOKEN
If you want to enable stripe payment gateway, sign up for a stripe account, fill the forms and save the publishable key and the secret key from stripe dashboard. Then, set the secret key in the following option in api/.env:
BC_STRIPE_SECRET_KEY=STRIPE_SECRET_KEY
Don't expose stripe secret key on a website or embed it in a mobile application. It must be secret and stored securely in the server-side.
In stripe, all accounts have a total of four API keys by default - two for test mode and two for live mode:
- Test mode secret key: Use this key to authenticate requests on your server when in test mode. By default, you can use this key to perform any API request without restriction.
- Test mode publishable key: Use this key for testing purposes in your web or mobile app’s client-side code.
- Live mode secret key: Use this key to authenticate requests on your server when in live mode. By default, you can use this key to perform any API request without restriction.
- Live mode publishable key: Use this key, when you’re ready to launch your app, in your web or mobile app’s client-side code.
Use only your test API keys for testing. This ensures that you don't accidentally modify your live customers or charges.
If you want to enable HTTPS, you need to set the following options:
BC_HTTPS = true
BC_PRIVATE_KEY=/etc/ssl/bookcars.ma.key
BC_CERTIFICATE=/etc/ssl/bookcars.ma.crt
If you want to use Google reCAPTCHA on the frontend, you need to set:
BC_RECAPTCHA_SECRET=RECAPTCHA_SECRET
- Create /opt/bookcars/backend/.env file:
VITE_PORT=3001
VITE_NODE_ENV=production
VITE_BC_API_HOST=http://localhost:4002
VITE_BC_DEFAULT_LANGUAGE=en
VITE_BC_PAGE_SIZE=30
VITE_BC_CARS_PAGE_SIZE=15
VITE_BC_BOOKINGS_PAGE_SIZE=20
VITE_BC_BOOKINGS_MOBILE_PAGE_SIZE=10
VITE_BC_CDN_USERS=http://localhost/cdn/bookcars/users
VITE_BC_CDN_TEMP_USERS=http://localhost/cdn/bookcars/temp/users
VITE_BC_CDN_CARS=http://localhost/cdn/bookcars/cars
VITE_BC_CDN_TEMP_CARS=http://localhost/cdn/bookcars/temp/cars
VITE_BC_CDN_LOCATIONS=http://localhost/cdn/bookcars/locations
VITE_BC_CDN_TEMP_LOCATIONS=http://localhost/cdn/bookcars/temp/locations
VITE_BC_SUPPLIER_IMAGE_WIDTH=60
VITE_BC_SUPPLIER_IMAGE_HEIGHT=30
VITE_BC_CAR_IMAGE_WIDTH=300
VITE_BC_CAR_IMAGE_HEIGHT=200
VITE_BC_MINIMUM_AGE=21
VITE_BC_PAGINATION_MODE=classic
VITE_BC_CURRENCY=$
VITE_BC_DEPOSIT_FILTER_VALUE_1=250
VITE_BC_DEPOSIT_FILTER_VALUE_2=500
VITE_BC_DEPOSIT_FILTER_VALUE_3=750
You need to configure the following options:
VITE_BC_API_HOST=http://localhost:4002
VITE_BC_CDN_USERS=http://localhost/cdn/bookcars/users
VITE_BC_CDN_TEMP_USERS=http://localhost/cdn/bookcars/temp/users
VITE_BC_CDN_CARS=http://localhost/cdn/bookcars/cars
VITE_BC_CDN_TEMP_CARS=http://localhost/cdn/bookcars/temp/cars
VITE_BC_CDN_LOCATIONS=http://localhost/cdn/bookcars/locations
VITE_BC_CDN_TEMP_LOCATIONS=http://localhost/cdn/bookcars/temp/locations
Leave
localhostif you want to test locally or replace it with an IP, hostname or FQDN.
VITE_BC_PAGINATION_MODE: You can choose betweenclassicorinfinite_scroll. This option defaults toclassic. If you chooseclassic, you will get a classic pagination with next and previous buttons on desktop and infinite scroll on mobile. If you chooseinfinite_scroll, you will get infinite scroll on desktop and mobile. - Create /opt/bookcars/frontend/.env file:
VITE_NODE_ENV=production
VITE_BC_API_HOST=http://localhost:4002
VITE_BC_RECAPTCHA_ENABLED=false
VITE_BC_RECAPTCHA_SITE_KEY=GOOGLE_RECAPTCHA_SITE_KEY
VITE_BC_DEFAULT_LANGUAGE=en
VITE_BC_PAGE_SIZE=30
VITE_BC_CARS_PAGE_SIZE=15
VITE_BC_BOOKINGS_PAGE_SIZE=20
VITE_BC_BOOKINGS_MOBILE_PAGE_SIZE=10
VITE_BC_CDN_USERS=http://localhost/cdn/bookcars/users
VITE_BC_CDN_CARS=http://localhost/cdn/bookcars/cars
VITE_BC_CDN_LOCATIONS=http://localhost/cdn/bookcars/locations
VITE_BC_SUPPLIER_IMAGE_WIDTH=60
VITE_BC_SUPPLIER_IMAGE_HEIGHT=30
VITE_BC_CAR_IMAGE_WIDTH=300
VITE_BC_CAR_IMAGE_HEIGHT=200
VITE_BC_MINIMUM_AGE=21
VITE_BC_PAGINATION_MODE=classic
VITE_BC_STRIPE_PUBLISHABLE_KEY=STRIPE_PUBLISHABLE_KEY
VITE_BC_STRIPE_CURRENCY_CODE=USD
VITE_BC_SET_LANGUAGE_FROM_IP=false
VITE_BC_GOOGLE_ANALYTICS_ENABLED=false
VITE_BC_GOOGLE_ANALYTICS_ID=G-XXXXXXXXXX
VITE_BC_CONTACT_EMAIL=info@bookcars.ma
VITE_BC_DEPOSIT_FILTER_VALUE_1=250
VITE_BC_DEPOSIT_FILTER_VALUE_2=500
VITE_BC_DEPOSIT_FILTER_VALUE_3=750
You need to configure the following options:
VITE_BC_API_HOST=http://localhost:4002
VITE_BC_CDN_USERS=http://localhost/cdn/bookcars/users
VITE_BC_CDN_CARS=http://localhost/cdn/bookcars/cars
VITE_BC_CDN_LOCATIONS=http://localhost/cdn/bookcars/locations
VITE_BC_STRIPE_PUBLISHABLE_KEY=STRIPE_PUBLISHABLE_KEY
VITE_BC_STRIPE_CURRENCY_CODE=USD
VITE_BC_CONTACT_EMAIL=info@bookcars.ma
Leave
localhostif you want to test locally or replace it with an IP, hostname or FQDN.If you want to enable stripe payment gateway, set stripe publishable key in
VITE_BC_STRIPE_PUBLISHABLE_KEY. You can retrieve it from stripe dashboard.
VITE_BC_STRIPE_CURRENCY_CODEis the three-letter ISO 4217 alphabetic currency code, e.g. "USD" or "EUR". Required for Stripe payments. Must be a supported currency: https://docs.stripe.com/currenciesreCAPTCHA is by default disabled. If you want to enable it, you need to set
VITE_BC_RECAPTCHA_ENABLEDtotrueandVITE_BC_RECAPTCHA_SITE_KEYto Google reCAPTCHA site key.
Emails sent from the contact form are sent to:VITE_BC_CONTACT_EMAIL=info@bookcars.ma
If you want to enable Google Analytics, set the following options:
VITE_BC_GOOGLE_ANALYTICS_ENABLED=true
VITE_BC_GOOGLE_ANALYTICS_ID=G-XXXXXXXXXX
- If you want to run or build the mobile app, you need to create mobile/.env:
BC_API_HOST=https://bookcars.ma:4002
BC_DEFAULT_LANGUAGE=en
BC_PAGE_SIZE=20
BC_CARS_PAGE_SIZE=8
BC_BOOKINGS_PAGE_SIZE=8
BC_CDN_USERS=https://bookcars.ma/cdn/bookcars/users
BC_CDN_CARS=https://bookcars.ma/cdn/bookcars/cars
BC_SUPPLIER_IMAGE_WIDTH=60
BC_SUPPLIER_IMAGE_HEIGHT=30
BC_CAR_IMAGE_WIDTH=300
BC_CAR_IMAGE_HEIGHT=200
BC_MINIMUM_AGE=21
BC_STRIPE_PUBLISHABLE_KEY=STRIPE_PUBLISHABLE_KEY
BC_STRIPE_MERCHANT_IDENTIFIER=MERCHANT_IDENTIFIER
BC_STRIPE_COUNTRY_CODE=US
BC_STRIPE_CURRENCY_CODE=USD
BC_CURRENCY=$
You need to configure the following options:
BC_API_HOST=https://bookcars.ma:4002
BC_CDN_USERS=https://bookcars.ma/cdn/bookcars/users
BC_CDN_CARS=https://bookcars.ma/cdn/bookcars/cars
BC_STRIPE_PUBLISHABLE_KEY=STRIPE_PUBLISHABLE_KEY
BC_STRIPE_MERCHANT_IDENTIFIER=MERCHANT_IDENTIFIER
BC_STRIPE_COUNTRY_CODE=US
BC_STRIPE_CURRENCY_CODE=USD
BC_CURRENCY=$
Replace
localhostwith an IP, hostname or FQDN.If you want to enable stripe payment gateway, set stripe publishable key in
BC_STRIPE_PUBLISHABLE_KEY. You can retrieve it from stripe dashboard.BC_STRIPE_MERCHANT_IDENTIFIERis the merchant identifier you registered with Apple for use with Apple Pay.BC_STRIPE_COUNTRY_CODEis the two-letter ISO 3166 code of the country of your business, e.g. "US". Required for Stripe payments.BC_STRIPE_CURRENCY_CODEis the three-letter ISO 4217 alphabetic currency code, e.g. "USD" or "EUR". Required for Stripe payments. Must be a supported currency: https://docs.stripe.com/currencies - Configure NGINX:
sudo nano /etc/nginx/sites-available/default
Change the configuration as follow for the frontend:
server {
  root /var/www/bookcars/frontend;
  #listen 443 http2 ssl default_server;
  listen 80 default_server;
  server_name _;

  #ssl_certificate_key /etc/ssl/bookcars.ma.key;
  #ssl_certificate /etc/ssl/bookcars.ma.pem;

  access_log /var/log/nginx/bookcars.frontend.access.log;
  error_log /var/log/nginx/bookcars.frontend.error.log;

  index index.html;

  location / {
      # First attempt to serve request as file, then as directory,
      # then as index.html, then fall back to displaying a 404.
      try_files $uri $uri/ /index.html =404;
  }

  location /cdn {
    alias /var/www/cdn;
  }
}
If you want to enable SSL, uncomment and set these lines:
#listen 443 http2 ssl default_server
#ssl_certificate_key /etc/ssl/bookcars.ma.key
#ssl_certificate /etc/ssl/bookcars.ma.pem;
Add the following configuration for the backend:
server {
  root /var/www/bookcars/backend;
  #listen 3001 http2 ssl default_server;
  listen 3001 default_server;
  server_name _;

  #ssl_certificate_key /etc/ssl/bookcars.ma.key;
  #ssl_certificate /etc/ssl/bookcars.ma.pem;

  #error_page 497 301 =307 https://$host:$server_port$request_uri;

  access_log /var/log/nginx/bookcars.backend.access.log;
  error_log /var/log/nginx/bookcars.backend.error.log;

  index index.html;

  location / {
      # First attempt to serve request as file, then as directory,
      # then as index.html, then fall back to displaying a 404.
      try_files $uri $uri/ /index.html =404;
  }
}
Create
/var/www/cdn/bookcarsfolder and add full access permissions to the user who is running bookcars service on/var/www/cdn/bookcars.
If you want to enable SSL, uncomment and set these lines:#listen 3001 http2 ssl default_server #ssl_certificate_key /etc/ssl/bookcars.ma.key #ssl_certificate /etc/ssl/bookcars.ma.pem #error_page 497 301 =307 https://$host:$server_port$request_uri;
Then, check NGINX configuration and restart NGINX service:
sudo nginx -t
sudo systemctl restart nginx.service
sudo systemctl status nginx.service
- Enable the firewall and open BookCars ports:
sudo ufw enable
sudo ufw allow 4002/tcp
sudo ufw allow 80/tcp
sudo ufw allow 443/tcp
sudo ufw allow 3001/tcp
sudo ufw allow 27017/tcp
- Start bookcars service:
cd /opt/bookcars/api
npm install --omit=dev
sudo systemctl start bookcars.service
Make sure that BookCars service is running with the following command:
sudo systemctl status bookcars.service
Make sure that the database connection is established by checking the logs:
tail -f /var/log/bookcars.log
Or by opening this file:
tail -f /opt/bookcars/api/logs/all.log
Error logs are written in:
tail -f /opt/bookcars/api/logs/error.log
- Deploy BookCars:
bc-deploy all
BookCars backend is accessible on port 3001 and the frontend is accessible on port 80.
If you want to install BookCars on a VPS with small amount of RAM, you may encounter memory issues while running
bc-deploy all. In that case, you need to proceed as follow:- Run
bc-deploy apito install and run the API. - On your desktop PC, set up frontend/.env as described previously, then run the following commands from frontend folder:
npm install
npm run build
- Copy the content of frontend/build from your desktop PC to /var/www/bookcars/frontend on your VPS.
- On your desktop PC, set up backend/.env as described previously, then run the following commands from backend folder:
npm install
npm run build
- Copy the content of backend/build from your desktop PC to /var/www/bookcars/backend on your VPS.
- Restart NGINX:
sudo rm -rf /var/cache/nginx
sudo systemctl restart nginx
sudo systemctl status nginx
- Run
-
If you don't want to use the demo database, create an admin by navigating to hostname:3001/sign-up
-
Open backend/src/App.tsx and comment these lines to secure the backend:
const SignUp = lazy(() => import('./pages/SignUp'))
<Route exact path='/sign-up' element={<SignUp />} />
And run backend deployment again:
bc-deploy backend
If you want to deploy the frontend only, run the following command:
bc-deploy frontend
If you want to deploy the api only, run the following command:
bc-deploy api
If you want to deploy the api, the backend and the frontend, run the following command:
bc-deploy all
If you want to change the currency follow these instructions.
Installing (VPS)
This walkthrough shows how to install BookCars on a VPS running under Ubuntu 22.04 with at least 512MB of RAM and one CPU.
Installing (Docker)
BookCars can run in a Docker container on Linux and Docker Desktop for Windows or Mac.
Docker Image
This section describes how to build BookCars Docker image and run it in a Docker container.
- Clone BookCars repo:
git clone https://github.com/aelassas/bookcars.git
- Create ./api/.env.docker file with the following content:
NODE_ENV=production
BC_PORT=4002
BC_HTTPS=false
BC_PRIVATE_KEY=/etc/ssl/bookcars.key
BC_CERTIFICATE=/etc/ssl/bookcars.crt
BC_DB_URI=mongodb://admin:PASSWORD@mongo:27017/bookcars?authSource=admin&appName=bookcars
BC_DB_SSL=false
BC_DB_SSL_CERT=/etc/ssl/bookcars.crt
BC_DB_SSL_CA=/etc/ssl/bookcars.ca.pem
BC_DB_DEBUG=false
BC_COOKIE_SECRET=COOKIE_SECRET
BC_AUTH_COOKIE_DOMAIN=localhost
BC_JWT_SECRET=JWT_SECRET
BC_JWT_EXPIRE_AT=86400
BC_TOKEN_EXPIRE_AT=86400
BC_SMTP_HOST=smtp.sendgrid.net
BC_SMTP_PORT=587
BC_SMTP_USER=apikey
BC_SMTP_PASS=PASSWORD
BC_SMTP_FROM=admin@bookcars.ma
BC_CDN_USERS=/var/www/cdn/bookcars/users
BC_CDN_TEMP_USERS=/var/www/cdn/bookcars/temp/users
BC_CDN_CARS=/var/www/cdn/bookcars/cars
BC_CDN_TEMP_CARS=/var/www/cdn/bookcars/temp/cars
BC_CDN_LOCATIONS=/var/www/cdn/bookcars/locations
BC_CDN_TEMP_LOCATIONS=/var/www/cdn/bookcars/temp/locations
BC_DEFAULT_LANGUAGE=en
BC_BACKEND_HOST=http://localhost:3001/
BC_FRONTEND_HOST=http://localhost/
BC_MINIMUM_AGE=21
BC_EXPO_ACCESS_TOKEN=EXPO_ACCESS_TOKEN
BC_STRIPE_SECRET_KEY=STRIPE_SECRET_KEY
BC_ADMIN_EMAIL=admin@bookcars.ma
BC_RECAPTCHA_SECRET=RECAPTCHA_SECRET
Set the following options:
BC_DB_URI=mongodb://admin:PASSWORD@mongo:27017/bookcars?authSource=admin&appName=bookcars
BC_COOKIE_SECRET=COOKIE_SECRET
BC_AUTH_COOKIE_DOMAIN=localhost
BC_JWT_SECRET=JWT_SECRET
BC_SMTP_HOST=smtp.sendgrid.net
BC_SMTP_PORT=587
BC_SMTP_USER=apikey
BC_SMTP_PASS=PASSWORD
BC_SMTP_FROM=admin@bookcars.ma
BC_BACKEND_HOST=http://localhost:3001/
BC_FRONTEND_HOST=http://localhost/
BC_RECAPTCHA_SECRET=RECAPTCHA_SECRET
If you want to use MongoDB Atlas, put you MongoDB Atlas URI in
BC_DB_URIotherwise replacePASSWORDinBC_DB_URIwith your MongoDB password. ReplaceJWT_SECRETwith a secret token. Finally, set the SMTP options. SMTP options are necessary for sign up. You can use sendgrid or any other transactional email provider.If you choose sendgrid, create an account on sendgrid.com, login and go to the dashboard. On the left panel, click on Email API, then on Integration Guide. Then, choose SMTP Relay and follow the steps. You will be prompted to create an API Key. Once you create the API Key and verify the smtp relay, copy the API key in
BC_SMTP_PASSin ./api/.env. Sendgrid's free plan allows to send up to 100 emails/day. If you need to send more than 100 emails/day, switch to a paid plan or choose another transactional email provider.COOKIE_SECRETandJWT_SECRETshould at least be 32 characters long, but the longer the better. You can use an online password generator and set the password length to 32 or longer.The following settings are very important and if they are not set properly, authentication won't work:
BC_AUTH_COOKIE_DOMAIN=localhost
BC_BACKEND_HOST=http://localhost:3001/
BC_FRONTEND_HOST=http://localhost/
Replace
localhostwith an IP or FQDN. That is if you access the backend from http://<FQDN>:3001/.BC_BACKEND_HOSTshould be http://<FQDN>:3001/. The same goes forBC_FRONTEND_HOST. AndBC_AUTH_COOKIE_DOMAINshould be FQDN.Leave
localhostif you want to test locally.If you want to enable push notifications in the mobile app, follow these instructions and set the following option:
BC_EXPO_ACCESS_TOKEN=EXPO_ACCESS_TOKEN
If you want to enable stripe payment gateway, sign up for a stripe account, fill the forms and save the publishable key and the secret key from stripe dashboard. Then, set the secret key in the following option in api/.env:
BC_STRIPE_SECRET_KEY=STRIPE_SECRET_KEY
Don't expose stripe secret key on a website or embed it in a mobile application. It must be secret and stored securely in the server-side.
In stripe, all accounts have a total of four API keys by default - two for test mode and two for live mode:
- Test mode secret key: Use this key to authenticate requests on your server when in test mode. By default, you can use this key to perform any API request without restriction.
- Test mode publishable key: Use this key for testing purposes in your web or mobile app’s client-side code.
- Live mode secret key: Use this key to authenticate requests on your server when in live mode. By default, you can use this key to perform any API request without restriction.
- Live mode publishable key: Use this key, when you’re ready to launch your app, in your web or mobile app’s client-side code.
Use only your test API keys for testing. This ensures that you don't accidentally modify your live customers or charges.
If you want to use Google reCAPTCHA on the frontend, you need to set:
BC_RECAPTCHA_SECRET=RECAPTCHA_SECRET
- Create ./backend/.env.docker file with the following content:
VITE_NODE_ENV=production
VITE_BC_API_HOST=http://localhost:4002
VITE_BC_DEFAULT_LANGUAGE=en
VITE_BC_PAGE_SIZE=30
VITE_BC_CARS_PAGE_SIZE=15
VITE_BC_BOOKINGS_PAGE_SIZE=20
VITE_BC_BOOKINGS_MOBILE_PAGE_SIZE=10
VITE_BC_CDN_USERS=http://localhost/cdn/bookcars/users
VITE_BC_CDN_TEMP_USERS=http://localhost/cdn/bookcars/temp/users
VITE_BC_CDN_CARS=http://localhost/cdn/bookcars/cars
VITE_BC_CDN_TEMP_CARS=http://localhost/cdn/bookcars/temp/cars
VITE_BC_CDN_LOCATIONS=http://localhost/cdn/bookcars/locations
VITE_BC_CDN_TEMP_LOCATIONS=http://localhost/cdn/bookcars/temp/locations
VITE_BC_SUPPLIER_IMAGE_WIDTH=60
VITE_BC_SUPPLIER_IMAGE_HEIGHT=30
VITE_BC_CAR_IMAGE_WIDTH=300
VITE_BC_CAR_IMAGE_HEIGHT=200
VITE_BC_MINIMUM_AGE=21
VITE_BC_PAGINATION_MODE=classic
VITE_BC_CURRENCY=$
VITE_BC_DEPOSIT_FILTER_VALUE_1=250
VITE_BC_DEPOSIT_FILTER_VALUE_2=500
VITE_BC_DEPOSIT_FILTER_VALUE_3=750
Set the following options:
VITE_BC_API_HOST=http://localhost:4002
VITE_BC_CDN_USERS=http://localhost/cdn/bookcars/users
VITE_BC_CDN_TEMP_USERS=http://localhost/cdn/bookcars/temp/users
VITE_BC_CDN_CARS=http://localhost/cdn/bookcars/cars
VITE_BC_CDN_TEMP_CARS=http://localhost/cdn/bookcars/temp/cars
VITE_BC_CDN_LOCATIONS=http://localhost/cdn/bookcars/locations
VITE_BC_CDN_TEMP_LOCATIONS=http://localhost/cdn/bookcars/temp/locations
VITE_BC_CURRENCY=$
Leave
localhostif you want to test locally or Replace it with an IP, hostname or FQDN.If you want to change the pagination mode, change
VITE_BC_PAGINATION_MODEoption. You can choose betweenclassicorinfinite_scroll. This option defaults toclassic. If you chooseclassic, you will get a classic pagination with next and previous buttons on desktop and infinite scroll on mobile. If you chooseinfinite_scroll, you will get infinite scroll on desktop and mobile. - Create ./frontend/.env.docker file with the following content:
VITE_NODE_ENV=production
VITE_BC_API_HOST=http://localhost:4002
VITE_BC_RECAPTCHA_ENABLED=false
VITE_BC_DEFAULT_LANGUAGE=en
VITE_BC_PAGE_SIZE=30
VITE_BC_CARS_PAGE_SIZE=15
VITE_BC_BOOKINGS_PAGE_SIZE=20
VITE_BC_BOOKINGS_MOBILE_PAGE_SIZE=10
VITE_BC_CDN_USERS=http://localhost/cdn/bookcars/users
VITE_BC_CDN_CARS=http://localhost/cdn/bookcars/cars
VITE_BC_CDN_LOCATIONS=http://localhost/cdn/bookcars/locations
VITE_BC_SUPPLIER_IMAGE_WIDTH=60
VITE_BC_SUPPLIER_IMAGE_HEIGHT=30
VITE_BC_CAR_IMAGE_WIDTH=300
VITE_BC_CAR_IMAGE_HEIGHT=200
VITE_BC_MINIMUM_AGE=21
VITE_BC_PAGINATION_MODE=classic
VITE_BC_STRIPE_PUBLISHABLE_KEY=STRIPE_PUBLISHABLE_KEY
VITE_BC_STRIPE_CURRENCY_CODE=USD
VITE_BC_SET_LANGUAGE_FROM_IP=false
VITE_BC_GOOGLE_ANALYTICS_ENABLED=false
VITE_BC_GOOGLE_ANALYTICS_ID=G-XXXXXXXXXX
VITE_BC_CONTACT_EMAIL=info@bookcars.ma
VITE_BC_DEPOSIT_FILTER_VALUE_1=250
VITE_BC_DEPOSIT_FILTER_VALUE_2=500
VITE_BC_DEPOSIT_FILTER_VALUE_3=750
Set the following options:
VITE_BC_API_HOST=http://localhost:4002
VITE_BC_CDN_USERS=http://localhost/cdn/bookcars/users
VITE_BC_CDN_CARS=http://localhost/cdn/bookcars/cars
VITE_BC_CDN_LOCATIONS=http://localhost/cdn/bookcars/locations
VITE_BC_STRIPE_PUBLISHABLE_KEY=STRIPE_PUBLISHABLE_KEY
VITE_BC_STRIPE_CURRENCY_CODE=USD
VITE_BC_SET_LANGUAGE_FROM_IP=false
VITE_BC_GOOGLE_ANALYTICS_ENABLED=false
VITE_BC_GOOGLE_ANALYTICS_ID=G-XXXXXXXXXX
VITE_BC_CONTACT_EMAIL=info@bookcars.ma
Leave
localhostif you want to test locally or Replace it with an IP, hostname or FQDN.If you want to enable stripe payment gateway, set stripe publishable key in
VITE_BC_STRIPE_PUBLISHABLE_KEY. You can retrieve it from stripe dashboard.
VITE_BC_STRIPE_CURRENCY_CODEis the three-letter ISO 4217 alphabetic currency code, e.g. "USD" or "EUR". Required for Stripe payments. Must be a supported currency: https://docs.stripe.com/currenciesIf you want to change pagination mode, change
VITE_BC_PAGINATION_MODEoption.reCAPTCHA is by default disabled on the frontend. If you want to enable it, you have to set
VITE_BC_RECAPTCHA_ENABLEDtotrueandVITE_BC_RECAPTCHA_SITE_KEYto Google reCAPTCHA site key.Emails sent from the contact form are sent to:
VITE_BC_CONTACT_EMAIL=info@bookcars.ma
If you want to enable Google Analytics, set the following options:
VITE_BC_GOOGLE_ANALYTICS_ENABLED=true
VITE_BC_GOOGLE_ANALYTICS_ID=G-XXXXXXXXXX
- Open ./docker-compose.yml and set MongoDB password:
version: "3.8"
services:
api:
  build:
    context: .
    dockerfile: ./api/Dockerfile
  env_file: ./api/.env.docker
  restart: always
  ports:
    - 4002:4002
  depends_on:
    - mongo
  volumes:
    - cdn:/var/www/cdn/bookcars

mongo:
  image: mongo:latest
  command: mongod --quiet --logpath /dev/null
  restart: always
  environment:
    # Provide your credentials here
    MONGO_INITDB_ROOT_USERNAME: admin
    MONGO_INITDB_ROOT_PASSWORD: PASSWORD
  ports:
    - 27017:27017

backend:
  build:
    context: .
    dockerfile: ./backend/Dockerfile
  depends_on:
    - api
  ports:
    - 3001:3001

frontend:
  build:
    context: .
    dockerfile: ./frontend/Dockerfile
  depends_on:
    - api
  ports:
    - 80:80
  volumes:
    - cdn:/var/www/cdn/bookcars

volumes:
cdn:
If you want to use MongoDB Atlas, remove
mongocontainer. Otherwise, replacePASSWORDwith the password that you have set inBC_DB_URIin ./api/.env.docker. - Build and run Docker image:
sudo docker compose up
To run the compose in background, add the
-doption with the command:sudo docker compose up -d
If you want to rebuild, use the following command:
docker compose up --build --force-recreate --no-deps api backend frontend
If you want to check the logs of the containers for troubleshooting, use the following command:
sudo docker compose logs
If you want to rebuild without cache, use the following commands:
docker compose build --no-cache api backend frontend
docker compose up
That's it! BookCars backend is accessible from http://<hostname>:3001 and BookCars frontend is accessible from http://<hostname>.
If you run BookCars for the first time, you'll start from an empty database. So you have to create an admin from the backend by filling the from http://<hostname>:3001/sign-up. SMTP settings need to be configured to process sign up. Then, secure the backend by opening backend/src/App.tsx and commenting the following lines:
const SignUp = lazy(() => import('./pages/SignUp'))
<Route exact path='/sign-up' element={<Signup />} />
You'll need to rebuild and run Docker image:
sudo docker compose build --no-cache
sudo docker compose up
Once you create the admin user, do the following:
- Go to the suppliers page and create one or multiple suppliers
- Go to the locations page and create one or multiple locations
- Go to the cars page and create one or multiple cars
- Go to the frontend, sign up, choose a car and checkout.
Finally, you will see bookings listed in the backend dashboard.
You can use the demo database if you want.
Below are Docker configuration files:
- API: Dockerfile
- Backend: Dockerfile
- Frontend: Dockerfile
- BookCars: docker-compose.yml
That's it. You can explore the other pages in the backend and the frontend.
SSL
This section will walk you through how to enable SSL in the API, the backend and the frontend in a docker container.
Copy your private key bookcars.key and your certificate bookcars.crt in ./.
bookcars.key will be loaded as /etc/ssl/bookcars.key and bookcars.crt will be loaded as /etc/ssl/bookcars.crt in ./docker-compose.yml.
API
For the API, update ./api/.env.docker as follow to enable SSL:
BC_HTTPS=true
BC_PRIVATE_KEY=/etc/ssl/bookcars.key
BC_CERTIFICATE=/etc/ssl/bookcars.crt
BC_BACKEND_HOST=http://localhost:3001/
BC_FRONTEND_HOST=http://localhost/
Replace http://localhost with https://<fqdn>.
Backend
For the backend, update the following options in ./backend/.env.docker:
VITE_BC_API_HOST=http://localhost:4002
VITE_BC_CDN_USERS=http://localhost/cdn/bookcars/users
VITE_BC_CDN_TEMP_USERS=http://localhost/cdn/bookcars/temp/users
VITE_BC_CDN_CARS=http://localhost/cdn/bookcars/cars
VITE_BC_CDN_TEMP_CARS=http://localhost/cdn/bookcars/temp/cars
VITE_BC_CDN_LOCATIONS=http://localhost/cdn/bookcars/locations
VITE_BC_CDN_TEMP_LOCATIONS=http://localhost/cdn/bookcars/temp/locations
Replace http://localhost with https://<fqdn>.
Then, update ./backend/nginx.conf as follow to enable SSL:
server {
  listen 3001 ssl;
  root /usr/share/nginx/html;
  index index.html;

  ssl_certificate_key /etc/ssl/bookcars.key;
  ssl_certificate /etc/ssl/bookcars.crt;

  error_page 497 301 =307 https://$host:$server_port$request_uri;

  access_log /var/log/nginx/backend.access.log;
  error_log /var/log/nginx/backend.error.log;

  location / {
      # First attempt to serve request as file, then as directory,
      # then as index.html, then fall back to displaying a 404.
      try_files $uri $uri/ /index.html =404;
  }
}
Frontend
For the frontend, update the following options in ./frontend/.env.docker:
VITE_BC_API_HOST=http://localhost:4002
VITE_BC_CDN_USERS=http://localhost/cdn/bookcars/users
VITE_BC_CDN_CARS=http://localhost/cdn/bookcars/cars
VITE_BC_CDN_LOCATIONS=http://localhost/cdn/bookcars/locations
Replace http://localhost with https://<fqdn>.
Add the port 443 to ./frontend/Dokerfile as follow:
# syntax=docker/dockerfile:1

FROM node:lts-alpine as build
WORKDIR /frontend
COPY . .
COPY ./.env.docker ./.env
RUN npm install
RUN npm run build

FROM nginx:stable-alpine
COPY --from=build /frontend/build /usr/share/nginx/html
COPY nginx.conf /etc/nginx/conf.d/default.conf
CMD ["nginx", "-g", "daemon off;"]
EXPOSE 80
EXPOSE 443
Then, update ./frontend/nginx.conf as follow to enable SSL:
server {
  listen 80;
  return 301 https://$host$request_uri;
}
server {
  listen 443 ssl;
  root /usr/share/nginx/html;
  index index.html;

  ssl_certificate_key /etc/ssl/bookcars.key;
  ssl_certificate /etc/ssl/bookcars.crt;

  access_log /var/log/nginx/frontend.access.log;
  error_log /var/log/nginx/frontend.error.log;

  location / {
    # First attempt to serve request as file, then as directory,
    # then as index.html, then fall back to displaying a 404.
    try_files $uri $uri/ /index.html =404;
  }

  location /cdn {
    alias /var/www/cdn;
  }
}
docker-compose.yml
Update ./docker-compose.yml to load your private key bookcars.key and your certificate bookcars.crt, and add the port 443 to the frontend as follow:
version: "3.8"
services:
api:
  build:
    context: .
    dockerfile: ./api/Dockerfile
  env_file: ./api/.env.docker
  restart: always
  ports:
    - 4002:4002
  depends_on:
    - mongo
  volumes:
    - cdn:/var/www/cdn/bookcars
    - ./bookcars.key:/etc/ssl/bookcars.key
    - ./bookcars.crt:/etc/ssl/bookcars.crt

mongo:
  image: mongo:latest
  restart: always
  environment:
    # Provide your credentials here
    MONGO_INITDB_ROOT_USERNAME: admin
    MONGO_INITDB_ROOT_PASSWORD: PASSWORD
  ports:
    - 27017:27017

backend:
  build:
    context: .
    dockerfile: ./backend/Dockerfile
  depends_on:
    - api
  ports:
    - 3001:3001
  volumes:
    - ./bookcars.key:/etc/ssl/bookcars.key
    - ./bookcars.crt:/etc/ssl/bookcars.crt

frontend:
  build:
    context: .
    dockerfile: ./frontend/Dockerfile
  depends_on:
    - api
  ports:
    - 80:80
    - 443:443
  volumes:
    - cdn:/var/www/cdn/bookcars
    - ./bookcars.key:/etc/ssl/bookcars.key
    - ./bookcars.crt:/etc/ssl/bookcars.crt

volumes:
cdn:
Rebuild and run Docker image:
sudo docker compose build --no-cache
sudo docker compose up
Setup Stripe
If you want to enable stripe payment gateway, sign up for a stripe account, fill the forms and save the publishable key and the secret key from Stripe Developers Dashboard.
Don't expose stripe secret key on a website or embed it in a mobile application. It must be secret and stored securely in the server-side.
In stripe, all accounts have a total of four API keys by default-two for test mode and two for live mode:
- Test mode secret key: Use this key to authenticate requests on your server when in test mode. By default, you can use this key to perform any API request without restriction.
- Test mode publishable key: Use this key for testing purposes in your web or mobile app’s client-side code.
- Live mode secret key: Use this key to authenticate requests on your server when in live mode. By default, you can use this key to perform any API request without restriction.
- Live mode publishable key: Use this key, when you’re ready to launch your app, in your web or mobile app’s client-side code.
You can find your secret and publishable keys on the API keys page in Stripe Developers Dashboard.
Use only your test API keys for testing and development. This ensures that you don't accidentally modify your live customers or charges.
On production, use HTTPS in the API, the backend, the frontend and the mobile app to be able to use stripe payment gateway.
API
Set stripe secret key in the following option in api/.env:
BC_STRIPE_SECRET_KEY=STRIPE_SECRET_KEY
Frontend
Set Stripe publishable key and currency in the following options in frontend/.env:
VITE_BC_STRIPE_PUBLISHABLE_KEY=STRIPE_PUBLISHABLE_KEY
VITE_BC_STRIPE_CURRENCY_CODE=USD
Mobile App
Set Stripe publishable key and other Stripe settings in mobile/.env:
BC_STRIPE_PUBLISHABLE_KEY=STRIPE_PUBLISHABLE_KEY
BC_STRIPE_MERCHANT_IDENTIFIER=MERCHANT_IDENTIFIER
BC_STRIPE_COUNTRY_CODE=US
BC_STRIPE_CURRENCY_CODE=USD
BC_STRIPE_MERCHANT_IDENTIFIER is the merchant identifier you registered with Apple for use with Apple Pay.
BC_STRIPE_COUNTRY_CODE is the two-letter ISO 3166 code of the country of your business, e.g. "US". Required for Stripe payments.
BC_STRIPE_CURRENCY_CODE is the three-letter ISO 4217 alphabetic currency code, e.g. "USD" or "EUR". Required for Stripe payments. Must be a supported currency: https://docs.stripe.com/currencies
You also need to set merchantIdentifier in plugins sections in mobile/app.json if you want to enable Apple Pay.
Google Pay
Google Pay is not supported in Expo Go. To use Google Pay, you must create a development build. This can be done with EAS Build, or locally by running npx expo run:android.
Apple Pay
Apple Pay is not supported in Expo Go. To use Apple Pay, you must create a development build. This can be done with EAS Build, or locally by running npx expo run:ios.
Change Currency
To change the currency, follow these instructions:
Frontend
Open frontend/.env and change VITE_BC_CURRENCY and VITE_BC_STRIPE_CURRENCY_CODE settings.
By default, it is set to:
VITE_BC_CURRENCY=$
VITE_BC_STRIPE_CURRENCY_CODE=USD
For example, if you want to change to euro:
VITE_BC_CURRENCY=€
VITE_BC_STRIPE_CURRENCY_CODE=EUR
On production, you need to rebuild the frontend to apply changes.
Backend
Open backend/.env and change VITE_BC_CURRENCY setting.
By default, it is set to:
VITE_BC_CURRENCY=$
On production, you need to rebuild the backend to apply changes.
Mobile App
Open mobile/.env and change BC_CURRENCY and BC_STRIPE_CURRENCY_CODE settings.
By default, it is set to:
BC_CURRENCY=$
BC_STRIPE_CURRENCY_CODE=USD
For example, if you want to change to euro:
BC_CURRENCY=€
BC_STRIPE_CURRENCY_CODE=EUR
On production, you need to rebuild the mobile app to apply changes.
Add New Language
To add a new language proceed as follow:
API
- Add the new language ISO 639-1 code to
LANGUAGESsetting in api/src/config/env.config.ts. - Create a new file <ISO 639-1 code>.ts in src/lang folder and add the translations in it.
- Add your translations to src/lang/i18n.ts
Backend and frontend
- Add the new language ISO 639-1 code and its label in src/config/env.config.ts in
LANGUAGESconstant. - Add the translations in src/lang/*.ts.
Mobile App
- Add the new language ISO 639-1 code and its label in config/env.config.ts in
LANGUAGESconstant. - Create a new file <ISO 639-1 code>.ts in lang folder and add the translations in it.
- Add your translations to lang/i18n.ts
Demo Database
Windows, Linux and macOS
- Download and install MongoDB Command Line Database Tools.
- On Windows, add MongoDB Command Line Database Tools folder to
Pathenvironment variable. - Download bookcars-db.zip down to your machine, unzip it and go to the unzipped folder from a terminal.
- Restore BookCars demo db by using the following command:
mongorestore --verbose --drop --gzip --host=127.0.0.1 --port=27017 --username=admin --password=$PASSWORD --authenticationDatabase=admin --nsInclude="bookcars.*" --archive=bookcars.gz
Replace $PASSWORD with your MongoDB password.
If you are using MongoDB Atlas, put your MongoDB Atlas URI in --uri= command line argument:
mongorestore --verbose --drop --gzip --uri="mongodb://admin:$PASSWORD@127.0.0.1:27017/bookcars?authSource=admin&appName=bookcars" --nsInclude="bookcars.*" --nsFrom="bookcars.*" --nsTo="bookcars.*" --archive=bookcars.gz
Copy the content of cdn folder on your web server so that the files will be accessible through http://localhost/cdn/bookcars/
cdn folder contains the following folders:
- users: This folder contains users’ avatars and suppliers’ images.
- cars: This folder contains cars’ images.
- temp: This folder contains temporay files.
If you want to run BookCars from the source code or install it on Windows or Linux without using Docker, proceed as follow:
- On Windows, install IIS and copy the content of cdn folder in C:\inetpub\wwwroot\cdn\bookcars. Finally, add full access permissions to the user who is running BookCars API on C:\inetpub\wwwroot\cdn\bookcars.
- On Linux, install NGINX and copy content of cdn folder in /var/www/cdn/bookcars. Then, update /etc/nginx/sites-enabled/default as follow:
server {
  listen 80 default_server;
  server_name _;

  ...

  location /cdn {
    alias /var/www/cdn;
  }
}
Finally, add full access permissions to the user who is running BookCars API on /var/www/cdn/bookcars.
Backend credentials:
- Username: admin@bookcars.ma
- Password: B00kC4r5
Frontend and mobile app credentials:
- Username: jdoe@bookcars.ma
- Password: B00kC4r5
Docker
To restore BookCars demo database in Docker containers, proceed as follow:
- Make sure that the ports 80, 3001, 4002 and 27017 are not used by any application.
- Download and install MongoDB Command Line Database Tools on your local machine.
- Add MongoDB Command Line Database Tools folder to
Pathenvironment variable in your local machine. - Download bookcars-db.zip down to your local machine and unzip it.
- Run the compose:
docker compose up
- Go to bookcars-db folder and restore the demo database with the following command:
mongorestore --verbose --drop --gzip --host=127.0.0.1 --port=27017 --username=admin --password=$PASSWORD --authenticationDatabase=admin --nsInclude="bookcars.*" --archive=bookcars.gz
Replace$PASSWORDwith your MongoDB password set in your docker-compose.yml - Get API Docker container name with the following command:
docker container ls
The name should be something like this:src-api-1 - Go to bookcars-db/cdn folder and copy the content of the folder in API container with the following commands:
docker cp ./cdn/users src-api-1:/var/www/cdn/bookcars
docker cp ./cdn/cars src-api-1:/var/www/cdn/bookcars
Replacesrc-api-1with your API container name. - Go to the backend http://localhost:3001 and login with the following credentials:
Username: admin@bookcars.ma
Password: B00kC4r5 - Go to the frontend http://localhost and login with the following credentials:
Username: jdoe@bookcars.ma
Password: B00kC4r5
Build Mobile App
Prerequisites
To build BookCars the mobile app, you need to have the following tools installed on your machine:
Install eas-cli with the following command:
npm i -g eas-cli
Configuration
-
You need to download the google-services.json file and place it in ./mobile root directory for push notifications. Otherwise, the mobile app won't build. Don't forget to set Firebase Server key in expo.dev > Credentials > Service Credentials > Google Cloud Messaging Token as stated in the documentation.
-
If you don't have an Expo account, you'll need to create one to build BookCars mobile app.
-
Go to expo.dev, Click on Pojects then Create a Project. Set BookCars as project name and click on Create.
-
Go to BookCars project and copy the project ID. Open ./mobile/app.json and paste the project ID in
extra.eas.projectId. -
Create an Expo Access Token from expo.dev (Account Settings > Access Tokens) and set api/.env
BC_EXPO_ACCESS_TOKENsetting:BC_EXPO_ACCESS_TOKEN=EXPO_ACCESS_TOKEN
- Create mobile/.env file with the following content:
BC_API_HOST=https://bookcars.ma:4002
BC_DEFAULT_LANGUAGE=en
BC_PAGE_SIZE=20
BC_CARS_PAGE_SIZE=8
BC_BOOKINGS_PAGE_SIZE=8
BC_CDN_USERS=https://bookcars.ma/cdn/bookcars/users
BC_CDN_CARS=https://bookcars.ma/cdn/bookcars/cars
BC_SUPPLIER_IMAGE_WIDTH=60
BC_SUPPLIER_IMAGE_HEIGHT=30
BC_CAR_IMAGE_WIDTH=300
BC_CAR_IMAGE_HEIGHT=200
BC_MINIMUM_AGE=21
BC_STRIPE_PUBLISHABLE_KEY=STRIPE_PUBLISHABLE_KEY
BC_STRIPE_MERCHANT_IDENTIFIER=MERCHANT_IDENTIFIER
BC_STRIPE_COUNTRY_CODE=US
BC_STRIPE_CURRENCY_CODE=USD
BC_CURRENCY=$
You need to configure the following options:
BC_API_HOST=https://bookcars.ma:4002
BC_CDN_USERS=https://bookcars.ma/cdn/bookcars/users
BC_CDN_CARS=https://bookcars.ma/cdn/bookcars/cars
BC_STRIPE_PUBLISHABLE_KEY=STRIPE_PUBLISHABLE_KEY
BC_STRIPE_MERCHANT_IDENTIFIER=MERCHANT_IDENTIFIER
BC_STRIPE_COUNTRY_CODE=US
BC_STRIPE_CURRENCY_CODE=USD
BC_CURRENCY=$
Replace
https://bookcars.mawith an IP or FQDN.If you want to enable stripe payment gateway, set stripe publishable key in
BC_STRIPE_PUBLISHABLE_KEY. You can retrieve it from stripe dashboard.BC_STRIPE_MERCHANT_IDENTIFIERis the merchant identifier you registered with Apple for use with Apple Pay.BC_STRIPE_COUNTRY_CODEis the two-letter ISO 3166 code of the country of your business, e.g. "US". Required for Stripe payments.BC_STRIPE_CURRENCY_CODEis the three-letter ISO 4217 alphabetic currency code, e.g. "USD" or "EUR". Required for Stripe payments. Must be a supported currency: https://docs.stripe.com/currencies
Production Build
If you want to use BookCars mobile app on production, you should use HTTPS in BookCars API and disable usesCleartextTraffic expo plugin in ./mobile/app.json by removing the line "./plugins/usesCleartextTraffic" in plugins section.
Instructions
- Clone the source down to your machine:
git clone https://github.com/aelassas/bookcars.git
- Go to mobile folder:
cd ./mobile
- Run the following command:
npm install
Android
EAS Build
To build BookCars Android app with EAS Build hosted service, run the following command:
npm run build:android
Local Build
macOS or Linux are required for local builds. For Windows, you should use EAS Builds.
You need to install Android Studio, openjdk-17, and set ANDROID_HOME and JAVA_HOME environment variables. Then, run the following command:
npm run build:android:local
On macOS, if you face some issues regarding local build, try to set ANDROID_HOME and JAVA_HOME environment variables in ./mobile/eas.json as follows:
{
"cli": {
  "version": ">= 0.53.0"
},
"build": {
  "development": {
    "developmentClient": true,
    "distribution": "internal",
    "android": {
      "image": "latest",
      "gradleCommand": ":app:assembleDebug"
    },
    "ios": {
      "image": "latest",
      "buildConfiguration": "Debug"
    }
  },
  "preview": {
    "distribution": "internal"
  },
  "production": {
    "env": {
      "ANDROID_HOME": "/path/to/android/sdk",
      "JAVA_HOME": "/path/to/java/home"
    },
    "android": {
      "image": "latest",
      "buildType": "apk"
    },
    "ios": {
      "image": "latest"
    }
  }
},
"submit": {
  "production": {}
}
}
iOS
EAS Build
To build BookCars iOS app, run the following command:
npm run build:ios
Local Build
You need to install fastlane and CocoaPods on macOS.
To build BookCars iOS app locally, run the following command:
npm run build:ios:local
Run from Source
Below are the instructions to run BookCars from source code.
Prerequisites
-
Install git, Node.js, NGINX or IIS on Windows, MongoDB and mongosh. If you want to use MongoDB Atlas, you can skip installing and configuring MongoDB.
-
Configure MongoDB:
mongosh
Create admin user:
db = db.getSiblingDB('admin')
db.createUser({ user: "admin" , pwd: "PASSWORD",
roles: ["userAdminAnyDatabase", "dbAdminAnyDatabase", "readWriteAnyDatabase"]})
Replace
PASSWORDwith a strong password.Secure MongoDB by changing mongod.conf as follow:
net:
port: 27017
bindIp: 0.0.0.0

security:
authorization: enabled
Restart MongoDB service.
Instructions
- Clone BookCars repo:
git clone https://github.com/aelassas/bookcars.git
- Create api/.env file with the following content:
NODE_ENV=development
BC_PORT=4002
BC_HTTPS=false
BC_PRIVATE_KEY=/etc/ssl/bookcars.ma.key
BC_CERTIFICATE=/etc/ssl/bookcars.ma.crt
BC_DB_URI=mongodb://admin:PASSWORD@127.0.0.1:27017/bookcars?authSource=admin&appName=bookcars
BC_DB_SSL=false
BC_DB_SSL_CERT=/etc/ssl/bookcars.ma.crt
BC_DB_SSL_CA=/etc/ssl/bookcars.ma.ca.pem
BC_DB_DEBUG=false
BC_COOKIE_SECRET=COOKIE_SECRET
BC_AUTH_COOKIE_DOMAIN=localhost
BC_JWT_SECRET=JWT_SECRET
BC_JWT_EXPIRE_AT=86400
BC_TOKEN_EXPIRE_AT=86400
BC_SMTP_HOST=smtp.sendgrid.net
BC_SMTP_PORT=587
BC_SMTP_USER=apikey
BC_SMTP_PASS=PASSWORD
BC_SMTP_FROM=admin@bookcars.ma
BC_CDN_USERS=/var/www/cdn/bookcars/users
BC_CDN_TEMP_USERS=/var/www/cdn/bookcars/temp/users
BC_CDN_CARS=/var/www/cdn/bookcars/cars
BC_CDN_TEMP_CARS=/var/www/cdn/bookcars/temp/cars
BC_CDN_LOCATIONS=/var/www/cdn/bookcars/locations
BC_CDN_TEMP_LOCATIONS=/var/www/cdn/bookcars/temp/locations
BC_DEFAULT_LANGUAGE=en
BC_BACKEND_HOST=http://localhost:3001/
BC_FRONTEND_HOST=http://localhost:3002/
BC_MINIMUM_AGE=21
BC_EXPO_ACCESS_TOKEN=EXPO_ACCESS_TOKEN
BC_STRIPE_SECRET_KEY=STRIPE_SECRET_KEY
BC_ADMIN_EMAIL=admin@bookcars.ma
BC_RECAPTCHA_SECRET=RECAPTCHA_SECRET
On Windows, install IIS and update the following settings with these values:
BC_CDN_USERS=C:\inetpub\wwwroot\cdn\bookcars\users
BC_CDN_TEMP_USERS=C:\inetpub\wwwroot\cdn\bookcars\temp\users
BC_CDN_CARS=C:\inetpub\wwwroot\cdn\bookcars\cars
BC_CDN_TEMP_CARS=C:\inetpub\wwwroot\cdn\bookcars\temp\cars
BC_CDN_LOCATIONS=C:\inetpub\wwwroot\cdn\bookcars\locations
BC_CDN_TEMP_LOCATIONS=C:\inetpub\wwwroot\cdn\bookcars\temp\locations
Add full access permissions to the user who is running BookCars API on C:\inetpub\wwwroot\cdn\bookcars.
You need to configure the following options:
BC_DB_URI=mongodb://admin:PASSWORD@127.0.0.1:27017/bookcars?authSource=admin&appName=bookcars
BC_COOKIE_SECRET=COOKIE_SECRET
BC_JWT_SECRET=JWT_SECRET
BC_SMTP_HOST=smtp.sendgrid.net
BC_SMTP_PORT=587
BC_SMTP_USER=apikey
BC_SMTP_PASS=PASSWORD
BC_SMTP_FROM=admin@bookcars.ma
If you want to use MongoDB Atlas, put you MongoDB Atlas URI in
BC_DB_URIotherwise replacePASSWORDinBC_DB_URIwith your MongoDB password. ReplaceJWT_SECRETwith a secret token. Finally, set the SMTP options. SMTP options are necessary for sign up. You can use sendgrid or any other transactional email provider.If you choose sendgrid, create an account on sendgrid.com, login and go to the dashboard. On the left panel, click on Email API, then on Integration Guide. Then, choose SMTP Relay and follow the steps. You will be prompted to create an API Key. Once you create the API Key and verify the smtp relay, copy the API key in
BC_SMTP_PASSin ./api/.env. Sendgrid's free plan allows to send up to 100 emails/day. If you need to send more than 100 emails/day, switch to a paid plan or choose another transactional email provider.COOKIE_SECRETandJWT_SECRETshould at least be 32 characters long, but the longer the better. You can use an online password generator and set the password length to 32 or longer.If you want to enable push notifications in the mobile app, follow these instructions and set the following option:
BC_EXPO_ACCESS_TOKEN=EXPO_ACCESS_TOKEN
If you want to enable stripe payment gateway, sign up for a stripe account, fill the forms and save the publishable key and the secret key from stripe dashboard. Then, set the secret key in the following option in api/.env:
BC_STRIPE_SECRET_KEY=STRIPE_SECRET_KEY
Don't expose stripe secret key on a website or embed it in a mobile application. It must be secret and stored securely in the server-side. Use stripe in test mode.
Use only your test API keys for testing. This ensures that you don't accidentally modify your live customers or charges.
If you want to use Google reCAPTCHA on the frontend, you need to set:
BC_RECAPTCHA_SECRET=RECAPTCHA_SECRET
To run the api, use the follwing commands:
cd ./api
npm install
npm run dev
- Add backend/.env file:
VITE_PORT=3001
VITE_NODE_ENV=development
VITE_BC_API_HOST=http://localhost:4002
VITE_BC_DEFAULT_LANGUAGE=en
VITE_BC_PAGE_SIZE=30
VITE_BC_CARS_PAGE_SIZE=15
VITE_BC_BOOKINGS_PAGE_SIZE=20
VITE_BC_BOOKINGS_MOBILE_PAGE_SIZE=10
VITE_BC_CDN_USERS=http://localhost/cdn/bookcars/users
VITE_BC_CDN_TEMP_USERS=http://localhost/cdn/bookcars/temp/users
VITE_BC_CDN_CARS=http://localhost/cdn/bookcars/cars
VITE_BC_CDN_TEMP_CARS=http://localhost/cdn/bookcars/temp/cars
VITE_BC_CDN_LOCATIONS=http://localhost/cdn/bookcars/locations
VITE_BC_CDN_TEMP_LOCATIONS=http://localhost/cdn/bookcars/temp/locations
VITE_BC_SUPPLIER_IMAGE_WIDTH=60
VITE_BC_SUPPLIER_IMAGE_HEIGHT=30
VITE_BC_CAR_IMAGE_WIDTH=300
VITE_BC_CAR_IMAGE_HEIGHT=200
VITE_BC_MINIMUM_AGE=21
VITE_BC_PAGINATION_MODE=classic
VITE_BC_CURRENCY=$
VITE_BC_DEPOSIT_FILTER_VALUE_1=250
VITE_BC_DEPOSIT_FILTER_VALUE_2=500
VITE_BC_DEPOSIT_FILTER_VALUE_3=750
To run the backend, use the follwing commands:
cd ./backend
npm install
npm start
- Add frontend/.env file:
VITE_PORT=3002
VITE_NODE_ENV=development
VITE_BC_API_HOST=http://localhost:4002
VITE_BC_RECAPTCHA_ENABLED=false
VITE_BC_RECAPTCHA_SITE_KEY=GOOGLE_RECAPTCHA_SITE_KEY
VITE_BC_DEFAULT_LANGUAGE=en
VITE_BC_PAGE_SIZE=30
VITE_BC_CARS_PAGE_SIZE=15
VITE_BC_BOOKINGS_PAGE_SIZE=20
VITE_BC_BOOKINGS_MOBILE_PAGE_SIZE=10
VITE_BC_CDN_USERS=http://localhost/cdn/bookcars/users
VITE_BC_CDN_CARS=http://localhost/cdn/bookcars/cars
VITE_BC_CDN_LOCATIONS=http://localhost/cdn/bookcars/locations
VITE_BC_SUPPLIER_IMAGE_WIDTH=60
VITE_BC_SUPPLIER_IMAGE_HEIGHT=30
VITE_BC_CAR_IMAGE_WIDTH=300
VITE_BC_CAR_IMAGE_HEIGHT=200
VITE_BC_MINIMUM_AGE=21
VITE_BC_PAGINATION_MODE=classic
VITE_BC_STRIPE_PUBLISHABLE_KEY=STRIPE_PUBLISHABLE_KEY
VITE_BC_STRIPE_CURRENCY_CODE=USD
VITE_BC_SET_LANGUAGE_FROM_IP=false
VITE_BC_GOOGLE_ANALYTICS_ENABLED=false
VITE_BC_GOOGLE_ANALYTICS_ID=G-XXXXXXXXXX
VITE_BC_CONTACT_EMAIL=info@bookcars.ma
VITE_BC_DEPOSIT_FILTER_VALUE_1=250
VITE_BC_DEPOSIT_FILTER_VALUE_2=500
VITE_BC_DEPOSIT_FILTER_VALUE_3=750
If you want to enable stripe payment gateway, set stripe publishable key in
VITE_BC_STRIPE_PUBLISHABLE_KEY. You can retrieve it from stripe dashboard.
VITE_BC_STRIPE_CURRENCY_CODEis the three-letter ISO 4217 alphabetic currency code, e.g. "USD" or "EUR". Required for Stripe payments. Must be a supported currency: https://docs.stripe.com/currenciesreCAPTCHA is by default disabled. If you want to enable it, you have to set
VITE_BC_RECAPTCHA_ENABLEDtotrueandVITE_BC_RECAPTCHA_SITE_KEYto Google reCAPTCHA site key.To run the frontend, use the follwing commands:
cd ./frontend
npm install
npm start
- If you want to run the mobile app, you need to add mobile/.env:
BC_API_HOST=https://bookcars.ma:4002
BC_DEFAULT_LANGUAGE=en
BC_PAGE_SIZE=20
BC_CARS_PAGE_SIZE=8
BC_BOOKINGS_PAGE_SIZE=8
BC_CDN_USERS=https://bookcars.ma/cdn/bookcars/users
BC_CDN_CARS=https://bookcars.ma/cdn/bookcars/cars
BC_SUPPLIER_IMAGE_WIDTH=60
BC_SUPPLIER_IMAGE_HEIGHT=30
BC_CAR_IMAGE_WIDTH=300
BC_CAR_IMAGE_HEIGHT=200
BC_MINIMUM_AGE=21
BC_STRIPE_PUBLISHABLE_KEY=STRIPE_PUBLISHABLE_KEY
BC_STRIPE_MERCHANT_IDENTIFIER=MERCHANT_IDENTIFIER
BC_STRIPE_COUNTRY_CODE=US
BC_STRIPE_CURRENCY_CODE=USD
BC_CURRENCY=$
You need to configure the following options:
BC_API_HOST=https://bookcars.ma:4002
BC_CDN_USERS=https://bookcars.ma/cdn/bookcars/users
BC_CDN_CARS=https://bookcars.ma/cdn/bookcars/cars
BC_STRIPE_PUBLISHABLE_KEY=STRIPE_PUBLISHABLE_KEY
BC_STRIPE_MERCHANT_IDENTIFIER=MERCHANT_IDENTIFIER
BC_STRIPE_COUNTRY_CODE=US
BC_STRIPE_CURRENCY_CODE=USD
BC_CURRENCY=$
You need to replace
https://bookcars.mawith an IP or hostname. - Configure http://localhost/cdn
- On Windows, install IIS, create C:\inetpub\wwwroot\cdn\bookcars folder and add full access permissions to the user who is running BookCars API on bookcarsC:\inetpub\wwwroot\cdn\bookcars folder.
- On Linux, install NGINX, create /var/www/cdn/bookcars folder, add full access permissions to the user who is running BookCars API on /var/www/cdn/bookcars folder, and add cdn folder to NGINX by changing /etc/nginx/sites-available/default as follow:
server { listen 80 default_server; server_name _; ... location /cdn { alias /var/www/cdn; } } - Create an admin user from http://localhost:3001/sign-up
- To run the mobile app, simply download Expo app on your device and run the following commands from ./mobile folder:
npm install
npm start
You need to download the google-services.json file and place it in ./mobile root directory for push notifications.
You can find detailed instructions about running the mobile app here.
To change the currency, follow these instructions.
Run Mobile App
To run the mobile app, create ./mobile/.env file with the following options:
BC_API_HOST=https://bookcars.ma:4002
BC_DEFAULT_LANGUAGE=en
BC_PAGE_SIZE=20
BC_CARS_PAGE_SIZE=8
BC_BOOKINGS_PAGE_SIZE=8
BC_CDN_USERS=https://bookcars.ma/cdn/bookcars/users
BC_CDN_CARS=https://bookcars.ma/cdn/bookcars/cars
BC_SUPPLIER_IMAGE_WIDTH=60
BC_SUPPLIER_IMAGE_HEIGHT=30
BC_CAR_IMAGE_WIDTH=300
BC_CAR_IMAGE_HEIGHT=200
BC_MINIMUM_AGE=21
BC_STRIPE_PUBLISHABLE_KEY=STRIPE_PUBLISHABLE_KEY
BC_STRIPE_MERCHANT_IDENTIFIER=MERCHANT_IDENTIFIER
BC_STRIPE_COUNTRY_CODE=US
BC_STRIPE_CURRENCY_CODE=USD
BC_CURRENCY=$
You need to configure the following options:
BC_API_HOST=https://bookcars.ma:4002
BC_CDN_USERS=https://bookcars.ma/cdn/bookcars/users
BC_CDN_CARS=https://bookcars.ma/cdn/bookcars/cars
BC_STRIPE_PUBLISHABLE_KEY=STRIPE_PUBLISHABLE_KEY
BC_STRIPE_MERCHANT_IDENTIFIER=MERCHANT_IDENTIFIER
BC_STRIPE_COUNTRY_CODE=US
BC_STRIPE_CURRENCY_CODE=USD
BC_CURRENCY=$
Replace https://bookcars.ma with an IP, hostname or FQDN.
If you want to enable stripe payment gateway, set stripe publishable key in BC_STRIPE_PUBLISHABLE_KEY. You can retrieve it from stripe dashboard. Use stripe in test mode.
BC_STRIPE_MERCHANT_IDENTIFIER is the merchant identifier you registered with Apple for use with Apple Pay.
BC_STRIPE_COUNTRY_CODE is the two-letter ISO 3166 code of the country of your business, e.g. "US". Required for Stripe payments.
BC_STRIPE_CURRENCY_CODE is the three-letter ISO 4217 alphabetic currency code, e.g. "USD" or "EUR". Required for Stripe payments. Must be a supported currency: https://docs.stripe.com/currencies
Install demo database by following these instructions.
Configure http://localhost/cdn
On Windows, install IIS and add full access permissions to the user who is running BookCars API on C:\inetpub\wwwroot\cdn\bookcars.
On Linux, install NGINX and update /etc/nginx/sites-enabled/default as follow:
server {
  listen 80 default_server;
  server_name _;

  ...

  location /cdn {
    alias /var/www/cdn;
  }
}
Finally, add full access permissions to the user who is running BookCars API on /var/www/cdn/bookcars.
Configure ./api by following these instructions.
Run ./api with the following command:
cd ./api
npm run dev
Run mobile app by simply downloading Expo app on your device and running the following commands from ./mobile folder:
cd ./mobile
npm install
npm start
Open Expo app on your device and scan the QR code to run BookCars mobile app.
Push Notifications
If you want to enable BookCars push notifications, Download google-services.json file and place it in ./mobile root directory for push notifications. Its path can be configured from ./mobile/app.json configuration file through googleServicesFile setting option. Don't forget to generate a new private key in the Firebase Console and upload the JSON file to Expo dashboard.
Unit Tests and Coverage
Below are the instructions to run unit tests and build coverage report.
Prerequisites
-
Configure MongoDB:
mongosh
-
Create admin user:
db = db.getSiblingDB('admin')
db.createUser({ user: "admin" , pwd: "PASSWORD", roles: ["userAdminAnyDatabase", "dbAdminAnyDatabase", "readWriteAnyDatabase"]})
Replace
PASSWORDwith a strong password. -
Secure MongoDB by changing mongod.conf as follows:
net:
port: 27017
bindIp: 0.0.0.0

security:
authorization: enabled
-
Restart MongoDB service.
Instructions
- Clone Movin' In repo:
git clone https://github.com/aelassas/bookcars.git
- Create api/.env file with the following content:
NODE_ENV=development
BC_PORT=4002
BC_HTTPS=false
BC_PRIVATE_KEY=/etc/ssl/bookcars.ma.key
BC_CERTIFICATE=/etc/ssl/bookcars.ma.crt
BC_DB_URI=mongodb://admin:PASSWORD@127.0.0.1:27017/bookcars?authSource=admin&appName=bookcars
BC_DB_SSL=false
BC_DB_SSL_CERT=/etc/ssl/bookcars.ma.crt
BC_DB_SSL_CA=/etc/ssl/bookcars.ma.ca.pem
BC_DB_DEBUG=false
BC_COOKIE_SECRET=COOKIE_SECRET
BC_AUTH_COOKIE_DOMAIN=localhost
BC_JWT_SECRET=JWT_SECRET
BC_JWT_EXPIRE_AT=86400
BC_TOKEN_EXPIRE_AT=86400
BC_SMTP_HOST=in-v3.mailjet.com
BC_SMTP_PORT=587
BC_SMTP_USER=USER
BC_SMTP_PASS=PASSWORD
BC_SMTP_FROM=admin@bookcars.ma
BC_CDN_USERS=/var/www/cdn/bookcars/users
BC_CDN_TEMP_USERS=/var/www/cdn/bookcars/temp/users
BC_CDN_CARS=/var/www/cdn/bookcars/cars
BC_CDN_TEMP_CARS=/var/www/cdn/bookcars/temp/cars
BC_DEFAULT_LANGUAGE=en
BC_BACKEND_HOST=http://localhost:3001/
BC_FRONTEND_HOST=http://localhost:3002/
BC_MINIMUM_AGE=21
BC_EXPO_ACCESS_TOKEN=EXPO_ACCESS_TOKEN
BC_STRIPE_SECRET_KEY=STRIPE_SECRET_KEY
BC_STRIPE_SESSION_EXPIRE_AT=82800
BC_ADMIN_EMAIL=admin@bookcars.ma
BC_RECAPTCHA_SECRET=RECAPTCHA_SECRET
On Windows, install IIS and update the following settings with these values:
BC_CDN_USERS=C:\inetpub\wwwroot\cdn\bookcars\users
BC_CDN_TEMP_USERS=C:\inetpub\wwwroot\cdn\bookcars\temp\users
BC_CDN_CARS=C:\inetpub\wwwroot\cdn\bookcars\cars
BC_CDN_TEMP_CARS=C:\inetpub\wwwroot\cdn\bookcars\temp\cars
Add full access permissions to the user who is running Movin' In API on C:\inetpub\wwwroot\cdn\bookcars.
Then, set the following options:
BC_DB_URI=mongodb://admin:PASSWORD@127.0.0.1:27017/bookcars?authSource=admin&appName=bookcars
BC_COOKIE_SECRET=COOKIE_SECRET
BC_JWT_SECRET=JWT_SECRET
BC_SMTP_HOST=in-v3.mailjet.com
BC_SMTP_PORT=587
BC_SMTP_USER=USER
BC_SMTP_PASS=PASSWORD
BC_SMTP_FROM=admin@bookcars.ma
BC_STRIPE_SECRET_KEY=STRIPE_SECRET_KEY
Replace PASSWORD in BC_DB_URI with MongoDB password and JWT_SECRET with a secret token. Finally, set the SMTP options. SMTP options are necessary for sign up. You can use mailjet, brevo, sendgrid or any other transactional email provider.
Replace STRIPE_SECRET_KEY with your Stripe secret key in test mode. You can find it in Stripe Developers Dashboard.
COOKIE_SECRET and JWT_SECRET should at least be 32 characters long, but the longer the better. You can use an online password generator and set the password length to 32 or longer.
If you want to enable push notifications in the mobile app, follow these instructions and set the following option:
BC_EXPO_ACCESS_TOKEN=EXPO_ACCESS_TOKEN
Run Movin' In API unit tests:
cd ./api
npm install
npm test
Coverage
Once you run unit tests, a coverage report is automatically built in:
./api/coverage
You can also view the coverage report on codecov.
Logs
All API logs are written in ./api/logs/all.log.
API Error logs are also written in ./api/logs/error.log.
Using the Code

This section describes the software architecture of BookCars including the API, the frontend, the mobile app and the backend.
BookCars API is a Node.js server application that exposes a RESTful API using Express which gives access to BookCars MongoDB database.
BookCars frontend is a React web application that is the main web interface for booking cars.
Bookcars backend is a React web application that lets admins and suppliers manage car fleets, bookings and customers.
BookCars mobile app is a React Native application that is the main mobile app for booking cars.
A key design decision was made to use TypeScript instead of JavaScript due to its numerous advantages. TypeScript offers strong typing, tooling, and integration, resulting in high-quality, scalable, more readable and maintainable code that is easy to debug and test.
API

BookCars API exposes all BookCars functions needed for the backend, the frontend and the mobile app. The API follow the MVC design pattern. JWT is used for authentication. There are some functions that need authentication such as functions related to managing cars, bookings and customers, and others that do not need authentication such as retrieving locations and available cars for non authenticated users.
- ./api/src/models/ folder contains MongoDB models.
- ./api/src/routes/ folder contains Express routes.
- ./api/src/controllers/ folder contains controllers.
- ./api/src/middlewares/ folder contains middlewares.
- ./api/src/config/env.config.ts contains the configuration and TypeScript type definitions.
- ./api/src/lang/ folder contains localization.
- ./api/src/app.ts is the main server where routes are loaded.
- ./api/index.ts is the main entry point of BookCars API.
index.ts
index.ts is the main entry point of BookCars API:
import 'dotenv/config'
import process from 'node:process'
import fs from 'node:fs/promises'
import http from 'node:http'
import https from 'node:https'
import * as env from './config/env.config'
import * as DatabaseHelper from './common/DatabaseHelper'
import app from './app'

if (await DatabaseHelper.Connect(env.DB_DEBUG)) {
  let server: http.Server | https.Server

  if (env.HTTPS) {
      https.globalAgent.maxSockets = Number.POSITIVE_INFINITY
      const privateKey = await fs.readFile(env.PRIVATE_KEY, 'utf8')
      const certificate = await fs.readFile(env.CERTIFICATE, 'utf8')
      const credentials = { key: privateKey, cert: certificate }
      server = https.createServer(credentials, app)

      server.listen(env.PORT, () => {
          console.log('HTTPS server is running on Port', env.PORT)
      })
  } else {
      server = app.listen(env.PORT, () => {
          console.log('HTTP server is running on Port', env.PORT)
      })
  }

  const close = () => {
      console.log('\nGracefully stopping...')
      server.close(async () => {
          console.log(`HTTP${env.HTTPS ? 'S' : ''} server closed`)
          await DatabaseHelper.Close(true)
          console.log('MongoDB connection closed')
          process.exit(0)
      })
  }

  ['SIGINT', 'SIGTERM', 'SIGQUIT'].forEach((signal) => process.on(signal, close))
}
This is a TypeScript file that starts a server using Node.js and Express. It imports several modules including dotenv, process, fs, http, https, mongoose, and app. It then checks if the HTTPS environment variable is set to true, and if so, creates an HTTPS server using the https module and the provided private key and certificate. Otherwise, it creates an HTTP server using the http module. The server listens on the port specified in the PORT environment variable.
The close function is defined to gracefully stop the server when a termination signal is received. It closes the server and the MongoDB connection, and then exits the process with a status code of 0. Finally, it registers the close function to be called when the process receives a SIGINT, SIGTERM, or SIGQUIT signal.
app.ts
app.ts is in the main server:
import express, { Express } from 'express'
import compression from 'compression'
import helmet from 'helmet'
import nocache from 'nocache'
import cookieParser from 'cookie-parser'
import strings from './config/app.config'
import * as env from './config/env.config'
import cors from './middlewares/cors'
import allowedMethods from './middlewares/allowedMethods'
import supplierRoutes from './routes/supplierRoutes'
import bookingRoutes from './routes/bookingRoutes'
import locationRoutes from './routes/locationRoutes'
import notificationRoutes from './routes/notificationRoutes'
import carRoutes from './routes/carRoutes'
import userRoutes from './routes/userRoutes'
import * as Helper from './common/Helper'

const app: Express = express()

app.use(helmet.contentSecurityPolicy())
app.use(helmet.dnsPrefetchControl())
app.use(helmet.crossOriginEmbedderPolicy())
app.use(helmet.frameguard())
app.use(helmet.hidePoweredBy())
app.use(helmet.hsts())
app.use(helmet.ieNoOpen())
app.use(helmet.noSniff())
app.use(helmet.permittedCrossDomainPolicies())
app.use(helmet.referrerPolicy())
app.use(helmet.xssFilter())
app.use(helmet.originAgentCluster())
app.use(helmet.crossOriginResourcePolicy({ policy: 'cross-origin' }))
app.use(helmet.crossOriginOpenerPolicy())

app.use(nocache())
app.use(compression({ threshold: 0 }))
app.use(express.urlencoded({ limit: '50mb', extended: true }))
app.use(express.json({ limit: '50mb' }))

app.use(cors())
app.options('*', cors())
app.use(cookieParser(env.COOKIE_SECRET))
app.use(allowedMethods)

app.use('/', supplierRoutes)
app.use('/', bookingRoutes)
app.use('/', locationRoutes)
app.use('/', notificationRoutes)
app.use('/', carRoutes)
app.use('/', userRoutes)

strings.setLanguage(env.DEFAULT_LANGUAGE)

Helper.mkdir(env.CDN_USERS)
Helper.mkdir(env.CDN_TEMP_USERS)
Helper.mkdir(env.CDN_CARS)
Helper.mkdir(env.CDN_TEMP_CARS)

export default app
First of all, we retrieve MongoDB connection string, then we establish a connection with BookCars MongoDB database. Then we create an Express app and load middlewares such as cors, compression, helmet, and nocache. We set up various security measures using the helmet middleware library. we also import various route files for different parts of the application such as supplierRoutes, bookingRoutes, locationRoutes, notificationRoutes, carRoutes, and userRoutes. Finally, we load Express routes and export app.
Routes
There are six routes in BookCars API. Each route has its own controller following the MVC design pattern and SOLID principles. Below are the main routes:
userRoutes: Provides REST functions related to userssupplierRoutes: Provides REST functions related to supplierslocationRoutes: Provides REST functions related to locationscarRoutes: Provides REST functions related to carsbookingRoutes: Provides REST functions related to bookingsnotificationRoutes: Provides REST functions related to notifications
We are not going to explain each route one by one. We'll take, for example, locationRoutes and see how it was made:
import express from 'express'
import routeNames from '../config/locationRoutes.config'
import authJwt from '../middlewares/authJwt'
import * as locationController from '../controllers/locationController'

const routes = express.Router()

routes
.route(routeNames.validate)
.post(authJwt.verifyToken, locationController.validate)

routes
.route(routeNames.create)
.post(authJwt.verifyToken, locationController.create)

routes
.route(routeNames.update)
.put(authJwt.verifyToken, locationController.update)

routes
.route(routeNames.delete)
.delete(authJwt.verifyToken, locationController.deleteLocation)

routes
.route(routeNames.getLocation)
.get(locationController.getLocation)

routes
.route(routeNames.getLocations)
.get(locationController.getLocations)

routes
.route(routeNames.checkLocation)
.get(authJwt.verifyToken, locationController.checkLocation)

export default routes
First of all, we create an Express Router. Then, we create the routes using their name, method, middlewares and controllers.
routeNames contains locationRoutes route names:
export default {
  validate: '/api/validate-location',
  create: '/api/create-location',
  update: '/api/update-location/:id',
  delete: '/api/delete-location/:id',
  getLocation: '/api/location/:id/:language',
  getLocations: '/api/locations/:page/:size/:language',
  checkLocation: '/api/check-location/:id',
}
locationController contains the main business logic regarding locations. We are not going to see all the source code of the controller since it's quite large but we'll take create and getLocations controller functions for example.
Below is Location model:
import { Schema, model } from 'mongoose'
import * as env from '../config/env.config'

const locationSchema = new Schema<env.Location>(
{
  values: {
    type: [Schema.Types.ObjectId],
    ref: 'LocationValue',
    validate: (value: any): boolean => Array.isArray(value) && value.length > 1,
  },
},
{
  timestamps: true,
  strict: true,
  collection: 'Location',
},
)

const locationModel = model<env.Location>('Location', locationSchema)

locationModel.on('index', (err) => {
if (err) {
  console.error('Location index error: %s', err)
} else {
  console.info('Location indexing complete')
}
})

export default locationModel
Below is env.Location TypeScript type:
export interface Location extends Document {
  values: Types.ObjectId[]
  name?: string
}
A Location has multiple values. One per language. By default, English and French languages are supported.
Below is LocationValue model:
import { Schema, model } from 'mongoose'
import * as env from '../config/env.config'

const locationValueSchema = new Schema<env.LocationValue>(
{
  language: {
    type: String,
    required: [true, "can't be blank"],
    index: true,
    trim: true,
    lowercase: true,
    minLength: 2,
    maxLength: 2,
  },
  value: {
    type: String,
    required: [true, "can't be blank"],
    index: true,
    trim: true,
  },
},
{
  timestamps: true,
  strict: true,
  collection: 'LocationValue',
},
)

const locationValueModel = model<env.LocationValue>('LocationValue', locationValueSchema)

locationValueModel.on('index', (err) => {
if (err) {
  console.error('LocationValue index error: %s', err)
} else {
  console.info('LocationValue indexing complete')
}
})

export default locationValueModel
Below is env.LocationValue TypeScript type:
export interface LocationValue extends Document {
  language: string
  value: string
}
A LocationValue has a language code (ISO 639-1) and a string value.
Below is create controller function:
export const create = async (req: Request, res: Response) => {
const body: bookcarsTypes.LocationName[] = req.body
const names = body

try {
  const values = []
  for (let i = 0; i < names.length; i++) {
    const name = names[i]
    const locationValue = new LocationValue({
      language: name.language,
      value: name.name,
    })
    await locationValue.save()
    values.push(locationValue._id)
  }

  const location = new Location({ values })
  await location.save()
  return res.sendStatus(200)
} catch (err) {
  console.error(`[location.create] ${strings.DB_ERROR} ${req.body}`, err)
  return res.status(400).send(strings.DB_ERROR + err)
}
}
In this function, we retrieve the body of the request, we iterate through the values provided in the body (one value per language) and we create a LocationValue. Finally, we create the location depending on the created location values.
Below is getLocations controller function:
export const getLocations = async (req: Request, res: Response) => {
try {
  const page = Number.parseInt(req.params.page)
  const size = Number.parseInt(req.params.size)
  const language = req.params.language
  const keyword = escapeStringRegexp(String(req.query.s || ''))
  const options = 'i'

  const locations = await Location.aggregate(
    [
      {
        $lookup: {
          from: 'LocationValue',
          let: { values: '$values' },
          pipeline: [
            {
              $match: {
                $and: [
                  { $expr: { $in: ['$_id', '$$values'] } },
                  { $expr: { $eq: ['$language', language] } },
                  {
                    $expr: {
                      $regexMatch: {
                        input: '$value',
                        regex: keyword,
                        options,
                      },
                    },
                  },
                ],
              },
            },
          ],
          as: 'value',
        },
      },
      { $unwind: { path: '$value', preserveNullAndEmptyArrays: false } },
      { $addFields: { name: '$value.value' } },
      {
        $facet: {
          resultData: [{ $sort: { name: 1 } }, { $skip: (page - 1) * size }, { $limit: size }],
          pageInfo: [
            {
              $count: 'totalRecords',
            },
          ],
        },
      },
    ],
    { collation: { locale: env.DEFAULT_LANGUAGE, strength: 2 } },
  )

  return res.json(locations)
} catch (err) {
  console.error(`[location.getLocations] ${strings.DB_ERROR} ${req.query.s}`, err)
  return res.status(400).send(strings.DB_ERROR + err)
}
}
In this controller function, we retrieve locations from the database using aggregate MongoDB function and facet to implement pagination.
Below is another simple route, notificationRoutes:
import express from 'express'
import routeNames from '../config/notificationRoutes.config'
import authJwt from '../middlewares/authJwt'
import * as notificationController from '../controllers/notificationController'

const routes = express.Router()

routes
.route(routeNames.notificationCounter)
.get(authJwt.verifyToken, notificationController.notificationCounter)

routes
.route(routeNames.notify)
.post(authJwt.verifyToken, notificationController.notify)

routes
.route(routeNames.getNotifications)
.get(authJwt.verifyToken, notificationController.getNotifications)

routes
.route(routeNames.markAsRead)
.post(authJwt.verifyToken, notificationController.markAsRead)

routes
.route(routeNames.markAsUnRead)
.post(authJwt.verifyToken, notificationController.markAsUnRead)

routes
.route(routeNames.delete)
.post(authJwt.verifyToken, notificationController.deleteNotifications)

export default routes
Below is the Notification model:
import { Schema, model } from 'mongoose'
import * as env from '../config/env.config'

const notificationSchema = new Schema<env.Notification>(
{
  user: {
    type: Schema.Types.ObjectId,
    required: [true, "can't be blank"],
    ref: 'User',
    index: true,
  },
  message: {
    type: String,
    required: [true, "can't be blank"],
  },
  booking: {
    type: Schema.Types.ObjectId,
    ref: 'Booking',
  },
  isRead: {
    type: Boolean,
    default: false,
  },
},
{
  timestamps: true,
  strict: true,
  collection: 'Notification',
},
)

const notificationModel = model<env.Notification>('Notification', notificationSchema)

notificationModel.on('index', (err) => {
if (err) {
  console.error('Notification index error: %s', err)
} else {
  console.info('Notification indexing complete')
}
})

export default notificationModel
Below is env.Notification TypeScript type:
export interface Notification extends Document {
  user: Types.ObjectId
  message: string
  booking: Types.ObjectId
  isRead?: boolean
}
A Notification is composed of a reference to a user, a message, a reference to a booking and isRead flag.
Below is getNotifications controller function:
export const getNotifications = async (req: Request, res: Response) => {
const { userId: _userId, page: _page, size: _size } = req.params

try {
  const userId = new mongoose.Types.ObjectId(_userId)
  const page = Number.parseInt(_page)
  const size = Number.parseInt(_size)

  const notifications = await Notification.aggregate([
    { $match: { user: userId } },
    {
      $facet: {
        resultData: [{ $sort: { createdAt: -1 } }, { $skip: (page - 1) * size }, { $limit: size }],
        pageInfo: [
          {
            $count: 'totalRecords',
          },
        ],
      },
    },
  ])

  return res.json(notifications)
} catch (err) {
  console.error(`[notification.getNotifications] ${strings.DB_ERROR} ${_userId}`, err)
  return res.status(400).send(strings.DB_ERROR + err)
}
}
In this simple controller function, we retrieve notifications using MongoDB aggregate function, page and size parameters.
Below is markAsRead controller function:
export const markAsRead = async (req: Request, res: Response) => {
try {
  const body: { ids: string[] } = req.body
  const { ids: _ids } = body
  const ids = _ids.map((id) => new mongoose.Types.ObjectId(id))
  const { userId: _userId } = req.params
  const userId = new mongoose.Types.ObjectId(_userId)

  const bulk = Notification.collection.initializeOrderedBulkOp()
  const notifications = await Notification.find({
    _id: { $in: ids },
    isRead: false,
  })
  const length = notifications.length

  bulk.find({ _id: { $in: ids }, isRead: false }).update({ $set: { isRead: true } })
  const result = await bulk.execute()

  if (result.modifiedCount !== length) {
    console.error(`[notification.markAsRead] ${strings.DB_ERROR}`)
    return res.status(400).send(strings.DB_ERROR)
  }
  const counter = await NotificationCounter.findOne({ user: userId })
  if (!counter || typeof counter.count === 'undefined') {
    return res.sendStatus(204)
  }
  counter.count -= length
  await counter.save()

  return res.sendStatus(200)
} catch (err) {
  console.error(`[notification.markAsRead] ${strings.DB_ERROR}`, err)
  return res.status(400).send(strings.DB_ERROR + err)
}
}
In this controller function, we bulk update notifications and mark them as read.
Frontend
The frontend is a web application built with Node.js, React, MUI and TypeScript. From the frontend, the customer can search for available cars depending on pickup and drop-off points and time, choose a car and proceed to checkout.
- ./frontend/src/assets/ folder contains CSS and images.
- ./frontend/src/pages/ folder contains React pages.
- ./frontend/src/components/ folder contains React components.
- ./frontend/src/services/ contains BookCars API client services.
- ./frontend/src/App.tsx is the main React App that contains routes.
- ./frontend/src/index.tsx is the main entry point of the frontend.
TypeScript type definitions are defined in the package ./packages/bookcars-types.
App.tsx is the main react App:
import React, { lazy, Suspense } from 'react'
import { BrowserRouter as Router, Route, Routes } from 'react-router-dom'

const SignIn = lazy(() => import('./pages/SignIn'))
const SignUp = lazy(() => import('./pages/SignUp'))
const Activate = lazy(() => import('./pages/Activate'))
const ForgotPassword = lazy(() => import('./pages/ForgotPassword'))
const ResetPassword = lazy(() => import('./pages/ResetPassword'))
const Home = lazy(() => import('./pages/Home'))
const Cars = lazy(() => import('./pages/Cars'))
const Checkout = lazy(() => import('./pages/Checkout'))
const Bookings = lazy(() => import('./pages/Bookings'))
const Booking = lazy(() => import('./pages/Booking'))
const Settings = lazy(() => import('./pages/Settings'))
const Notifications = lazy(() => import('./pages/Notifications'))
const ToS = lazy(() => import('./pages/ToS'))
const About = lazy(() => import('./pages/About'))
const ChangePassword = lazy(() => import('./pages/ChangePassword'))
const Contact = lazy(() => import('./pages/Contact'))
const NoMatch = lazy(() => import('./pages/NoMatch'))

const App = () => (
<Router>
  <div className="App">
    <Suspense fallback={<></>}>
      <Routes>
        <Route path="/sign-in" element={<SignIn />} />
        <Route path="/sign-up" element={<SignUp />} />
        <Route path="/activate" element={<Activate />} />
        <Route path="/forgot-password" element={<ForgotPassword />} />
        <Route path="/reset-password" element={<ResetPassword />} />
        <Route path="/" element={<Home />} />
        <Route path="/cars" element={<Cars />} />
        <Route path="/checkout" element={<Checkout />} />
        <Route path="/bookings" element={<Bookings />} />
        <Route path="/booking" element={<Booking />} />
        <Route path="/settings" element={<Settings />} />
        <Route path="/notifications" element={<Notifications />} />
        <Route path="/change-password" element={<ChangePassword />} />
        <Route path="/about" element={<About />} />
        <Route path="/tos" element={<ToS />} />
        <Route path="/contact" element={<Contact />} />

        <Route path="*" element={<NoMatch />} />
      </Routes>
    </Suspense>
  </div>
</Router>
)

export default App
We are using React lazy loading to load each route.
We are not going to cover each page of the frontend, but you can open the source code and see each one if you want.
Mobile App
BookCars provides a native mobile app for Android and iOS. The mobile app is built with React Native, Expo and TypeScript. Like for the frontend, the mobile app allows the customer to search for available cars depending on pickup and drop-off points and time, choose a car and proceed to checkout.
The customer receives push notifications if his booking is updated from the backend. Push notifications are built with Node.js, Expo Server SDK and Firebase.
- ./mobile/assets/ folder contains images.
- ./mobile/screens/ folder contains main React Native screens.
- ./mobile/components/ folder contains React Native components.
- ./mobile/services/ contains BookCars API client services.
- ./mobile/App.tsx is the main React Native App.
TypeScript type definitions are defined in:
- ./mobile/types/index.d.ts
- ./mobile/types/env.d.ts
- ./mobile/miscellaneous/bookcarsTypes.ts
./mobile/types/ is loaded in ./mobile/tsconfig.json as follow:
{
"extends": "expo/tsconfig.base",
"compilerOptions": {
  "strict": true,
  "typeRoots": [
    "./types"
  ]
}
}
App.tsx is the main React Native app:
import 'react-native-gesture-handler'
import React, { useCallback, useEffect, useRef, useState } from 'react'
import { RootSiblingParent } from 'react-native-root-siblings'
import { NavigationContainer, NavigationContainerRef } from '@react-navigation/native'
import { StatusBar as ExpoStatusBar } from 'expo-status-bar'
import { SafeAreaProvider } from 'react-native-safe-area-context'
import { Provider } from 'react-native-paper'
import * as SplashScreen from 'expo-splash-screen'
import * as Notifications from 'expo-notifications'
import DrawerNavigator from './components/DrawerNavigator'
import * as Helper from './common/Helper'
import * as NotificationService from './services/NotificationService'
import * as UserService from './services/UserService'

Notifications.setNotificationHandler({
handleNotification: async () => ({
  shouldShowAlert: true,
  shouldPlaySound: true,
  shouldSetBadge: true,
}),
})

// Prevent native splash screen from autohiding before App component declaration
SplashScreen.preventAutoHideAsync()
.then((result) => console.log(`SplashScreen.preventAutoHideAsync() succeeded: ${result}`))
.catch(console.warn) // it's good to explicitly catch and inspect any error

const App = () => {
const [appIsReady, setAppIsReady] = useState(false)
const responseListener = useRef<Notifications.Subscription>()
const navigationRef = useRef<NavigationContainerRef<StackParams>>(null)

useEffect(() => {
  const register = async () => {
    const loggedIn = await UserService.loggedIn()
    if (loggedIn) {
      const currentUser = await UserService.getCurrentUser()
      if (currentUser?._id) {
        await Helper.registerPushToken(currentUser._id)
      } else {
        Helper.error()
      }
    }
  }

  // Register push notifiations token
  register()

  // This listener is fired whenever a user taps on or interacts with a notification (works when app is foregrounded, backgrounded, or killed)
  responseListener.current = Notifications.addNotificationResponseReceivedListener(async (response) => {
    try {
      if (navigationRef.current) {
        const { data } = response.notification.request.content

        if (data.booking) {
          if (data.user && data.notification) {
            await NotificationService.markAsRead(data.user, [data.notification])
          }
          navigationRef.current.navigate('Booking', { id: data.booking })
        } else {
          navigationRef.current.navigate('Notifications', {})
        }
      }
    } catch (err) {
      Helper.error(err, false)
    }
  })

  return () => {
    if (responseListener.current) {
      Notifications.removeNotificationSubscription(responseListener.current)
    }
  }
}, [])

setTimeout(() => {
  setAppIsReady(true)
}, 500)

const onReady = useCallback(async () => {
  if (appIsReady) {
    // This tells the splash screen to hide immediately! If we call this after
    // `setAppIsReady`, then we may see a blank screen while the app is
    // loading its initial state and rendering its first pixels. So instead,
    // we hide the splash screen once we know the root view has already
    // performed layout.
    await SplashScreen.hideAsync()
  }
}, [appIsReady])

if (!appIsReady) {
  return null
}

return (
  <SafeAreaProvider>
    <Provider>
      <RootSiblingParent>
        <NavigationContainer ref={navigationRef} onReady={onReady}>
          <ExpoStatusBar style="light" backgroundColor="rgba(0, 0, 0, .9)" />
          <DrawerNavigator />
        </NavigationContainer>
      </RootSiblingParent>
    </Provider>
  </SafeAreaProvider>
)
}

export default App
We are not going to cover each screen of the mobile app, but you can open the source code and see each one if you want.
Backend
The backend is a web application built with Node.js, React, MUI and TypeScript. From the backend, admins can create and manage suppliers, cars, locations, customers and bookings. When new suppliers are created from the backend, they will receive an email prompting them to create an account in order to access the backend and manage their car fleet and bookings.
- ./backend/assets/ folder contains CSS and images.
- ./backend/pages/ folder contains React pages.
- ./backend/components/ folder contains React components.
- ./backend/services/ contains BookCars API client services.
- ./backend/App.tsx is the main React App that contains routes.
- ./backend/index.tsx is the main entry point of the backend.
TypeScript type definitions are defined in the package ./packages/bookcars-types.
App.tsx of the backend follow similar logic like App.tsx of the frontend.
We are not going to cover each page of the backend but you can open the source code and see each one if you want.
Points of Interest
Building the mobile app with React Native and Expo is very easy. Expo makes mobile development with React Native very simple.
Using the same language (TypeScript) for backend, frontend and mobile development is very convenient.
TypeScript is a very interesting language and has many advantages. By adding static typing to JavaScript, we can avoid many bugs and produce high quality, scalable, more readable and maintainable code that is easy to debug and test.
That's it! I hope you enjoyed reading this article.