
A Primer on GCP Compute Instance VMs for Dockerized Apps [Tutorial Part 8]
5.00/5 (1 vote)
How to create VMs, use a container registry and a secret manager
This article appeared first on https://www.pascallandau.com/ at A primer on GCP Compute Instance VMs for dockerized Apps [Tutorial Part 8]
In this article, we will take a look on the Google Cloud Platform (GCP) and create a Compute Instance VM to run dockerized applications. This includes:
- creating VMs
- using a container registry
- using a secret manager
All code samples are publicly available in my Docker PHP Tutorial repository on Github.
You find the branch with the final result of this tutorial at part-8-gcp-compute-instance-vm-docker.
All published parts of the Docker PHP Tutorial are collected under a dedicated page at Docker PHP Tutorial. The previous part was Create a CI pipeline for dockerized PHP Apps and the following one is Deploy dockerized PHP Apps to production on GCP via docker compose.
If you want to follow along, please subscribe to the RSS feed or via email to get automatic notifications when the next part comes out. :)
Table of Contents
- Introduction
- Set up a GCP Project
- Create a Service Account
- Set up the gcloud CLI Tool
- Set up the Container Registry
Introduction
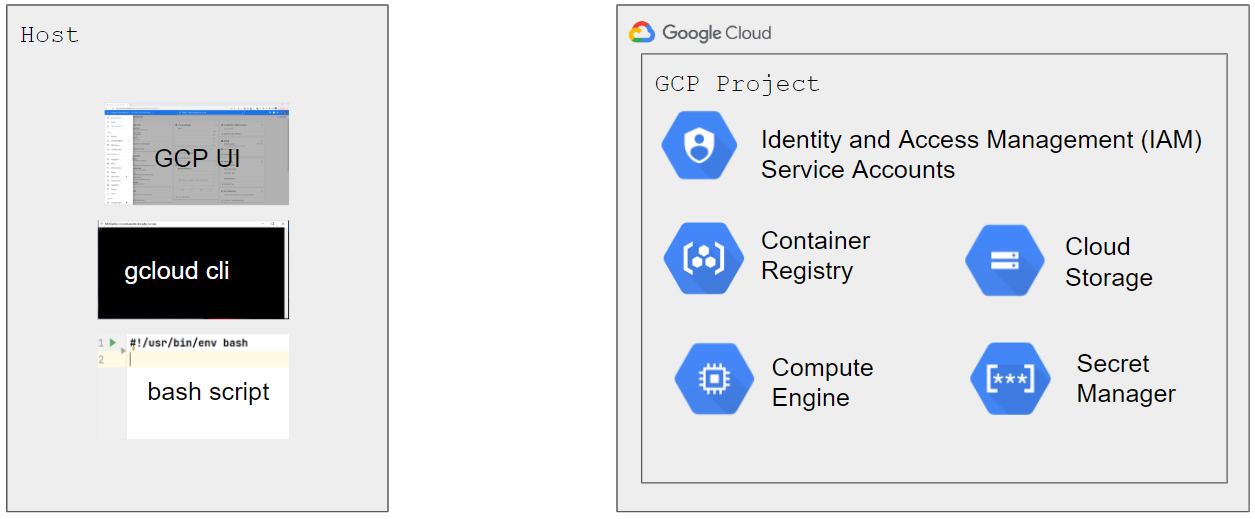
In the next tutorial, we will deploy our dockerized PHP Apps to "production" via docker compose and will create this "production" environment on GCP (Google Cloud Platform). This tutorial serves as a primer on GCP to build up some fundamental knowledge, because we will use the platform to provide all the infrastructure required to run our dockerized PHP application.
In the process, we'll learn about GCP projects as our own "space" in GCP and service accounts as a way to communicate programmatically. We'll start by doing everything manually via the UI, but will also explain how to do it programmatically via the gcloud cli and end with a fully automated script.
The following video shows the overall flow:
The API keys (see service account key files) that I use are not in the repository, because I would be billed for any usage, i.e., you must create you own project and keys to follow along.
Caution
But you should still know about that upfront and make sure to shut everything down / delete everything in case you're trying it out yourself. The "safest" way to do so is Shutting down (deleting) the whole project.
Set Up a GCP Project
On GCP, resources are organized under so-called projects. We can create a project via the Create Project UI:
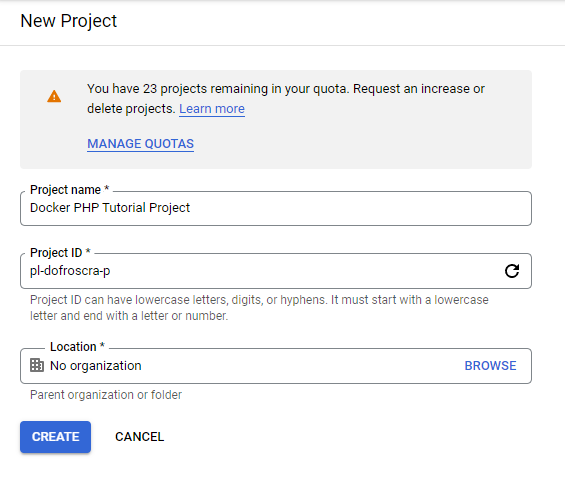
The project ID must be a globally unique string, and I have chosen pl-dofroscra-p for this tutorial (pl => Pascal Landau; dofroscra => Docker From Scratch; p => production).
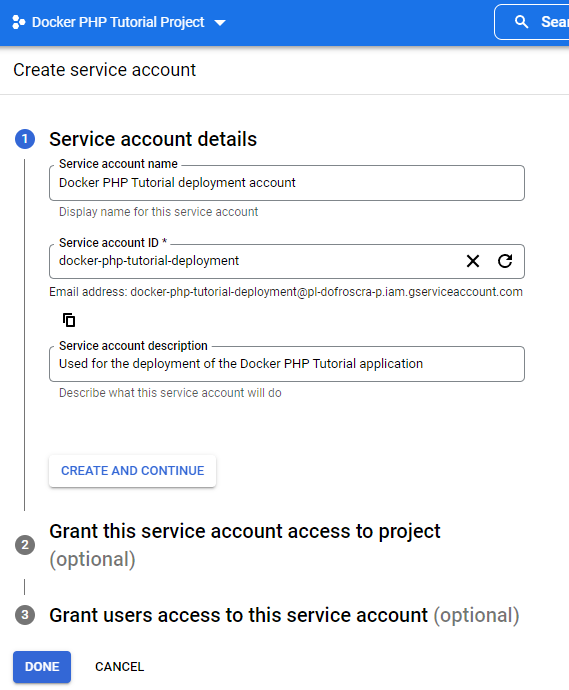
Create a Service Account
As a next step, we need a service account that we can use to make API requests, because we don't want to use our "personal GCP account". Service accounts are created via the IAM & Admin > Service Accounts UI:
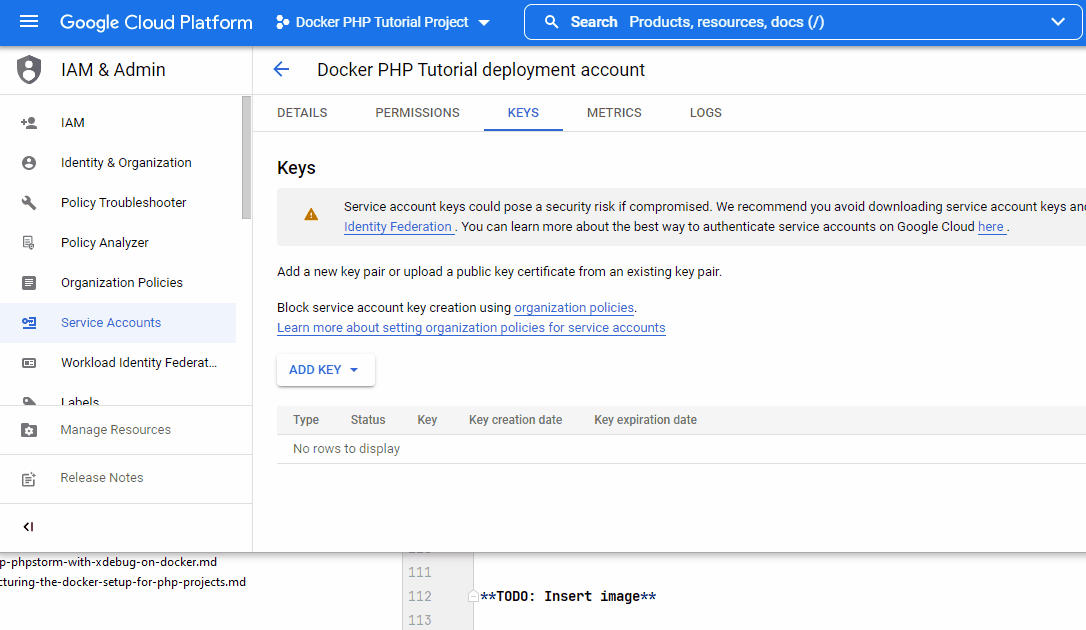
Create Service Account Key File
In order to use the account programmatically, we also need to create a key file by choosing the "Manage Keys" option of the corresponding service account.

This will open up a UI at:
https://console.cloud.google.com/iam-admin/serviceaccounts/details/$serviceAccountId/keys
where $serviceAccountId is the numeric id of the service account, e.g., 109548647107864470967. To create a key:
- Click
"ADD KEY"and select"Create new key"from the drop down menu- This will bring up a modal window to choose the key type.
- Select the recommended JSON type and click
"Create".- GCP will then generate a new key pair, store the public key and offer the private key file as download.
- Download the file and make sure to treat it like any other private key (ssh, gpg, ...) i.e., never share it publicly!
We will store this file in the root of the codebase at gcp-service-account-key.json and add it to the .gitignore file.
Each service account has also a unique email address that consists of its (non-numeric) id and the project id. You can also find it directly in the key file:
$ grep "email" ./gcp-service-account-key.json
  "client_email":
  "docker-php-tutorial-deployment@pl-dofroscra-p.iam.gserviceaccount.com",
This email address is usually used to reference the service account, e.g., when assigning IAM permissions.
Configure IAM Permissions
IAM stands for Identity and Access Management (IAM) and is used for managing permissions on GCP. The two core concepts are "permissions" and "roles":
- permissions are fine-grained for particular actions, e.g.,
storage.buckets.createto "Create Cloud Storage buckets" - roles combine a selection of permissions, e.g., the
Cloud Storage Adminrole has permissions likestorage.buckets.createstorage.buckets.get- etc.
- roles are assigned to users (or service accounts)
You can find a full overview of all permissions in the Permissions Reference and all roles under Understanding roles > Predefined roles.
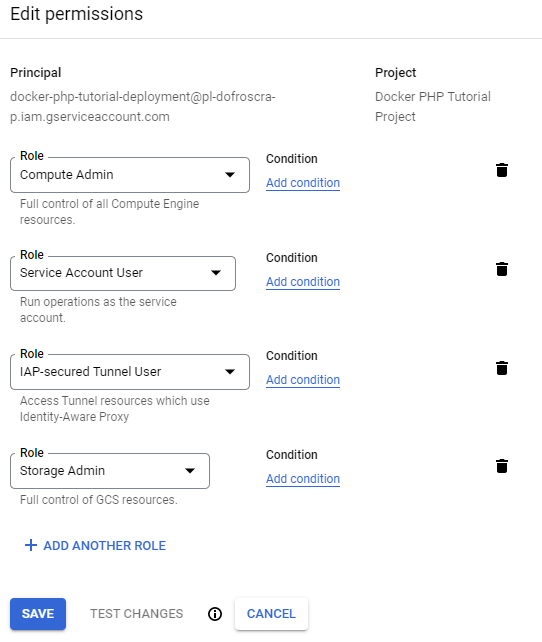
For this tutorial, we'll assign the following roles to the service account "user" docker-php-tutorial-deployment@pl-dofroscra-p.iam.gserviceaccount.com:
- Storage Admin
- required to create the GCP bucket for the registry and to pull the images on the VM
- Secret Manager Admin
- required to retrieve secrets from the Secret Manager
- Compute Admin, Service Account User and IAP-secured Tunnel User
- are necessary for logging into a VM via IAP.
Roles can be assigned through the Cloud Console IAM UI by editing the corresponding user.
Caution: It might take some time (usually a couple of seconds) until changes in IAM permissions take effect.
Set Up the gcloud CLI tool
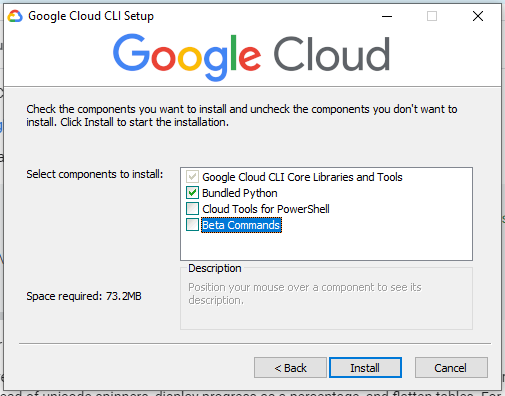
The CLI tool for GCP is called gcloud and is available for all operating systems.
In this tutorial, we are using version 380.0.0 installed natively on Windows via the GoogleCloudSDKInstaller.exe using the "Bundled Python" option.
FYI: As described under Uninstalling the Google Cloud CLI, you can find the installation and config directories via:
# installation directory
$ gcloud info --format='value(installation.sdk_root)'
C:\Users\Pascal\AppData\Local\Google\Cloud SDK\google-cloud-sdk

# config directory
$ gcloud info --format='value(config.paths.global_config_dir)'
C:\Users\Pascal\AppData\Roaming\gcloud
I will not use my personal Google account to run gcloud commands, thus I'm not using the "usual" initialization process by running gcloud init. Instead, I will use the service account that we created previously and activate it as described under gcloud auth activate-service-account via
gcloud auth activate-service-account
docker-php-tutorial-deployment@pl-dofroscra-p.iam.gserviceaccount.com
--key-file=./gcp-service-account-key.json --project=pl-dofroscra-p
Output:
$ gcloud auth activate-service-account docker-php-tutorial-deployment@
pl-dofroscra-p.iam.gserviceaccount.com --key-file=./gcp-service-account-key.json
--project=pl-dofroscra-p
Activated service account credentials for:
[docker-php-tutorial-deployment@pl-dofroscra-p.iam.gserviceaccount.com]
FYI: Because we are using a json key file that includes the service account ID, we can also omit the id in the command, i.e.
$ gcloud auth activate-service-account --key-file=./gcp-service-account-key.json
--project=pl-dofroscra-p
Activated service account credentials for:
[docker-php-tutorial-deployment@pl-dofroscra-p.iam.gserviceaccount.com]
Set Up the Container Registry
We will use docker compose to run our PHP application in the next tutorial part and need to make our docker images available in a container registry. Luckily, GCP offers a Container Registry product that gives us a ready-to-use private registry as part of a GCP project. Before we can use it, the corresponding Google Container Registry API must be enabled:
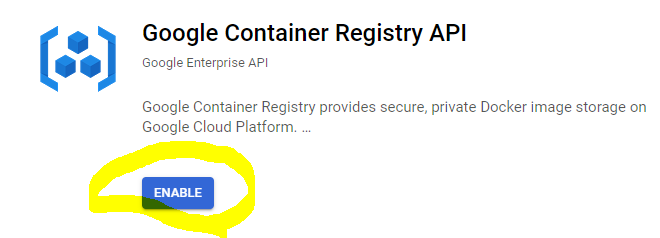
You find the Container Registry in the Cloud Console UI under Container Registry.
Authenticate Docker
Since the Container Registry is private, we need to authenticate before we can push our docker images. The available authentication methods are described in the GCP docu "Container Registry Authentication methods". For pushing images from our local host system, we will use the service account key file that we created previously and run the command shown in the "JSON key file" section of the document.
key=./gcp-service-account-key.json
cat "$key" | docker login -u _json_key --password-stdin https://gcr.io
A successful authentication looks as follows:
$ cat "$key" | docker login -u _json_key --password-stdin https://gcr.io
Login Succeeded

Logging in with your password grants your terminal complete access to your account.
For better security, log in with a limited-privilege personal access token.
Learn more at https://docs.docker.com/go/access-tokens/
So what exactly "happens" when we run this command? According to the docker login documentation
When you log in, the command stores credentials in $HOME/.docker/config.json on Linux or %USERPROFILE%/.docker/config.json on Windows [...]
The Docker Engine can keep user credentials in an external credentials store, such as the native keychain of the operating system. [...]
You need to specify the credentials store in $HOME/.docker/config.json to tell the docker engine to use it. [...]
By default, Docker looks for the native binary on each of the platforms, i.e., “
osxkeychain” on macOS, “wincred” on windows, and “pass” on Linux.
In other words: I won't be able to see the content of the service account key file in "plain text" anywhere but Docker will utilize the OS specific tools to store them securely. After I ran the docker login command on Windows, I found the following content in ~/.docker/config.json:
$ cat ~/.docker/config.json
{
        "auths": {
                "gcr.io": {}
        },
        "credsStore": "desktop"
}
FYI: "desktop" seems to be a wrapper for the Wincred executable.
Pushing Images to the Registry
For this tutorial, we will create a super simple nginx alpine image that provides a "Hello world" hello.html file via:
docker build -t my-nginx -f - . <<EOF
FROM nginx:1.21.5-alpine

RUN echo "Hello world" >> /usr/share/nginx/html/hello.html

EOF
The name of the image is my-nginx:
$ docker image ls | grep my-nginx
my-nginx         latest             42dd1608d126   50 seconds ago    23.5MB
In order to push an image to a registry, the image name must be prefixed with the corresponding registry. This was quite confusing to me, because I would have expected to be able to run something like this:
$ docker push my-nginx --registry=gcr.io

unknown flag: --registry
See 'docker push --help'.
But nope, there is no such --registry option. Even worse: Omitting it would cause a push to docker.io, the "default" registry:
$ docker push my-nginx
Using default tag: latest
The push refers to repository [docker.io/my-nginx]
According to the GCP docs on Pushing and pulling images, the following steps are necessary to push an image to a GCP registry:
- Tag the image with its target path in Container Registry, including the gcr.io registry host and the project ID my-project
- Push the image to the registry
In our case, the target path to our Container Registry is:
gcr.io/pl-dofroscra-p
because pl-dofroscra-p is the id of the GCP project we created previously.
The full image name becomes:
gcr.io/pl-dofroscra-p/my-nginx
To push the my-nginx image, we must first "add another name" to it via docker tag:
$ docker tag my-nginx gcr.io/pl-dofroscra-p/my-nginx

$ docker image ls
REPOSITORY                       TAG       IMAGE ID       CREATED          SIZE
my-nginx                         latest    ba7a2c5faf0d   15 minutes ago   23.5MB
gcr.io/pl-dofroscra-p/my-nginx   latest    ba7a2c5faf0d   15 minutes ago   23.5MB
and push that name afterwards:
$ docker push gcr.io/pl-dofroscra-p/my-nginx
Using default tag: latest
The push refers to repository [gcr.io/pl-dofroscra-p/my-nginx]
134174afa9ad: Preparing
cb7b4430c52d: Preparing
419df8b60032: Preparing
0e835d02c1b5: Preparing
5ee3266a70bd: Preparing
3f87f0a06073: Preparing
1c9c1e42aafa: Preparing
8d3ac3489996: Preparing
8d3ac3489996: Waiting
3f87f0a06073: Waiting
1c9c1e42aafa: Waiting
cb7b4430c52d: Pushed
134174afa9ad: Pushed
419df8b60032: Pushed
5ee3266a70bd: Pushed
0e835d02c1b5: Pushed
8d3ac3489996: Layer already exists
3f87f0a06073: Pushed
1c9c1e42aafa: Pushed
latest: digest: sha256:0740591fb686227d8cdf4e42b784f634cbaf9f5caa6ee478e3bcc24aeef75d7f
        size: 1982
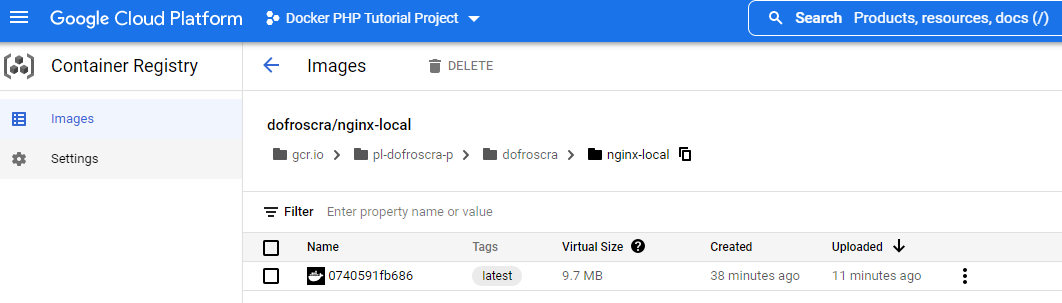
You can then find the image in the UI of the Container Registry:
Don't worry: We won't have to do the tagging every time before a push, because we will set up make to use the correct name automatically when building the images in the next part.
Images are Stored in Google Cloud Storage Buckets
We assigned the Storage Admin role to the service account previously that contains the storage.buckets.create permission. If we wouldn't have done that, the following error would have occurred:
denied: Token exchange failed for project 'pl-dofroscra-p'.
Caller does not have permission 'storage.buckets.create'.
To configure permissions, follow instructions at:
https://cloud.google.com/container-registry/docs/access-control
The Container Registry tries to store the docker images in a Google Cloud Storage bucket that is created on the fly when the very first image is pushed, see the GCP docs on "Adding a registry":
The first image push to a hostname triggers creation of the registry in a project and the corresponding Cloud Storage storage bucket. This initial push requires project-wide permissions to create storage buckets.
You can find the bucket, that in my case is named artifacts.pl-dofroscra-p.appspot.com in the Cloud Storage UI:
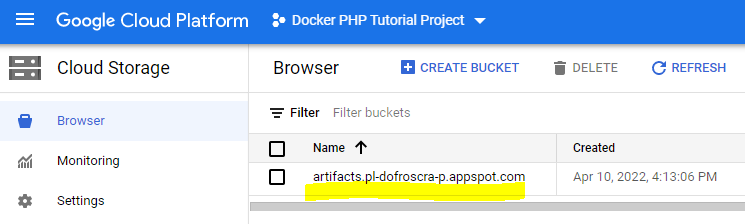
CAUTION: Make sure to delete this bucket once you are done with the tutorial - otherwise storage costs will incur.
Due to technical constraints, this article is capped at 30000 characters. Read the full content at A primer on GCP Compute Instance VMs for dockerized Apps [Tutorial Part 8]