
Pulumi in Action on Azure
0/5 (0 vote)
In this article we explore how easy it is to build infrastructure on Azure using Pulumi and TypeScript.
In the previous article, we eased into infrastructure as code with Pulumi. We configured the CLI and set up the Pulumi service to store our configuration and state. We also built a simple virtual machine in JavaScript and explored the code differences between JavaScript, TypeScript and C#.
In this article, we’ll expand on these concepts to build the infrastructure for a three-tiered web application in TypeScript. We’re first going to build a database service that will allow us to host the structured data for our system. Then, we’ll add in a WebApp that we can connect to the database via a connection string. Finally, we’ll create a serverless front end for hosting the web pages and other client-side code using Azure storage.
Creating a New Application
First, we need to create a new application so we can start building our infrastructure. Make a new directory and run the command pulumi new azure-typescript. This will build a new TypeScript application for Azure resources.

Once this process is complete, clean out the existing sample infrastructure by removing everything from the index.ts.
We’re going to set specific config elements so we can potentially build different environments, such as development and production, by referencing different configuration files. Use the following Pulumi configuration commands to set the location and resource group name:
pulumi config set resourceGroup gpDevPulumi
pulumi config set location EastUS
We’ll later use the same pattern to set some additional variables for configuring different resources, but these two are core to our environment.
Next, we add the following code to the index.ts file:
import * as pulumi from "@pulumi/pulumi";
import * as resources from "@pulumi/azure-native/resources";

const config = new pulumi.Config();
const configRG = config.require("resourceGroupName");
const configLocation = config.require("location");

// Create an Azure Resource Group
const resourceGroup = new resources.ResourceGroup(configRG, { location: configLocation, resourceGroupName: configRG });
This code is very similar to the beginning of the code to build our example VM, except we can now retrieve configuration variables from the Pulumi configuration file. If we build this infrastructure now using pulumi up, a standard resource group will be created using the name and location we supply using configuration.
Building the Database
Now that we have our resource group up and running, let’s build our database using Azure Cosmos DB. We’re building out the database first, as it has dependencies in our architecture other than a resource group and location. Other resources will also depend on this database.
To ensure our infrastructure is driven by configuration, we’re also going to set all the required variables via our configuration file. To use Pulumi’s database API, we need to add another import line:
import * as storage from "@pulumi/azure-native/storage";
We also need to create two configuration variables to hold the Cosmos DB Account Name and Cosmos DB Database Name:
const configDBAccountName = config.require("cosmosAccountName");
const configDBName = config.require("cosmosDBName");
Once we have these components in place, we can create our Cosmos DB account and database by entering the following code block:
// Cosmos DB Account
var cosmosdbAccount = new documentdb.DatabaseAccount(configDBAccountName, {
    resourceGroupName: configRG,
    databaseAccountOfferType: documentdb.DatabaseAccountOfferType.Standard,
    locations: [{
        locationName: configLocation,
        failoverPriority: 0,
    }],
    consistencyPolicy: {
        defaultConsistencyLevel: documentdb.DefaultConsistencyLevel.Session,
    },
});

// Cosmos DB Database
var cosmosdbDatabase = new documentdb.SqlResourceSqlDatabase(configDBName, {
    resourceGroupName: configRG,
    accountName: cosmosdbAccount.name,
    resource: {
        id: configDBName,
    },
});
This code will then create our Cosmos DB account and database. But before we can test this and run pulumi up, we need to set our configuration using the following code:
pulumi config set cosmosContainerName pulumi-dev-cosmosdbcontainer
pulumi config set cosmosDBName pulumi-dev-cosmosdb

With these two variables set, we can now build our infrastructure using pulumi up. Once this works, let’s collapse what we have built using pulumi down and move on to the web application component.
Adding a Web Application
Now that we have our database in place, we can follow a similar process to add an Azure WebApp as our application tier. For our WebApp, we’ll need a Storage Account, Service Plan, Application Insights instance, and the WebApp itself. For Pulumi to build this infrastructure, we need three more imports:
import * as storage from "@pulumi/azure-native/storage";
import * as web from "@pulumi/azure-native/web";
import * as insights from "@pulumi/azure-native/insights";
We also need additional configuration options, as we can specify several different types and SKUs for all three components:
// Storage Configuration
const configStorageName = config.require("storageName");
const configStorageKind = config.require("storageKind");
const configStorageSKU = config.require("storageSKU");
// WebApp Service Configuration
const configAppServiceName = config.require("appServiceName");
const configAppServiceKind = config.require("appServiceKind");
const configAppServiceSKUName = config.require("appServiceSKUName");
const configAppServiceSKUTier = config.require("appServiceSKUTier");
// WebApp App Insights Configuration
const configAppInsightsName = config.require("appInsightsName");
const configAppInsightsKind = config.require("appInsightsKind");
const configAppInsightsType = config.require("appInsightsType");
// WebApp Configuration
const configAppName = config.require("webAppName");
By using configuration-driven components, our deployment code won’t need to change as much in the future if we need to increase the scope of our environment.
Once we have all this in place, we also need to set them by using the pulumi config command.
You can view the Azure documentation for more information about types, but note that Pulumi will generate an error if you have an incorrectly set type in your configuration.
We can now create the code that will deploy our infrastructure. The storage, service plan, and app insights are all pretty straightforward.
// Storage Account
var storageAccount = new storage.StorageAccount(configStorageName, {
    resourceGroupName: resourceGroup.name,
    kind: configStorageKind,
    sku: {
        name: configStorageSKU,
    },
});

// WebApp Service Plan
var appServicePlan = new web.AppServicePlan(configAppServiceName, {
    resourceGroupName: resourceGroup.name,
    kind: configAppServiceKind,
    sku: {
        name: configAppServiceSKUName,
        tier: configAppServiceSKUTier,
    },
});

// App Insights for the Web App
var appInsights = new insights.Component(configAppInsightsName, {
    resourceGroupName: resourceGroup.name,
    kind: configAppInsightsKind,
    applicationType: configAppInsightsType,
});
For our WebApp, we need to retrieve the Cosmos DB connection string from the previous step. To do this, we can use the Cosmos DB account variable and retrieve the connection string from it by adding the following line:
var comosdbDonnectionString = cosmosdbAccount.documentEndpoint;
Pulumi exposes many attributes and functions to resources we create, enabling us to retrieve information from them after they are created. Pulumi is also able to work out any dependencies between resources, ensuring the maximum amount of code can be run in parallel without causing errors when deploying.
Once we have this connection string, we can create our WebApp and add the additional Cosmos DB string by adding the following code block:
var webApp = new web.WebApp(configAppName, {
    resourceGroupName: resourceGroup.name,
    serverFarmId: appServicePlan.id,
    siteConfig: {
        appSettings: [
            {
                name: "APPINSIGHTS_INSTRUMENTATIONKEY",
                value: appInsights.instrumentationKey,
            },
            {
                name: "APPLICATIONINSIGHTS_CONNECTION_STRING",
                value: pulumi.interpolate`InstrumentationKey=${appInsights.instrumentationKey}`,
            },
            {
                name: "ApplicationInsightsAgent_EXTENSION_VERSION",
                value: "~2",
            }
        ],
        connectionStrings: [{
            name: "db",
            connectionString: comosdbDonnectionString,
            type: web.ConnectionStringType.DocDb
        }],
    },
});
With all these components added, we now have our WebApp created and connected to the database. We can run pulumi up again to build our infrastructure in Azure. When this has finished, we can check WebApp’s configuration to confirm the Connection string for our Cosmos DB has correctly populated.

Finishing Up with the Front End
Now that we have our application and database, let’s build some infrastructure for our serverless front end by modifying the storage account to host static pages. This time we don’t need to add any additional imports, but we do need to add the following configuration line:
const configFrontEndName = config.require("frontEndName");
We also need to set this variable with the CLI:
pulumi config set frontEndName pulumiFrontEnd
Because we already have a storage account, let’s reuse it:
// Enable static website support
var staticWebsite = new storage.StorageAccountStaticWebsite(configFrontEndName, {
    accountName: storageAccount.name,
    resourceGroupName: resourceGroup.name,
    indexDocument: "index.html",
    error404Document: "404.html",
});
This sets some basic configurations for serving files. We should also have some files to serve, so let’s create an example index and 404 file in a websrc directory. One of the major benefits of Pulumi is that source code can be in the same language and reside in the same codebase.
Let’s add these files to our blob storage by adding the following code block:
["index.html", "404.html"].map(name =>
    new storage.Blob(name, {
        resourceGroupName: resourceGroup.name,
        accountName: storageAccount.name,
        containerName: staticWebsite.containerName,
        source: new pulumi.asset.FileAsset(`./websrc/${name}`),
        contentType: "text/html",
    }),
);
This code uses Pulumi’s asset function to retrieve files from our source directory and add them to Blob storage. Let’s add one last function to cover everything we have done:
export const staticEndpoint = storageAccount.primaryEndpoints.web;
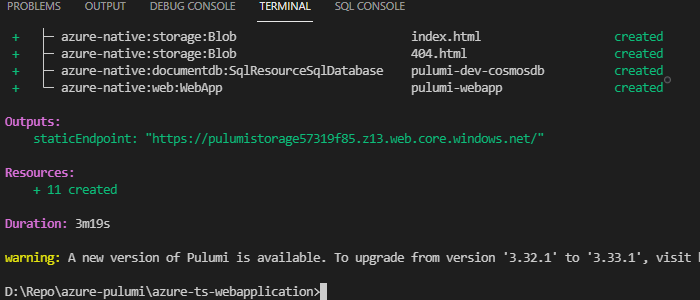
Whenever we use the export keyword in our Pulumi scripts, the Pulumi API will generate Output based on the objects or attributes we send. In this case, we’re sending the URL our storage container uses to serve web pages.
To learn more about Cloud Engineering with Azure Pulumi, check out the resource Cloud Engineering with Azure Pulumi.
Next Steps
In this article, we walked through building out the infrastructure for a three-tiered web application in TypeScript with Pulumi. We explored the way Pulumi stores and retrieves configuration variables to use when configuring components, as well as how we can access infrastructure attributes and even local files to further build out our application.
In the final article of this series, we’ll look at building out tests to ensure the infrastructure we’re building meets our requirements.
To learn more about Cloud Engineering with Azure Pulumi, check out the resource Cloud Engineering with Azure Pulumi.