
Easy to learn .NET 6.0 and Angular - Getting Started Angular Standalone Template – Part 2
5.00/5 (1 vote)
Getting started with .NET 6.0 and Standalone Angular Template in VS 2022
Introduction
I have been planning to publish .NET 6.0 and Angular series of articles. In this series, I planned to publish articles like:
- Easy to learn .NET 6.0 and Angular - Getting Started Angular Template – Part 1
- Easy to learn .NET 6.0 and Angular - Getting Started Angular Standalone Template – Part 2
- Easy to learn .NET 6.0 and Angular - Getting Started Admin LTE Design – Part 3
- Easy to learn .NET 6.0 and Angular - Getting Started Multi Language – Part 4
- Easy to learn .NET 6.0 and Angular - Getting Started Publish to IIS – Part 5
- Easy to learn .NET 6.0 and Angular - Getting Started WEB API – Part 6
- Easy to learn .NET 6.0 and Angular - Getting Started WEB API CRUD SQL SERVER – Part 7
In this article, we will learn about getting started with the .NET 6.0 and Standalone Angular Template which is available in Visual Studio 2022.
In the previous version of Visual Studio like 2019, the Angular project can be created using the ASP.NET Core Angular Templates but in the previous version of Angular Template, all the Angular related projects will be added to ClientAPP and also include the API Controllers and ASP.NET Core project structure. From Visual Studio, this can be separated as Frontend UI part and Backend API part separately as the Visual Studio 2022 ASP.CORE Angular Standalone project by default only the Angular related project files. We can’t see any ASP.NET Core folder structure, if we want to use the WEB API, then we can add new WEB API Project within the Angular Standalone project solutions. In this article, we will see that in detail.
Background
Prerequisites
- Visual Studio 2022
- Node.js – If you don’t have Node.js, install Node.js (download link)
- Angular CLI (download link)
Visual Studio 2022
If you have not yet installed Visual Studio 2022, then you can download it from this link and install it on your computer.
Download and install Visual Studio 2022.

Note: The Community version is free for all and you can download the community version as if you don’t have the Installation Key, if you have the Installation key or have the MSDN subscription, then you can download the Professional or Enterprise version.
As a Microsoft MVP, I have the MSDN subscription and I have installed the Professional version.

Using the Code
Create ASP.NET Core with Angular Template
After installing all the prerequisites listed above, click Start >> Programs >> Visual Studio 2022 >> Visual Studio 2022 on your desktop. Click New >> Project.

Search for Angular Template and select ASP.NET Core with Angular and click Next.

Enter your project name and click Next.

If you want to use the ASP.NET Core and WEB API for your project, then you must check the Add integration for Empty ASP.NET Web API and click on Create button.

When we create the project, we can see the Solution structure like below:
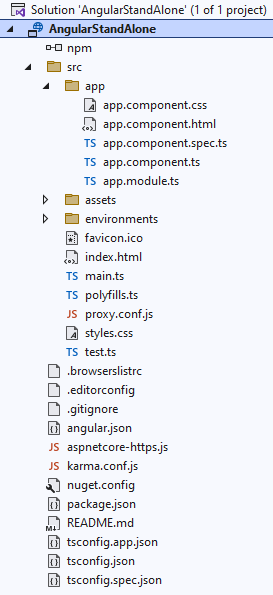
Here, we can see few interesting and new files have been added and we can also see as here in Visual Studio, there is no ASP.NET Core project’s structure. We can also see in the app folder only the app.component and app.module Angular files exists.
Visual Studio 2019 Angular Template Project
If you had worked with the Visual Studio 2019 ASP.NET Core Angular Template, we are aware about the project structure as it will contain both the combination of Angular and ASP.NET Core projects. Also, in the Angular project, we can see some samples added like Home, fetch-data, home and nav-menu folder using this demo work, it will be easy for us to extend the project and add pages as per our requirement.

Visual Studio 2022 Angular Standalone Project
As we can see in Visual Studio 2022 Angular Standalone project, there is no sample demo angular pages like home, fetch-data, counter and nav-bar. Here, all we can see is the App.component and app.module Angular main files. The ASP.NET core project structure is also missing in the Angular Standalone project. If we need to use ASP.NET Core WEB API as backend to our project, then we can add new project within the Angular Standalone solution and the WEB API controllers can be added in proxy.conf.js file, we will see how to make the WEB API project and add the controls to our Standalone Angular projects in detail below:
New Angular Files Part
aspnetcore-https.js
This JavaScript file set up the HTTPS for the application which are targeted to use the ASP.NET Core HTTPS certificates.

proxy.conf.js
This JavaScript file is used to add our HTTPs ports, WEB API URL as target and in the context, we will be adding all our controller and methods to get access in the Angular application.

Add Integration for Empty ASP.NET Web API Project
Note: In order to add ASP.NET Core WEB API project and integrate the API to our Angular project means then we must check the Add Integration for Empty ASP.NET Web API Project.
Here, we can see in the below image as I have created one more test Angular Standalone project but this time, I didn’t check the Add Integration for Empty ASP.NET Web API Project.
When we create the Angular Standalone project this time, we can see as both the proxy.conf.js and aspnetcore-https.js files are missing in the Angular project. In order to integrate ASP.NET Core and WEB API, both the proxy.conf.js and aspnetcore-https.js are very important. Always remember if you want to integrate ASP.NET Core and WEB API for your Angular Standalone project using Visual Studio 2022, then you must check the Add Integration for Empty ASP.NET Web API project during the creation of the project.
Adding WEB API Project
Now let’s create new ASP.NET Core WEB API project with our Angular Standalone Solution.
Right click your Angular Standalone Solution and add New Project > Select ASP.NET Core Web API and click Next.

Enter the project name and make sure the project is under the Angular Standalone Solutions and click Next.

We can see as the Framework here selected is .NET 6.0 and click on Create button.

Now we can see that our ASP.NET Core WEB API project has been added under the Angular Standalone project solution.

Disabling Launch Browser for WEB API Project
As we have both our Angular and WEB API project solutions both in the same solutions, we do not need to open two browsers for Angular and WEB API. Our WEB API needs to be run in the background and perform CRUD operations and some business operation in WEB API and all the data display and controls will be done from our UI Part in Angular project so now, we disable the Launch Browser options for the WEB API Project.
Right click on our ASP.NET Core WEB API project and select Properties > Select Debug > Click on Open Debug Launch Profiles UI > uncheck Launch browser.

Select the Startup Project
Now we need to make both our Angular and ASP.NET Core WEB API Project run, also we need to make the startup project to start initially. Here, first we need to run the WEB API project and followed by that, our Angular Project for making this.
Right click the Angular and ASP.NET Core WEB API Solution and select Properties. We can see by default it is selected as the Single startup project and here, we can see as our Angular Standalone project has been selected.

In order to run both our Angular and ASP.NET Core projects, we need to select the Multiple startup projects and select the action of each project as Start. Make sure as your ASP.NET Core WEB API as top of Angular project as if we want to bind the ASP.NET Core results in Angular, then we need to run first our WEB API project and then Angular project.

Build and Run the Application
When we run the application, we can see as the Angular component is not able to load the WEB API results in the Angular page as we have not added the WEB API URL in the angular project proxy.conf.js file.

To check the WEB API URL, open the Properties folder from the ASP.NET Core WEB API Project and open the launchSetting.json file. Check for the applicationURL and select the https URL like below:

Open the proxy.config.js file from the Angular project and replace the copied WEB API URL to the target like below:

Run the Application
Now when you run the application, you can see the ASP.NET Core WEB API weather forecast has been usefully banded in the Angular page.

ASP.NET Core WEB API Swagger Results
The Swagger is added by default to the ASP.NET Core WEB API project in order to check and test the WEB API results, when we run the project, we can copy the target URL and add the swagger in URL https://localhost:7101/swagger/index.html and run it to test and view the WEB API details.

app.component.ts
In the Angular project app.component file, we can see as by default, the code has been added to get the WEB API results and bind in the Angular page:
import { HttpClient } from '@angular/common/http';
import { Component } from '@angular/core';

@Component({
  selector: 'app-root',
  templateUrl: './app.component.html',
  styleUrls: ['./app.component.css']
})
export class AppComponent {
  public forecasts?: WeatherForecast[];

  constructor(http: HttpClient) {
    http.get<WeatherForecast[]>('/weatherforecast').subscribe(result => {
      this.forecasts = result;
    }, error => console.error(error));
  }

  title = 'AngularStandAlone';
}

interface WeatherForecast {
  date: string;
  temperatureC: number;
  temperatureF: number;
  summary: string;
}
Student Total Marks
Now let’s make a simple WEB API controller to get the Students Total mark.
Creating Model Class
For this, first we need to add the class file to create our Model Class. Right click the ASP.NET Core WEB API project and click > Add > New Item. Select Class and name it as StudentDetails.cs and click Add.

In the class, add property variables like below code:
public class StudentDetails
    {
        public String REG_Code { get; set; }
        public int StudentMark { get; set; }
    }
Creating API Controller Class
Right click Controllers folder and click > Add > Controller. Select API > Select API Controller – Empty and click Add.

Give the empty API Controller name as StudentDetailsController.cs and click Add.

In the controller, we add Get method which will create random 10 students Registration code along with random Students total marks for 500 and for this, we create random range to display the result of mark range from 300 to 500.
ApiController]
    [Route("[controller]")]
    public class StudentDetailsController : ControllerBase
    {
        private readonly ILogger<StudentDetailsController> _logger;

        public StudentDetailsController(ILogger<StudentDetailsController> logger)
        {
            _logger = logger;
        }

        [HttpGet(Name = "StudentDetails")]
        public IEnumerable<StudentDetails> Get()
        {
            var rng = new Random();
            int ivale = 0;
            return Enumerable.Range(1, 10).Select(index => new StudentDetails
            {
                REG_Code = "STD_000" + rng.Next(1, 100),
                StudentMark = rng.Next(300, 500),
            }).ToArray(); ;
        }
    }
}
Angular Part
Now let's organize the Angular project by adding some home page, Student page and bind the fetchdata details from the app.component page to the home page. Also, let's add nav menu folder to navigate to components.
home Component
Add new folder as home inside the app folder and add html and typescript with the name as home.component.

In the home component, we can copy our app.component weatherforecast binding details and add in this home component.
import { HttpClient } from '@angular/common/http';
import { Component } from '@angular/core';

@Component({
  selector: 'app-home',
  templateUrl: './home.component.html'
})
export class HomeComponent {
  public forecasts?: WeatherForecast[];

  constructor(http: HttpClient) {
    http.get<WeatherForecast[]>('/weatherforecast').subscribe(result => {
      this.forecasts = result;
    }, error => console.error(error));
  }

  title = 'angularproject3';
}

interface WeatherForecast {
  date: string;
  temperatureC: number;
  temperatureF: number;
  summary: string;
}
home.component.html
In the html, add the below code to display the results of weather forecast details:
<h1 id="tableLabel">Weather forecast</h1>
<p>This component demonstrates fetching data from the server.</p>
<p *ngIf="!forecasts"><em>Loading... Please refresh once the ASP.NET backend
 has started. See <a href="https://aka.ms/jspsintegrationangular">
 https://aka.ms/jspsintegrationangular</a> for more details.</em></p>

<table *ngIf="forecasts">
  <thead>
    <tr>
      <th>Date</th>
      <th>Temp. (C)</th>
      <th>Temp. (F)</th>
      <th>Summary</th>
    </tr>
  </thead>
  <tbody>
    <tr *ngFor="let forecast of forecasts">
      <td>{{ forecast.date }}</td>
      <td>{{ forecast.temperatureC }}</td>
      <td>{{ forecast.temperatureF }}</td>
      <td>{{ forecast.summary }}</td>
    </tr>
  </tbody>
</table>
students Component
Add new folder as students inside the app folder and add html and type script with then name as students.component:

In the students component, we will get the StudentDetails from the WEB API and bind the result in the studentdetails object:
import { HttpClient } from '@angular/common/http';
import { Component } from '@angular/core';

@Component({
  selector: 'app-students',
  templateUrl: './students.component.html'
})
export class StudentsComponent {

  public studentdetails?: StudentDetails[];

  constructor(http: HttpClient) {
    http.get<StudentDetails[]>('/StudentDetails').subscribe(result => {
      this.studentdetails = result;
    }, error => console.error(error));
  }

  title = 'Item Sales Count';
}

interface StudentDetails {
  reG_Code: string;
  studentMark: number;
}
students.component.html
In the html page, we bind the studentdetails results to display the students marks along with the Registration code of the student.
<table *ngIf="studentdetails">
  <thead>
    <tr>
      <th>Student Registratoin Code</th>
      <th>Students Total Mark</th>
    </tr>
  </thead>
  <tbody>
    <tr *ngFor="let stddtl of studentdetails">
      <td>{{ stddtl.reG_Code }}</td>
      <td align="right">{{ stddtl.studentMark }}</td>
    </tr>
  </tbody>
</table>
navbar Component
Add new folder as navbar inside the app folder and add html and type script with the name as navbar.component.

The navbar component is used to navigate to different menu which we will be using in this project so here in component, we just add the component name as NavBarComponent and don’t add any functions inside the class.
import { Component, Inject } from '@angular/core';

@Component({
  selector: 'app-navbar',
  templateUrl: './navbar.component.html'
})
export class NavBarComponent {

}
navbar.component.html
In the html page, we bind the add the navigation routerlinks as here, we have our home page and student details page.
<a [routerLink]="['/home']"> Home</a> ||
<a [routerLink]="['/students']"> Student Details</a>
app.component.ts
In the app component, we replace the below code as this is our main component and we add the:
import { HttpClient } from '@angular/common/http';
import { Component } from '@angular/core';

@Component({
  selector: 'app-root',
  templateUrl: './app.component.html',
  styleUrls: ['./app.component.css']
})
export class AppComponent {

  title = 'AngularStandAlone';
}
app.component.html
In the html page, we bind the navbar inside the body tag and add the router-outlet to display our components inside the div tags.
<body>
  <app-navbar></app-navbar>

  <div>
    <router-outlet></router-outlet>
  </div>

</body>
app.module.ts
In the app module, we need to import all the new components which we added and also we add the RouterModule.forRoot for adding all the routing and routing URL mappings.
import { BrowserModule } from '@angular/platform-browser';
import { Injectable, NgModule, CUSTOM_ELEMENTS_SCHEMA } from '@angular/core';
import { FormsModule, ReactiveFormsModule } from '@angular/forms';
import { HttpClient, HttpClientModule, HTTP_INTERCEPTORS } from '@angular/common/http';
import { RouterModule } from '@angular/router';

import { AppComponent } from './app.component';
import { StudentsComponent } from './students/students.component';
import { HomeComponent } from './home/home.component';
import { NavBarComponent } from './navbar/navbar.component';
@NgModule({
  declarations: [
    AppComponent,
    StudentsComponent,
    HomeComponent,
    NavBarComponent
  ],
  imports: [
    BrowserModule, HttpClientModule,
    RouterModule.forRoot([
      { path: 'home', component: HomeComponent, pathMatch: 'full' },
      { path: 'students', component: StudentsComponent },
      { path: 'home', component: HomeComponent },
      { path: 'navbar', component: NavBarComponent },
    ])
  ],
  providers: [],
  bootstrap: [AppComponent]
})
export class AppModule { }
proxy.conf.js
Build we need to add our studentDetails controller in the context of the proxy.conf.js file in the Angular project.

Build and Run
Build and run the application. We can see as both the Home and Student Details navigation link has been added and we can navigate to both the menu and see the results of both the WEB API results.

Points of Interest
Hope this article helps to understand how to get started with ASP.NET Core and Angular Standalone project using Visual Studio 2022. In the next part, we will see more in detail about using the ASP.NET Core and Angular to make the Admin LTE designs.
History
- 7th June, 2022: Initial version