
Azure Arc Enabled Kubernetes Part 1: Setting up Azure Arc Enabled Kubernetes
0/5 (0 vote)
In the first article of this three-part series, we explore how to connect Azure Arc to a Kubernetes cluster hosted in the cloud and apply a policy.
Hybrid and multicloud workloads have traditionally been painful to set up and manage. Azure Arc brings your multicloud, multi-datacenter, and Edge management into one solution with central visibility and control.
In this article, we’ll demonstrate how to connect a non-Azure-hosted Kubernetes cluster with Azure Arc. Using Azure Arc, we can manage the non-Azure hosted Kubernetes cluster in the Azure portal, enabling us to centralize pre-existing Kubernetes clusters and other servers.
Prerequisites
To follow along with this tutorial, you need:
- A local environment with administrator rights
- The local environment must have the following tools installed and configured:
- A local terminal with sufficient access to create SSH keys and SSH into remote virtual machines (VMs)
- Access to the Kubernetes cloud cluster you want to manage (or follow the instructions below to set up a new Kubernetes cluster)
- An active Azure subscription with sufficient permissions or set up a free Azure account and get $200 credit and access to free services. It’s free to access all the Azure Arc Kubernetes functions that we use throughout this series (although later articles in this series will use services such as a Log Analytics workspace and storage accounts to store policies and more. These services do have a cost.)
Hosting a Kubernetes Cluster
We’ll start by setting up a new Kubernetes cluster that we’ll later link with Azure Arc. We can connect to any Kubernetes cluster, but we’ll use a managed Kubernetes service for simplicity’s sake.
We use the provider DigitalOcean for this demonstration, but you can work with any cloud provider of your choice. Ensure you provision at least two CPUs for this cluster. Otherwise, the pods won’t all be running, causing the Azure Arc connection to fail.
We’ve created a project called Azure-Arc and created our Kubernetes cluster named k8s-1-21-5-do-0-ams3-azure-arc within that project.

We select the newly created cluster. Doing so takes us to a Getting Started screen, which guides us through setting up and installing the required tools for managing our cluster. Then, we download the configuration to our local environment to connect to the cluster and install optional third-party apps to administer the cluster.

Installing and Configuring doctl
In addition to kubectl, we also need Digital Ocean’s command-line tool doctl. The GitHub repo has detailed instructions on installing it in various environments. We'll only cover the quick steps to install it in Linux as that is the environment our local administrator is running.
First, download the latest version of doctl using the following command:
cd ~
wget https://github.com/digitalocean/doctl/releases/download/v<version>/doctl-<version>-linux-amd64.tar.gz
We need to put the version number in the <version> placeholders. We'll be using version 1.65.0.

Next, we extract the binary:
tar xf ~/doctl-<version>-linux-amd64.tar.gz
Then, we move the binary into our local bin folder:
sudo mv ~/doctl /usr/local/bin
We then authenticate the cluster:
doctl auth init --context <Your Cluster Name>

Note that we need an access token to authenticate the cluster. We generate this token by following the guide titled How to Create a Personal Access Token.
Next, we switch authentication:
doctl auth list
doctl switch --context <ClusterName>

Now, we validate that we can connect to our cluster:
doctl account get
doctl compute droplet create --region tor1 --image ubuntu-18-04-x64 --size s-1vcpu-1gb <DROPLET-NAME>
doctl compute droplet delete <DROPLET-ID>
We connect to the Kubernetes cluster using the command below, or by following the cloud provider’s instructions:
doctl kubernetes cluster kubeconfig save <ClusterName>

Connecting the Kubernetes Cluster to Azure Arc
Our Kubernetes cluster is ready to go. Now we need to connect to Azure Arc using Arc Kubernetes agents.
We’ll connect the Kubernetes Cluster we just created to Azure using Azure CLI. We must install the connectedk8s Azure CLI extension, so we run this command:
az extension add --name connectedk8s
az extension add --name k8s-configuration
This installation might take a few seconds. Once the extension installs, we can proceed. We must be logged in to our Azure subscription from this point forward. From the CLI, we log in with this command:
az login
This command opens our internet browser and asks us to log in to our Microsoft account. After we log in, the CLI lists all our subscriptions.

We have redacted the identifying information in the image above, but we need to ensure we are using the correct subscription. The isDefault flag marks the currently active subscription. If this isn’t the right subscription, you can switch with the command below and the subscription name or ID:
az account set --subscription
After we log in and confirm we’re in the correct subscription, we run the following command to register providers for Azure Arc-enabled Kubernetes:
az provider register --namespace Microsoft.Kubernetes
az provider register --namespace Microsoft.KubernetesConfiguration
az provider register --namespace Microsoft.ExtendedLocation
Although this process can take up to 10 minutes, we can monitor the progress with these commands:
az provider show -n Microsoft.Kubernetes -o table
az provider show -n Microsoft.KubernetesConfiguration -o table
az provider show -n Microsoft.ExtendedLocation -o table
Once we’re registered, the registration state changes to Registered.

We must assign our Kubernetes cluster to a resource group. So, let’s create one quickly using the command:
az group create --name AzureArc --location WestEurope --output table

Now we connect our Kubernetes cluster to Azure Arc:
az connectedk8s connect --name k8s-1-21-5-do-0-ams3-azure-arc --resource-group AzureArc
This operation will take some time to implement. This command also has a condition set stating that all the pods must be running.
Once the command succeeds, the CLI displays our cluster’s details.

Verify Connection
We can verify the connection using the following command:
az connectedk8s list --resource-group AzureArc --output table

We can also verify the connection by logging into Azure Portal and searching for and selecting Kubernetes - Azure Arc.

This action takes us to the Kubernetes - Azure Arc section, which displays our newly-connected cluster.

Alternatively, we can verify the connection on our external Kubernetes cluster by checking for the pods under the azure-arc namespace:
kubectl get pods -n azure-arc

This command displays all the pods required for our Kubernetes Cluster to connect to Azure Arc.
Administering Arc-Enabled Kubernetes Clusters with an Azure Policy
After connecting our cluster to Azure Arc, we can perform and install various extensions to manage the cluster or add monitoring tools. Most of that is out of scope for this article, but we’ll add security and monitoring in the second article of this series and deploy containers in the third. Here, we want to demonstrate applying policies to our Kubernetes cluster in Azure Arc.
We would generally apply policies for two reasons: enforce and safeguard our Kubernetes cluster in a centralized, consistent manner, and apply GitOps configurations at scale on our Kubernetes cluster.
To apply Azure policies, we first need to register the Microsoft.PolicyInsights namespace:
az provider register --namespace 'Microsoft.PolicyInsights'
We also need to create a service principal to use with these policies. This command creates a service principal named AzArcK8s:
az ad sp create-for-rbac -n "AzArcK8s"
Note: You need sufficient Azure Active Directory permissions to create the above service principal. If you don’t have adequate permissions, contact your administrator to make the service principal for you.

We can add the repo to the Helm Kubernetes package manager using this command:
helm repo add azure-policy https://raw.githubusercontent.com/Azure/azure-policy/master/extensions/policy-addon-kubernetes/helm-charts

We can then install the azure-policy add-on using Helm. This will install all the required pods into our Kubernetes cluster under the kube-system and gatekeeper-system namespaces. We must use the details of the service principal we created earlier.
helm install azure-policy-addon azure-policy/azure-policy-addon-arc-clusters ¶    --set azurepolicy.env.resourceid=<AzureArcClusterResourceId> \
    --set azurepolicy.env.clientid=<ServicePrincipalAppId> \¶    --set azurepolicy.env.clientsecret=<ServicePrincipalPassword> \
    --set azurepolicy.env.tenantid=<ServicePrincipalTenantId>
Once we’ve installed the add-on, we can apply policies to Arc-enabled Kubernetes clusters.
We validate the add-on's installation by running the following commands and ensuring the pods are running for policy under the kube-system namespace and gatekeeper under the gatekeeper-system namespace:
kubectl get pods -n kube-system
kubectl get pods -n gatekeeper-system

Assigning a Policy to an Azure Arc Kubernetes Cluster
We’ll now assign a policy to our Kubernetes cluster. At the moment, Microsoft limits us to assigning built-in policies.
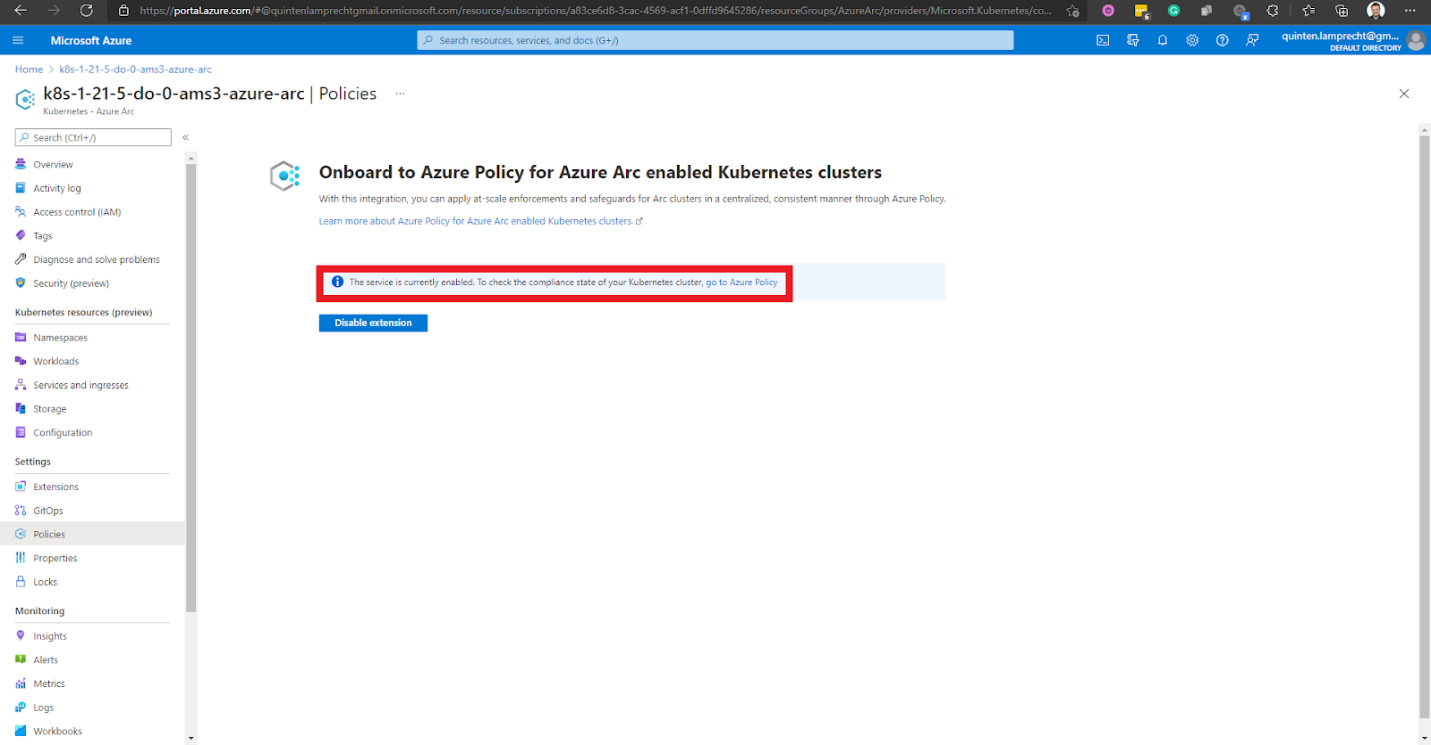
To assign a policy using the Azure portal, we select our Arc-enabled cluster under Kubernetes - Azure Arc, then select Policies under the Settings section.

Note that Azure states that we should enable the Azure Policy for Arc-enabled Kubernetes clusters. The message also provides us with a link to Azure Policy. We click that link to go to the Compliance page.
We select Assign policy on the Compliance page, which takes us to the Assign policy page.

Next to Policy definition, we select the blue ellipsis (…) to open the built-in definitions.

Then, we refine the search in the Search box by typing Kubernetes. We can now see all the policies available for Kubernetes.

Select the policy [Preview]: Azure Arc enabled Kubernetes clusters should have Azure Defender's extension installed and click the Select button. This action populates the Policy definition and Assignment name fields. We then click Review + create.

Ensure all the policy information is correct on the review page, then click Create.

Once Azure successfully creates the policy, it takes us back to the Compliance page, which now lists our newly-created policy. By default, its Compliant state is Not started.

This setting updates after about 15 minutes.

Next Steps
We have now hosted a Kubernetes cluster and installed its CLI tool. We connected our cluster to Azure Arc and installed the Policy add-on to enable policies on our cluster.
You can also read the Arc-Enabled Kubernetes section of the What the Hack series for more information.
Sign up to try Azure Arc for yourself or your organization, or continue to part two of this series to learn how to add security and monitoring to your Kubernetes cluster.
To learn more about how to get started with Azure Arc-enabled Kubernetes or how Azure Arc-enabled Kubernetes allows you to attach and configure Kubernetes clusters running anywhere, check out our resource page on Azure Arc Enabled Kubernetes.