
Streaming at Scale with Azure Event Hubs for Kafka Developers Part 2: Processing Streaming Data with Azure Functions in Python
0/5 (0 vote)
In this article, we develop several Azure Functions in Python to process the payload we receive and save the data to a Cosmos DB instance.
In the previous article, we created an Event Hubs instance and a demonstration application that sent messages using the Kafka API. Most Kafka applications can work with Event Hubs with minimal changes to the application’s configuration. However, this is only one side of the story. We also must retrieve messages and make them useful.
To do this, we use Azure Functions, a serverless compute service that allows us to run code without managing any infrastructure. Azure Functions have a few different bindings that enable them to listen to several services — including Event Hubs — to greatly simplify the build experience. They also scale automatically based on the load to handle a lot of generated Event Hub messages.
Each function we create in Python also saves different data in an Azure Cosmos database. Like Azure Functions, Azure Cosmos DB provides a NoSQL database as a service, allowing us to save data without managing any infrastructure. Before writing some more Python, let’s create our Cosmos Database and Azure Function services to handle the data generated.
Creating a Cosmos DB Instance
To begin, we need a place to store our data.
Open the Azure Portal and go to the resource folder we created in the first article. Click the Create a resource button and search for the Azure Cosmos DB option. We use the Core option to take advantage of the output bindings available with Azure Functions.
Select Subscription and Resource Group, then give your service an Account Name and Location if necessary. I have chosen the Serverless option for Capacity mode, but if you wanted dedicated resources for production, Provisioned throughput might be a better option.

Click Review + create to initialize the Cosmos DB instance. This can take a few minutes depending on the configuration, but we now should have a place to store our data.
If you'd like learn more about, or share what you know about Azure Cosmos DB, check out the Azure Cosmos DB Conf; a free online virtual developer event organized in collaboration with the Azure Cosmos DB community.
Creating an Azure Function App
Now that we have a place to store our data, we need a function to retrieve messages from our Event Hub and save them to our Cosmos DB.
Open the resource group again, click Create, and find the Azure Functions option. Like the Cosmos DB configuration, select the resource group and give the function app a name. Select the code option instead of docker to reduce the management required. Finally, select Python as the code base, 3.9 as the version, and click Review and create.

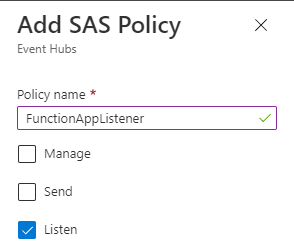
Like the Cosmos DB, this can take a few minutes to create, but once complete, we should now have a Function App to host our Azure Functions. Before we move to code, the last step is to create a shared access policy (SAS) for our Function App to read messages from the Event Hub.
To do this, open the Event Hub namespace, then the Event Hub we created, and click the Shared Access Policy menu on the left. Add a new policy with the permission to listen to the Event Hub.
Creating Our First Function
We use Visual Studio (VS) Code to create our first function. Additionally, we use the Azure Function Core tools and the Azure CLI to develop our functions locally before deploying them from VS Code. Once these components are installed, open VS Code and click the extensions button on the left side. Find and install the Azure Functions extension, which should also install the Azure Account and Azure Resources extension.

With these extensions installed, we should have an Azure icon we can open and use to log into our Azure tenancy. In the Functions section, click the create new project option, which then prompts us to configure our function application. The configuration steps are as follows:
- Select a folder in which to create the project. This is where you save all the code for your functions.
- Select the language to use to develop the function and the version. For consistency, this article uses Python 3 bindings.
- Select a Function trigger type, which will be the Azure Event Hub Trigger. An Event Hub trigger configures the function to listen for Event Hub messages to run.
- Enter a name for the function. Our first function saves the customer details, so let’s name it
airline-customer-save. - Sign in to your Azure account, which opens in a new browser window to access Azure resources.
- Select your Azure subscription, the Event Namespace, and the Event Hub that we created in the first article.
- Finally, select the Listen shared access policy that we created and leave the $Default subject in place.
After these steps, VS Code sets up boilerplate code for our function. Any Azure Function project set up in this way contains some Function App settings in the file host.json, some local settings in the file local.settings.json, and any Python dependencies in the file requirements.txt. Additionally, for each function hosted within the Function App, there is a folder with the function name, a function.json file containing the function's bindings, and a script file with the default name __init__.py.

If we click the Azure icon on the left and open the Functions section, we should see a cloud icon with an arrow called Deploy to Function App.
This asks for the subscription and the function app to deploy. After selecting these, VS Code then deploys the primary function to our function app.

We have now deployed the Function app, but it won’t process any messages until we add the connection details to the Function app. If we look at the function.json file, we see the Event Hub Trigger linked to our Event Hub by using the name in the variable connection. We must add the name and the connection string from the Event Hub Shared Access Policy to our Function App.
Open the Function App in the Azure Console and select the Configuration menu item from the left menu. Add a new application setting with the name as the connection string in our code and the value as the Shared Access Policy’s primary connection string and click OK. Make sure to save these settings.

Saving Data with Functions
Our Function App now processes messages, but it doesn’t do anything other than registering an informational event to the logs. To save our data, we use an out binding to connect to our Cosmos DB instance.
Open the function.json file in the Function directory and add the following JSON to the bindings after the Event Hub section:
{
      "type": "cosmosDB",
      "direction": "out",
      "name": "doc",
      "databaseName": "airlineData",
      "collectionName": "customer",
      "id": "id",
      "partitionKey": "/id",
      "createIfNotExists": "true",
      "connectionStringSetting": "AzureCosmosDBConnectionString"
 }
This code block allows us to access the doc variable to save objects in our Cosmos DB. It also specifies the database name, the collection name, the ID value, and the partition key. It also sets the flag to create the database and collection if it doesn’t exist. Finally, the connection string links the Function App setting we need to retrieve the Cosmos DB connection string.
To get this string, we open our Cosmos DB instance and select the keys option from the menu on the left, and copy the connection string. We can add this string to the file, local.settings.json, to debug locally, but we also must create a new Application Setting key in our Function App.

To save our data to our Cosmos DB, we now must update our Function parameter to include the doc variable and use that variable in our Function to save the data. Our code should now look like this:
def main(events: List[func.EventHubEvent], doc: func.Out[func.Document]):
    for event in events:
        logging.info('Python EventHub trigger processed an event: %s',
                        event.get_body().decode('utf-8'))

        event_body = event.get_body().decode('utf-8')
        doc.set(func.Document.from_json(event_body))
Next Steps
We now have a simple function to save Kafka event data directly in a Cosmos DB. In the final article, we finish building this application by adding Power BI to build reports and dashboards on top of our Cosmos DB dataset. To do this, we expand on this function to manipulate this data and save individual components with different functions to handle each use case.
To learn how to accelerate foundational app development, check out The Developer’s 7-Step Guide to Low-Code App Development.