
Audio Steganography for Pretty Good Concealing (AS4PGC)
5.00/5 (9 votes)
Compress, encrypt and hide a secret file inside an audio file (MP3, WAV, OGG, FLAC, ..)

Send secret messages to your friends and family or store important things in a place no one else can find!
In this article, you will learn what you can do to protect your digital privacy, improving the security provided by encryption by complementing it with steganography.
Introduction
Encryption is no longer enough to protect your data!
Not only are there risks with "backdoors" and "weak passwords", also the keys of the current encryption algorithms are sometimes intentionally limited in order for "them" to be able to access your data.
Besides those dangers, with the arrival of quantum-computing, the cryptographic systems currently in place to ensure data security may soon offer no protection at all.
It is an open secret that governments and companies store your data, even if it is encrypted and they currently cannot access it.
All information encrypted with current algorithms that you are sending or storing right now may be decrypted and compromised in a near future, revealing your secrets.
Fortunately, there is a current technology which “circumvents” that problem by “hiding” the data in the first place, making it “invisible” to attackers.
That technology is “steganography”.
This article presents a new steganographic technique and its implementation in the form of a tool for the command-line interface (CLI) which uses “audio steganography” in addition to encryption.
Contents
- Tool
- Overview
- Code
- Long lasting solution
- Robustness
- Applications
- About Cybersecurity
- About Steganalysis
- Next steps
- Alternative Tools
- Image and Video Gallery
- Proposed Articles
- Summary
- Points of interest
- History
Tool
Before jumping into the details, you may want to play with the tool a little bit and have a feeling of what you can do with it.
The command line tool is just a command you type in your terminal or command prompt.
The tool is easy to use when applying the default settings. No special knowledge is required.
It also offers advanced features which can be used by supplying optional arguments.
Installation
For installation and management of Python packages on Windows and Linux, pip is the preferred option.
That's why I created a project in PyPi which you can find at the following link:
Just follow the instructions in the link and you are done.
Basically, you need to type this in a console:
pip install as4pgc
and also install ffmpeg. In Linux type:
sudo apt install ffmpeg
For Windows, follow the instructions in this link:
You can upgrade the tool anytime if required by typing:
pip install --upgrade as4pgc
For checking the version currently installed, type:
as4pgc -V
How to Use / Recommendations
After installation, for a complete list of options and their description, you can type:
as4pgc -h
Hide, for example, a file of any type inside an .mp3 file:
as4pgc -w secret.zip carrier.mp3
Use the option -p to activate plots and track the signal processing steps.
Use the option -v to output details.
Then, recover the hidden file with:
as4pgc -r stego.mp3
But, before you start, be aware of the following recommendations.
An important recommendation is to avoid using any carrier file publicly available.
If both files, carrier and stego, fall into the hands of the attacker, he may easily extract the difference by comparing both files.
Of course, even in that case, he still needs to extract the message using the correct embedding settings and unencrypt it, probably by applying a brute-force attack.
So, although using publicly available files is not immediately a problem, if possible, don’t let the attacker go that far.
In some cases, the bare knowledge that a message has been hidden inside the file, may already be a problem. Therefore, try to:
- record your own audio files, and if possible destroy the original carrier file.
- avoid too many silences or low audio levels.
- give no hints in the carrier about the secret message, e.g., send the stego file to a friend as a “voice message” telling him about your fictive or real vacations.
Inside the file, you can hide, e.g., a user-password to access a shared folder on Google-drive. Check Applications for more ideas.
The following diagram shows the idea:
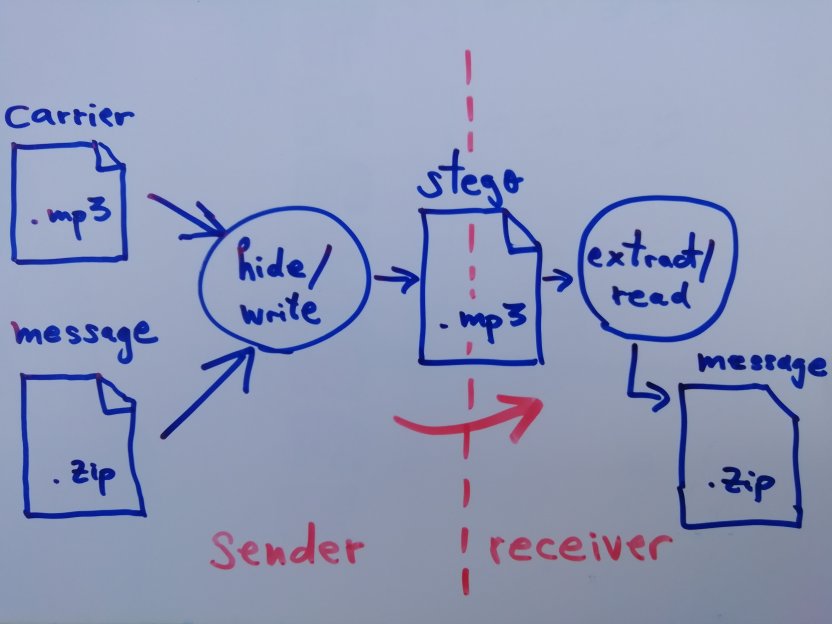
Overview of Method
The target of this steganographic technique is hiding information in compressed audio files instead of using the classical LSB-steganography typically applied on .WAV files.
LSB stands for least significant bit, so LSB-steganography refers to the process of replacing the least significant bit of the bytes of a container/carrier file with the bits that form the data we want to hide, the result is a stego file.
Some examples of compressed audio formats are MP3, FLAC and OGG.
But also uncompressed .WAV files may be used as carrier medium using the current method, which sometimes replaces more bits than just the LSB.
This reduces the embedding capacity, but an audio format is used, which is much more widespread and therefore less suspicious.
But, why don’t we just use LSB-stego also in compressed audio files?
The main reason it is not possible to directly manipulate single bits of single samples as in .WAV format is because of changes resulting from conversion, e.g., in .MP3 format which distorts signal manipulations.
Modifications on single bits of the samples are just too small to survive audio compression reliably. Instead, in the present technique, the audio signal is partitioned in small chunks and then the FFT (Fast Fourier Transform) of each chunk is calculated.
The FFT-series obtained for specific frequencies, is manipulated by increasing or decreasing the amplitude of the FFT in alternating chunks.
To obtain the coded audio signal back into "time domain", we just perform the inverse FFT of each coded chunk in the FFT-series.
Coding is done in alternating chunks, using the unmodified chunks as reference points. A linear interpolation between these reference points determines the threshold between ones and zeros, which we need in order to recover them.
It is important that the FFT-series has consecutive samples that are highly correlated. That is why, if we take e.g. white noise as input, it will be harder to hide a secret message.
The next figure shows the idea:

The 3D figure above has axis chunks, FFT and frequency (f). The dotted lines show the FFTs at each chunk, that is FFT(f) for chunk 0, 1, and so on.
From these FFTs, we will only code some frequencies, denoted fcN.
As an example, three series are colored in red, green and blue, corresponding to the coding frequencies fc0, fc1 and fc2.
The even chunks are used as reference points, while the odd chunks are binary coded, with ONES and ZEROS.
Take, for example, the series S0 at chunk 3, there we find a ONE because if we set a line between S0(2) and S0(4), the interpolation will lay above that point.
A ZERO, like S1(3) will be above the point determined by the linear interpolation between S1(2) and S1(4).
Finally, a chunk which is not coded at a specific frequency will be close to the interpolated value, that value will be skipped (discarded). S0(1) shows an example.
The next figure shows another example:

But, how does this happen exactly?
The most important thing to notice is that, when targeting a reasonably “high capacity” while keeping distortions at very low level (not hearable), not all signal manipulations will “survive” audio compression.
That is, after embedding the message inside the carrier, which is processed in PCM-format and then converted to a compressed audio file, the result will not contain exactly all changes we made.
PCM stands for Pulse Code Modulation which represents the audio signal in an uncompressed digital format. Compressed audio will not reproduce the original PCM signal exactly.
Therefore, a read-back step is introduced which checks which bits were successfully written in the compressed file and which not.
This step is repeated until all bits are successfully coded.
While coding, the problematic bits are processed in several steps applying the next rules one after the other on successive failures:
- Recode: increase coding level a little bit to increase the chance of success in the next iteration
- Force plus: code bit in order to exceed acceptance criteria and get discarded (the plausibility check on maximum value will fail in the next iteration and the bit will be marked to be skipped)
- Force minus: same as force plus but for minimum value (lower threshold)
This results in several chunks not being coded and therefore in a lower capacity, but over time more and more bits will be successfully coded, until the complete message is finally embedded.
As you notice, the present method relies on an “iterative approach”.
Therefore, it is important to keep track of “algorithm-convergence”, reaching desirable results within an acceptable/maximum time.
So, one end criteria is the maximum number of iterations allowed, after which we will interrupt and exit with an error message.
This may happen for example if we try to embed a file which is too big to fit inside the carrier. Note that we use the term "carrier" and "container" file or signal interchangeably.
The following diagram shows roughly the sequence in which data is processed and the generation of files with an example:

Be aware that the program only reads and writes uncompressed .wav files directly. Intermediate conversions to and from compressed audio files are done with help of the external tool ffmpeg.
If you have a critical view, you may argue that using a try-and-error or brute-force method like this one is bad.
But think about it, machine learning and artificial intelligence, as well as many algorithms out there, work in a similar way. This is also true for the extended processing time, e.g., to train the models.
The current version of the code and the proposed default values for the different parameters is partially the result of several tests and compromises.
For example, when making the choice of how many samples shall be inside a chunk, we need to consider that, the more samples in a chunk, the less chunks we have to code but, the more frequencies we can code within each chunk.
The opposite is also true. The “optimal” value may also depend on the amount of “noise” introduced by coding and the frequency range chosen for coding.
At the moment, the following parameters are set with these default values:
chunk_len_samples = 480interleaved_chunks = 2# needed for interpolation >1interleaved_fc = 2# to avoid interference between codes >1code_frequency_start_bin = 120# fc0 = 120000 Hzcode_frequency_end_bin = 179# fcN = 17900 Hz
To understand how the magnitude of specific frequency components is coded, we need to remember that it is composed of a real and an imaginary part.
Therefore, for coding the absolute magnitude of the FFT at a specific frequency, we modify both, the real (Re) and imaginary (Im) parts, by multiplying them with a predefined factor.
The factor is a value "relative" to the original magnitude at that frequency.
For coding a ONE, we multiply with CODE_FACTOR_PERCENT_MINUS, multiplying with CODE_FACTOR_PERCENT_PLUS will code a ZERO.
Here is an example for coding a ONE at coding frequency fc in chunk i:
code_sig3_chunk_FFT[i][CODE_FREQUENCY_START_BIN + fc] =
interpolatedFFTn_real*CODE_FACTOR_PERCENT_MINUS +
1j*interpolatedFFTn_imag*CODE_FACTOR_PERCENT_MINUS
Because the reference FFT real and imaginary parts may result in an interpolated value which has a different sign than the original value at that place, we consider its sign when coding in order to reduce distortions, e.g.:
interpolatedFFTn_imag = abs(code_sig3_chunk_FFT_n[i - 1, fc].imag +
diffFFT_n_imag / 2.0) * np.sign(code_sig3_chunk_FFT_n[i, fc].imag)
With this trick, it will not matter if the real or imaginary part of the code is positive or negative as long as the absolute value (the module) has the right magnitude.
Here is an example:

In order to code a ZERO at chunk i, the first diagram in Figure 5 shows that the interpolated value A shall be exceeded up to ZEROA, marked with a "blue" cross.
Alternatively, if Re(S2)i changes its value down to the red X (ZEROB), we will also obtain the same module, thus still coding a ZERO.
This can better be seen in the diagram on the right side of Figure 5, which shows in addition the imaginary part (the modifications on Im are not shown for simplicity).
Note that if we code Re(S2)i as ZEROA, the modification of the original value is huge, resulting in a strong coding noise. This can be avoided when considering the sign.
To continue, all coded samples shall be above SKIP_CODING_IF_MIN_EXCEEDED_DEFAULT. This ensures that modifications have enough amplitude to survive audio compression.
The most noise introduced by coding results already from the interpolated values, therefore the parameter INTERPOLATE_AND_DUMMY_CODE_ALL shall be preferably set to false.
The disadvantage in that case is that the modifications are not spread along the complete audio signal, thus increasing noise at the place where the message is coded, which may provide a hint to the attacker.
This can be solved, e.g., by spreading the coding by increasing the parameter interleaved_chunks.
We use rfft() for calculating the "real" Fast Fourier Transform instead of fft() because the signal is a real physical signal and we can apply rfft() which is more efficient. The same is valid for irfft(), the "inverse real" FFT.
Some other details like normalization, scaling, logging, compression, and encryption are not explained here but can be easily understood reading AS4PGC.py which has several comments in the code.
Message extraction starts by calling the tool with argument -r and the file name of the stego file. Then the tool asks to enter the password.
If the correct password was entered, then the original file with the secret message will be created in the same folder.
During message extraction, a header is first decoded in order to obtain necessary information, especially the length of the hidden message.
Then, several plausibility checks are performed and if required the secret message is decrypted and decompressed.
More details can be found in the function read() in AS4PGC.py which has several comments in the code.
Configuration
As mentioned above, the program offers several possibilities to adapt it in order to improve results according to your needs.
For that, a file called config.ini may be conveniently modified.
When no config.ini is provided, the default values of the configuration parameters will be used. This works fine most of the time.
The dataclass variable configuration contains several parameters of different types which are initialized with default values.
If a configuration file is provided, then it will be read during program start overwriting the default values.
Some other parameters like "--no_encryption" and "--messupconfig" may be provided as a command line option.
A few parameters like SEED_IGNORE are then modified pseudo-randomly introducing an additional deception step.
For this, a key derived from the password provided is used.
When "--messupconfig" is provided, several configuration parameters are "scrambled" in addition.
This ensures further protection, making it more difficult for attackers to extract the hidden message.
The most obvious parameters will not be described here, but the following list provides details of some important parameters:
IGNORE_THRESHOLDa value of0.99will randomly select 1% of the chunks to NOT be codedDO_IGNORE_SOMEactivates the use ofIGNORE_THRESHOLDDO_DECEPTIONcode dummy bits when ignoredINTERPOLATE_AND_DUMMY_CODE_ALLcode dummy bits beyond the original secret messageRECODE_FACTOR_PLUSfactor to be applied when "recoding" a failed codeCODE_FACTOR_PERCENTfactor in percent to increase the value of an FFT-chunk in order to code a bitCODE_FACTOR_PERCENT_DETECTION_THRESHOLDrelative threshold value below which the codes are not valid
Header
Because at the moment of extracting/decoding the hidden message its length is unknown, we require the use of a header.
The header will always be encrypted with the password provided by the user.
During message extraction, the header is first decoded and decrypted in order to obtain necessary information, especially the length of the hidden message.
Then, several plausibility checks are performed and if required, the secret message is decrypted and decompressed.
Whether the file with the secret message is compressed and/or encrypted, as well as the name of the original secret file, is also specified in the header.
Note that if we were able to detect the end of the hidden message, then we would probably not require a header.
But then, in case we use dummy codes beyond the hidden message, we would need a special marker to find the end of the original message.
This in turn means that any message contents matching the special marker shall be first replaced. This is sometimes problematic.
Therefore, the use of a header seems to be a very convenient tool to handle message coding and decoding.
The following diagram shows the fields of the header in detail:

Deception
In general, thanks to the several layers of protection, we can assume that attackers will NOT be able to read our secret message.
Avoiding “detection” is more difficult. Using steganalysis, the attacker may be able to detect the existence of the message with some confidence.
He may also be able to estimate the approximate size of the message. But that is usually how far he can get.
The current technique is quite secure and assures no one can read your message without permission (e.g., without password(s), config.ini).
Nevertheless, we shall improve embedding in order to deceive the attacker as far as we can without introducing vulnerabilities and without much reduction of capacity.
For this purpose, the current code has the following measures:
- the header as well as the hidden message are encrypted, thus increasing the entropy of the hidden data
- several configuration parameters may be "messed-up = scrambled" - reversible operation needed, thus no use of
SystemRandom() - secure pseudo-random binary array
deception[]to code dummy bits in ignore-chunks and in chunks beyond message - random padding bytes in header (reversible operation)
- coding frequencies randomly shuffled, see
random_f_shift[]- important improvement of deception in frequency domain - coding frequencies offset randomly a fix amount - see
fc_offset[] - several FFT-chunks ignored randomly (see
ignore[])
The use of the secure functions urandom() and SystemRandom(), which uses urandom() internally, is not "reversible".
That's why, for random operations that need to be reversed in order to recover the original message, we need to use the less secure versions for generation of random data.
This is no problem because in those cases, we use in addition the seed values which are derived from the password.
Note: The words random and pseudo-random are used in this article interchangeably, but we always refer to pseudo-random.
Although there is "currently" an important difference between these terms, some scientists argue, that we don't know for sure what "real randomness" means.
That leads to the more philosophical question: Does God play dice?
Capacity
A rough analysis on the current method reveals that the "coding capacity" is much lower than the one obtained, e.g., when considering LSB-coding on .WAV files.
If we assume that we can code with LSB 1 bit of information in every sample of a mono .WAV file, then we can hide 48000 bits in every second, assuming a sampling rate of 48 kbps.
If the audio samples have a resolution of 16 bit, we then code 1 bit out of 16 bits.
Now, how does it look like when coding, e.g., MP3 files with the current method?
Some tests achieved a coding capacity of 1200 bits per second. So, how many bits do we have in each audio sample?
Those tests were performed with a quality of 320 kbps, which is "equivalent" to 20000 x 16 bit samples per second.
This results approximately in a coding factor similar to the one obtained with LSB coding on .WAV files.
But that equivalent result is valid for a sampling rate which is much lower (20kbps vs. 48kbps).
If we now consider the fact that we do obtain 48000 audio samples when converting MP3 data back to PCM, we may conclude that we only code 1200 bits in 48000x16, resulting in a factor of 640 (a factor 40 when compared with LSB-WAV).
This sounds more reasonable, it seems we can hide 40 times less information as compared to LSB-WAV. But, what about the size of the files? Are we being fair here?
When considering the final size of the .WAV and .MP3 audio files in bytes, we find again the factor 2.4. That is, if the .WAV file size in bytes is e.g.,1440 kB, then the .MP3 file is only 600 kB.
Even in that case, we are still 16.66 times worse than LSB-WAV.
That's the price you have to pay if you want to use the most wide spread audio formats, which use lossy compression. You'll probably never get better than that.
Note though that the capacity will strongly depend on the actual configuration.
That is, it will depend on the number of audio samples in each FFT-chunk, on the number of frequencies used for coding, the number of skipped chunks, etc.
Filtering
By default, BSF_MIN_ATTENUATION_DB is set to the value 85, which not only activates the band pass filter, but also sets it to a quite strong attenuation.
But, what is the problem with that?
The attenuation of the band pass filter determines how much audio signal is removed from the original carrier at the frequency range used for coding, before doing the actual coding.
On the one side, this helps removing "interferences" between the contents of the carrier and the embedded bits, on the other side, this reduces the hiding of the coding signal.
That's why this feature shall be used with care, e.g., setting an attenuation which disguises our coding signal good enough while the carrier does not interfere with it too much.
Under certain circumstances, filtering may help avoid convergence issues, e.g., when we code high frequencies with very low level on a carrier which has strong audio contents in this range.
The filter attenuation shall be selected as a compromise between algorithm convergence and code hiding.
For convenience, a high minimum attenuation is set as default. This will ease coding for most users at the cost of losing some hiding against the attacker/steganalyst.
Code
The code is written in Python and is compatible with Python versions 3.6 to 3.9.
Several tests have been made on Windows 10 and Linux Mint 20.
The current version of the code is labelled as Development Status 4 - Beta in PyPi.
At the top of this article, you find the link to the project in GitHub and also a .zip file is provided for download.
With help of the batch file gen_exe_with_pyinstaller.bat, an executable file can be generated using pyinstaller.
Module Description
Here, you find some brief information about the code in AS4PGC.py:
- # first lines of code: definitions, load/create config.ini
- #
print_progress(..): print progress bar - #
write(): hide message in carrier and output result in stego file - #
read(): extract hidden message from stego file - #
main(): callwrite()if-woption orread()if-roption - #
psnr(): calculate Peak Signal To Noise Ratio - #
snr(): calculate Signal To Noise Ratio - #
nextpow2(): helper function forfreq_shift() - #
freq_shift(): frequency shift a signal using SSB modulation
Long Lasting Solution
If you check the articles, AC4PGC and AC4QGP, you will notice a "pattern".
The secure offline devices described in AC4PGC and AC4QGP output analog-electrical-signals, which on the insecure side are then digitized and transported, e.g., over VoIP (compressed) in specific data formats.
All this process is then reversed in the receiver, and the original analog-electrical-signal is recovered. That electrical signal contains the encrypted binary message which can be only unencrypted in the offline devices.
The transmission channel may change in different situations, e.g., PSTN, radio link, etc., and the intermediate signal may suffer different conversions. But in the end, the original analog signal is recovered (with some disturbances).
In the present article, the output and input of this technique may be considered the audio signal in PCM format.
In between, that is, in the compressed audio file, different formats may be used and some disturbances may be added. But that is only the transport media.
The pattern emerges when considering the compressed audio file as the communication channel, similar to the transmission over VoIP in AC4PGC and AC4QGP.
With this, we notice that the solution focuses on the "signal characteristics" and is quite independent of the specific:
- compression techniques
- algorithms
- codecs
- implementations (tools, programming language)
- parameters used for compression / format conversion
- applied standards
- protocols and data formats
Therefore, we may expect that the present technique (not necessarily the current “implementation” of this technique) is still applicable in a very far future.
The pattern above can be described as: sending data from A to B “overcoming the communication-channel / insecure-path” without much information about what happens in between.
That is, the specific characteristics of the communication-channel, even if known in advance, are just not much relevant. Only signal processing counts.
Consider, for example, the compression using .OGG or .MP3, two completely different compression algorithms.
As opposed to MP3Stego, a software tool which hides data within the “bowels” of MP3, and only works for MP3, the message embedding and extraction with AS4PGC is possible in both cases, MP3 and OGG. No changes required.
Also several other formats can be overcome, even future compression formats that don’t yet exist. They can all be seen as disturbances of the communication channel.
But of course there are limits, this article shows which things need to be considered from the theoretical point of view, but also for the specific implementation, considering the programming language, external tools, formats, settings, etc.
When compared to direct approaches like MP3Stego, the price we need to pay for such a flexible approach and long lasting solution is:
- increased time (it takes much longer to hide/recover the secret message)
- increased noise (though still not hearable by humans, the modifications in the signal may be more noticeable when steganalysis is used)
- reduced capacity (the size of the message which can be hidden is smaller)
Robustness
This chapter is left as a reminder for later updates of this article.
Evaluation of steganographic methods include robustness tests against several types of attacks.
We mentioned already steganalysis, which is an analysis method to find out if the stego file contains a hidden message or not.
We can improve hiding using different techniques, but there are other attacks which involve "modification" of the stego file, e.g., during interception of a file transmitted via email.
One example is changing the volume of the stego file, but several other attacks like resampling, LP filtering, echo addition, noise addition are also possible.
But one thing can be said in advance, the robustness of this technique is probably not too strong.
Slight changes in the stego file will probably corrupt the hidden message, especially if it is encrypted.
Possible solutions like storing unencrypted redundant information may increase robustness, but this needs to be investigated.
As a result, further improvements in the implementation may be added in future.
Applications
Here, you find some ideas to store and/or share secret messages:
- text message
- passwords, bank-PINs, picture of a QR-Code
- digital certificate
- important e-mail
- small computer program
- medical records
- weblink to an “unlisted” youtube video
- low resolution photograph
- any small file (of a few Kilobytes) you want to keep safe:
- tax declaration
- abstract of bank account
- monthly expenses
- contact data: tel.nr., e-mail addresses, postal addresses,..
If the secret file is too large, then you can split it into smaller files and store them into different carrier files. Splitting zip files is probably the easiest option.
Zip files may be additionally encrypted with a different password. This encryption comes "on top" of the one applied in the method described in this article.
About Cybersecurity
The fact that we hide information does not release us from applying cybersecurity measures.
This code can be analyzed in windows with audit_code.bat which uses two different tools to evaluate the vulnerability status of the code, bandit and safety.
The results are stored in the folder audit. The commands can be also executed in a linux terminal.
Currently, only “low” severity issues exist in the code which are not critical or relevant. The corresponding comments with justifications can be found in the code.
In the chapter Introduction, several dangers to encryption were mentioned which may justify the use of additional measures like steganography.
Another important and mostly unknown issue is the end node problem, which may, for example, allow the attacker steal your encryption password at the moment you enter it.
Unfortunately, with the current tool, you still need to worry about end node security.
Some possible ways to overcome even this problem are described in these articles:
About Steganalysis
Regarding steganalysis, probably the biggest danger to this technique, the reader shall be aware that steganalaysis main goal is producing a statement about the “probability” of a steganographic payload being hidden in a file.
Producing statements of 90% is already very good but is by far no “proof” that your file actually contains hidden information.
In any case, steganalysis is very seldom able to exactly recover the hidden message.
And even if it did, as an extraordinary case, the attacker shall then start cracking your “encrypted” message. Being then at the starting point as if only encryption had been used.
The following list shows the barriers that the attacker needs to cross:
- find out that your file contains any hidden message (using steganalysis)
- recover/extract the message
- unencrypt the message
- if the message is an encrypted .zip file, then “unencrypt the .zip file”
- prove that it was really you who hid the message there in the first place! (non repudiation)
Next Steps
The list of next steps is quite long, nevertheless, for the sake of completeness, it is provided next:
- shuffle chunks using a polynomial instead of using
modulo()which is too straight forward orrandom()which does not work – probably because too many random details cannot be recoverably-compressed in mp3 - add more scrambling in: space between chunks, nr. of samples in chunk, chunks used for average interpolation, code thresholds, etc.
- stereo support
- support further audio formats
- code the "derivative" of the FFT-series: porting of existent proof of concept to python - yes, the method works!...using a trick...
(coding the derivative of the FFT-series has some advantages like producing less noise and hiding the information yet in another domain) - code with other “reversible” functions to perform coding in different domains (analog to derivative of FFT above), e.g.,
histogram() - code under consideration of min/max values of CDF
- noise smoothing
- one time pad: with noise, music, or codebook
- GUI as front-end for the CLI tool, for setting parameters, specifying files, password, automating embedding of several files, apply AI, etc.
- cool 3D-plots (too slow?)
- use
moviepyto hide the secret message inside audio of videos! - audio stego streaming, e.g., using bluetooth
- apply cybersecurity measures to protect the tool itself (e.g., encrypt config.ini)
- default embedding of header in order to hide values of config.ini where different embedding parameters for hiding the message are stored, thus only a password is needed, no more need for an "external" config.ini. Disadvantage: Header always embedded in the same way, thus easier to detect with steganalysis?
- temporal masking: code close frequencies with higher amplitude (tones played at the same time)
- skip force as configured, e.g., store in header the position (relative or absolute) of chunk/s to be skipped
- hide “several” secret messages at once:
The method can be easily extended to hide N (N>1) messages, each one with its own password and settings (partially).
The messages could be just coded one after the other or even mixed, using complementary frequencies. - use of machine learning: the relative big amount of parameters, value-ranges and their combinations may have a big impact on the results of this method. As usual, the compromise between robustness, capacity and hiding level may be adapted according to the needs by tweaking / fine-tuning parameters. For this purpose, the config.ini file may be used. Nevertheless, my experience over the last weeks shows that some results are indeed quite counter intuitive and the dependencies between parameters are sometimes difficult to understand. This is how I came to the idea that “machine learning” may be a good approach to follow in order to optimize the results. If we feed a model with the appropriate parameters, the machine learning algorithm may be able to replace the human and retrofit the results again and again until an optimal configuration is found which produces the best results. All this happens automatically, thus relieving the human from this tedious work and achieving even better results. Some features to consider are:
-
file size
-
message size
-
audio time length
-
signal characteristics in time domain and in frequency domain
-
pitch
-
target SNR
-
filter settings (if any)
-
- conversion tool to apply the method in other domains (e.g. image files):
Some years ago, I implemented a similar technique as the one described in this article, using C# and Visual Studio. That worked really well, but the great “finding” was being able to apply the method to image files without changing anything.
The trick was first converting the image files to audio to apply the process as usual, and then convert back to .JPG to obtain the final image stego file.
The analysis tools showed very good results for both MP3 audio and JPG image stego files. That is, with moderate encoding densities, the files showed no visible statistical features. I remember correct identification rates as low as <2%.
This means, there was a very little suspicion that the file may hold a steganographic payload.
This cross-domain feature may even be extended to other domains like signals coming from sensors.
Here is the sequence of conversion steps:
.JPG → .WAV (carrier)
         | CODE
         v
.JPG ← .WAV (stego)
Alternative Tools
Here, you find the link to Stego-tool-kit which contains information about MP3Stego, AudioStego and DeepSound, three possible alternative tools. Also, a good overview of the classical tools to hide information in images is provided:
https://github.com/DominicBreuker/stego-toolkit
There, you also find issue24 which mentions:
AS4PGC has some advantages when compared to the other three audio tools (MP3Stego, DeepSound, AudioStego):
- + generic method, thus several formats supported (MP3, WAV, FLAC, OGG,..)
- + available as .exe, and as python module
- + available in PyPi for easy installation with pip
- + really works with MP3 formats (
DeepSoundseems not to work with MP3,AudioStegocreates very strong whistles!) - + works in Windows and in Linux
- + plots to help tracking processing steps (useful for developers)
In its current version, it has some disadvantages:
- slow (hiding takes 3 to 20 times the audio time length)
Note: The hiding time is mostly due to ffmpeg-file-conversions. - more distortion/noise than
MP3Stego
Image and Video Gallery


Proposed Articles
Following the thread of the topic online privacy and what you can do to protect it, you may also want to check the following articles:
AC4PGC - Audio Chat for Pretty Good Concealing

AC4QGP - Audio Chat for Quite Good Privacy

IP Radar 2 - Real-time detection and defence against malicious network activity

Summary
The proposed steganographic technique as well as its implementation as a command line tool can be improved in the future, but they are already a good contribution to support the topic for the general public, presenting several advantages with regards to the previous existent open source and free solutions.
With this tool, steganography proves again the improvement in cybersecurity and privacy as a valuable “complement to cryptography”.
When used with care, and being aware of its limits, AS4PGC is more than just a gadget, offering interesting ways to protect your privacy in different situations.
Next time you send encrypted information to someone for whatever reason, think if this alternative may also cover your needs. And who knows, it may even give you the additional protection you urgently need!
Points of Interest
Borrowing some words from Andy Yen:
"What we have here is just the first step, but it shows that with improving technology, privacy doesn't have to be difficult, it doesn't have to be disruptive. Ultimately, privacy depends on each and everyone of us. And we have to protect it now because our online data is more than just a fractions of ones and zeros. It's actually a lot more than that. It's our lives, our personal stories, our friends, our families, and in some ways also our hopes and aspirations. So, now it's the time for us to stand up and say: yes, we do want to live in a world with online privacy. And yes, we can work together to turn this vision into reality!".
History
- 24th September, 2021: Article posted