
How I Start any .NET Core Web API Project
4.96/5 (25 votes)
This is the typical process that I go through when creating a new Web API project in .NET Core 3.1.
Table of Contents
- Introduction
- Steps
- Create the Web API Project in Visual Studio
- Configure for IIS
- Configure for Swashbuckle / Swagger
- Add Swashbuckle
- Add Newtonsoft.Json
- Add an Exception Service
- Set CORS Policy
- Add an Authentication Service
- Read appsettings.json
- Optionally add a Database Context
- Optionally add RestSharp
- Optionally Format the JSON
- Add Some More Basic Test Endpoints
- Other Considerations
- Conclusion
- History
Introduction
This article describes the typical process that I go through to create a boilerplate Web API in .NET Core 3.1. From the table of contents, you can see what all the different pieces are that I set up.
Steps
Create the Web API Project in Visual Studio
Option 1

The above screenshot is what you get when you right-click on Visual Studio 2019 and select "Run as Administrator", which you'll probably have to do anyways to debug a Web API project. This will present you with a list of templates, and you would select ASP.NET Core Web API:

The final screen (with the Create button) has the options:

- I do not select an authentication type as the majority of the Web APIs that I write use custom authentication routines which will be discussed below.
- I also do not configure the Web API for HTTPS because the Web API will be running under IIS which is already configured for HTTPS on the production environment.
Option 2
Alternatively, in VS2019, select File => New Project, then select "Installed" and "ASP.NET Core Web Application":

You will then be presented with some options, including "API":

Oddly, this approach does not prompt you for the authentication type and "configure for HTTPS."
Configure for IIS
Right-click on the solution and click "Properties" from the popup menu:
![]()
Create a new profile called "IIS" and select IIS as the Launch option:
![]()


You should now see:

Change the option to launch the browser with the page "weatherforecast":
![]()
Verify that Anonymous Authentication is checked and Windows Authentication is unchecked:

IMPORTANT! I found that I also had to edit the launchSettings.json file, completely removing the references to iisExpress, otherwise Visual Studio continues to launch the web API through IIS Express, so this is what my launchSettings.json file looks like now:
{
  "iisSettings": {
    "windowsAuthentication": false,
    "anonymousAuthentication": true,
    "iis": {
      "applicationUrl": "http://localhost/Demo",
      "sslPort": 0
    }
  },
  "$schema": "http://json.schemastore.org/launchsettings.json",
  "profiles": {
    "IIS": {
      "commandName": "IIS",
      "launchBrowser": true,
      "launchUrl": "weatherforecast",
      "sqlDebugging": true
    }
  }
}
Why this is, I do not know!
You can now run the boilerplate WeatherForecast Web API that Visual Studio created for you, though, of course, we will be removing this:

Visual Studio will provision IIS automatically for you - I really like this feature!
Configure for Swashbuckle / Swagger
In the Build options of the project:

enable XML documentation.

Also, ignore warning 1591:
![]()
as otherwise the IDE will constantly warn you about missing XML comments.
Add Swashbuckle
Swashbuckle is useful for generating a page that describes all the API endpoints as well as a somewhat clunky way of testing those endpoints. None-the-less, I find it useful particularly as other developers will almost always be writing front-end code using those API's. One can also add attribute tags for each API and use one of the various front-end "call API" utilities that Swashbuckle provides for auto-generating the front-end methods. Beware though, some of this these utilities generate really bizarre looking code.
Including Swashbuckle documentation is quite simple. Right-click on the project Dependencies and select Manage NuGet Packages:
![]()
Browse for "Swash":

and install the package "Swashbuckle.AspNetCore" (the version may be greater than 6.1.4):

In the Startup.cs file, add the Swagger service to the ConfigureServices method as indicated:
public void ConfigureServices(IServiceCollection services)
{
  services.AddControllers();

  // ADD THIS:
  services.AddSwaggerGen(c =>
  {
    var xmlFile = $"{Assembly.GetExecutingAssembly().GetName().Name}.xml";
    var xmlPath = Path.Combine(AppContext.BaseDirectory, xmlFile);
    c.IncludeXmlComments(xmlPath);
  });
}
In the Configure method, add to the application builder the indicated code after app.UseRouting();:
public void Configure(IApplicationBuilder app, IWebHostEnvironment env)
{
  if (env.IsDevelopment())
  {
    app.UseDeveloperExceptionPage();
  }

  app.UseRouting();

  // ------ ADD THIS ------
  app.UseSwagger()
    .UseSwaggerUI(c =>
    {
      c.SwaggerEndpoint("/demo/swagger/v1/swagger.json", "Demo API V1");
    });
  // ======================

  app.UseAuthorization();

  app.UseEndpoints(endpoints =>
  {
    endpoints.MapControllers();
  });
}
Note that the first element in endpoint path is the same as the application name "demo".
When you start the application, you can now navigate to Demo/swagger (or whatever you named your project, and you will see:

Add Newtonsoft.Json
I prefer Newtonsoft.Json because in my opinion it's simply better than the default JSON serializer built into .NET Core. For one thing, it handles serializing/deserializing enumerations, maintains the casing based on the model property, handles self-referencing loops without any special code, and so forth. I also like to pretty-format the return JSON because it's easier to read for debugging purposes. Again, in the NuGet package manager, install Microsoft.AspNetCore.Mvc.Newtonsoft.JSON, making sure you select the most recent 3.1.x version:

In Startup.cs, modify the ConfigureServices method to direct it to use NewtonsoftJson:
public void ConfigureServices(IServiceCollection services)
{
  services.AddControllers()
    // must be version 3.1.13 -- version 5's support .NET 5 only.
    // <a href="https://anthonygiretti.com/2020/05/10/why-model-binding-to-jobject-
    // from-a-request-doesnt-work-anymore-in-asp-net-core-3-1-and-whats-the-alternative/">
    // https://anthonygiretti.com/2020/05/10/why-model-binding-to-jobject-from-a-request-
    // doesnt-work-anymore-in-asp-net-core-3-1-and-whats-the-alternative/</a>
    .AddNewtonsoftJson();

  services.AddSwaggerGen(c =>
  {
    var xmlFile = $"{Assembly.GetExecutingAssembly().GetName().Name}.xml";
    var xmlPath = Path.Combine(AppContext.BaseDirectory, xmlFile);
    c.IncludeXmlComments(xmlPath);
  });
}
Obviously, you can omit my comments if you like.
Add an Exception Service
Particularly when debugging, I don't just want a 500 Internal Server Error, I prefer a consistent and well-formatted response indicating the error and the stack trace, so I always add an exception service that utilizes my exception reporting library.
In the project's properties, Debug section, add the environment variable ASPNETCORE_ENVIRONMENT with the value Development:

As per this writeup, ASP.NET Core uses the ASPNETCORE_ENVIRONMENT variable to determine the current environment.
Add a MiddlewareExceptionHandler, which I typically do in the file ExceptionService.cs in the folder Services:
![]()
Here's the code:
// Borrowed from here: http://netitude.bc3tech.net/2017/07/31/
// using-middleware-to-trap-exceptions-in-asp-net-core/
// Note that middleware exception handling is different from exception filters:
// https://damienbod.com/2015/09/30/asp-net-5-exception-filters-and-resource-filters/
// https://docs.microsoft.com/en-us/aspnet/core/mvc/controllers/filters?
// view=aspnetcore-2.2#exception-filters
// Exception filters do NOT catch exceptions that occur in the middleware.
public class MiddlewareExceptionHandler
{
  private readonly RequestDelegate _next;

  public MiddlewareExceptionHandler(RequestDelegate next)
  {
    _next = next ?? throw new ArgumentNullException(nameof(next));
  }

  public async Task Invoke(HttpContext context)
  {
    try
    {
      await _next(context);
    }

    // This handles the problem when the AUTHORIZATION token doesn't
    // actually validate and ASP.NET Core middleware generates this:
    // An unhandled exception occurred while processing the request.
    // InvalidOperationException: No authenticationScheme was specified,
    // and there was no DefaultChallengeScheme found.
    // We want to handle this error as a "not authorized" response.
    catch (InvalidOperationException)
    {
      if (context.Response.HasStarted)
      {
        throw;
      }

      context.Response.Clear();
      context.Response.StatusCode = 401;
      context.Response.ContentType = "application/json";

      await context.Response.WriteAsync("{\"status\":401,\"message\":\"Not authorized.\"}");
    }
    catch (Exception ex)
    {
      if (context.Response.HasStarted)
      {
        throw;
      }

      context.Response.Clear();
      context.Response.StatusCode = 500;
      context.Response.ContentType = "application/json";

      var exReport = new ExceptionReport(ex);
      var exJson = JsonConvert.SerializeObject(exReport, Formatting.Indented);
      await context.Response.WriteAsync(exJson);
    }
  }
}

// Extension method used to add the middleware to the HTTP request pipeline.
public static class MiddlewareExceptionExtensions
{
  public static IApplicationBuilder UseHttpStatusCodeExceptionMiddleware
               (this IApplicationBuilder builder)
  {
    return builder.UseMiddleware<MiddlewareExceptionHandler>();
  }
}
The rest of the "exception reporting" code, also in that file, is:
public static class ExceptionReportExtensionMethods
{
  public static ExceptionReport CreateReport(this Exception ex)
  {
    return new ExceptionReport(ex);
  }

  public static T[] Drop<T>(this T[] items, int n = 0)
  {
    // We could use C# 8's ^ operator to take all but the last n...
    return items.Take(items.Length - (1 + n)).ToArray();
  }
}

public class ExceptionReport
{
  public DateTime When { get; } = DateTime.Now;

  [JsonProperty(NullValueHandling = NullValueHandling.Ignore)]
  public string ApplicationMessage { get; set; }

  public string ExceptionMessage { get; set; }

  public List<StackFrameData> CallStack { get; set; } = new List<StackFrameData>();

  [JsonProperty(NullValueHandling = NullValueHandling.Ignore)]
  public ExceptionReport InnerException { get; set; }

  public ExceptionReport(Exception ex, int exceptLastN = 0)
  {
    ExceptionMessage = ex.Message;
    var st = new StackTrace(ex, true);
    var frames = st.GetFrames()?.Drop(exceptLastN) ?? new StackFrame[0];
    CallStack.AddRange(
      frames
        .Where(frame => !String.IsNullOrEmpty(frame.GetFileName()))
        .Select(frame => new StackFrameData(frame)));
    InnerException = ex.InnerException?.CreateReport();
  }
}

public class StackFrameData
{
  public string FileName { get; private set; }
  public string Method { get; private set; }
  public int LineNumber { get; private set; }

  public StackFrameData(StackFrame sf)
  {
    FileName = sf.GetFileName();
    Method = sf.GetMethod().Name;
    LineNumber = sf.GetFileLineNumber();
  }

  public override string ToString()
  {
    return $"File: {FileName}\r\nMethod: {Method}\r\nLine: {LineNumber}";
  }
}
Then, in Startup.cs, modify how if env.IsDevelopment() is handled in the Configure method:
public void Configure(IApplicationBuilder app, IWebHostEnvironment env)
{
  if (env.IsDevelopment())
  {
    // Do not halt execution. I don't fully understand this.
    // See http://netitude.bc3tech.net/2017/07/31/
    // using-middleware-to-trap-exceptions-in-asp-net-core/
    // "Notice the difference in order when in development mode vs not.
    // This is important as the Developer Exception page
    // passes through the exception to our handler so in order to get the
    // best of both worlds, you want the Developer Page handler first.
    // In production, however, since the default Exception Page halts execution,
    // we definitely to not want that one first."
    app.UseDeveloperExceptionPage();
    app.UseHttpStatusCodeExceptionMiddleware();
  }
  else
  {
    app.UseHttpStatusCodeExceptionMiddleware();
    app.UseExceptionHandler("/Home/Error");
  }
  ...
Because I'm in development mode, I'm not implementing the error page.
Test the exception handling by adding a GET method in the WeatherForecastController.cs file that throws an exception:
[HttpGet("TestException")]
public void TestException()
{
  throw new Exception("Exception occurred!");
}
Run the application and navigate to http://localhost/Demo/weatherForecast/testException and you should see:
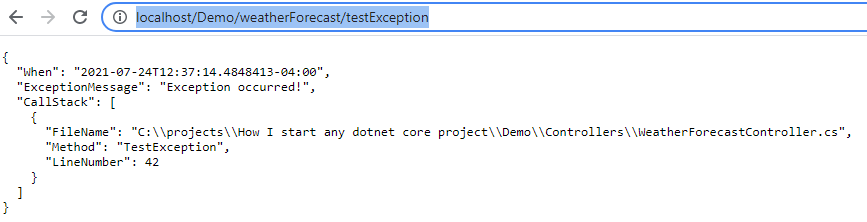
If the exception had occurred somewhere in the bowels of your code, you would see more of the stack trace.
Set CORS Policy
We usually want to enable some sort of CORS (Cross Origin Resource Sharing) policy (read more here) although for most applications I set this to any origin. In the ConfigureServices method in the Startup.cs file, add the following:
services.AddCors(options =>
  options.AddDefaultPolicy(builder => builder
    .AllowAnyMethod()
    .AllowAnyHeader()
    .AllowCredentials()
    // Needed because we can't use AllowAnyOrigin with AllowCredentials
    // https://jasonwatmore.com/post/2020/05/20/
    // aspnet-core-api-allow-cors-requests-from-any-origin-and-with-credentials
    // https://docs.microsoft.com/en-us/aspnet/core/security/cors?view=aspnetcore-5.0
    .SetIsOriginAllowed(origin => true)
    .WithExposedHeaders(EXPOSED_HEADERS)
  )
);
In the Configure method, after UseRouting(), add a call to UseCors():
 app
  .UseRouting()
  .UseCors();
Setting up CORS is a very, VERY fickle thing. Most of the production issues I end up dealing with have to do with the finicky nature of CORS, so beware. If an endpoint fails, use the browser's debugger to determine whether the pre-flight CORS test is failing to determine if you have an endpoint issue or a CORS issue.
Add an Authentication Service
Most APIs require authentication (and possibly authorization, but I usually don't implement user-role authorization.) To add authentication, I create an AuthenticationService.cs file in the Services folder with this template:
public class TokenAuthenticationSchemeOptions : AuthenticationSchemeOptions
{
}

public class AuthenticationService : AuthenticationHandler<TokenAuthenticationSchemeOptions>
{
  private SessionService sessionService;

  public AuthenticationService(
    IOptionsMonitor<TokenAuthenticationSchemeOptions> options,
    ILoggerFactory logger,
    UrlEncoder encoder,
    ISystemClock clock) : base(options, logger, encoder, clock)
  {
    this.sessionService = sessionService;
  }

  protected override Task<AuthenticateResult> HandleAuthenticateAsync()
  {
    Task<AuthenticateResult> result =
        Task.FromResult(AuthenticateResult.Fail("Not authorized."));

    // Authentication confirms that users are who they say they are.
    // Authorization gives those users permission to access a resource.

    if (Request.Headers.ContainsKey("yourAuthKey"))
    {
      // Verify the key...

      // If verified, optionally add some claims about the user...
      var claims = new[]
      {
        new Claim("[key]", "value"),
      };

      // Generate claimsIdentity on the name of the class:
      var claimsIdentity = new ClaimsIdentity(claims, nameof(AuthenticationService));

      // Generate AuthenticationTicket from the Identity
      // and current authentication scheme.
      var ticket = new AuthenticationTicket(new ClaimsPrincipal(claimsIdentity), Scheme.Name);

      result = Task.FromResult(AuthenticateResult.Success(ticket));
    }

    return result;
  }
}
In the constructor, you may wish to also pass in some sort of "account service" -- a service that lets you connect to the database to verify the user's account.
Also, in the Startup.cs file, add the authentication scheme to the ConfigureServices method:
 services
  .AddAuthentication("tokenAuth")
  .AddScheme<TokenAuthenticationSchemeOptions, AuthenticationService>("tokenAuth", ops => { });
Given that the above code will fail authentication unless we provide a header with the key "yourAuthKey", we can test it with an API endpoint (see below.)
Lastly, add UseAuthentication() to the Configure method:
app
  .UseAuthentication()
  .UseRouting()
  .UseCors();
Read appsettings.json
You can read about Configuration in ASP.NET Core here. For our purposes, I'm simply going to set up a simple configuration file. The configuration file in the demo has both applications.json and an appsettings.Development.json, correlating to the ASPNETCORE_ENVIRONMENT environment variable value. The appsettings that include the environment value override what's in applications.json. For example, in appsetting.json, I'll define a couple settings, Key1 and Key2:
{
  "Logging": {
    "LogLevel": {
      "Default": "Information",
      "Microsoft": "Warning",
      "Microsoft.Hosting.Lifetime": "Information"
    }
  },
  "AllowedHosts": "*",

  // I've added these keys:
  "Key1": "first key",
  "Key2": "second key"
}
And in appsettings.Development.json, I'll override Key2:
{
  "Logging": {
    "LogLevel": {
      "Default": "Information",
      "Microsoft": "Warning",
      "Microsoft.Hosting.Lifetime": "Information"
    }
  },

  // I'm overriding Key2:
  "Key2": "Key2 override"
}
In order to get these values into an object so that we're not referencing the config settings with a hardcoded string, like Configuration("Key1"), we can create a class with the configuration keys of interest and bind the class to the configuration. For example, given:
public class AppSettings
{
  public static AppSettings Settings { get; set; }

  public AppSettings()
  {
    Settings = this;
  }

  public string Key1 { get; set; }
  public string Key2 { get; set; }
}
we then do the binding in the Startup constructor.
public AppSettings AppSettings { get; } = new AppSettings();

public Startup(IConfiguration configuration)
{
  Configuration = configuration;
  Configuration.Bind(AppSettings);
}
and because the constructor sets the public static variable Settings, we can access the settings anywhere in the application. For example, we can create an endpoint that returns the application settings (see below for regarding Add Some More Basic Test Endpoints):
[AllowAnonymous]
[HttpGet("AppSettings")]
public object GetAppSettings()
{
  return AppSettings.Settings;
}
and we see:

IMPORTANT! Normally you don't want to make your app settings publicly available as they probably contain sensitive information such as database passwords and so forth.
Optionally Add a Database Context
Most web APIs require connecting to a database, and as I use SQL Server exclusively, I will add one or more lines to register the database contexts, depending on how many contexts I have:
services.AddDbContext<MyDbContext>(options => options.UseSqlServer("myConnectionString"));
You would not typically hardcode your connection string(s) but rather obtain them from the application settings depending on the environment (see below.) Also, this requires adding the appropriate database support, such as Microsoft.EntityFrameworkCore.SqlServer. The DB context can then be added to the constructor of a service:
public SomeService(MyDbContext context)
and .NET Core will handle the instance creation and dependency injection.
Optionally add RestSharp
If your service makes calls to other APIs, I prefer to use RestSharp. Again in the NuGet package manager, add the most current version of RestSharp:

Optionally Format the JSON
If we modify the way we register NewtonsoftJson:
services.AddControllers()
  .AddNewtonsoftJson(options => options.SerializerSettings.Formatting = Formatting.Indented);
we can globally add formatting to the JSON being returned and we see, for example:

I find this particularly useful when I'm not using Postman (which does its own formatting) for debugging endpoints.
Add Some More Basic Test Endpoints
While we added an ExceptionTest API earlier, I don't really want this in the "demo" controller. Similarly for adding a version endpoint. Therefore, these two endpoints get added to a "public" controller as I usually don't intend to require authentication for these:
[ApiController]
[Route("[controller]")]
public class Public : ControllerBase
{
  [AllowAnonymous]
  [HttpGet("Version")]
  public object Version()
  {
    return new { Version = "1.00" };
  }

  [AllowAnonymous]
  [HttpGet("TestException")]
  public void TestException()
  {
    throw new Exception("Exception occurred!");
  }
}
Notice I have this class derive from ControllerBase so we can leverage common responses, like Ok().
For the Version API, you will now see:

Note the AllowAnonymous attribute as we are now using authentication elsewhere. And do whatever you like in the Version API endpoint to get the version. For example, I often add a check that the necessary DB connections are also successful.
Authentication Test
Let's test the authentication service -- yes, I'm putting this endpoint in the "public" controller:
[Authorize]
[HttpGet("TestAuthentication")]
public ActionResult TestAuthentication()
{
  return Ok();
}
and we see:

If we use Postman to call this endpoint with the "yourAuthKey" value set:
curl --location --request GET 'http://localhost/Demo/public/testauthentication' \
--header 'yourAuthKey: Somevalue'
we see the endpoint returned OK:

Other Considerations
General Folder Structure
I tend to set up this folder structure:

- Common - Common classes such as helper classes
- Controllers - All the controllers the application supports. If a particular controller file gets to large, I will create a folder for the controller which contains
partialclasses of that controller to organize the endpoints. - Extensions - I use a variety of extension methods in my code, and those files go in this folder.
- Interfaces - Any interface definitions I need (see below)
- Models - Database context and models
- Requests - Classes defining incoming requests
- Responses - Classes defining outgoing responses
- Services - Any services I need (see below)
Service Interface or Concrete Service Class?
One of the common patterns I see in other people's code is the excessive use of interfaces when registering a service. For example:
services.AddSingleton<IUserCacheService, UserCacheService>();
The result is that every service implements an interface, and the dependency injection in a controller or service constructor relies on the interface rather than the concrete service. For example:
public SomeControllerOrService(IUserCacheService userCacheService)
The point of an interface is to abstract the implementation. If you know that the implementation will never be abstracted, there is absolutely no point in adding an interface -- it merely obfuscates the code, creates more typing and is something else to maintain whenever one updates the concrete service's methods. It's absolutely pointless -- as a project grows and more and more services are added (usually simply to define logical boundaries) the number of interfaces files grows and becomes essentially code smell. One can instead write:
services.AddSingleton<CacheServices.UsersCacheService>();
and:
public SomeControllerOrService(UserCacheService userCacheService)
One of the arguments for implementing services as interfaces is to mock the service for testing the controller. While this sounds reasonable, I find the reasoning to be inadequate. Most, if not all of the business rules and general code logic is not in the controller endpoint code but rather in the services -- in fact, it often makes sense to have one or more business rule services to decouple the controller and other services from the application-specific logic. Given that, when I write integration tests, I don't want to test against a mock service, I want to test against the actual service! Like anything, there are reasonable exceptions such as when the service interfaces with other components (database, third party APIs, etc.) that are only available in the "live" staging or production environments. Then yes, implementing the service with an interface so it can be mocked makes sense, but care needs to be taking that any business logic is implemented outside of the service. Therefore, consider whether the service ever will be abstracted, and if you are reasonably (or very) sure that it will not, then don't bother with an interface to the service.
Singleton, Scoped, and Transient Services Lifetimes
There's a good write-up on the different types of services here. In summary:
- Singleton: "The Singleton scope creates a single instance of the service when the request for it comes for the first time. After that for every subsequent request, it will use the same instance. The new request does not create the new instance of the service but reuses the existing instance."
- Scoped: "The Services with scoped lifetime are created only once per each request (scope), i.e., It creates a new instance per request and reuses that instance within that request." For example, if your controller requires a service and some other code in your controller, referencing another service, also requires that service, then the scoped service will be reused because it's part of the same request.
- Transient: "The Transient services always create a new instance, every time we request for it." As opposed to scoped service, any requirements for a transient service by other services during the request will obtain new instances.
Why do we have these types of service lifetimes? The primary answer is that some services may be infrequently used and potentially take up a lot of memory, though I argue that if this is the case, you do not have a well-designed service. Regardless, you may not want the service to linger beyond the lifetime of the request, and hence a singleton service may not be appropriate. I really can't think of a use case for transient services (can you?) and they consume memory (albeit for a short lifetime) but also require the dependency injection system to create a new instance for each referenced transient service, which reduces application performance. I usually use only singleton services because my services do not contain static variables or state information. If I needed to maintain state within the request, then a scoped service would be the correct service to use.
As the article mentioned above points out, one has to be careful regarding mixing services of different lifetimes. If a singleton service persists a scoped or transient service, then the scoped or transient service is persisted, defeating the purpose of the "lifetime during the request or per access."
Service or Controller as Service?
Another consideration is, "do I need a service or can the code be put into the controller?" For example, does Version require a service?
[AllowAnonymous]
[HttpGet("Version")]
public object Version()
{
  return new { Version = "1.00" };
}
I should think not! It may access a service, such as validating a database connection. I tend to write endpoints that are either:
- a simple operation / response that relies on other services
- an operation that includes business rules based on the request or state of the data in the database
The latter is the more confusing one to resolve. Should the business rules be decoupled from the controller and placed into a service or other "business rules" container? If the endpoint does a lot of operations (with rules or without) should that be decoupled into, say, a workflow service? Where should request validation belong? Should the business rules, workflows, and validation be abstracted depending on other application configuration settings or runtime user options? These are questions one should ask oneself when one notices that the code in an endpoint is getting rather lengthy.
Conclusion
There you have it -- the typical process that I go through when creating an ASP.NET Web API project. I hope you find this useful when you create your own Web API projects!
History
- 5th August, 2021: Initial version