
A Complete Tutorial to Connect Android with ASP.NET Core Web API
5.00/5 (2 votes)
In this tutorial, we will learn how to connect Android with ASP.NET Core Web API.
We will build an Android app to show a list of technical blogs with categories.
Using Retrofit 2, the Android app will be connected to the RESTful APIs that we will build using the latest technology by Microsoft and the open source community: ASP.NET Core Web API 5.
Our data will reside in a local SQLServer Express Database and will be accessed from our Web API project using Entity Framework Core 5.
This is a full-stack development tutorial, we will tap into different layers of development (frontend, backend, database) with different languages (Java, C#, SQL) and technologies (Android, ASP.NET Core Web API, SQL Server Express).
So let’s start learning how to Connect Android with ASP.NET Core Web API.
Preparing the Database
We will create our database inside an SQL Server Express installed on a local machine, so if you don’t have it already installed, please go ahead download and install the latest updates of SQL Server Management Studio and SQL Server Express.
Once you are able to connect to the SQL Server Express using the SQL Server Management Studio, you can go ahead and create a new database and name it ‘BlogsDb’.
Once the database is created, run the below script to create the needed tables and insert sample data into them, so we can kick-start our tutorial.
USE [BlogsDb]
GO
/****** Object:  Table [dbo].[Blog]    Script Date: 1/31/2021 5:35:24 PM ******/
SET ANSI_NULLS ON
GO
SET QUOTED_IDENTIFIER ON
GO
CREATE TABLE [dbo].[Blog](
	[Id] [int] IDENTITY(1,1) NOT NULL,
	[Name] [nvarchar](255) NOT NULL,
	[Description] [nvarchar](1000) NOT NULL,
	[Url] [nvarchar](255) NOT NULL,
	[RssFeed] [nvarchar](255) NULL,
	[TS] [smalldatetime] NOT NULL,
	[Active] [bit] NOT NULL,
 CONSTRAINT [PK_Blogs] PRIMARY KEY CLUSTERED
(
	[Id] ASC
)WITH (PAD_INDEX = OFF, STATISTICS_NORECOMPUTE = OFF, _
 IGNORE_DUP_KEY = OFF, ALLOW_ROW_LOCKS = ON, ALLOW_PAGE_LOCKS = ON) ON [PRIMARY]
) ON [PRIMARY]
GO
/****** Object:  Table [dbo].[BlogCategory]    Script Date: 1/31/2021 5:35:24 PM ******/
SET ANSI_NULLS ON
GO
SET QUOTED_IDENTIFIER ON
GO
CREATE TABLE [dbo].[BlogCategory](
	[BlogsId] [int] NOT NULL,
	[CategoriesId] [int] NOT NULL,
 CONSTRAINT [PK_BlogCategory_1] PRIMARY KEY CLUSTERED
(
	[BlogsId] ASC,
	[CategoriesId] ASC
)WITH (PAD_INDEX = OFF, STATISTICS_NORECOMPUTE = OFF, _
 IGNORE_DUP_KEY = OFF, ALLOW_ROW_LOCKS = ON, ALLOW_PAGE_LOCKS = ON) ON [PRIMARY]
) ON [PRIMARY]
GO
/****** Object:  Table [dbo].[Category]    Script Date: 1/31/2021 5:35:24 PM ******/
SET ANSI_NULLS ON
GO
SET QUOTED_IDENTIFIER ON
GO
CREATE TABLE [dbo].[Category](
	[Id] [int] IDENTITY(1,1) NOT NULL,
	[Name] [nvarchar](255) NOT NULL,
 CONSTRAINT [PK_Categories] PRIMARY KEY CLUSTERED
(
	[Id] ASC
)WITH (PAD_INDEX = OFF, STATISTICS_NORECOMPUTE = OFF, _
 IGNORE_DUP_KEY = OFF, ALLOW_ROW_LOCKS = ON, ALLOW_PAGE_LOCKS = ON) ON [PRIMARY]
) ON [PRIMARY]
GO
SET IDENTITY_INSERT [dbo].[Blog] ON
GO
INSERT [dbo].[Blog] ([Id], [Name], [Description], [Url], [RssFeed], [TS], _
       [Active]) VALUES (1, N'Coding Sonata', N'CodingSonata is the best place _
       where you can learn new technical stuff, improve your coding skills _
       and listen to amazing classical music', N'codingsonata.com', _
       N'codingsonata.com/feed', CAST(N'2020-12-31T11:39:00' AS SmallDateTime), 1)
GO
INSERT [dbo].[Blog] ([Id], [Name], [Description], [Url], [RssFeed], [TS], _
       [Active]) VALUES (2, N'ASP.NET Blog',
       N'The official blog for ASP.NET Developers and Community', _
       N'https://devblogs.microsoft.com/aspnet/', _
       N'https://devblogs.microsoft.com/aspnet/feed/', _
       CAST(N'2021-01-17T16:23:00' AS SmallDateTime), 1)
GO
INSERT [dbo].[Blog] ([Id], [Name], [Description], [Url], [RssFeed], [TS], _
       [Active]) VALUES (3, N'Android Developers Blog',
       N'The latest Android and Google Play news for app and game developers.', _
       N'https://android-developers.googleblog.com/', _
       N'https://android-developers.blogspot.com/atom.xml', _
       CAST(N'2020-12-27T08:05:00' AS SmallDateTime), 1)
GO
INSERT [dbo].[Blog] ([Id], [Name], [Description], [Url], [RssFeed], [TS], _
       [Active]) VALUES (4, N'Google Developers', _
       N'Engineering and technology articles for developers, _
       written and curated by Googlers. The views expressed are those of the authors _
       and don''t necessarily reflect those of Google.', _
       N'https://medium.com/google-developers', N'', _
       CAST(N'2021-01-26T10:53:00' AS SmallDateTime), 1)
GO
INSERT [dbo].[Blog] ([Id], [Name], [Description], [Url], [RssFeed], [TS], _
       [Active]) VALUES (5, N'Microsoft Azure Blog', N'Get the latest Azure news, _
       updates, and announcements from the Azure blog. _
       From product updates to hot topics, hear from the Azure experts.', _
       N'https://azure.microsoft.com/en-us/blog/', N'', _
       CAST(N'2020-12-03T12:13:00' AS SmallDateTime), 1)
GO
INSERT [dbo].[Blog] ([Id], [Name], [Description], [Url], [RssFeed], [TS], _
       [Active]) VALUES (6, N'SQL Server Blog', N'Learn how to unleash the power _
       in your data and get the latest Microsoft SQL Server news, updates, _
       and best practices from our Microsoft experts.', _
       N'https://cloudblogs.microsoft.com/sqlserver/', N'', _
       CAST(N'2021-01-27T09:20:00' AS SmallDateTime), 1)
GO
INSERT [dbo].[Blog] ([Id], [Name], [Description], [Url], [RssFeed], [TS], _
       [Active]) VALUES (7, N'Cisco Blogs', N'Insights on Cisco''s Global Search _
       for Innovative Technology Solutions', N'https://blogs.cisco.com/', _
       N'https://blogs.cisco.com/feed', CAST(N'2021-01-31T19:40:00' AS SmallDateTime), 1)
GO
SET IDENTITY_INSERT [dbo].[Blog] OFF
GO
INSERT [dbo].[BlogCategory] ([BlogsId], [CategoriesId]) VALUES (1, 1)
GO
INSERT [dbo].[BlogCategory] ([BlogsId], [CategoriesId]) VALUES (1, 2)
GO
INSERT [dbo].[BlogCategory] ([BlogsId], [CategoriesId]) VALUES (1, 4)
GO
INSERT [dbo].[BlogCategory] ([BlogsId], [CategoriesId]) VALUES (1, 5)
GO
INSERT [dbo].[BlogCategory] ([BlogsId], [CategoriesId]) VALUES (2, 1)
GO
INSERT [dbo].[BlogCategory] ([BlogsId], [CategoriesId]) VALUES (2, 2)
GO
INSERT [dbo].[BlogCategory] ([BlogsId], [CategoriesId]) VALUES (2, 4)
GO
INSERT [dbo].[BlogCategory] ([BlogsId], [CategoriesId]) VALUES (2, 5)
GO
INSERT [dbo].[BlogCategory] ([BlogsId], [CategoriesId]) VALUES (3, 1)
GO
INSERT [dbo].[BlogCategory] ([BlogsId], [CategoriesId]) VALUES (3, 4)
GO
INSERT [dbo].[BlogCategory] ([BlogsId], [CategoriesId]) VALUES (4, 1)
GO
INSERT [dbo].[BlogCategory] ([BlogsId], [CategoriesId]) VALUES (4, 4)
GO
INSERT [dbo].[BlogCategory] ([BlogsId], [CategoriesId]) VALUES (5, 4)
GO
INSERT [dbo].[BlogCategory] ([BlogsId], [CategoriesId]) VALUES (5, 5)
GO
INSERT [dbo].[BlogCategory] ([BlogsId], [CategoriesId]) VALUES (5, 6)
GO
INSERT [dbo].[BlogCategory] ([BlogsId], [CategoriesId]) VALUES (6, 4)
GO
INSERT [dbo].[BlogCategory] ([BlogsId], [CategoriesId]) VALUES (6, 5)
GO
INSERT [dbo].[BlogCategory] ([BlogsId], [CategoriesId]) VALUES (7, 5)
GO
INSERT [dbo].[BlogCategory] ([BlogsId], [CategoriesId]) VALUES (7, 6)
GO
SET IDENTITY_INSERT [dbo].[Category] ON
GO
INSERT [dbo].[Category] ([Id], [Name]) VALUES (1, N'Front End Development')
GO
INSERT [dbo].[Category] ([Id], [Name]) VALUES (2, N'Back End Development')
GO
INSERT [dbo].[Category] ([Id], [Name]) VALUES (3, N'Desktop Development')
GO
INSERT [dbo].[Category] ([Id], [Name]) VALUES (4, N'Databases')
GO
INSERT [dbo].[Category] ([Id], [Name]) VALUES (5, N'DevOps and Cloud')
GO
INSERT [dbo].[Category] ([Id], [Name]) VALUES (6, N'Infrastructure and Networking')
GO
SET IDENTITY_INSERT [dbo].[Category] OFF
GO
Once the query is run, refresh the BlogsDb from the Object Explorer, then you should be able to see the new tables created within the BlogsDb database.

The ASP.NET Core Web API Project
Now we will move to our Web API part to build the RESTful APIs and connect to our database using the ASP.NET Core Web API Technology.
Creating a New ASP.NET Core Web API Project
Start Visual Studio 2019, make sure you are using the latest update 16.8.x which includes the latest version of .NET 5.
Choose ASP.NET Core Web Application and then give it a name like ‘BlogsApi’ then choose Create.

Then choose API and press Create.

Wait until Visual Studio prepares the template API project for you, then press F5 or Run. You should see Swagger page on your default browser indicating that your Web API project is up and running fine on your local machine which is your IIS Express (localhost).
Now let’s start by preparing our entities and dbcontext class that will be used to connect to your database using the Entity Framework Core library.
Entities
Let’s create a new folder with name ‘Entities’ and add a class inside it with name ‘Blog’.
using System;
using System.Collections.Generic;

namespace BlogsApi.Entities
{
    public class Blog
    {
        public int Id { get; set; }
        public string Name { get; set; }
        public string Description { get; set; }
        public string Url { get; set; }
        public string RssFeed { get; set; }
        public DateTime TS { get; set; }
        public bool Active { get; set; }
        public virtual ICollection<Category> Categories { get; set; }
    }
}
Next, let’s add another class with name ‘Category’:
using System.Collections.Generic;

namespace BlogsApi.Entities
{
    public class Category
    {
        public int Id { get; set; }
        public string Name { get; set; }
        public virtual ICollection<Blog> Blogs { get; set; }
    }
}
Importing EF Core
Before adding the DbContext, we will need to install the nuget packages for EF Core and EF Core SqlServer:
Entity Framework Core and Entity:


Creating the DbContext
Now, we want to add our DbContext inherited class, this will inherit the Entity Framework Core DbContext class and will be used to connect the entities and any other configurations with our database.
Below is the class for the BlogsDbContext that will inherit from the DbContext of EF Core:
using Microsoft.EntityFrameworkCore;

namespace BlogsApi.Entities
{
    public class BlogsDbContext : DbContext
    {
        public DbSet<Blog> Blogs { get; set; }
        public DbSet<Category> Categories { get; set; }
        public BlogsDbContext(DbContextOptions<BlogsDbContext> options) : base(options)
        {
        }
        protected override void OnModelCreating(ModelBuilder modelBuilder)
        {
            modelBuilder.Entity<Blog>().ToTable("Blog");
            modelBuilder.Entity<Category>().ToTable("Category");
            modelBuilder.Entity<Blog>().HasMany(s => s.Categories).WithMany(c => c.Blogs);
        }
    }
}
Now let’s plug in the database within the services collection. You will need to add the below code inside the startup class in the ConfigureServices method:
services.AddDbContext<BlogsDbContext>(options =>
options.UseSqlServer(Configuration.GetConnectionString("BlogsDbConnectionString")));
Adding Connection String to appsettings.json
Open appsettings.json file and let’s add a section for our new connection string, it should look as below:
{
  "ConnectionStrings": {
    "BlogsDbConnectionString": "Server=Home\\SQLEXPRESS;Database=BlogsDb;
     Trusted_Connection=True;MultipleActiveResultSets=true"
  },
  "Logging": {
    "LogLevel": {
      "Default": "Information",
      "Microsoft": "Warning",
      "Microsoft.Hosting.Lifetime": "Information"
    }
  },
  "AllowedHosts": "*"
}
Creating Services and Interfaces
In order to have some separation in the functionalities and to improve the traceability and testability of our web API project, we will introduce services that will act as the business layer and will hold the business logic while being able to access the DbContext object. The DbContext object will be injected into the services constructors to be used.
The services will implement interfaces so that we can rely on abstractions rather than concrete implementations. This is a very important principal to follow so that you can improve your code’s testability and traceability.
Interfaces
Create a new folder with name ‘Interfaces’, then add a new item, you will need to choose interface and name it ‘IBlogService’:
using BlogsApi.Entities;
using System.Collections.Generic;
using System.Threading.Tasks;

namespace BlogsApi.Interfaces
{
    public interface IBlogService
    {
        Task<List<Blog>> GetAllBlogs();
        Task<List<Blog>> GetBlogsUnderCategory(int id);

    }
}
Then add another interface and name it ‘ICategoryService’:
using BlogsApi.Entities;
using System.Collections.Generic;
using System.Threading.Tasks;

namespace BlogsApi.Interfaces
{
    public interface IBlogService
    {
        Task<List<Blog>> GetAllBlogs();
        Task<List<Blog>> GetBlogsUnderCategory(int id);

    }
Services
Create a new folder with name ‘Services’, then add a class with name ‘BlogService’:
using BlogsApi.Entities;
using BlogsApi.Interfaces;
using Microsoft.EntityFrameworkCore;
using System.Collections.Generic;
using System.Linq;
using System.Threading.Tasks;

namespace BlogsApi.Services
{
    public class BlogService : IBlogService
    {
        private readonly BlogsDbContext blogsDbContext;
        public BlogService(BlogsDbContext blogsDbContext)
        {
            this.blogsDbContext = blogsDbContext;
        }
        public async Task<List<Blog>> GetAllBlogs()
        {
            var blogs = blogsDbContext.Blogs.Include
            (o => o.Categories).Where(o => o.Active).OrderByDescending(o => o.TS);
            return await blogs.ToListAsync();
        }
        public async Task<List<Blog>> GetBlogsUnderCategory(int id)
        {
            var blogs = blogsDbContext.Blogs.Include(o => o.Categories).Where
            (o => o.Active && o.Categories.Any(category => category.Id == id));
            return await blogs.ToListAsync();
        }
    }
}
And add another class with name ‘CategoryService’:
using BlogsApi.Entities;
using BlogsApi.Interfaces;
using Microsoft.EntityFrameworkCore;
using System.Collections.Generic;
using System.Threading.Tasks;

namespace BlogsApi.Services
{
    public class CategoryService : ICategoryService
    {
        private BlogsDbContext blogsDbContext;

        public CategoryService(BlogsDbContext blogsDbContext)
        {
            this.blogsDbContext = blogsDbContext;
        }
        public async Task<List<Category>> GetCategories()
        {
            var categories = blogsDbContext.Categories;

             return await categories.ToListAsync();
        }
    }
}
Now to make sure that we have the correct binding between the service and interface when injecting the service into the constructor through the interface, we need to configure this within the startup ConfigureServices method:
services.AddScoped<IBlogService, BlogService>();
services.AddScoped<ICategoryService, CategoryService>();
Creating Models (DTO)
It is very important to know that it is not recommended that you return the entity objects as-is to your clients, because since the entities represent the exact structure of your database, you don’t want your clients or (the front end world) to know about this structure. It might not cause a serious threat or problem however it might cause some leakage in your internal system design and might fall into your competitor’s hands.
The other reason to not return the entity object is to prevent the tightly coupling with your backend structure, if you are about to modify any of the tables, then chances are that your clients might be affected and might cause problems at their side.
So to avoid such issues and stay flexible and loosely coupled, you should introduce DTO (Data Transfer Objects) or Models, which will be new classes that will bind to your entity classes, which may include all or part of your entity properties with the same or different names or data types.
So let’s go ahead and create a new folder with name ‘Models’.
And then add a new class to it with name BlogModel.
using System;
using System.Collections.Generic;

namespace BlogsApi.Models
{
    public class BlogModel
    {
        public int Id { get; set; }
        public string Name { get; set; }
        public string Description { get; set; }
        public string Url { get; set; }
        public string RssFeed { get; set; }
        public DateTime SubmittedDate { get; set; }
        public List<CategoryModel> Categories { get; set; }
    }
}
Now we need another class for CategoryModel:
namespace BlogsApi.Models
{
    public class CategoryModel
    {
        public int Id { get; set; }
        public string Name { get; set; }
    }
}
Perfect! So what will happen now, we will convert the entity classes to model classes, and return them for our clients.
Usually, it is a good idea to have a helper class to hold the conversion logic and you only call it from your controller.
So, before writing our controllers, let’s create our helpers. Create a new folder with name ‘Helpers’ and then inside it, create a new class with name BlogHelper:
using BlogsApi.Entities;
using BlogsApi.Models;
using System.Collections.Generic;
using System.Linq;

namespace BlogsApi
{
    public class BlogHelper
    {
        public static List<BlogModel> ConvertBlogs(List<Blog> blogs)
        {
            var blogModels = blogs.ConvertAll(blog => new BlogModel
            {
                Id = blog.Id,
                Name = blog.Name,
                Description = blog.Description,
                Url = blog.Url,
                RssFeed = blog.RssFeed,
                SubmittedDate = blog.TS,
                Categories = blog.Categories.ToList().ConvertAll
                (category => new CategoryModel { Id = category.Id, Name = category.Name })
            });

            return blogModels;
        }
    }
}
And then create another class with name CategoryHelper, it will include the method to convert the categories entities to models:
using BlogsApi.Entities;
using BlogsApi.Models;
using System.Collections.Generic;

namespace BlogsApi.Helpers
{
    public class CategoryHelper
    {
        public static List<CategoryModel> ConvertCategories(List<Category> categories)
        {
            var categoryModels = categories.ConvertAll(category => new CategoryModel
            {
                Id = category.Id,
                Name = category.Name,
            });

            return categoryModels;
        }
    }
}
Now we are ready to add our controllers and glue all the components together.
Controllers
Let’s create our endpoints that will be used as the entry points or the gateway to our database to access the tables.
In the controllers folder, add a new controller with name ‘BlogsController’. This controller will have one endpoint to return all the blogs, as you can see in Get() method, we call the GetAllBlogs method and then the result is passed to our converter method to convert the entities type to models type, and then the result is returned in the response body of the http 200 ok.
using BlogsApi.Interfaces;
using Microsoft.AspNetCore.Mvc;
using System.Threading.Tasks;

namespace BlogsApi.Controllers
{
    [ApiController]
    [Route("[controller]")]
    public class BlogsController : ControllerBase
    {
        private readonly IBlogService blogService;
        public BlogsController(IBlogService blogService)
        {
            this.blogService = blogService;
        }
        [HttpGet]
        [Route("")]
        public async Task<IActionResult> Get()
        {
            var blogs = await blogService.GetAllBlogs();

            var blogModels = BlogHelper.ConvertBlogs(blogs);

            return Ok(blogModels);
        }
    }
}
As you can also notice, we are using the constructor injection of the BlogsController to provide the instance of BlogService through the abstract interface IBlogService.
Next, let’s add another controller with name ‘CategoriesController’, this will include two endpoints: one to get all categories and the other one to get the blogs within a given category (id):
using BlogsApi.Helpers;
using BlogsApi.Interfaces;
using Microsoft.AspNetCore.Mvc;
using System.Threading.Tasks;

namespace BlogsApi.Controllers
{
    [ApiController]
    [Route("[controller]")]
    public class CategoriesController : ControllerBase
    {
        private readonly ICategoryService categoryService;
        private readonly IBlogService blogService;

        public CategoriesController
               (ICategoryService categoryService, IBlogService blogService)
        {
            this.categoryService = categoryService;
            this.blogService = blogService;
        }

        [HttpGet]
        [Route("")]
        public async Task<IActionResult> Get()
        {
            var categories = await categoryService.GetCategories();

            var categoryModels = CategoryHelper.ConvertCategories(categories);

            return Ok(categoryModels);
        }

        [HttpGet]
        [Route("{categoryId}/blogs")]
        public async Task<IActionResult> GetCategoryBlogs(int categoryId)
        {
            var blogs = await blogService.GetBlogsUnderCategory(categoryId);

            var blogModels = BlogHelper.ConvertBlogs(blogs);

            return Ok(blogModels);
        }
    }
}
Now, to make sure everything is working fine, we need to run the Web API project and see what results we will get.
One important note here is that we won’t be running our APIs on IIS Express, we will run it on the default hosting of ASP.NET Core Web API, why? Because we will run our Android App on an emulator and the emulator must connect to IP Address 10.0.2.2 which is another alias for 127.0.0.1 but not localhost, therefore, the emulator won’t be able to connect to IIS Express but it will connect to the default host of ASP.NET Core Web API.
I will show you how this will work later in this tutorial.
Accordingly, from your Visual Studio, click on the run dropdown button and select BlogsApi instead of IIS Express:

Then press on the BlogsApi button itself. This will trigger a terminal window with the hosting provider of ASP.NET Core Web API bootstrapping your Web API Project:

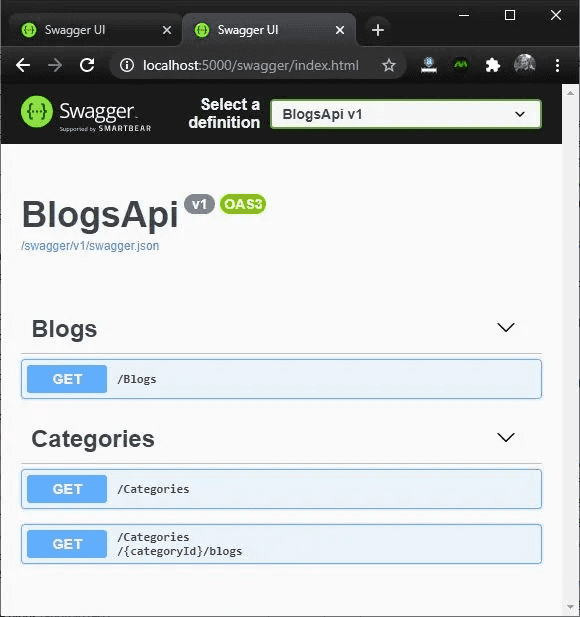
And then you should be presented with your default browser showing a Swagger documentation of the BlogsApi.
Your API project is now hosted on localhost under 2 ports: 5001 https and 5000 http.
For this tutorial, we will connect to http://localhost:5000 because Android requires a self-signed certificate to connect to https, so this would be outside the scope of this tutorial.
Remember that on production, you should always connect your web or mobile app to https and build your RESTful APIs to work on https based domains.
Of course, we can test our APIs on Swagger through the easy provided UI to navigate and test the endpoints, however I prefer to use Postman.
Testing the APIs on Postman
If you don’t have Postman installed, then go ahead and download it from here.
Then open Postman and create a new collection with name ‘BlogsApi’.
Create a new request with Get Categories. This will point to the endpoint that returns all the categories:

Now let’s create another request to retrieve all the blogs under a provided CategoryId:

Now the last request that we want to test is retreiving all the blogs chronologically ordered from the newest blog.

There you go! We have finished building and testing our RESTful APIs using ASP.NET Core Web API.
Of course, these are just small samples of what you can do with this powerful technology. You can still add POST, PUT, DELETE or even other GET requests to the project to make it larger and more comprehensive.
Now let’s jump to the front-end part of our tutorial and prepare our Android App to connect to our RESTful APIs that we have just built using ASP.NET Core Web API Technology.
Building the Android App
Our Android App will display all the Categories of the blogs through nicely formatted cards within a launch screen that will have bottom navigation with three buttons: Categories, Latest Blogs and Notifications.
Whenever the user taps a card, it will open a new screen displaying a scrollable list of blogs under that specific category, and then if the user taps any given blog, the app will show all the blog details in a new screen with a clickable link to open the blog on mobile browser. At any time, the user can go back to previous screens with the default device back button.
As mentioned earlier in this tutorial, we will connect Android with ASP.NET Core Web API using Retrofit 2.
So let’s begin with creating our Android app, I will be using Android Studio 4.1.2 , if you don’t have Android Studio, you can go ahead, download and install it from the Official Android Developer Page , if you have an older version, I would suggest you update your version.
Now open Android Studio, and click Create New Project.

Then choose Bottom Navigation Activity from the Project template screen:

After that, in the project configuration screen, change the name to blogs. You can also change the package name to whatever you prefer, usually the naming is based on the product you have so if you have a website, then it can be like com.codingsonata.blogs. Let’s keep it like com.demo.blogs for now.
For the Minimum SDK, we will choose API 21: Android 5.0 (Lollipop), of course this is usually decided based on the business requirements for what devices will be supported and which APIs of the Android SDK will be used.
Press Finish to let Android Studio start preparing your project:

Let’s run this sample app to check that the emulator will be booting and running fine and the template app will normally load.
So, once you see the below screen on the emulator, it means that you are all set up to start building the blogs app that will connect to our RESTful APIs built with ASP.NET Core Web API.

Now close the emulator, and head back to Android Studio.
Setting up Retrofit 2
As mentioned previously in this article, we will be using Retrofit 2 to connect to our ASP.NET Core Web API , if you are new to Retrofit 2, I would suggest first that you check my tutorial series ‘Retrofit Tutorial in Android‘, it will give you a full walkthrough about Retrofit and how to use it in Android to connect to live APIs.
So open your build.gradle (:app) file and navigate to the dependencies section, add the below references to get Retrofit 2:
implementation 'com.squareup.retrofit2:retrofit:2.9.0'
implementation 'com.squareup.retrofit2:converter-gson:2.9.0'
Once added, sync your project to let gradle download and build the project with the new libraries.
Let’s prepare our app to connect to our RESTful APIs.
Create a new package with name ‘data’ and place it directly under com.example.blogs package.
The Models
Add a new package under data with name ‘model’, this will include the POJO classes that will hold and bind the data from the RESTful endpoints.
Create Blog class:
package com.example.blogs.data.model;

public class Blog {
    private final int Id;
    private final String name;
    private final String description;
    private final String url;
    private final String rssFeed;
    private final String submittedDate;

    public Blog(int id, String name, String description, String url,
                String rssFeed, String submittedDate) {
        Id = id;
        this.name = name;
        this.description = description;
        this.url = url;
        this.rssFeed = rssFeed;
        this.submittedDate = submittedDate;
    }

    public int getId() {
        return Id;
    }

    public String getName() {
        return name;
    }

    public String getDescription() {
        return description;
    }

    public String getUrl() {
        return url;
    }

    public String getRssFeed() {
        return rssFeed;
    }

    public String getSubmittedDate() {
        return submittedDate;
    }
}
Then create another class with name ‘Category’:
package com.example.blogs.data.model;

public class Category {
    private final int id;
    private final String name;

    public Category(int id, String name) {
        this.id = id;
        this.name = name;
    }

    public int getId() {
        return id;
    }

    public String getName() {
        return name;
    }
}
Now add a new package under data with name ‘remote’, this will include the classes that will initiate and connect to Retrofit.
Retrofit 2 Service and Interface
We will need to create an interface that will use annotations from Retrofit library to match and identify the endpoints. The interface name is IBlogsApi, you can give whatever name you prefer, just make sure it starts with I to stay with conventions:
package com.example.blogs.data.remote;

import com.example.blogs.data.model.Blog;
import com.example.blogs.data.model.Category;

import java.util.List;

import retrofit2.Call;
import retrofit2.http.GET;
import retrofit2.http.Path;

public interface IBlogsApi {
    @GET("categories")
    Call<List<Category>> getCategories();

    @GET("categories/{id}/blogs")
    Call<List<Blog>> getBlogsByCategory(@Path("id") int id);

    @GET("blogs")
    Call<List<Blog>> getBlogs();
}
Then, let’s add RetrofitService class, we will define a static method to create the retrofit instance:
package com.example.blogs.data.remote;

import retrofit2.Retrofit;
import retrofit2.converter.gson.GsonConverterFactory;

public class RetrofitService {
    public static IBlogsApi Create(){
        Retrofit retrofit = new Retrofit.Builder()
                .baseUrl("http://10.0.2.2:5000/")
                .addConverterFactory(GsonConverterFactory.create())
                .build();
         return retrofit.create(IBlogsApi.class);
    }
}
If you notice above in the baseUrl string, we are connecting to 10.0.2.2. As mentioned previously, this is an alias to the host loopback interface which redirects to 127.0.0.1 or localhost, but we didn’t specify localhost in the baseUrl, because the Android emulator can only connect to this IP address 10.0.2.2 with the port specifying 5000 which is where the ASP.NET Core Web API is hosted.
Now before moving to the next part of calling the create method of RetrofitService, we will extend the Application class in a new MainApplication class and inside it, we will keep a static reference to the BlogsApiManager and we will override the onCreate Method of the application to get a singleton instance of the BlogsApiManager.
So let’s add a new class directly under the root package corp.example.blogs.
package com.example.blogs;

import android.app.Application;
import com.example.blogs.data.remote.BlogsApiManager;

public class MainApplication extends Application {

    public static BlogsApiManager blogsApiManager;

    @Override
    public void onCreate() {
        super.onCreate();
        blogsApiManager = BlogsApiManager.getInstance();
    }
}
BlogsApi Manager
Next, we will define a manager class that will hold a singleton instance to RetrofitService and will include the methods that will bind to the RESTful APIs through Retrofit Callback events:
package com.example.blogs.data.remote;

import com.example.blogs.data.model.Blog;
import com.example.blogs.data.model.Category;

import java.util.List;

import retrofit2.Call;
import retrofit2.Callback;

public class BlogsApiManager {

    private static IBlogsApi service;
    private static BlogsApiManager apiManager;

    private BlogsApiManager() {
        service = RetrofitService.Create();
    }

    public static BlogsApiManager getInstance() {
        if (apiManager == null) {
            apiManager = new BlogsApiManager();
        }
        return apiManager;
    }
    public void getCategories(Callback<List<Category>> callback){
        Call<List<Category>> categoriesCall = service.getCategories();
        categoriesCall.enqueue(callback);
    }
    public void getBlogsByCategory(int id, Callback<List<Blog>> callback){
        Call<List<Blog>> blogsByCategoryCall = service.getBlogsByCategory(id);
        blogsByCategoryCall.enqueue(callback);
    }
    public void getBlogs(Callback<List<Blog>> callback){
        Call<List<Blog>> blogsCall = service.getBlogs();
        blogsCall.enqueue(callback);
    }
}
The Repository
In this tutorial, our data source is only coming via the remote service of RESTful APIs that we built using ASP.NET Core Web API, we don’t have local data source to connect to, so the repository layer will only include calls to the BlogsApiManager and will hold the data within LiveData objects, which later will be propagated to the UI layer view the ModelView of the specific UI component.
This structure of layering the services falls under MVVM architectural design pattern, using the LiveData and ModelView components of Android X.
So let’s add a new package under data with name ‘repository’, this will include the repository of our blogs app:
package com.example.blogs.data.repository;

import androidx.lifecycle.MutableLiveData;

import com.example.blogs.data.model.Blog;
import com.example.blogs.data.remote.BlogsApiManager;
import com.example.blogs.data.model.Category;

import java.util.List;

import retrofit2.Call;
import retrofit2.Callback;
import retrofit2.Response;

public class BlogsRepository {

    private static volatile BlogsRepository instance;

    private final BlogsApiManager blogsApiManager;

    private final MutableLiveData<List<Category>> categories = new MutableLiveData<>();
    private final MutableLiveData<List<Blog>> blogsByCategory = new MutableLiveData<>();
    private final MutableLiveData<List<Blog>> blogs = new MutableLiveData<>();

    private BlogsRepository(BlogsApiManager blogsApiManager) {
        this.blogsApiManager = blogsApiManager;
    }

    public static BlogsRepository getInstance(BlogsApiManager blogsApiManager) {
        if (instance == null) {
            instance = new BlogsRepository(blogsApiManager);
        }
        return instance;
    }

    public MutableLiveData<List<Category>> getCategories(){
        blogsApiManager.getCategories(new Callback<List<Category>>() {
            @Override
            public void onResponse(Call<List<Category>> call,
                        Response<List<Category>> response) {
                if (response.isSuccessful()){
                    List<Category> body = response.body();
                    categories.setValue(body);
                } else{
                    categories.postValue(null);
                }
            }
            @Override
            public void onFailure(Call<List<Category>> call, Throwable t) {
                categories.postValue(null);
            }
        });

        return categories;
    }

    public MutableLiveData<List<Blog>> getBlogsByCategory(int id){
        blogsApiManager.getBlogsByCategory(id, new Callback<List<Blog>>() {
            @Override
            public void onResponse(Call<List<Blog>> call, Response<List<Blog>> response) {
                if (response.isSuccessful()){
                    List<Blog> body = response.body();
                    blogsByCategory.setValue(body);
                } else{
                    blogsByCategory.postValue(null);
                }
            }
            @Override
            public void onFailure(Call<List<Blog>> call, Throwable t) {
                blogsByCategory.postValue(null);
            }
        });

        return blogsByCategory;
    }

    public MutableLiveData<List<Blog>> getBlogs(){
        blogsApiManager.getBlogs(new Callback<List<Blog>>() {
            @Override
            public void onResponse(Call<List<Blog>> call, Response<List<Blog>> response) {
                if (response.isSuccessful()){
                    List<Blog> body = response.body();
                    blogs.setValue(body);
                } else{
                    blogs.postValue(null);
                }
            }
            @Override
            public void onFailure(Call<List<Blog>> call, Throwable t) {
                blogs.postValue(null);
            }
        });

        return blogs;
    }
}
Now let’s prepare the UI part of the app.
UI
Expand the ui package in your project explorer, you will notice three packages created for you by the template we have chosen earlier.
Also you will notice MainActivity created for you, this is the hosting activity for the navigation host fragment, which will use the BottomNavigationView to switch between the different fragments.
This is the code for MainActivity, you don’t have to do anything specific on it:
package com.example.blogs.ui;

import android.os.Bundle;

import androidx.appcompat.app.AppCompatActivity;
import androidx.navigation.NavController;
import androidx.navigation.Navigation;
import androidx.navigation.ui.AppBarConfiguration;
import androidx.navigation.ui.NavigationUI;

import com.example.blogs.R;
import com.google.android.material.bottomnavigation.BottomNavigationView;

public class MainActivity extends AppCompatActivity {

    @Override
    protected void onCreate(Bundle savedInstanceState) {
        super.onCreate(savedInstanceState);
        setContentView(R.layout.activity_main);
        BottomNavigationView navView = findViewById(R.id.nav_view);
        // Passing each menu ID as a set of Ids because each
        // menu should be considered as top level destinations.
        AppBarConfiguration appBarConfiguration = new AppBarConfiguration.Builder(
        R.id.navigation_home, R.id.navigation_dashboard, R.id.navigation_notifications)
        .build();
        NavController navController =
           Navigation.findNavController(this, R.id.nav_host_fragment);
        NavigationUI.setupActionBarWithNavController
           (this, navController, appBarConfiguration);
        NavigationUI.setupWithNavController(navView, navController);
    }
}
We will need to rename the home package to categories, so right click on home package and refactor -> rename (or just use the Shift + F6 in your keyboard), and use the name ‘categories’.
Categories Package
Before we jump in the fragment part of the categories section, we will create a ViewModel for it which will act as the intermediary layer between the UI and the model.
So add a new class with CategoriesViewModel:
package com.example.blogs.ui.categories;

import androidx.lifecycle.MutableLiveData;
import androidx.lifecycle.ViewModel;

import com.example.blogs.data.model.Category;
import com.example.blogs.data.repository.BlogsRepository;

import java.util.List;

public class CategoriesViewModel extends ViewModel {

    private final BlogsRepository categoryRepository;

    public CategoriesViewModel(BlogsRepository categoryRepository) {
        this.categoryRepository = categoryRepository;
    }

    public MutableLiveData<List<Category>> getCategories() {

        return categoryRepository.getCategories();
    }
}
And now let’s add a factory class, CategoriesViewModelFactory, that will instantiate the ViewModel Instance within the fragment:
package com.example.blogs.ui.categories;

import androidx.annotation.NonNull;
import androidx.lifecycle.ViewModel;
import androidx.lifecycle.ViewModelProvider;

import com.example.blogs.MainApplication;
import com.example.blogs.data.repository.BlogsRepository;

public class CategoriesViewModelFactory implements ViewModelProvider.Factory {

    @NonNull
    @Override
    @SuppressWarnings("unchecked")
    public <T extends ViewModel> T create(@NonNull Class<T> modelClass) {
        if (modelClass.isAssignableFrom(CategoriesViewModel.class)) {
            return (T) new CategoriesViewModel
            (BlogsRepository.getInstance(MainApplication.blogsApiManager));
        } else {
            throw new IllegalArgumentException("Unknown ViewModel class");
        }
    }
}
We want to display the categories through a recyclerview with a GridLayoutManager having two categories per row, and each category will be displayed within a card view.
So let’s start by preparing the category item layout that will be used to display the category card.
Category Item Layout
Navigate to res/layout folder and add a new layout resource file with name category_item.xml:
<?xml version="1.0" encoding="utf-8"?>
<androidx.cardview.widget.CardView
    xmlns:android="http://schemas.android.com/apk/res/android"
    xmlns:cardView="http://schemas.android.com/apk/res-auto"
    android:id="@+id/carView"
    android:layout_width="match_parent"
    android:layout_height="100dp"
    cardView:cardCornerRadius="5dp"
    cardView:cardElevation="5dp"
    android:layout_margin="5dp">

    <TextView
        android:id="@+id/category_name"
        android:layout_width="match_parent"
        android:layout_height="wrap_content"
        android:padding="14dp"
        android:text="Sample"
        android:textAppearance="@style/Base.TextAppearance.AppCompat.Large" />
</androidx.cardview.widget.CardView>
Categories Adapter
Now, let’s create the adapter that will bind the data to the recyclerview using the card_item layout.
Inside the categories package, create a new class with name ‘CategoriesAdapter’:
package com.example.blogs.ui.categories;

import android.content.Context;
import android.view.LayoutInflater;
import android.view.View;
import android.view.ViewGroup;
import android.widget.TextView;

import androidx.annotation.NonNull;
import androidx.recyclerview.widget.RecyclerView;

import com.example.blogs.R;
import com.example.blogs.data.model.Category;
import com.example.blogs.ui.common.OnItemClickListener;

import java.util.ArrayList;
import java.util.List;

public class CategoriesAdapter extends
    RecyclerView.Adapter<CategoriesAdapter.CategoryViewHolder> {

    @NonNull
    private final Context context;
    private List<Category> categories = new ArrayList<>();
    private final OnItemClickListener<Category> onCategoryClickListener;

    public CategoriesAdapter(@NonNull Context context,
           OnItemClickListener<Category> onCategoryClickListener) {
        this.context = context;
        this.onCategoryClickListener = onCategoryClickListener;
    }

    @Override
    public CategoryViewHolder onCreateViewHolder(ViewGroup parent, int viewType) {
        return new CategoryViewHolder
        (LayoutInflater.from(context).inflate(R.layout.category_item, parent, false));
    }

    @Override
    public void onBindViewHolder(CategoryViewHolder holder, int position) {
        holder.setCategoryItem(categories.get(position));
    }

    @Override
    public int getItemCount() {
        return categories == null ? 0 : categories.size();
    }

    public void setCategories(List<Category> categories) {
        this.categories = categories;
        this.notifyDataSetChanged();
    }

    class CategoryViewHolder extends RecyclerView.ViewHolder {

        private final TextView categoryName;
        private final View categoryItem;

        CategoryViewHolder(View categoryItem) {
            super(categoryItem);
            categoryName = categoryItem.findViewById(R.id.category_name);
            this.categoryItem = categoryItem;
        }

        private void setCategoryItem(Category category){
            categoryName.setText(category.getName());
            categoryItem.setOnClickListener
            (view -> onCategoryClickListener.onItemClicked(view, category));
        }
    }
}
OnItemClickListener
In the above code, you will notice:
import com.example.blogs.ui.common.OnItemClickListener;
We added a click listener for our categories card items so that whenever the user taps a category, we can know which category was selected and thus transition to a new screen with the blogs that are listed under the selected category.
So open ui package and create a new package with name ‘common’ and inside it, add an interface with name ‘OnItemClickListener’:
package com.example.blogs.ui.common;

import android.view.View;

public interface OnItemClickListener<T> {
    void onItemClicked(View view, T data);
}
Categories Fragment
Now navigate to HomeFragment and rename it to CategoriesFragment. This will hold all the UI related code to update the view, it will observe the CategoriesViewModel for any changes and then update the recyclerview and its adapter accordingly, we will also display a progress while the API call is happening and hide it once results are received.
package com.example.blogs.ui.categories;

import android.content.Intent;
import android.os.Bundle;
import android.view.LayoutInflater;
import android.view.View;
import android.view.ViewGroup;

import androidx.annotation.NonNull;
import androidx.core.widget.ContentLoadingProgressBar;
import androidx.fragment.app.Fragment;
import androidx.lifecycle.ViewModelProvider;
import androidx.recyclerview.widget.GridLayoutManager;
import androidx.recyclerview.widget.RecyclerView;

import com.example.blogs.R;
import com.example.blogs.data.model.Category;
import com.example.blogs.ui.blogs.BlogsActivity;
import com.example.blogs.ui.common.OnItemClickListener;
import com.google.gson.Gson;

public class CategoriesFragment extends Fragment {

    private CategoriesAdapter categoryAdapter;

    public View onCreateView(@NonNull LayoutInflater inflater,
                             ViewGroup container, Bundle savedInstanceState) {
        CategoriesViewModel homeViewModel = new ViewModelProvider
        (this, new CategoriesViewModelFactory()).get(CategoriesViewModel.class);
        View root = inflater.inflate(R.layout.fragment_categories, container, false);

        ContentLoadingProgressBar progress = root.findViewById(R.id.progress);

        RecyclerView categoriesRecyclerView =
                     root.findViewById(R.id.categories_recycler_view);
        OnItemClickListener<Category> onCategoryClickListener = (view, category) -> {
            Intent intent = new Intent(getActivity(), BlogsActivity.class);
            String categoryJson = new Gson().toJson(category);
            intent.putExtra("Category", categoryJson);
            intent.putExtra("CallerActivity", getActivity().getClass().getSimpleName());
            startActivity(intent);
        };

        categoryAdapter = new CategoriesAdapter(root.getContext(), onCategoryClickListener);
        categoriesRecyclerView.setAdapter(categoryAdapter);
        categoriesRecyclerView.setLayoutManager(new GridLayoutManager(root.getContext(), 2));

        progress.show();
        homeViewModel.getCategories().observe(getViewLifecycleOwner(), categories -> {
            categoryAdapter.setCategories(categories);
            progress.hide();
        });

        return root;
    }
}
Let’s create the fragment_categories.xml layout now:
<?xml version="1.0" encoding="utf-8"?>
<androidx.constraintlayout.widget.ConstraintLayout
    xmlns:android="http://schemas.android.com/apk/res/android"
    xmlns:app="http://schemas.android.com/apk/res-auto"
    xmlns:tools="http://schemas.android.com/tools"
    android:layout_width="match_parent"
    android:layout_height="match_parent"
    tools:context=".ui.categories.CategoriesFragment">

    <androidx.core.widget.ContentLoadingProgressBar
        android:id="@+id/progress"
        android:layout_width="wrap_content"
        android:layout_height="wrap_content"
        style="?android:attr/progressBarStyleLarge"
        android:visibility="visible"
        android:indeterminateTint="@color/purple_700"
        app:layout_constraintBottom_toBottomOf="parent"
        app:layout_constraintEnd_toEndOf="parent"
        app:layout_constraintStart_toStartOf="parent" />
    <androidx.recyclerview.widget.RecyclerView
        android:layout_width="match_parent"
        android:layout_height="match_parent"
        android:id="@+id/categories_recycler_view"
        app:layout_constraintBottom_toBottomOf="parent"
        app:layout_constraintEnd_toEndOf="parent"
        app:layout_constraintStart_toStartOf="parent"
        app:layout_constraintTop_toTopOf="parent"
        />
</androidx.constraintlayout.widget.ConstraintLayout>
BlogsActivity
Now we are done from the Categories Fragment part, it's time to create a new activity that will display all the blogs under the selected category.
The BlogsActivity will be called from the CategoriesFragment and will receive an intent with the category object parsed as JSON and the CallerActivity so that the BlogsActivity will display all its blogs inside a fragment that will be shared and used in the 2nd layout of the bottom navigation ‘latest blogs’.
So under ui package, create a new package with name ‘blogs’, inside it create a new Activity, choose blank Activity:
package com.example.blogs.ui.blogs;

import android.content.Intent;
import android.os.Bundle;

import androidx.appcompat.app.AppCompatActivity;
import androidx.appcompat.widget.Toolbar;
import androidx.fragment.app.FragmentTransaction;

import com.example.blogs.R;
import com.example.blogs.data.model.Category;
import com.google.gson.Gson;

public class BlogsActivity extends AppCompatActivity {

    @Override
    protected void onCreate(Bundle savedInstanceState) {
        super.onCreate(savedInstanceState);
        setContentView(R.layout.activity_blogs);
        Toolbar toolbar = findViewById(R.id.toolbar);
        setSupportActionBar(toolbar);

        Intent intent = getIntent();
        String categoryJson = intent.getStringExtra("Category");
        Category category = new Gson().fromJson(categoryJson, Category.class);

        setTitle(category.getName());
        String callerActivity = intent.getStringExtra("CallerActivity");

        BlogsFragment fragment = new BlogsFragment();
        Bundle args = new Bundle();
        args.putInt("CategoryId", category.getId());
        args.putString("CallerActivity", callerActivity);

        if (savedInstanceState == null){
            FragmentTransaction ft = getSupportFragmentManager().beginTransaction();
            fragment.setArguments(args);
            ft.replace(R.id.blogs_fragment_container, fragment);
            ft.commit();
        }
    }
}
Let’s add an XML layout for activity_blogs, it will contain a FragmentContainerView to host the fragment and an AppBarLayout to show the top bar with the category name, as you can see from the previous code, we are setting the activity’s title to the selected category name, after reading the intent and converting it to Category object from JSON string format.
So below is the activity_blogs.xml:
<?xml version="1.0" encoding="utf-8"?>
<androidx.coordinatorlayout.widget.CoordinatorLayout
    xmlns:android="http://schemas.android.com/apk/res/android"
    xmlns:app="http://schemas.android.com/apk/res-auto"
    xmlns:tools="http://schemas.android.com/tools"
    android:layout_width="match_parent"
    android:layout_height="match_parent"
    tools:context=".ui.blogs.BlogsActivity">

    <com.google.android.material.appbar.AppBarLayout
        android:layout_width="match_parent"
        android:layout_height="wrap_content"
        android:id="@+id/app_bar"
        android:theme="@style/Theme.Blogs.AppBarOverlay">

        <androidx.appcompat.widget.Toolbar
            android:id="@+id/toolbar"
            android:layout_width="match_parent"
            android:layout_height="?attr/actionBarSize"
            android:background="?attr/colorPrimary"
            app:popupTheme="@style/Theme.Blogs.PopupOverlay" />

    </com.google.android.material.appbar.AppBarLayout>

    <androidx.fragment.app.FragmentContainerView
        android:id="@+id/blogs_fragment_container"
        app:layout_behavior=
        "com.google.android.material.appbar.AppBarLayout$ScrollingViewBehavior"
        android:name="androidx.navigation.fragment.NavHostFragment"
        android:layout_width="match_parent"
        android:layout_height="match_parent"
        app:defaultNavHost="true"
        app:navGraph="@navigation/mobile_navigation" />

</androidx.coordinatorlayout.widget.CoordinatorLayout>
BlogsFragment
Now let’s create the BlogsFragment. As mentioned previously, this fragment will be used from two different places so it will fork its arguments to check the CallerActivity, if it is coming from MainActivity, then it means that this fragment will show the blogs of the selected category, because we are passing the CallerActivity right from the CategoriesFragment which is hosted under the MainActivity latest blogs, so it will call the getBlogs method, otherwise it will show the latest blogs:
package com.example.blogs.ui.blogs;

import android.content.Intent;
import android.os.Bundle;
import android.view.LayoutInflater;
import android.view.View;
import android.view.ViewGroup;
import android.widget.LinearLayout;

import androidx.annotation.NonNull;
import androidx.core.widget.ContentLoadingProgressBar;
import androidx.fragment.app.Fragment;
import androidx.lifecycle.Observer;
import androidx.lifecycle.ViewModelProvider;
import androidx.recyclerview.widget.DividerItemDecoration;
import androidx.recyclerview.widget.LinearLayoutManager;
import androidx.recyclerview.widget.RecyclerView;

import com.example.blogs.R;
import com.example.blogs.data.model.Blog;
import com.example.blogs.ui.MainActivity;
import com.example.blogs.ui.blog.info.BlogInfoActivity;
import com.example.blogs.ui.common.OnItemClickListener;
import com.google.android.material.snackbar.BaseTransientBottomBar;
import com.google.android.material.snackbar.Snackbar;
import com.google.gson.Gson;

import java.util.ArrayList;
import java.util.List;

public class BlogsFragment extends Fragment {

    private BlogsAdapter blogsAdapter;

    public View onCreateView(@NonNull LayoutInflater inflater,
                             ViewGroup container, Bundle savedInstanceState) {
        BlogsViewModel blogViewModel = new ViewModelProvider
                (this, new BlogsViewModelFactory()).get(BlogsViewModel.class);
        View root = inflater.inflate(R.layout.fragment_blogs, container, false);

        ContentLoadingProgressBar progress = root.findViewById(R.id.progress);
        Bundle arguments = this.getArguments();

        String callerActivity = "";
        int categoryId = 0;
        if (arguments != null){
            callerActivity = arguments.getString("CallerActivity");
            categoryId = arguments.getInt("CategoryId");
        }

        RecyclerView blogsRecyclerView = root.findViewById(R.id.blogs_recycler_view);

        OnItemClickListener<Blog> onBlogClickListener = (view, blog) -> {
            Gson gson = new Gson();
            String blogJson = gson.toJson(blog);
            Intent intent = new Intent(getActivity(), BlogInfoActivity.class);
            intent.putExtra("Blog", blogJson);
            intent.putExtra("CallerActivity", getActivity().getClass().getSimpleName());
            startActivity(intent);
        };

        blogsAdapter = new BlogsAdapter(root.getContext(), onBlogClickListener);
        blogsRecyclerView.addItemDecoration
           (new DividerItemDecoration(root.getContext(), LinearLayout.VERTICAL));
        blogsRecyclerView.setAdapter(blogsAdapter);
        blogsRecyclerView.setLayoutManager(new LinearLayoutManager(root.getContext()));


        Snackbar make = Snackbar.make(getActivity().findViewById(android.R.id.content),
        "No blogs found for this category", BaseTransientBottomBar.LENGTH_INDEFINITE);

        Observer<List<Blog>> blogsObserver = blogs -> {
            if (blogs == null || blogs.size() == 0) {
                make.show();
                blogsAdapter.setBlogs(new ArrayList<>());
            } else {
                make.dismiss();
                blogsAdapter.setBlogs(blogs);
            }
            progress.hide();
        };
        progress.show();
        if (callerActivity.equals(MainActivity.class.getSimpleName())){
            blogViewModel.getBlogsByCategory(categoryId).observe
                              (getViewLifecycleOwner(), blogsObserver);
        } else {
            blogViewModel.getBlogs().observe(getViewLifecycleOwner(), blogsObserver);
        }
        return root;
    }
}
And let’s explore the fragment_blogs xml layout after you create it in the res/layout folder:
<?xml version="1.0" encoding="utf-8"?>
<androidx.constraintlayout.widget.ConstraintLayout
    xmlns:android="http://schemas.android.com/apk/res/android"
    xmlns:app="http://schemas.android.com/apk/res-auto"
    android:layout_width="match_parent"
    android:layout_height="match_parent"
    app:layout_behavior="@string/appbar_scrolling_view_behavior">
    <androidx.core.widget.ContentLoadingProgressBar
        android:id="@+id/progress"
        android:layout_width="wrap_content"
        android:layout_height="wrap_content"
        style="?android:attr/progressBarStyleLarge"
        android:visibility="visible"
        android:indeterminateTint="@color/purple_700"
        app:layout_constraintBottom_toBottomOf="parent"
        app:layout_constraintEnd_toEndOf="parent"
        app:layout_constraintStart_toStartOf="parent" />
    <androidx.recyclerview.widget.RecyclerView
        android:id="@+id/blogs_recycler_view"

        android:layout_width="match_parent"
        android:layout_height="match_parent" />
</androidx.constraintlayout.widget.ConstraintLayout>
The blogs fragment includes a recyclerview to display the list of blogs and has ContentLoadingProgressBar to display a nice spinner loading for the user while the app is doing the request.
BlogsViewModel
The BlogsViewModel will include two methods from the BlogsRepository, one to get the blogs under a selected category and the other to get the latest categories ordered by date:
package com.example.blogs.ui.blogs;

import androidx.lifecycle.MutableLiveData;
import androidx.lifecycle.ViewModel;

import com.example.blogs.data.model.Blog;
import com.example.blogs.data.model.Category;
import com.example.blogs.data.repository.BlogsRepository;

import java.util.List;

public class BlogsViewModel extends ViewModel {

    private MutableLiveData<List<Blog>> blogs;
    private BlogsRepository blogsRepository;

    public BlogsViewModel(BlogsRepository blogsRepository) {
        this.blogsRepository = blogsRepository;
    }

    public MutableLiveData<List<Blog>> getBlogsByCategory(int id) {
        blogs = blogsRepository.getBlogsByCategory(id);

        return blogs;
    }
    public MutableLiveData<List<Blog>> getBlogs() {
        blogs = blogsRepository.getBlogs();

        return blogs;
    }
}
BlogsViewModelFactory
And here is the the BlogsViewModelFactory, it is similar to the CategoriesViewModelFactory in terms of using the BlogsRepository to obtain the singleton instance the BlogsApiManager:
package com.example.blogs.ui.blogs;

import androidx.annotation.NonNull;
import androidx.lifecycle.ViewModel;
import androidx.lifecycle.ViewModelProvider;

import com.example.blogs.MainApplication;
import com.example.blogs.data.repository.BlogsRepository;

public class BlogsViewModelFactory implements ViewModelProvider.Factory {

    @NonNull
    @Override
    @SuppressWarnings("unchecked")
    public <T extends ViewModel> T create(@NonNull Class<T> modelClass) {
        if (modelClass.isAssignableFrom(BlogsViewModel.class)) {
            return (T) new BlogsViewModel(BlogsRepository.getInstance
                       (MainApplication.blogsApiManager));
        } else {
            throw new IllegalArgumentException("Unknown ViewModel class");
        }
    }
}
BlogsAdapter
And now, we will create the BlogsAdapter, it will be used to bind the blog_item to the blogs data source passed from the fragment:
package com.example.blogs.ui.blogs;

import android.content.Context;
import android.view.LayoutInflater;
import android.view.View;
import android.view.ViewGroup;
import android.widget.TextView;

import androidx.annotation.NonNull;
import androidx.recyclerview.widget.RecyclerView;

import com.example.blogs.R;
import com.example.blogs.data.helper.DateHelper;
import com.example.blogs.data.model.Blog;
import com.example.blogs.ui.common.OnItemClickListener;

import java.text.ParseException;
import java.util.ArrayList;
import java.util.List;

public class BlogsAdapter extends RecyclerView.Adapter<BlogsAdapter.BlogViewHolder> {

    @NonNull
    private final Context context;
    private List<Blog> blogs = new ArrayList<>();
    private final OnItemClickListener<Blog> onBlogItemClickListener;

    public BlogsAdapter(@NonNull Context context,
                        OnItemClickListener<Blog> onBlogItemClickListener) {
        this.context = context;
        this.onBlogItemClickListener = onBlogItemClickListener;
    }

    @Override
    public BlogViewHolder onCreateViewHolder(ViewGroup parent, int viewType) {
        return new BlogViewHolder(LayoutInflater.from(context).inflate
                                 (R.layout.blog_item, parent, false));
    }

    @Override
    public void onBindViewHolder(BlogViewHolder holder, int position) {
        try {
            holder.setBlogItem(blogs.get(position));
        } catch (ParseException e) {
            e.printStackTrace();
        }
    }

    @Override
    public int getItemCount() {
        return blogs == null ? 0 : blogs.size();
    }

    public void setBlogs(List<Blog> blogs) {
        this.blogs = blogs;
        this.notifyDataSetChanged();
    }

    class BlogViewHolder extends RecyclerView.ViewHolder {

        private final TextView blogName;
        private final TextView blogDescription;
        private final TextView blogDate;
        private final View regionItem;

        BlogViewHolder(View regionItem) {
            super(regionItem);
            this.regionItem = regionItem;
            blogName = regionItem.findViewById(R.id.blog_name);
            blogDescription = regionItem.findViewById(R.id.blog_description);
            blogDate = regionItem.findViewById(R.id.blog_date);
        }

        private void setBlogItem(Blog blog) throws ParseException {
            regionItem.setOnClickListener(view ->
                       onBlogItemClickListener.onItemClicked(view, blog));
            blogName.setText(blog.getName());
            blogDescription.setText(blog.getDescription());

            String formattedDate = DateHelper.getFormattedDate(blog.getSubmittedDate());
            blogDate.setText(formattedDate);
        }
    }
}
And let’s see how the blog_item.xml layout would look like:
<?xml version="1.0" encoding="utf-8"?>
<LinearLayout xmlns:android="http://schemas.android.com/apk/res/android"
    android:orientation="vertical"
    android:padding="10dp"
    android:layout_width="match_parent"
    android:layout_height="wrap_content">

    <TextView
        android:id="@+id/blog_name"
        android:layout_width="match_parent"
        android:layout_height="wrap_content"
        android:padding="10dp"
        android:textStyle="bold"
        android:text="Blog Name"
        android:textAppearance="@style/TextAppearance.AppCompat.Medium" />

    <TextView
        android:id="@+id/blog_description"
        android:layout_width="match_parent"
        android:layout_height="wrap_content"
        android:padding="8dp"
        android:text="This is a Sample Blog description with one line only displayed"
        android:ellipsize="end"
        android:maxLines="2"
        android:textAppearance="@style/Base.TextAppearance.AppCompat.Large" />

    <TextView
        android:id="@+id/blog_date"
        android:layout_width="match_parent"
        android:layout_height="wrap_content"
        android:padding="8dp"
        android:textAlignment="textEnd"
        android:text="-"
        android:ellipsize="end"
        android:maxLines="2"
        android:textSize="12sp"
        android:textAppearance="@style/Base.TextAppearance.AppCompat.Large" />
</LinearLayout>
So far, we have implemented both the Categories and the Blogs screens. Now, let’s implement the screen that will receive the blog details and display it for the user.
BlogsInfoActivity
Under ui package, add a new package with name blog.info and inside it create a new Blank Activity and name it BlogInfoActivity. Inside this activity, we will display all the blog information, there is no need to create a fragment for this, because in this tutorial, we will not have a different screen or section to display the blog information.
The BlogsInfoActivity should have this code:
package com.example.blogs.ui.blog.info;

import android.content.Intent;
import android.os.Bundle;

import com.example.blogs.data.helper.DateHelper;
import com.example.blogs.data.model.Blog;

import androidx.appcompat.app.AppCompatActivity;
import androidx.appcompat.widget.Toolbar;

import android.widget.TextView;
import android.widget.Toast;

import com.example.blogs.R;
import com.google.gson.Gson;

public class BlogInfoActivity extends AppCompatActivity {

    @Override
    protected void onCreate(Bundle savedInstanceState) {
        super.onCreate(savedInstanceState);
        setContentView(R.layout.activity_blog_info);
        Toolbar toolbar = findViewById(R.id.toolbar);
        setSupportActionBar(toolbar);

        Intent intent = getIntent();

        String blogJson = intent.getStringExtra("Blog");

        Blog blog = new Gson().fromJson(blogJson, Blog.class);

        if (blog == null){
            Toast.makeText(this, "Invalid blog", Toast.LENGTH_LONG).show();
            return;
        }

        TextView blogName = findViewById(R.id.blog_name);
        TextView blogDescription = findViewById(R.id.blog_description);
        TextView blogUrl = findViewById(R.id.blog_url);
        TextView blogRss = findViewById(R.id.blog_rss);
        TextView blogDate = findViewById(R.id.blog_date);

        blogName.setText(blog.getName());
        blogDescription.setText(blog.getDescription());
        blogUrl.setText(blog.getUrl());
        blogRss.setText(blog.getRssFeed());
        blogDate.setText(DateHelper.getFormattedDate(blog.getSubmittedDate()));

    }
}
If you notice from the last line in the above source code, we added a method to format the date:
blogDate.setText(DateHelper.getFormattedDate(blog.getSubmittedDate()));
The getFormattedDate takes the string that includes the date of the blog in UTC, and formats it to display it in a more presentable date time format.
Let’s head to data package and create a new package with name helper and inside it, add a new class with name ‘DateHelper’.
package com.example.blogs.data.helper;

import java.text.DateFormat;
import java.text.ParseException;
import java.text.SimpleDateFormat;
import java.util.Date;
import java.util.Locale;

public class DateHelper {
    public static String getFormattedDate(String date)  {

        SimpleDateFormat displayDateFormat =
              new SimpleDateFormat("MMM dd, yyy h:mm a", Locale.US);
        DateFormat inputDateFormat =
            new SimpleDateFormat("yyyy-MM-dd'T'HH:mm:ss", Locale.US);
        Date formattedDate = null;
        try {
            formattedDate = inputDateFormat.parse(date);
        } catch (ParseException e) {
            e.printStackTrace();
        }
        if (formattedDate == null){
            return "-";
        }
        return displayDateFormat.format(formattedDate);
    }
}
So let’s go back to the res/layout folder and create a new layout resource with name ‘activity_blog_info.xml’.
This is the source for activity_blog_info.xml, you can feel free to design it in the way you prefer:
<?xml version="1.0" encoding="utf-8"?>
<LinearLayout xmlns:android="http://schemas.android.com/apk/res/android"
    android:orientation="vertical"
    android:padding="10dp"
    android:layout_width="match_parent"
    android:layout_height="wrap_content">

    <TextView
        android:id="@+id/blog_name"
        android:layout_width="match_parent"
        android:layout_height="wrap_content"
        android:padding="10dp"
        android:textStyle="bold"
        android:text="Blog Name"
        android:textAppearance="@style/TextAppearance.AppCompat.Medium" />

    <TextView
        android:id="@+id/blog_description"
        android:layout_width="match_parent"
        android:layout_height="wrap_content"
        android:padding="8dp"
        android:text="This is a Sample Blog description with one line only displayed"
        android:ellipsize="end"
        android:maxLines="2"
        android:textAppearance="@style/Base.TextAppearance.AppCompat.Large" />

    <TextView
        android:id="@+id/blog_date"
        android:layout_width="match_parent"
        android:layout_height="wrap_content"
        android:padding="8dp"
        android:textAlignment="textEnd"
        android:text="-"
        android:ellipsize="end"
        android:maxLines="2"
        android:textSize="12sp"
        android:textAppearance="@style/Base.TextAppearance.AppCompat.Large" />
</LinearLayout>
Adding Network Configuration
Before testing our work on the emulator, we just need to do one last step, we will add a new package with name XML under the res folder and inside it, we will add an XML file with name network_security_config.
<?xml version="1.0" encoding="utf-8"?>
<!-- IMPORTANT NOTE:
the configuration setting cleartextTrafficPermitted=\"true\"
only be used for testing purposes,
when connecting to APIs on production you should always connect to
https based endpoints instead of http
-->
<network-security-config>
    <base-config cleartextTrafficPermitted="true">
        <trust-anchors>
            <certificates src="system" />
        </trust-anchors>
    </base-config>
</network-security-config>
I have added an important note inside this. You keep it in mind always, that you should not use cleartextTrafficPermitted=”true” on production environment, which means you should always connect to https APIs when working on business products. This is added only because we are testing our app on an emulator that is connected to localhost via the special IP Address (10.0.2.2), so we are connecting to our APIs via http calls.
Let’s include the above network_security_config inside our application manifest, add the below line to the application tag.
android:networkSecurityConfig="@xml/network_security_config"
And since we are still in the manifest, make sure you specify the MainActivity to be the main and launcher activity.
Eventually, your manifest should look like this:
<?xml version="1.0" encoding="utf-8"?>
<manifest xmlns:android="http://schemas.android.com/apk/res/android"
    package="com.example.blogs">

    <uses-permission android:name="android.permission.INTERNET" />

    <application
        android:name=".MainApplication"
        android:allowBackup="true"
        android:icon="@mipmap/ic_launcher"
        android:label="@string/app_name"
        android:networkSecurityConfig="@xml/network_security_config"
        android:roundIcon="@mipmap/ic_launcher_round"
        android:supportsRtl="true"
        android:theme="@style/Theme.Blogs">
        <activity
            android:name=".ui.blog.info.BlogInfoActivity"
            android:label="@string/title_activity_blog_info"
            android:theme="@style/Theme.Blogs.NoActionBar" />
        <activity
            android:name=".ui.blogs.BlogsActivity"
            android:label="@string/title_activity_blog"
            android:theme="@style/Theme.Blogs.NoActionBar" />
        <activity
            android:name=".ui.MainActivity"
            android:label="@string/title_activity_main">
            <intent-filter>
                <action android:name="android.intent.action.MAIN" />
                <category android:name="android.intent.category.LAUNCHER" />
            </intent-filter>
        </activity>
    </application>

</manifest>
And your Android folder structure should appear as this:

Testing the Android App on Emulator
Now let’s run our application to see how would it appear on the emulator.
The first screen (launch screen) is the MainActivity and the first displayed fragment is the categories fragment, so we will see the categories populated in cards through the grid layout:

Now if we tap on Front End Development, we will see a new screen with the blogs populated vertically on the screen and the title will be Front End Development.

Then if we tap on Coding Sonata, we will see another screen with all the blog details related to the selected blog:

Now, let’s go back twice to the main screen that shows the categories and select desktop development, we didn’t add any blog under this category, so on the next screen, we will see a Snackbar telling us that there are no blogs under this category.

Now let’s go back to the main screen and tap the latest blogs button, you should see the latest blogs sorted by date.

And this is how the loading progress spinner will show whenever there is a call happening to the API to get the categories.

Summary
So that’s it, we have managed to build and connect Android to ASP.NET Core Web API in .NET 5. We used Entity Framework Core 5 to connect to SQL Server Express Database. The Android app targeting Android SDK 30 with min sdk 21 connects to the RESTful APIs using Retrofit 2.
I hope you had learned how to Connect Android with ASP.NET Core Web API.
You can find the full source code for both the API and App project on GitHub.
Feel free to leave your feedback in the comments section and if you like this tutorial, please use the social button on the left to share it with your community.
Subscribe with your email to be the first to receive the updates and new articles that I add to this blog.
Check my other articles about Android and ASP.NET Core Web API:
- Secure ASP.NET Core Web API using API Key Authentication
- Secure ASP.NET Core Web API using JWT Authentication
- Your Guide to Learn ASP.NET Core Web API
- Retrofit Tutorial in Android – Part 1 Introduction
- Retrofit Tutorial in Android – Part 2 POST Requests
- Retrofit Tutorial in Android – Part 3 Request Headers
Bonus
While you read and explore this long tutorial, I have chosen for you to enjoy the enchanting tones of this modern classical list of contemporary masterpieces by the virtuoso composer and pianist: Yiruma
The Best Of YIRUMA Yiruma’s Greatest Hits ~ Best Piano (HD/HQ)
The post A Complete Tutorial to Connect Android with ASP.NET Core Web API appeared first on Coding Sonata.