
Excelsior! Building Applications Without a Safety Net - Part 4
5.00/5 (1 vote)
Fourth part of a series of articles where we build an application showing the entire thought process when writing it
Introduction
I remember, as a young developer, being in awe of people who could sit down and code, seemingly without any effort. Systems would seem to flow out of their fingers, effortlessly crafted, elegant, and refined. It felt like I was witnessing Michelangelo in the Sistine Chapel or Mozart sitting down in front of a fresh stave. Of course, with experience, I now know that what I was seeing was developers doing what developers do. Some were doing it well, and really understood the craft of development, while others were producing work that was less elegant and less well written. Over the years, I have been privileged enough to learn from some amazing developers but I keep coming back to the same basic question, time after time, namely…
How much better would I be as a developer now, if I could have listened to the thought processes of other developers when they were writing applications?In this series of articles, I’m going to take you through what I’m thinking while I develop an application. The code that accompanies the article will be written as a “warts and all” development so you can see how I take something from the initial requirements phase through to something I would be happy for others to use. This means that the articles will show every mistake I make and the shortcuts I take while I’m fleshing ideas out. I’m not going to claim I’m a great developer here, but I am competent and experienced enough that this should help people who are new to the field get over their awe a lot earlier, and gain confidence in themselves.
Setting the Scene
This article is the follow up to Part 1 and Part 2 where we introduced the MVP for the HTTP GET operation, and Part 3 where we started to create our user interface in Blazor.
Source Code
The code for this article can be downloaded from https://github.com/ohanlon/goldlight.xlcr/tree/article4.
In the conclusion to Part 3, I had mentioned that I was going to continue to develop the user interface by adding tabs to allow me to add many GET operations. I am going to let you into a little secret here, my first thought was that I was going to write this control myself. All I would need to do was create a couple of Blazor components, one to represent the tab control and a tab page component that I would render into the control as a child component. While this seemed to be a fun challenge, I paused and asked myself what other use cases the tab would have to consider. How would I keep the tab to a single line when the width of the tabs exceeded the width of the screen - I had, in my mind, the idea that I would have to wrap the tab control in a span and manage the scrolling myself? How would I show buttons to scroll to tabs that were off the screen? How would I make this responsive? Here's the "dirty secret" of professional developers, the first thing I did was to use Google to search to see how others had solved this problem. I have no intention of reinventing the wheel if I can help it.
While I was viewing the Google results, there were several component vendors listing their commercial tab controls. As I want you all to be able to work along with me, I don't want the constraint of forcing people to pay for a control, hence the reason I was going to write one. StackOverflow had a few suggestions and I was rolling up my sleeves to start coding when I saw a link to MudBlazor. Now, the name intrigued me, so I followed the link and it turns out that MudBlazor is an open source project that will give me a tab control to use.
Note that there are other options I could try, from MatBlazor through to fast-blazor.
The end result of this, I am going to use this control rather than "rolling my own". Normally I will create a test project to try out controls like this but, in this case, I am going to try MudBlazor out on the code I currently have. The reasons I am prepared to do this are twofold:
- I don't have much code in place already so I am not making a major commitment to adjusting the code to fit this control.
- I am working on a fresh branch in Github. If I need to, I can simply revert the code and I will be no worse off than I was before.
Installing MudBlazor
MudBlazor has comprehensive documentation but I am going to include the steps here so you can follow along with what I am doing.
The first thing to do is to install the MudBlazor component. Now, I could install it from the package manager or I can install it from the command line. In this case, as I already have the solution open, I am just going to install the MudBlazor package using the NuGet package manager. With this installed, I am ready to start modifying my code to use MudBlazor.
According to the MudBlazor documentation, I should add a using statement inside _Imports.razor. If you aren't familiar with razor, this file is used to add using statements that can be used throughout the codebase. I could have used this to simplify the @inject Goldlight.Xlcr.Core.GetRequest statement I added in Index.razor. I see no reason not to follow the MudBlazor documentation here, so I will add the following statement inside the imports file.
@using MudBlazor
MudBlazor does not use Bootstrap, so I am going to remove the following lines from _Host.cshtml.
<link rel="stylesheet" href="css/bootstrap/bootstrap.min.css" />
<link href="css/site.css" rel="stylesheet" />
I replace those styles with:
<link href="https://fonts.googleapis.com/css?family=Roboto:300,400,500,700&display=swap"
 rel="stylesheet" />
<link href="_content/MudBlazor/MudBlazor.min.css" rel="stylesheet" />
The final thing I need to do in this file is add a reference to the MudBlazor JavaScript code. Just before the closing body tag, I add this:
<script src="_content/MudBlazor/MudBlazor.min.js"></script>
Before I can use MudBlazor, I need to add a reference to its services in the ConfigureServices method in Startup.cs.
services.AddMudServices();
I'm curious to see what the application looks like right now, so I'm going to start it up.
Well, that doesn't look quite right to me. According to the documentation, I need to add a reference to MudThemeProvider in app.razor like so.
<MudThemeProvider />
Restyling the Application
Now that I have MudBlazor running successfully in my application, I want to really start to make use of it. In the Index.razor file, I used a standard HTML button. I am going to replace it with a MudButton which will provide me with a themed button.
<MudButton Variant="Variant.Filled" Color="Color.Primary"
 @onclick="ExecuteGet" Disabled="@string.IsNullOrWhiteSpace(searchAddress)">Go</MudButton>
There are a couple of changes from the standard HTML button. First of all, we can set what type of button appearance we want through the use of the Variant to define whether we want the button to appear Outlined, as just Text or Filled. We can then set the type of Color we want to display the button as, whether we want to make the button use Primary styling, Secondary or one of several others.
I am going to replace the textbox with a MudBlazor equivalent. It gives us a much richer look and feel, but requires quite significant changes over and above the type. In order to replicate what we have now, I change my code to look like this.
<MudTextField T="string" @bind-Value="searchAddress"
 Placeholder="Enter address to search for" FullWidth="true"
 Variant="Variant.Outlined" Immediate="true" Margin="Margin.Dense" AutoFocus="true" />
You might think I used trial and error to work out the combination of values I want here but the reality is that I used the text field documentation to choose the appearance I wanted. The dense value example was a really good starting point for me and the associated code made it very easy for me to choose what I needed to set these values to. MudTextField is a generic type, so T="string" tells the code what the type of the generic is. I have a real simplification of the binding property by setting the bind-value to the bound value; and I use the Immediate property to say I want the binding to update in real time, rather than when the focus is lost.
bind keyword to bind to the searchAddress property, and used the bind:event to set the change detection to oninput. While this is technically correct, it missed the point as to the purpose of the bind keyword. This keyword wraps up the bind-value and bind-value:event keywords, setting the event to onchange; bind-value tells the code what to bind to, so I should have used bind-value and bind-value:event="oninput" in my original code.
Changing the Layout
What is interesting to me is that I have currently chosen to keep these fields wrapped in div statements. As MudBlazor supplies its own layout systems, it seems to be that I should be looking at how it recommends I lay out the application. I am going to look to change the layouts for the fields. The first thing I'm going to do is delete the div elements and add a MudContainer which will wrap the contents of this page up. I happen to know that the container wraps things up in a flex box, so when I am laying things out inside it, I use the flex layout to determine how these items fit onto a line.
The way I am laying the content out inside the container is to use a MudGrid and, inside the grid, I add each item into a MudItem, which is where I control how big each item will look when they are being displayed. I want to set the textbox to take up 11 parts out of the 12, and let the button take up the last 1 part. The way that I do this is to set the xs, sm, md and lg sizes for each item. These attributes are the shorthand way of saying what the flexed item will do when it moves to that appropriate screen size (this is part of the way that a layout becomes responsive when it's viewed in different devices with different maximum screen sizes).
Without our elements, this is what the page code looks like:
<MudContainer>
  <MudGrid>
    <MudItem lg="11" md="11" sm="11" xs="11">
      <!-- Text field goes here -->
    </MudItem>
    <MudItem lg="1" md="1" sm="1" xs="1">
      <!-- Button goes here -->
    </MudItem>
    <MudItem lg="12" md="12" sm="12" xs="12">
      <!-- Search result goes here -->
    </MudItem>
  </MudGrid>
</MudContainer>
Before I add the markup for the input text and button into the grid, I want to touch on what I want to see in the search results grid. I want the ability to show more than just the search content. To do this, I am going to add the ability to expand the search result using a MudExpanders layout to layout, the relevant MudExpander elements. The reason I have this in mind is that I want somewhere that I can display any errors that occur rather than just logging errors to the console so my plan is to have a second expander that shows errors and other useful logging information.
I am choosing to display the results content in a readonly MudTextField because I want to have the search result neatly constrained by the containing expansion panel. I could have elected to use a div element in here, with a scrollbar being set if there's overflow but I am electing to go with the simplest option here as this means I can avoid having to worry about styling the component.
With minimal effort, I now have the following layout.
<MudContainer>
  <MudGrid>
    <MudItem lg="11" md="11" sm="11" xs="11">
      <MudTextField T="string" @bind-Value="searchAddress"
       Placeholder="Enter address to search for" FullWidth="true"
       Variant="Variant.Outlined" Immediate="true"
       Margin="Margin.Dense" AutoFocus="true" />
    </MudItem>
    <MudItem lg="1" md="1" sm="1" xs="1">
      <MudButton Variant="Variant.Filled" Color="Color.Primary"
                 @onclick="ExecuteGet"
                 Disabled="@string.IsNullOrWhiteSpace(searchAddress)">Go</MudButton>

    </MudItem>
    <MudItem lg="12" md="12" sm="12" xs="12">
      <MudExpansionPanels>
        <MudExpansionPanel Text="Search result">
          <MudTextField T="string" Text="@searchResult"
           Lines="10" ReadOnly="true" Variant="Variant.Text" />
        </MudExpansionPanel>
      </MudExpansionPanels>
    </MudItem>
  </MudGrid>
</MudContainer>
These aren't the only layout changes I want to make. The next thing I want to tackle is the container that actually lays the page out. The main layout of the page is controlled from Shared/MainLayout.razor and looks like this:
@inherits LayoutComponentBase

<div class="page">
    <div class="sidebar">
        <NavMenu />
    </div>

    <div class="main">
        <div class="top-row px-4">
            <a href="https://docs.microsoft.com/aspnet/" target="_blank">About</a>
        </div>

        <div class="content px-4">
            @Body
        </div>
    </div>
</div>
This layout has the navigation menu taking the full width of the side and the header is displayed filling the rest. As you will have discovered by now, the sidebar collapses when the screen size goes below a certain width. The question I have to ask myself is how am I going to change this layout to use MudBlazor as the container system?
As I am creating a layout, the documentation is pretty clear that I need to use a MudLayout system. I am going to base my layout on one of the layout templates provided in the documentation, specifically the Top App Bar with clipped drawer. I have decided to base my implementation on this one because I prefer the header to stretch the full width always.
@inherits LayoutComponentBase

<MudLayout>
  <MudAppBar Elevation="2">
    <MudIconButton Icon="@Icons.Material.Filled.Menu"
     Color="Color.Inherit" Edge="Edge.Start"
                   OnClick="@((e) => drawerOpen = !drawerOpen)" />
    <MudText Typo="Typo.h6" Class="ml-3">Goldlight Xlcr</MudText>
  </MudAppBar>
  <MudDrawer @bind-Open="drawerOpen" ClipMode="DrawerClipMode.Always" Elevation="2">
   <NavMenu />
  </MudDrawer>
  <MudMainContent>
    @Body
  </MudMainContent>
</MudLayout>

@code {
  bool drawerOpen = true;
}
I have decided to experiment with many different elevations for the app bar. What this value refers to is how high the component is in the z-axis, so it affects the shadow that is displayed. Rather than stopping and starting the application every time I make a change, I am going to run the blazor application from the commandline and set it to watch any changes I make. What this does is trigger a rebuild and a redisplay of the application.
I eventually settle on 6 as being a pleasing value for both Elevation properties. The application now looks like this:

The navigation menu needs some care now so it's time for me to turn my attention to that part, which will mean changing NavMenu.razor. I'm not going to list out what this file looks like right now, as I'm going to remove almost all of the content and replace it with the new navigation menu. As part of my change, I'm going to simplify the entries so that I only have the Home link. My new navigation menu is as simple as this:
<MudNavMenu>
  <MudNavLink Match="NavLinkMatch.All">Home</MudNavLink>
</MudNavMenu>
The updated application now looks like this:
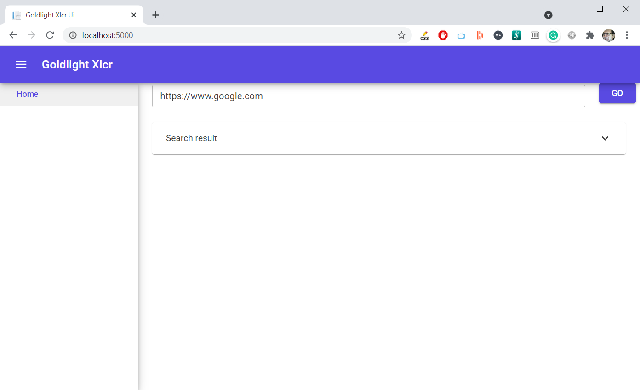
In my eye, this looks a lot better than what I had with the original theme. I'm happy with using this as my starting point to add the tab bars. Right now, my Index.razor file is doing a lot of heavy lifting containing the logic and layout for the get functionality. What I want to do now is move this logic out of the Index file into its own component. I like to keep my components together so I am going to create a components folder to host any that I create. The reason that I like to have my components together is because it helps me visualise, at a glance, whereabouts my code is. If I'm looking in a razor page and I see a reference to a component in there, I know exactly where to find it.
The type of component I'm going to add is a Razor component which I am going to unimaginatively call RequestLayout. In this component, I am going to copy most of the content from the Index.razor file so the layout file ends up looking like this.
@inject Goldlight.Xlcr.Core.GetRequest Get
<MudGrid>
  <MudItem lg="11" md="11" sm="11" xs="11">
    <MudTextField T="string" @bind-Value="searchAddress"
     Placeholder="Enter address to search for" FullWidth="true"
     Variant="Variant.Outlined" Immediate="true"
     Margin="Margin.Dense" AutoFocus="true" />
  </MudItem>
  <MudItem lg="1" md="1" sm="1" xs="1">
    <MudButton Variant="Variant.Filled" Color="Color.Primary"
               @onclick="ExecuteGet"
               Disabled="@string.IsNullOrWhiteSpace(searchAddress)">Go</MudButton>

  </MudItem>
  <MudItem lg="12" md="12" sm="12" xs="12">
    <MudExpansionPanels>
      <MudExpansionPanel Text="Search result">
        <MudTextField T="string" Text="@searchResult"
         Lines="10" ReadOnly="true" Variant="Variant.Text" />
      </MudExpansionPanel>
    </MudExpansionPanels>
  </MudItem>
</MudGrid>

@code {
  private string searchAddress = "";
  private string searchResult;
  private async Task ExecuteGet()
  {
    HttpResponseMessage result = await Get.Execute(searchAddress);
    searchResult = await result.Content.ReadAsStringAsync();
  }
}
To make my life a bit easier as I'm adding components and referencing them, I'm going to update the _Imports.razor file with the following:
@using Goldlight.Xlcr.Ui.Components
Obviously, I need to remove the code from the Index.razor file that I have copied into the component so I end up with this as my index content.
@page "/"
<MudContainer>
  <RequestLayout />
</MudContainer>
I have to admit that I know this is not what I am going to ultimately end up with. I want to add tabs to the layout so I will have two choices, effectively. I'm either going to add the tabs inside the container or I'm going to add another component which I will refer to here. If I go with the other component, then RequestLayout will move into that new component.
Adding Tabs to the Display
I took a bit of time away from the article to mull over the approach I want to take here, whether I want to put the tabs in its own component or not. The thing that is going through my mind right now is that I want to allow the application to be able to save tabs so the user will be able to go back to open tabs when the application opens up again. What I am considering here is that I want to segregate the tabs into its own component so that I can apply single responsibility with the tabs.
I'm going to add a component called AppTabs. This will be used to hold the tabs structure. The most basic structure for this is going to look like this:
<MudTabs>
  <MudTabPanel Text="GET">
    <RequestLayout />
  </MudTabPanel>
</MudTabs>
As I have moved the RequestLayout component here, I can display the tabs component in Index.razor instead. I now have a tabbed interface, even if it is only displaying one tab right now.
Now that I can display a tab, it would be useful if I could dynamically add a tab. In order to achieve this, I am going to replace the existing panel with a fixed tab that lets me add tabs.
<MudTabs>
  <MudTabPanel Text="Add request" Icon="@Icons.Material.Filled.Add"
   ID='"AddRequestId"'></MudTabPanel>
</MudTabs>
As it stands, this does not actually add any tabs so I need to decide on an approach that lets me add them. What I am thinking here is that I need a way to increase the count of the number of tabs and render them into the panel. The simplest way to achieve this is for me to use a counter to keep track of the number of tabs I need to display and use a loop to render the tabs. It seems to me that all I need to do is add a simple variable to my page and increment this every time I click the Add request button. Let me add the code section to increment my tab count.
@code {
  private int tabs = 0;

  private void AddTab()
  {
    tabs++;
  }
}
While I have added the code to increment the number of tabs, I haven't hooked this into the Add Request button. To do this, I simply need to add an OnClick handler to tell the button what operation to trigger when it is pressed. When I add the handler, I have to remember that I just need to supply the function name, the brackets aren't necessary. My code now looks like this:
<MudTabs>
  <MudTabPanel OnClick="AddTab" Text="Add request"
               Icon="@Icons.Material.Filled.Add" ID='"AddRequestId"'>
  </MudTabPanel>
</MudTabs>
I am almost finished now. I need to render the tabs dynamically, so all I need to do is add a for loop that uses the tabs variable to control how many tabs I want to display. When I add this loop, my code looks like this:
<MudTabs>
  <MudTabPanel OnClick="AddTab" Text="Add request"
               Icon="@Icons.Material.Filled.Add" ID='"AddRequestId"'>
  </MudTabPanel>
  @for (int i = 0; i < tabs; i++)
  {
     <MudTabPanel Text="GET">
      <RequestLayout />
    </MudTabPanel>
  }
</MudTabs>

@code {
  private int tabs = 0;

  private void AddTab()
  {
    tabs++;
  }
}
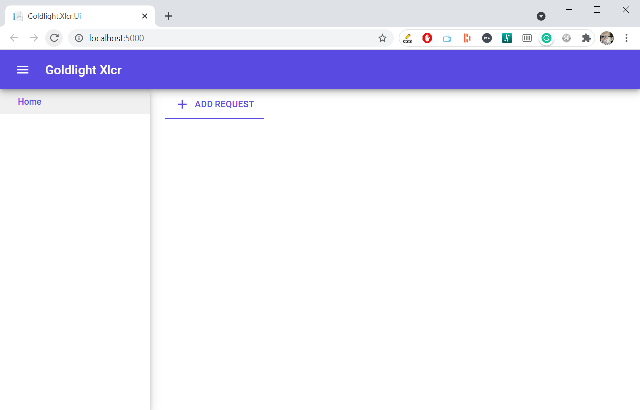
It's time for me to take the application for a test drive. This first screenshot shows what the application looks like on startup.
If I add a few tabs, this should be reflected in the display if my logic is correct.
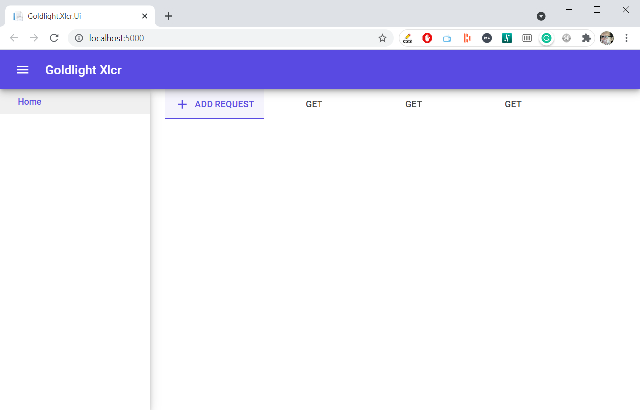
So far, this appears to be hanging together the way I would expect. If I choose a tab, I can use the GET request the way I would expect to.
Actually, this is not quite correct. Something I have not taken into account is that the tab does not keep the tab instance alive when I switch away from it. What this means is that I perform the operation, and get the results back. When I change tabs and then go back to the one I just performed the get on, I lose all the details. This is, obviously, not the behaviour I want and indicates that I might have made a mistake when I chose to use a simple counter to keep track of the tabs. Let me go back to the tabs documentation and see what they have to say. If there's no easy way to maintain the state between tab switches, then I am going to have to change the approach I use to add the tabs and manage them.
Okay, they have thought of this and I just need to add a simple property to my MudTabs declaration. There's a KeepPanelsAlive attribute that is set to false by default. If I set this to true, the tabs are preserved when I switch between them.
<MudTabs KeepPanelsAlive="true">
  <MudTabPanel OnClick="AddTab" Text="Add request"
               Icon="@Icons.Material.Filled.Add" ID='"AddRequestId"'>
  </MudTabPanel>
  @for (int i = 0; i < tabs; i++)
  {
     <MudTabPanel Text="GET">
      <RequestLayout />
    </MudTabPanel>
  }
</MudTabs>

@code {
  private int tabs = 0;

  private void AddTab()
  {
    tabs++;
  }
}
Now, when I rerun the application, the get operations are preserved between tab changes. The usability of the application isn't where I want it just yet, but we have come a long way in dynamically showing our operations. There are lots of things I could have done differently to render out the tabs but I have followed the TDD ethos here of using the simplest possible code to add tabs. I have no doubt that this code will become more complicated but, as you can see here, simple solutions are an ideal starting point because I can gradually increase the complexity as we introduce more complex requirements. In the next article, I am going to take a step back and look at adding the ability to handle more HTTP verbs now that I know I can handle the GET operation in my Blazor application.
History
- 3rd August, 2021: Initial version