
Azure Active Directory Authentication with OpenID Connect and Authorization with App Roles
5.00/5 (6 votes)
Azure AD for authentication and authorization of users for your website
This project shows you how to use Azure Active Directory (Azure AD) to authenticate and authorize users for your website and API using OpenID Connect and Azure App Roles.
You can see the source article and the latest updates to this project here.
This project was built using the Paging and Sorting Project as the starting point.
OpenID Connect and OAuth 2.0 Overview
The below sequence diagram shows you the communication between different parties using OpenID Connect with OAuth 2.0 Authorization Code + PKCE flow:
- User Browser
- Client Application – the front end web application
- Identity Provider – the Azure Active Directory which supports OpenID Connect protocol
- API – the API that the Client Application calls

After the user is authenticated with the Identity Provider in Step 6, the code that represents the identity of the user is sent to the Client Application in Step 7.
In Step 8, the Client Application will send its clientId and clientSecret along with the code to the Identity Provider (IDP) so that the IDP knows which application is requesting access.
In Step 9, the Id Token (to construct ID/claims for the Client Application) and the Access Token (to construct ID/claims for the API) is passed from the IDP to the Client Application. At this point, the Client Application can check authorization on itself. To call the API, the Client Application will pass the Access Token to the API so that the API can check for authorization.
Notice that the API does not interact with the Identity Provider, it merely checks the Access Token (called the Bearer Token) provided by the Client Application.
Both the Client Application and the API will need to be registered with the Identity Provider.
To use Azure App Role for authorization, the user and the roles will need to be added in Azure AD which we will show you.
Azure AD Setup for Authentication
In Azure, you can create your own Azure Active Directory instance if needed. Inside Azure AD, you will first register the Client Application by going to App Registrations:

The Redirect URI is entered for Step 7 in the sequence diagram, it should end with “signin-oidc” in order for your Client Application to pick it up.
After the registration is complete, you will see:
- Application (client) ID – this is the ID for the Client Application
- Directory (tenant) ID – this is the ID for the Azure AD
- The Endpoints from the OAuth2 protocol

Next, go to the Authentication tab to specify the logout URL:

The logout URL should end with “signout-oidc”.
Next, go to Certificates and secrets tab to create a new client secret, which will be used in Step 8 of the sequence diagram:

And that’s all for the Client Application.
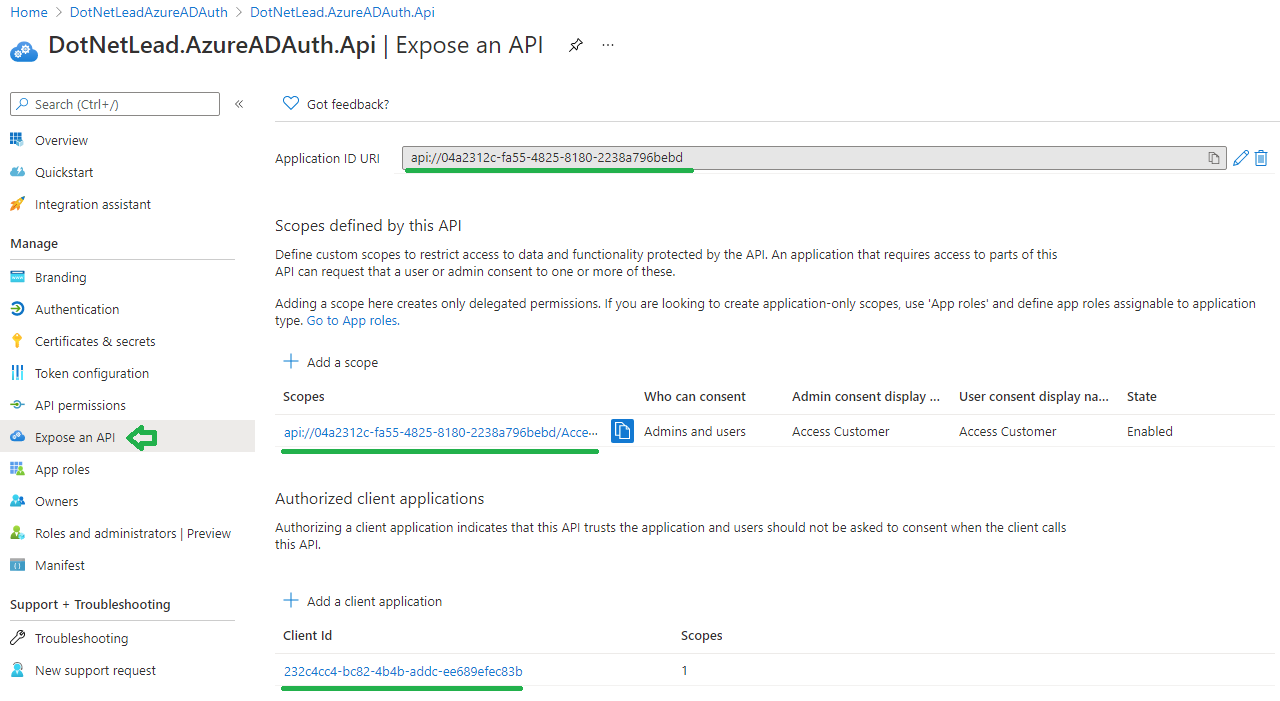
Next, register the API by going to App Registrations. After completion, go to the Expose an API tab to add a scope and enter the Client Id from the Client Application (so that the API can accept the request from the Client Application in Step 10 of the sequence diagram):
Go back to the Client Application, click API permissions tab and add the scope from the API (so that the API can accept the request from the Client Application in Step 10 of the sequence diagram):

Azure AD Setup for Authorization
Next, we need to define the roles in both the Client Application and the API. Go to Azure AD -> App Registration -> Select the application you created (Client Application or API) –> Manifest, then add the roles as shown below. For the “id” field, it just needs a unique identifier that you can create yourself for each role. Be sure to make this update for both the Client Application and the API.

In this project, we defined the “User” role and the “CustomerService” role for the Client Application, and “CustomerAPI” role for the API. Both the CustomerService and CustomerAPI roles are required to access customer data.
Next, double check that the roles added are enabled by going to the App roles tab:

To assign users to roles, go to Azure AD -> Enterprise Applications -> Select the application you created (Client Application or API) -> Users and groups -> Add user/group (or Edit existing User):

Notice that each row is a user/role combination. If a user has two roles, you will need to add it twice. In our example, Kendall has the Customer Service role and but Mark does not, therefore only Kendall can manage the customers. Be sure to make this update for both the Client Application and the API.
Code for Client Application
First, add the NuGet packages below:
IdentityModelMicrosoft.AspNetCore.Authentication.OpenIdConnect
In the Client Application’s Startup.ConfigureServices method, we have the code below to:
- Add
HttpHandler, calledBearerTokenHandler, for passing the Access Token to the API. The code forBearer TokenHandleris shown later. - Register API client that will use the
HttpHandler, so that any calls to the API automatically includes the Access Token. - Give path for access denied page.
- Register to use OpenID Connect by specifying:
- Authority – specifies the IDP, obtained by going to Azure AD -> App registration -> Select the Client Application -> Click Endpoints. Be sure to end the url with “
v2.0” as shown. - Client Id – the client ID for the Client Application
- Client Secret – the client secret for the Client Application
- ResponseType – specifying “code” will use the OpenID Connect code flow with PKCE protection
- Scope – add scope to access the API. The value is obtained from the Expose an API tab when the API was registered in Azure
- Authority – specifies the IDP, obtained by going to Azure AD -> App registration -> Select the Client Application -> Click Endpoints. Be sure to end the url with “
//make http bearer token handler available
            services.AddTransient<BearerTokenHandler>();

            //add http client
            services.AddHttpClient("API", client =>
            {
                client.BaseAddress = new Uri(this.Configuration["APIurl"]);
                client.DefaultRequestHeaders.Clear();
                client.DefaultRequestHeaders.Add(HeaderNames.Accept, "application/json");
            }).AddHttpMessageHandler<BearerTokenHandler>();  //add the bearer token in request

            services.AddAuthentication(options =>
            {
                options.DefaultScheme = CookieAuthenticationDefaults.AuthenticationScheme;
                options.DefaultChallengeScheme = OpenIdConnectDefaults.AuthenticationScheme;
            })
            .AddCookie(CookieAuthenticationDefaults.AuthenticationScheme, options =>
            {
                //set path to access denied from authorization
                options.AccessDeniedPath = "/AccessDenied";
            })
            .AddOpenIdConnect(OpenIdConnectDefaults.AuthenticationScheme, options =>
            {
                options.SignInScheme = CookieAuthenticationDefaults.AuthenticationScheme;
                //the identity provider
                options.Authority =
                 "https://login.microsoftonline.com/b0ea34f0-13bb-49aa-a7f0-9f34136ad44e/v2.0";
                //this application
                options.ClientId = "232c4cc4-bc82-4b4b-addc-ee689efec83b";
                options.ClientSecret = "gowrq2SNgbe.XhGGh5a9Nm-4DPi.o9__OI";
                //OpenId Connect flow
                options.ResponseType = "code";
                //the "code" flow will use PKCE by default,
                //below line is not required but we can be explicit
                options.UsePkce = true;
                //"openid" and "profile" scopes are included by default by the middleware,
                //it's not required but we can be explicit
                options.Scope.Add("openid");
                options.Scope.Add("profile");
                //add the scope to access the API
                options.Scope.Add("api://04a2312c-fa55-4825-8180-2238a796bebd/AccessCustomer");
                options.SaveTokens = true;
            });
In the Startup.Configure method, add the requirement for authentication and authorization:
app.UseAuthentication();
            app.UseAuthorization();
The HttpHandler class is defined below to automatically include the Access Token when calling the API:
//for passing the access token to the API
    public class BearerTokenHandler : DelegatingHandler
    {
        private readonly IHttpContextAccessor _httpContextAccessor;

        public BearerTokenHandler(IHttpContextAccessor httpContextAccessor)
        {
            _httpContextAccessor = httpContextAccessor ??
                throw new ArgumentNullException(nameof(httpContextAccessor));
        }

        protected override async Task<HttpResponseMessage> SendAsync(
            HttpRequestMessage request,
            CancellationToken cancellationToken)
        {
            //get the access token from HttpContext
            var accessToken = await _httpContextAccessor
                .HttpContext.GetTokenAsync(OpenIdConnectParameterNames.AccessToken);

            //add the access token to the request
            if (!string.IsNullOrWhiteSpace(accessToken))
            {
                request.SetBearerToken(accessToken);
            }

            return await base.SendAsync(request, cancellationToken);
        }
    }
With the setup in place, when you add the Authorize attribute with the required role to a page, it will automatically check for the token or start the login process:
[Authorize(Roles = "CustomerService")]
    public class ListModel : PageModel
To show the user’s name after login, we create a ViewComponent that gets the name from User.Identity.Claims where Type is “name” for display in the front end:
public class LoginViewComponent : ViewComponent
    {
        public LoginViewComponent(){}

        public IViewComponentResult Invoke()
        {
            //get the user name from claims
            if (User.Identity.IsAuthenticated)
            {
                var identity = (ClaimsIdentity)User.Identity;
                var claims = identity.Claims;
                string userName = identity.Claims.FirstOrDefault(i => i.Type == "name").Value;

                LoginModel model = new LoginModel
                {
                    IsLoggedIn = User.Identity.IsAuthenticated,
                    UserName = userName
                };
                return View(model);
            }
            else
                return View(new LoginModel());
        }
    }
Code for API
First, add the NuGet packages below:
Microsoft.AspNetCore.Authentication.JwtBearer
In the API’s Startup.ConfigureServices method, we have the code below to use Json Web Token(JWT) as the way to authenticate:
//use "Bearer" as the authentication scheme
         services.AddAuthentication("Bearer")
             .AddJwtBearer("Bearer", options =>
             {
                 //the identity provider
                 options.Authority =
                 "https://login.microsoftonline.com/b0ea34f0-13bb-49aa-a7f0-9f34136ad44e/v2.0";
                 //the Application ID URI
                 options.Audience = "api://04a2312c-fa55-4825-8180-2238a796bebd";
                 //allow token issuer from Client
                 options.TokenValidationParameters.ValidIssuer =
                 "https://sts.windows.net/b0ea34f0-13bb-49aa-a7f0-9f34136ad44e/";
                 options.SaveToken = true;
             });
Below are the options specified:
Authority– specifies the IDP, obtained by going to Azure AD -> App registration -> Select the API -> Click Endpoints. Be sure to end the url with “v2.0” as shown.Audience– specifies the API, obtained by going to Azure AD -> App registration -> Select the API -> Overview tab. It’s the Application ID URI.TokenValidationParameters.ValidIssuer– the authentication also checks the issuer of the token. The value can be obtained by stepping to the line below in theBearerTokenHandlerclass in the Client Application to get the value of the JWT, then go to the website https://jwt.io and paste in the JWT to see the issuer.-
var accessToken = await _httpContextAccessor
                .HttpContext.GetTokenAsync(OpenIdConnectParameterNames.AccessToken);
-

In the Startup.Configure method, add the requirement for authentication and authorization:
app.UseAuthentication();

            app.UseAuthorization();
With the setup in place, when you add the Authorize attribute with the required role to a page, it will check the role of the user:
[Authorize(Roles = "CustomerAPI")]
    public class CustomerController : ControllerBase
You can verify that the role was passed to the API by checking the claims in the CustomerController.GetCustomers:

And that’s all! Hope you will find it useful to use Azure AD to authenticate and authorize users.