
Image-blending using Python and OpenCV
5.00/5 (1 vote)
Python code for image-blending based on an image mask
Introduction
Photoshop and other image processing programs as well (e.g., freeware alternatives such as GIMP or Paint.net) offer a wide range of possibilities to edit and manipulate images and photos. However, sometimes, one wishes to perform operations that are not built into standard software or simply look under the hood and get an idea how specific photo-editing procedures might work. Both goals can be achieved by trying to translate photo-editing procedure into programming code. Here, in this piece of text, I will do that and present code for merging parts (or the whole image as well) of an image with another image.
To comprehend the contents of this tutorial, you should have a basic knowledge of Python (Python 3) and the ways in which images are represented on a computer (i.e., RGB or BGR model). However, as the code is not overly complicated, it should be accessible to people with backgrounds in other programming languages as well. If you plan to execute or play around with the code I have loaded up, you need to install OpenCv and NumPy on your machine (use the pip command or the Anaconda Navigator to do that) along with Python, of course. OpenCV is a freely available image processing library (interfaces are available for C++, Python etc.) containing many features that help to process visual input such as videos and images. Here, in this piece of code, I only employ some basic methods. I use commands for loading and displaying images on a screen and set up a while loop to enable some interactions with the program (but this is also very much down to earth). As already mentioned, NumPy is also required. NumPy is Python’s number one library to handle numbers, arrays and matrices and it comes in very handy that OpenCv image data can be manipulated and modified using NumPy methods.
Background
Blending Images
Illustrative sample code on how to use OpenCV to merge information stored in one image with information of a second image is widely available on the web (e.g., see this link). For instance, the cv2.addWeighted(image1, weighting_factor1, image2, weighting_factor2) OpenCV function is a one-liner which is able to perform image blending in a straightforward way. If one chooses 0.5 for both weighting factors, the function returns an equally weighted (or mean) blend of two images. Choosing 0.7 and 0.3 as input weights, will result in an image consisting of 70 percent pixel color of image number one and 30 percent pixel color of image two. Choosing 1 and 0, to give another example, will return an unchanged version of image one, whereas 0 and 1 will return an unchanged version of image two. I mention this, because it becomes important below, when I go into the details of the code I wrote.
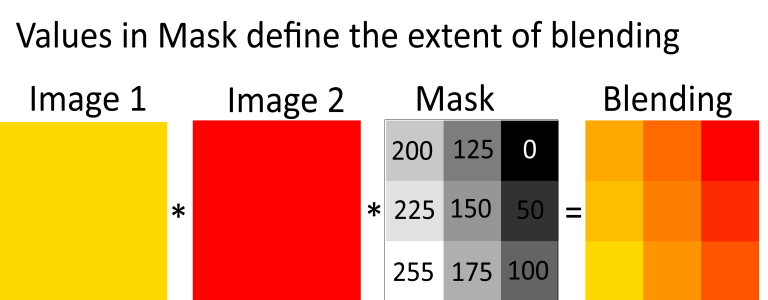
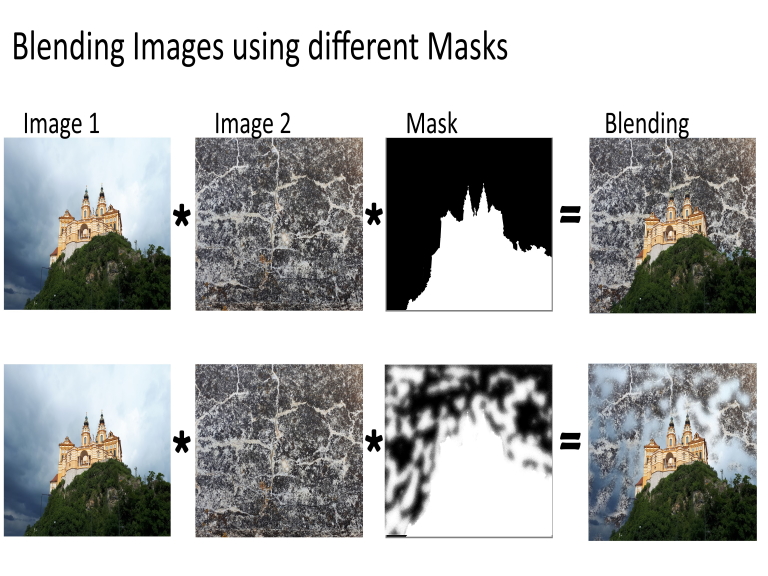
Using a Mask for Image Insertion
The cv2.addWeighted() function is particularly useful when information of two equally sized images is combined (or more precisely, regions of interest) and the same weighting factors are applied to all pixels. However, sometimes one plans to transfer a specific region from one image to another image. This can be done in different ways, but one common one is using a mask. A mask is usually a binary image (only containing black and white pixels) that serves as a template enclosing the regions for insertion or blending. To clear that up, I give an example. If one wants the sky of an image to be replaced by the background of a second image, the mask (or the binary image) needs to have a black region representing the sky of image one, so that the program “knows” where to put the background of image two. In other words, where the pixel color black (0 in an 8-bit image; [0,0,0] for a 24-bit image) is met in the mask, pixels of the first image are replaced by pixels of the second image.
Using a Matrix of Weighting Factors for Image Overlay
Using the Code
I divided the code sample you can find in the repository into four sections. Below, I only present code from the two inner sections, as they cover the main topic of this tutorial. For the sake of completeness, I briefly comment on section 1 and 4 in the following and then present essential information on section 2 and 3 in the form of bullet points.
In section 1, you find OpenCV code for loading the images (i.e., cv2.imread(“X.jpg”,cv2.IMREAD_UNCHANGED)) needed. There are three images: image 1 is the surface on which the contents of image 2 are pasted, and image 3 is the mask or template defining the conditions for the blending operation. There are some additional features as well, but I leave it to you to find out what they are for (there are informative comments in the sample code I uploaded).
In section 4, you find a “while loop” that allows a kind of rudimentary interaction with the program. The loop is waiting for key events. The program is quitted when pressing “q”, while pressing “s” saves the results of the blending operations and then quits the program.
Sections 2 and 3 contain code for blending information of two images based on the weighting factors provided by the mask.
- The function
mix_pixel(pix_1, pix_2, perc)processes input in a similar manner ascv2.addWeighted()does. It takes pixel information from two images and blends it according to the weights given in the third parameter (i.e.,perc) of the function (e.g., whenpercis in the middle of 0 and 255, it gives a fifty-fifty mix of pixel 1 and pixel 2; see also in section blending images). When the parameters areNumPyarrays (Note: All arrays need to have the same dimension) the operations are applied to all corresponding pixels of the images. The third parameter is an array (the mask) containing an individual weighting factor for each pixel. - The
blend_images_using_mask(img_orig, img_for_overlay,img_mask)function is quite simple. It takes the three images, checks whether the mask is a 3 channel greyscale image (otherwise, it would not have the same dimension as the other images), calls themix_pixel()function and then returns the result as a 3 channel 8 bit unsigned integer (otherwise OpenCV commands for displaying images would fail). - The final commands you find in the sample below are for displaying the different types of images, in order to make the outcome of the procedures visible and accessible for evaluation. There are also some lines of code that are used for making the images smaller, as the original size of a photo is usually is too large for a standard screen.
# code skeleton

import numpy as np
import cv2

# .......omitted code

# functions for blending operations

# takes a pixel from image 1 (pix_1) and blends it with a pixel from image 2 (pix_2)

# depending on the value given in perc (percentage);

# if perc = 0 or 255 (or 0,0,0 or 255,255,255) it will perform no blending at all

# and return the value of image 1 or image 2;

# by contrast, all values in between (e.g., 140) will give a weighted blend of the two images

# function can be used with scalars or numpy arrays (perc will be greyscale numpy array then)

def mix_pixel(pix_1, pix_2, perc):

    return (perc/255 * pix_1) + ((255 - perc)/255 * pix_2)

# function for blending images depending on values given in mask

def blend_images_using_mask(img_orig, img_for_overlay, img_mask):

    # turn mask into 24 bit greyscale image if necessary

    # because mix_pixel() requires numpy arrays having the same dimension

    # if image is 24-bit BGR, the image has 3 dimensions, if 8 bit greyscale 2 dimensions

    if len(img_mask.shape) != 3:

        img_mask = cv2.cvtColor(img_mask, cv2.COLOR_GRAY2BGR)

    # interpolate between two images (img_orig and img_to_insert)

    # using the values in img_mask (each pixel serves as individual weight)

    # as weighting factors (ranging from [0,0,0] to [255,255,255] or 0 to 100 percent);

    # because all three images are numpy arrays standard operators

    # for multiplication etc. will be applied to all values in arrays

    img_res = mix_pixel(img_orig, img_for_overlay, img_mask)

    return img_res.astype(np.uint8)

# blend images and display results

# call function above to perform blending with mask (containing weights for interpolation)

img_blended = blend_images_using_mask(img, img_insert, img_insert_mask)

#print(img_blended.shape)

# rf -> resizing factor; used to make images smaller, so they can be displayed on screen;

# blending operations, however, will be performed on original sized images

rf = 0.4

wi = img.shape[1] # width and

hi = img.shape[0] # height of images

 # call OpenCV resize
img_sm = cv2.resize(img, (int(wi * rf), int(hi * rf)),

                    interpolation=cv2.INTER_CUBIC)

img_insert_sm = cv2.resize(

    img_insert, (int(wi * rf), int(hi * rf)), interpolation=cv2.INTER_CUBIC)

img_blended_sm = cv2.resize(

    img_blended, (int(wi * rf), int(hi * rf)), interpolation=cv2.INTER_CUBIC)

# display images

cv2.imshow("Original Image", img_sm)

cv2.imshow("Insert This Image", img_insert_sm)

cv2.imshow("Blended Images", img_blended_sm)

# .......omitted code
Points of Interest
There is no guarantee that the code is free of bugs and works on each platform. Be careful when running the code and ending it not properly (by not pressing 'q' or 's'). You should restart the Kernel then (is possible when you use Jupyter Notebook) or remove the thread from the system (TaskManager in Windows). Also, all files have to be in the same folder for the program to be executed properly. Feel free to make suggestions for further improvement.
History
- 23rd December, 2020: Initial version