
Setting Up VS Code for Scala Development on WSL
0/5 (0 vote)
How to set up Visual Studio Code for Scala development on WSL
Visual Studio Code (VS Code) has been my favorite editor for years. With the numerous extensions and community support, VS Code has become one of the most popular editors for programming. Windows Subsystem for Linux (WSL) lets developers run a Linux environment directly on Windows. The powerful combination of these two provides programmers a great way to write software.
VS Code has excellent language support, including Scala. Most Scala developers use IntelliJ as their development tool. Therefore, not many tutorials exist for using VS Code as a Scala development tool. This article is a brief tutorial of the VS Code setup for Scala programming on WSL. Hopefully, it could provide useful information for setting up the Scala development environment.
Table of Contents
- Assumptions and Requirements
- Step 1: Setup WSL2
- Step 2: Install VS Code and Related Software on Windows 10
- Step 3: Install Java, sbt, and Scala on Ubuntu (WSL2)
- Step 4: Use VS Code to Create a Sample Project
- VS Code Usage
- Conclusion
Assumptions and Requirements
This tutorial is written with the following setup:
- Windows 10 2004 (host OS)
- Visual Studio Code 1.51 with extensions
- Scala (Metals) 1.9.6 for Scala programming
- Remote Development 0.20.0 for remote development on WSL
- Windows Subsystem for Linux 2 (WSL2)
- Ubuntu 20.04 on WSL2
- Java (OpenJDK 11)
- sbt 1.4.1
- Scala 2.13.3
- MobaXterm 20.5 an enhanced terminal for Windows to access WSL2.
Step 1: Setup WSL2
The latest WSL version, WSL2, is built with a full Linux kernel and is serviced by Windows updates. WSL2 not only offers increased file IO performance but also provides full system call compatibility. If your Windows 10 is newer than 1903 Build 18362, using WSL2 is highly recommended.
To setup WSL2 on Windows 10, follow the instructions: Windows Subsystem for Linux Installation Guide for Windows 10. Make sure WSL2 is enabled. After the WSL installation completes, install Ubuntu 20.04 from Windows Store.
Step 2: Install VS Code and Related Software on Windows 10
On Windows 10, install VS Code and Scala and Remote Development extensions.
- Download VS Code from https://code.visualstudio.com/.
- Follow the instruction to install VS Code.
- Click the Install and follow its instructions to install Remote Development.
- Do the same thing as the previous step to install Scala (Metals) extension.
Also, install MobaXterm from its official site https://mobaxterm.mobatek.net/download-home-edition.html. Another option to access WSL2 is Windows Terminal. This tutorial uses MobaXterm.
Step 3: Install Java, sbt, and Scala on Ubuntu (WSL2)
Launch the installed MobaXterm and click WSL session. MobaXterm automatically detects the WSL in the system.

And we should see the Ubuntu bash shell.

- Install OpenJDK 11
$ sudo apt install openjdk-11-jdk
By default, VS Code uses the
JAVA_HOMEenvironment variable to locate the java executable. To make sure the VS Code uses the correct JDK version, setupJAVA_HOMEis recommended. Add the following line to ~/.bashrc.export JAVA_HOME=/usr/lib/jvm/java-11-openjdk-amd64/
Note that the path may be different if installing a different JDK.
- Install sbt
$ sudo apt install sbt
- Install Scala
Install Scala is not necessary since sbt will download an appropriate version when we build a Scala program. However, if using Scala REPL (command-line shell) is desired, run the following command to install it.
$ sudo apt install scala
Step 4: Use VS Code to Create a Sample Project
The sample project the tutorial uses to the demo has the following layout:
scala-sample-code
├── .scalafmt.conf
├── build.sbt
├── project
│   └── build.properties
└── src
    ├── main
    │   └── scala
    │       └── Sample.scala
    └── test
        └── scala
            └── SampleSpec.scala
Before we launch VS Code, use mobaXterm Ubuntu shell to create a project folder on Ubuntu WSL2.
$ cd ~
$ mkdir scala-sample-code
Once the project folder is created, we can close mobaXterm and launch VS Code.
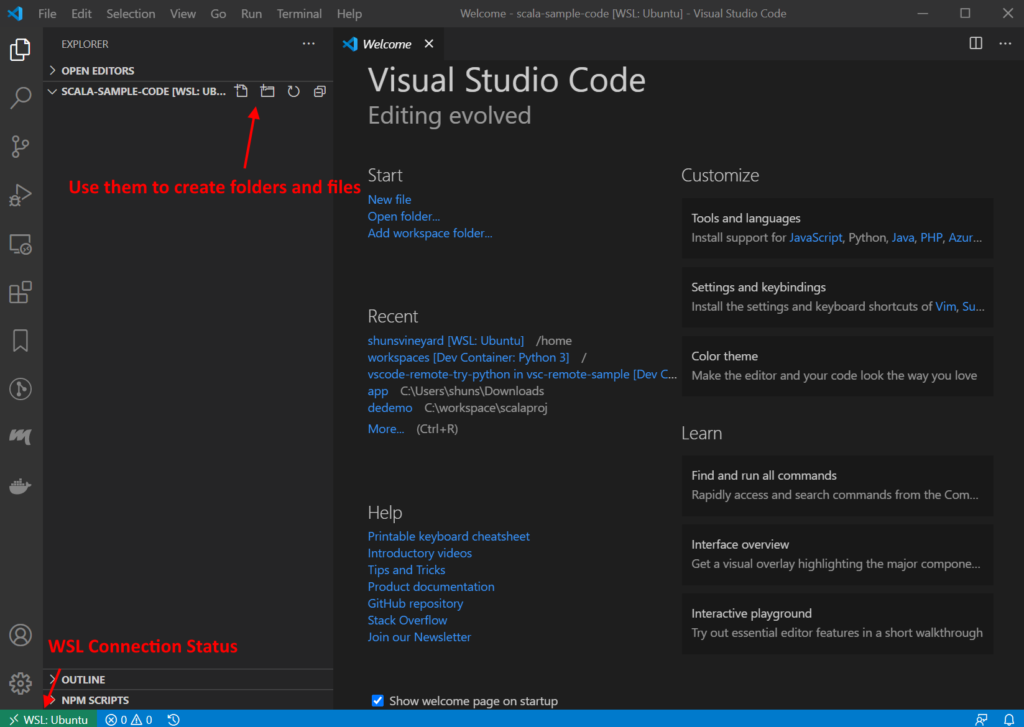
Click the left-bottom icon to connect to WSL and choose Open Folder in WSL as the picture shown below to open the scala-sample-code folder we just created.

After VS Code opens the scala-sample-code folder, we can see the left-bottom icon becomes WSL: Ubuntu, and we can start creating folders and files.
We first create build.sbt with the following content:
ThisBuild / scalaVersion     := "2.13.3"
ThisBuild / version          := "0.0.1"

lazy val sample = (project in file("."))
  .settings(
    name := "Sample Project",
    libraryDependencies += "org.scalatest" %% "scalatest" % "3.2.2" % Test,
  )
As soon as the build.sbt file is created, the Metals extension of VS Code automatically detects the change and bumps up a window for importing the build.

The import process automatically creates some sbt build folders and files. And we can continually create our project folders and files.
- .scalafmt.conf
version = "2.7.4"
align.preset = more
maxColumn = 100
- Sample.scala
object Sample extends Greeting with App { println(greeting) } trait Greeting { lazy val greeting: String = "hello" } - SampleSpec.scala
import org.scalatest.wordspec._

class SampleSpec extends AnyWordSpec {
  "The sample code" should {
    "say hello" in {
      assert(Sample.greeting.startsWith("h"))
    }
  }
}
After the sample project is created, the layout looks like the picture below from VS Code.

Note that .bloop, .metlas, and .vscode are generated by VS Code and Metals extension. If we use a version control system like Git, we should add these folders to .gitignore.
(The sample code is also available at https://github.com/shunsvineyard/scala-sample-code.)
VS Code Usage
The following subsections demonstrate some everyday use cases for Scala development using VS Code.
Code Format
Metals supports Scalafmt for code formatting. To format code, right-click on the Scala file we want to format and select Format Document to format the file as shown in the picture.

By default, Metals formats Scala documents based on the .scalafmt.conf file on the project directory’s root. The path can be modified from the Metals extension configuration. See Configurations to alter the settings.
Run and Debug
There are two ways to run and debug the Scala code.
1. Use Code Lenses
For each main or test class, Metals shows code lenses run | debug for main class and test | test debug for test classes. Click run or test to run or test the Scala program.

2. Use launch.json Configuration
The other way is to define launch.json for VS Code to run or debug a program.
Follow the steps in the picture to create the launch.json configuration file.

After step 3, VS Code asks a few more questions. We can leave them all blank and edit the launch.json file after the JSON file is created. After the configure file is created, we can fill in the configurations and run or debug the program.

Configurations
In addition to the most common use cases, code format, run and debug, there are many other things we can configure Metals to work in the ways we want.
To open the settings, do [File -> Preference -> Settings] to open the settings. The settings have three scopes: User, Remote, and Workspace. Choose whichever fits our needs. And select Extensions -> Metals to modify the settings.

Troubleshooting
Sometimes, the Metals extension may not work correctly. We can check the Metals output to get more information to solve it or, at least, have better error messages to Google.
For example, if the JDK version we installed does not support JDI (this will result in the debugger not working), we will get the following error message when we try to run the debugger.
Couldn't find a debug adapter descriptor for debug type 'scala'
(extension might have failed to activate)
Unfortunately, the error message does not give enough information about the issue. In this case, we can check the Metals output. See the picture below:

It gives us more information about this issue.
Message: Debugging is not supported because bloop server is running on a
JRE /usr/lib/jvm/java-8-openjdk-amd64/jre with no support for Java Debug Interface:
'JDI implementation is not provided by the vendor'.
To enable debugging, install a JDK and restart the bloop server.
So, we know the JDK is the issue and needs to be fixed.
Terminal for sbt Commands
One useful VS Code feature worth mentioning is the integrated terminal. With the integrated terminal, we can run the shell on WSL. For Scala development, the terminal provides a convenient way to run sbt commands within the VS Code.
Using Ctrl+Shift+P to bring up the Command Palette and type terminal. It should show a few terminal options. Choose to Create New Integrated Terminal (In Active Workspace).

This brings up the WSL shell on the project directory.

With this feature, we can use the terminal without external tools such as Windows Terminal or MobaXterm.
Conclusion
This article provides the basic setup and common use cases for using VS Code to write Scala code. Although it demonstrates the configurations on Windows Subsystem for Linux, the VS Code Usage also works on Windows, Linux, and MacOS.
VS Code may not be the most popular editor for Scala programming, but with the great extension support such as Metals, VS Code can be a useful tool for Scala development. Especially for people who work in multiple languages, VS Code could be the one for all your needs.
The post Setting Up VS Code for Scala Development on WSL appeared first on Shun's Vineyard.