
Android Sensor Monitoring in Simulink Matlab
0/5 (0 vote)
Implementation of Android sensor monitoring in Simulink (Matlab)
Introduction
Generally, the measured data of the built-in sensors of the Android devices will be subsequently used by a set of advanced mathematical algorithms such as calibration, noise cancellation, and estimation. These advanced mathematical algorithms cannot simply be implemented in Android devices and high-level software is needed for this purpose. In Simulink Matlab, the mentioned algorithms can be simply developed and some of them have been already developed. Hence, this article provides a sensor monitoring of the Android sensors in Simulink to follow the mentioned goal.
An Android app and Simulink file are developed to follow the main aim of this article. The app lists all built-in sensors of the Android device via a ListView and ArrayAdapter pair. The desired sensor can be selected among the displayed list of sensors by clicking on the sensor. Then, the corresponding signals of the sensor are measured by registering an eventlistener for the sensor that is fully described in the article.
The measured data is sent to the monitoring device through the socket programming technique. For this purpose, both app and Simulink should implement sockets in which the first one is considered to be the server-socket and the other is considered to be the client-socket. Finally, the received data will be used in Simulink such as implementing the mathematical algorithms.
In this project, a Java class is defined to manage all parts which is AppManager. The appManager object (that is an instance of the AppManager class) controls and manages all parts of the project involving the server and sensor parts.
This article presents the required details and finally develops an app and Simulink file that can be easily used in the next project. In fact, the article can simply be used in advanced sensor monitoring projects such as position navigation and timing.
Background
In order to mention the parts of the article, the following backgrounds are needed to be presented. As stated earlier in the previous section, a ListView and ArrayAdapter pair is exploited to show the built-in Android devices and selects the desired one. To completely understand this part, the following link is presented that is previously provided:
The above link entirely explains the first part and its related implementation details.
The second part of the article spans the socket programming technique. For this purpose, two TCP sockets are developed in both Android and monitoring devices in which the first one is the server and the second one is the client. It means that the implemented socket in the Android device is considered to be server-socket and the other one is client-server. Some useful tutorials for this concept have been presented that can be found through simple searching such as the following one:
It should be noted that the required technical details for the implementation of the mentioned TCP sockets are given in the next section.
Sensor Monitoring in Simulink
This section presents the main parts of this article that consists of four subsections, namely the ListView implementation, sensor registering in Android, server-socket implementation in Android, and client-socket implementation in Simulink. These subsections are proposed in the sequel.
ListView Implementation
This subsection designs an appropriate list view for displaying the built-in sensors of the Android device. It should be noted that the whole details about this part are presented in the aforementioned link that can be seen for a better understanding.
First, the XML layout of each item (sensor) is developed as given in the following code block:
<linearlayout
    android:background="#FFFFFF"
    android:id="@+id/ll"
    android:layout_height="match_parent"
    android:layout_width="match_parent"
    android:orientation="vertical"
    android:paddingbottom="3dp"
    android:paddingleft="3dp"
    android:paddingright="3dp"
    android:paddingtop="3dp"
    xmlns:android="http://schemas.android.com/apk/res/android">
    <textview
        android:id="@+id/tvn"
        android:layout_height="wrap_content"
        android:layout_width="wrap_content"
        android:text=""
        android:textcolor="#000000"
        android:textsize="20dp"/>
    <textview
        android:id="@+id/tvv"
        android:layout_height="wrap_content"
        android:layout_width="wrap_content"
        android:text=""
        android:textcolor="#000000"
        android:textsize="20dp"/>
    <textview
        android:id="@+id/tvt"
        android:layout_height="wrap_content"
        android:layout_width="wrap_content"
        android:text=""
        android:textcolor="#000000"
        android:textsize="20dp"/>
</linearlayout>
As can be easily understood, each item (sensor) is simply shown by displaying its name, type, and vendor. The corresponding ArrayAdapter is implemented by the following code that is fully described in the mentioned link:
public class MyAdapter extends ArrayAdapter<sensor>{
    public List<sensor> sensors;
    public int selectedItem=-1;
    public AppManager appManager;
    public MyAdapter(Context context, int resource,
                     List<sensor> sensors,AppManager appManager) {
        super(context, resource,sensors);
        this.sensors=sensors;
        this.appManager=appManager;
    }

    @Override
    public View getView(int position,View convertView,ViewGroup parent){
        View rowView=convertView;
        Sensor sensor=sensors.get(position);
        if(convertView==null){
            rowView=LayoutInflater.from(getContext()).inflate(R.layout.list_item,parent,false);
            TextView tvn=(TextView)rowView.findViewById(R.id.tvn);
            tvn.setText(sensor.getName());
            TextView tvv=(TextView)rowView.findViewById(R.id.tvv);
            tvv.setText(sensor.getVendor());
            TextView tvt=(TextView)rowView.findViewById(R.id.tvt);
            tvt.setText(sensor.getStringType());
            ViewHolder viewHolder=new ViewHolder(tvn,tvv,tvt,Color.WHITE,position);
            rowView.setTag(viewHolder);
            rowView.setOnClickListener(new View.OnClickListener() {
                @Override
                public void onClick(View v) {
                    ViewHolder viewHolder1=(ViewHolder) v.getTag();
                    selectedItem=viewHolder1.position;
                    int color=viewHolder1.color;
                    if(color==Color.WHITE) {
                        appManager.itemSelected(selectedItem);
                        v.setBackgroundColor(Color.GRAY);
                        viewHolder1.color=Color.GRAY;
                        v.setTag(viewHolder1);
                    }else {
                        appManager.itemDeselected();
                        selectedItem=-1;
                        v.setBackgroundColor(Color.WHITE);
                        viewHolder1.color=Color.WHITE;
                        v.setTag(viewHolder1);
                    }
                }
            });
        }else{
            ViewHolder viewHolder=(ViewHolder)rowView.getTag();
            TextView tvn=viewHolder.tvn;
            TextView tvv=viewHolder.tvv;
            TextView tvt=viewHolder.tvt;
            int color=viewHolder.color;
            tvn.setText(sensor.getName());
            tvt.setText(sensor.getStringType());
            tvv.setText(sensor.getVendor());
            viewHolder.position=position;
            rowView.setTag(viewHolder);
            rowView.setBackgroundColor(color);
        }
        return rowView;
    }
}
In the above code, the ListView is designed such that it interacts with the view model by clicking on the desired sensor. The color of the clicked item (sensor) in the screen is changed from white to gray that highlights the item (sensor) is selected. Also, the sensor will be deselected via clicking on the selected item that returns its background color from gray to white.
The designed ListView is inserted into the main layout as follows:
<relativelayout
    android:layout_height="match_parent"
    android:layout_width="match_parent"
    android:paddingbottom="@dimen/activity_vertical_margin"
    android:paddingleft="@dimen/activity_horizontal_margin"
    android:paddingright="@dimen/activity_horizontal_margin"
    android:paddingtop="@dimen/activity_vertical_margin"
    tools:context="com.example.sensormonitoring.MainActivity"
    xmlns:android="http://schemas.android.com/apk/res/android"
    xmlns:tools="http://schemas.android.com/tools">

    <listview
        android:id="@+id/lv"
        android:layout_height="match_parent"
        android:layout_width="match_parent"/>
</relativelayout>
Now the ListView is shown in the next image:

As can be seen, the whole sensors are displayed in the list.
Each item that points to a special sensor can be selected by clicking on its item. The background color of the selected item is changed as shown in the next image:

The selected item will be the desired sensor in the remainder of this article.
Sensor Registering
This subsection describes how the selected sensor is registered in Android. For this purpose, the following Java class is provided:
public class SensorServant {
    public SensorManager sensorManager;
    public Sensor activeSensor;
    public List<Sensor> sensors;
    public AppManager appManager;
    public SensorEventListener sensorEventListener=new SensorEventListener() {
        @Override
        public void onSensorChanged(SensorEvent event) {
            appManager.setData(event.values);
        }

        @Override
        public void onAccuracyChanged(Sensor sensor, int accuracy) {

        }
    };
    public SensorServant(SensorManager sensorManager,
                         List<Sensor> sensors,AppManager appManager){
        this.sensorManager=sensorManager;
        this.sensors=sensors;
        this.appManager=appManager;
    }
    public void setSensor(int index) {
        activeSensor=sensors.get(index);
        sensorManager.registerListener(sensorEventListener,
                      activeSensor,SensorManager.SENSOR_DELAY_NORMAL);
    }

    public void deleteSensor(){
        sensorManager.unregisterListener(sensorEventListener);
    }
}
In the above class, some properties and methods are defined that are described in the following:
- Property
sensorManager: It is one of the Android frameworks which is related to the sensor concepts. - Property
activeSensor: This is aSensorinstance that points to the desired sensor. This property will benullif no sensor is selected. - Property
sensors: It contains the whole built-in sensors of the Android device. - Property
appManager: The manager object that is introduced in the first section.
- Method
setSensor(): TheappManagercalls this sensor when an item is selected in the list view. Through this method, the desired sensor is registered tosensorEvnetListenerthat is implemented in this class. - Method
deleteSnsor(): TheappManagercalls this sensor when the active item is deselected in the list view. In this situation, thesensorEvnetListeneris unregistered.
This class simply registers the desired sensor and measured its signals and sends them to the appManager by evaluating its setData method.
Server-Socket Implementation
This subsection describes how the server socket is developed in the Android app. To follow this aim, some explanatory notes are highly needed to be presented.
First, the server can support multi clients by implementing the following Java class:
public class Server  extends Thread {
    public Socket client;
    public ServerSocket serverSocket;
    public AppManager appManager;
    public Server(AppManager appManager) {
        this.appManager=appManager;
        try {
            serverSocket = new ServerSocket(appManager.port);
        }catch(Exception ex){
            Toast.makeText(appManager.context,ex.getMessage(),Toast.LENGTH_LONG).show();
        }
    }

    @Override
    public void run() {
        try {
            while(1==1) {
                client = serverSocket.accept();
                ServerServant serverServant = new ServerServant(this, client, appManager);
                serverServant.start();
            }
        } catch (Exception e) {
            Toast.makeText(appManager.context,"hI",Toast.LENGTH_LONG).show();
        }
    }
}
The Server class extends the Thread to be capable to support the multi-access property. This class develops a server-socket on a port that is given from the appManager. The server waits for the incoming clients in an ordinary thread that is generated from the appManager. When a client connects, it generates another thread (serverServant) to properly service the client. The serverServant is given here:
public class ServerServant extends Thread {
    public Server server;
    public Socket client;
    public PrintWriter writer;
    public BufferedReader reader;
    public AppManager appManager;
    public ServerServant(Server server,Socket client,AppManager appManager){
        this.server=server;
        this.client=client;
        this.appManager=appManager;
        try {
            writer=new PrintWriter(client.getOutputStream());
            reader=new BufferedReader(new InputStreamReader(client.getInputStream()));
        } catch (Exception e) {

        }
    }

    @Override
    public void run(){
        try {
            String str = reader.readLine();
            while(str.contains("ready")) {
                float[] data = appManager.getData();
                String str1="";
                for (int i = 0; i < data.length; i++) {
                    if(i<data.length-1) {
                        str1 += data[i] + ",";
                    }else{
                        str1+=data[i] + "";
                    }
                }
                int l=str1.length();
                String str2=""+l;
                while(str2.length()<2){
                    str2="0"+str2;
                }
                writer.print(str2);
                writer.flush();
                str=reader.readLine();
                if(!str.contains("ok")){
                    break;
                }
                writer.print(str1);
                writer.flush();
                str=reader.readLine();
            }
            reader.close();
            writer.close();
        }catch(Exception ex){

        }
    }
}
In fact, the above object is another thread that is generated to service the client. Obviously, this object is responsible for sending the measured signals of the desired sensor to the client. A simple protocol is designed for this service that can be easily followed in the above code. First, the client should send "ready" to tell the server about its situation. Then, the object prepares the measured data in a string that are separated by commas. The server firstly sends the length of the string and waits for receiving "ok" to send the string. The protocol continues until one of the mentioned words are not properly received.
Finally, the AppManager is given in the following code block:
public class AppManager {
    private MyAdapter adapter;
    private ListView listView;
    private SensorManager sensorManager;
    private Server server;
    public SensorServant sensorServant;
    private List<Sensor> sensors;
    public int port=50000;
    private float[] data;
    private boolean sendingData=false;
    public Context context;
    public AppManager(Context context,ListView listView){
        sensorManager=(SensorManager)context.getSystemService(context.SENSOR_SERVICE);
        sensors=sensorManager.getSensorList(Sensor.TYPE_ALL);
        adapter=new MyAdapter(context.getApplicationContext(),0,sensors,this);
        this.listView=listView;
        this.context=context;
        listView.setAdapter(adapter);
        sensorServant=new SensorServant(sensorManager,sensors,this);
        server=new Server(this);
        server.start();
    }
    public void itemSelected(int index){
        sensorServant.setSensor(index);
        sendingData=true;
    }
    public void itemDeselected(){
        sensorServant.deleteSensor();
        sendingData=false;
    }
    public void setData(float[] data){
        this.data=data;
    }
    public float[] getData(){
        return data;
    }
}
The app manager initializes the other objects and properly interacts with them as presented in the above code.
Client-Socket Implementation
It is clear that the client is the monitoring device. The client socket is implemented in a Simulink that is presented in the next image:

The main part of the Simulink is the center block which is a mask block with the following interpreted Matlab function as follows:
function ds=monitor(t,IP,port)
global tcp;
if t==0
    tcp=tcpclient(IP,port);
    mysend(tcp,'ready');
    d1=0;d2=0;d3=0;
    ds=[d1;d2;d3];
else
    len=read(tcp,2);
    len=str2double(char(len));
    mysend(tcp,'ok');
    data=read(tcp,len);
    str=char(data);
    ss=textscan(str,'%f,%f,%f');
    ds=[ss{1} ss{2} ss{3}];
    mysend(tcp,'ready');
end
end
The steps of the above code can be easily derived based on the mentioned protocol.
The mask block has the following parameters:

The definitions of the above parameter are obvious.
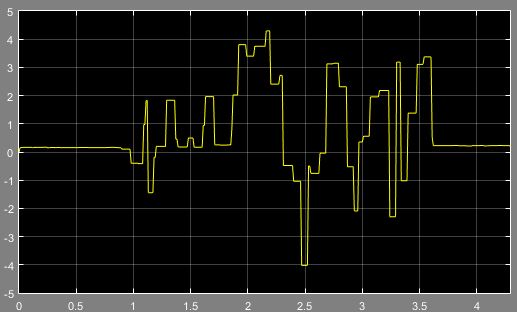
The next images respectively show the accelerometer's x-axis, y-axis, and z-axis signals in the Scopes of the Simulink:


Using the Code
The code can be used in the Simulink file. The advanced mathematical algorithms can use the mask block to follow their objects.
History
- 2nd November, 2020: Initial version