
Complete Guide to Installing / Running Debian Distro via VirtualBox
Try out Linux Debian via Oracle VirtualBox (includes snaphots of every screen for setup)
Background / Introduction
I'm working on a new book, Linux Programming with .NET Core, and I needed a VM running a Linux distro so I could walk through the installation of the .NET Core SDK and Visual Studio Code so I could take snapshots.
While setting it up the VM in VirtualBox, I decided to document this process because there were a couple of confusing parts to getting the VM installed.
Prerequisite: Oracle VirtualBox
Of course you need Oracle VirtualBox. I already had it installed. It's free. You can get it at: https://www.virtualbox.org/^.
It's an easy installation. Just follow the onscreen prompts.
Prerequisite 2: Debian ISO
It was kind of difficult to find a disk image (ISO) for Debian. Well, it was more difficult than I expected.
There were a lot of them listed and some spanned 3 CDs (3 separate ISOs) and I had no idea what I should select. However, I learned that you want the net installation one. I've provided links so you can easily get it.
Debian Download Overview Page
The first link will get you to the overview page with the downloads at the bottom of the page.
Go to https://cdimage.debian.org/debian-cd/current/amd64/iso-cd/.
Link to Net Installation ISO
The second link is a direct link to the ISO that you want.
Get the one named: debian-10.4.0-amd64-netinst.iso
Go ahead and download the ISO and have it ready so we can step through the VirtualBox creation of the new Debian OS.
Start VirtualBox
Start up the VirtualBox software and select the New [button]. This will start the process of creating a new Virtual Machine.

Name Your OS
First thing you have to do is create a name for your new OS.
I simply called mine Debian. This is what will appear in your Oracle VirtualBox window.
After that, I take all of the defaults throughout and they work fine.


Creates a Folder
VirtualBox will create a subfolder under its folders that will contain your virtual hard disk. I simply name this the same name that I use for the OS.

VirtualBox: Powered Off
Once you complete all of that, you will see that the image has been created in the Oracle VirtualBox console.
Go ahead and click the [Start] button.

Now, VirtualBox will prompt you for the location of your ISO. Yours won't be listed the first time so you'll need to click that little folder with the green up arrow and navigate to the location where your debian ISO file is located.
After you do that and it's loaded in the drop list, go ahead and click the [Start] button.

Sidebar
When I did that the first time, I got a strange error that looked like the following:

I got that error because I had Android Studio running and I was running an Android Emulator and my computer and VirtualBox didn't like running two VMs at the same time.
Back to the installation...
I chose Graphical Install.


Things began to load and the system tried to find my network, etc.

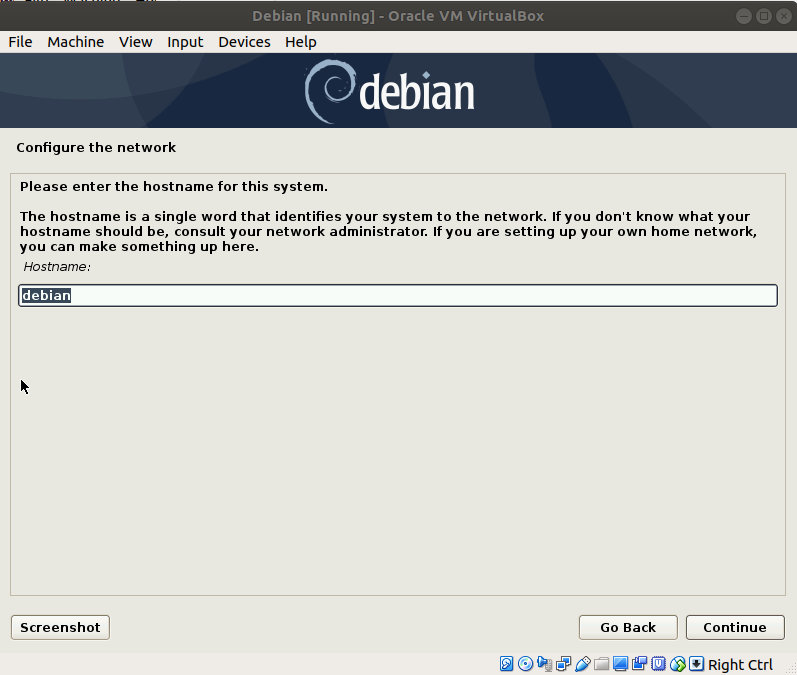
Name Your Host
I named mine debian. I'm a simple person. :)
Name Your Network

Set Root Password & Don't Forget It

Set Up a User Account
This part looks like it has duplicate screen shots, but it doesn't.
I used my user name as a my full name on this first screen. I'm a simple person. :)

UserName Is the Same
I used the same name (raddev) for my username. I'm just a simple person. :)

User Account Password
Set your user account password and don't forget it.


Use Entire Disk
This is the disk in your sandbox that you created that is 8GB to start out and will grow. I was a bit scared about this part, because I'm running Ubuntu and didn't want to accidentally overwrite my real system. There should be no worries here.

Select the Partition
You can see that this is the sandbox disk that you created. No worries. :)

All One Partition

It was a bit scary but just go for it. It'll work.

More Questions About The Disk
It keeps asking so much stuff about disks and partitions, it really gets scary, but it's all fine.

It's Installing
Finally, it's actually installing.

Scan Another CD?
The system thinks you are installing from CD so it asks about that. There is no need to scan another non-existent disk.


Debian Package Manager
This is the location of the servers that Debian will contact to install software from.


No Print Server Needed: You May Need One
I unchecked the print server because I don’t need it for my purposes.

Now It's Really Installing
This is when it takes a while. I’m on an m.2 drive, running a Ryzen 5 2600x 6-core X 2 (12-core) and it took at least 10 or 15 minutes.
Install GRUB Bootloader
This next step was a bit scary to me, because I am running Ubuntu on the machine where I’m running VirtualBox and installing this new Debian image. I was a bit afraid that if I said yes, that the thing would get confused and install on my local drive. No worries though, it works fine and is kept to the sandbox.

More Disk Selection Made Me Nervous
The next option also made me a bit nervous because again I was afraid I was somehow going to accidentally install this over my current system.

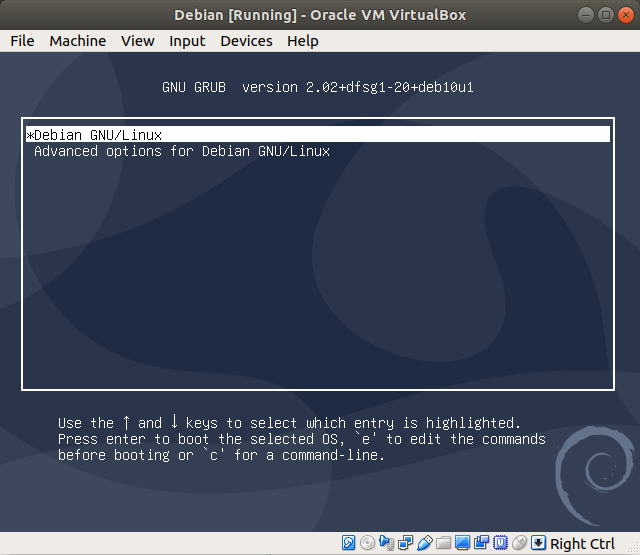
Completion!!

First, you’ll see the grub bootloader and then it’ll start booting into Debian.
Login Screen Appears
Finally, you’ll see the login screen.

Installing Apps: Need Sudo
When you log on and begin to try installing apps, you will find that sudo won’t work and you won’t be able to install things.
Here is the answer to fix that.
Follow the steps in the most upvoted answer -- there isn’t one marked as the official answer but that one has the 5 or 6 steps you’ll need to take.
This is a really cool way to try out Debian and so far I really like the system.
I tried installing an Ubuntu 20.04 image on VirtualBox and couldn’t get it to run. I wonder if it is becoming bloated. I hope not because I run Ubuntu 18.04 and I’m very happy with it.
History
- 30th July, 2020: First published