
Cookie Authentication in .NET Core 3.0
4.65/5 (8 votes)
There are multiple options to do authentication in .NET Core. This article demonstrates how to add cookie based authentication in .NET Core 3.0.
Introduction
Authentication is the process of determining or giving an individual access to system or user based on their identity. There are multiple options to do authentication in .NET Core. This article demonstrates how to add cookie based authentication in .NET Core 3.0.
With .NET Core 3.0, you can use cookie-based authentication out of the box without adding new additional NuGet packages.
Prerequisites
- Install .NET Core 3.0.0 or above SDK from here. Install the latest version of Visual Studio 2019 Community Edition from here.
Steps for Creating a Web Application
- Go to Visual Studio 2019, then select Create new project option from option list:

- After selecting that, a new window will open to select project template.
- Select “ASP.NET Core Web Application” and click on Next button.

- A new screen will open to configure your new project. Provide Project Name, Location, Solution Name as per your requirement. Press Create button.

- After clicking on Create button, a new screen will open to configure your project related information like which environment you want create for web application? .NET Framework or .NET Core. Select .NET Core and ASP.NET Core Version from drop down list. Then, select web application (Model-View-Controller) option from list and press Create button to create a project.

Now our project will open with basic structure of .NET Core environment. You can observe in the Solution Explorer that will have Controllers, Models and Views folders with “Startup.cs” and other files as well like the image below:

- Run your application to check whether the created web application is running fine or not. By default, it will open a Home page (Index page of Home controller) of your project.
Integrate Cookie Authentication
[Authorize]: attribute helps to validate user to an access controller (User Information)Claim: Contained user related information which will be stored into cookieClaimsIdentity: Pass list of claim andAuthenticationTypeClaimsPrincipal: Accept an array ofClaimsIdentitySignInAsync: PassClaimsPrincipleto it as parameter and finally, this method will create a cookie into browser
Startup.cs file Code Changes
- Open “Startup.cs” file and add
AddAuthenticationservice intoConfigureServicesmethod like below. Provide login path to login user to check/verify user is valid or not.public void ConfigureServices(IServiceCollection services) { services.AddAuthentication("CookieAuthentication") .AddCookie("CookieAuthentication", config => { config.Cookie.Name = "UserLoginCookie"; config.LoginPath = "/Login/UserLogin"; }); services.AddControllersWithViews(); } - Add
UseAuthenticationandUseAuthorizationextension method intoConfiguremethod of “Startup.cs”.UseAuthentication: Helps us to check “Who are you?”UseAuthorization: Helps to check “Are you allowed to access an information?” - Complete code in Startup.cs file:
	using System;
	using System.Collections.Generic;
	using System.Linq;
	using System.Threading.Tasks;
	using Microsoft.AspNetCore.Builder;
	using Microsoft.AspNetCore.Hosting;
	using Microsoft.AspNetCore.HttpsPolicy;
	using Microsoft.Extensions.Configuration;
	using Microsoft.Extensions.DependencyInjection;
	using Microsoft.Extensions.Hosting;

	namespace CookieAuthenticationDemo
	{
	    public class Startup
	    {
	        public Startup(IConfiguration configuration)
	        {
	            Configuration = configuration;
	        }

	        public IConfiguration Configuration { get; }

	        // This method gets called by the runtime.
            // Use this method to add services to the container.
	        public void ConfigureServices(IServiceCollection services)
	        {
	            services.AddAuthentication("CookieAuthentication")
	                 .AddCookie("CookieAuthentication", config =>
	                 {
	                     config.Cookie.Name = "UserLoginCookie";
	                     config.LoginPath = "/Login/UserLogin";
	                 });

	            services.AddControllersWithViews();
	        }

	        // This method gets called by the runtime.
            // Use this method to configure the HTTP request pipeline.
	        public void Configure(IApplicationBuilder app, IWebHostEnvironment env)
	        {
	            if (env.IsDevelopment())
	            {
	                app.UseDeveloperExceptionPage();
	            }
	            else
	            {
	                app.UseExceptionHandler("/Home/Error");
	                // The default HSTS value is 30 days.
	                // You may want to change this for production scenarios,
                    // see https://aka.ms/aspnetcore-hsts.
	                app.UseHsts();
	            }
	            app.UseHttpsRedirection();
	            app.UseStaticFiles();

	            app.UseRouting();

	            // who are you?
	            app.UseAuthentication();

	            // are you allowed?
	            app.UseAuthorization();

	            app.UseEndpoints(endpoints =>
	            {
	                endpoints.MapControllerRoute(
	                    name: "default",
	                    pattern: "{controller=Home}/{action=Index}/{id?}");
	            });
	        }
	    }
	}
Add User.cs File into Model Folder
Add new class into Models folder with name Users and put the below lines of code into it:
	using System.Collections.Generic;

	namespace CookieAuthenticationDemo.Models
	{
	    public class Users
	    {
	        public int Id { get; set; }
	        public string UserName { get; set; }
	        public string Name { get; set; }
	        public string EmailId { get; set; }
	        public string Password { get; set; }

	        public IEnumerable<Users> GetUsers()
	        {
	            return new List<Users>() { new Users
	            { Id = 101, UserName = "anet", Name = "Anet",
	            EmailId = "anet@test.com", Password = "anet123" } };
	        }
	    }
	}
Update HomeController with New Action Method
HomeController is the default controller created by Visual Studio while creating a new project.
- Add a new action method into
HomeControllerto get list of users withAuthorizeattribute.using CookieAuthenticationDemo.Models; using Microsoft.AspNetCore.Authorization; using Microsoft.AspNetCore.Mvc; namespace CookieAuthenticationDemo.Controllers { public class HomeController : Controller { public IActionResult Index() { return View(); } [Authorize] public ActionResult Users() { var uses = new Users(); return View(uses.GetUsers()); } } } - Add view for Users:
- Go to Views folder and select Home folder
- Right click on the Home folder to select add option and select view.
- A window popup will open to add View.
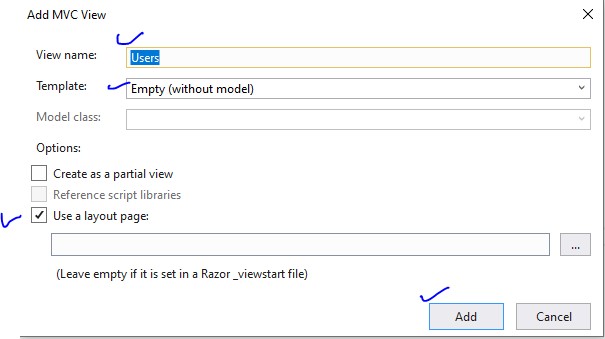
- Provide View name as User, select Template as Empty, select Use a layout page and press Add button. A new Users.cshtml file will create into Home folder. Refer to the image below to add view:
Put the below lines of code into it to show list of users:
	@model IEnumerable<CookieAuthenticationDemo.Models.Users>

	@{
	    ViewData["Title"] = "Users";
	}

	<h1>Users</h1>
	<table class="table">
	    <thead>
	        <tr>
	            <th>
	                @Html.DisplayNameFor(model => model.Id)
	            </th>
	            <th>
	                @Html.DisplayNameFor(model => model.UserName)
	            </th>
	            <th>
	                @Html.DisplayNameFor(model => model.Name)
	            </th>
	            <th>
	                @Html.DisplayNameFor(model => model.EmailId)
	            </th>
	            <th></th>
	        </tr>
	    </thead>
	    <tbody>
	@foreach (var item in Model) {
	        <tr>
	            <td>
	                @Html.DisplayFor(modelItem => item.Id)
	            </td>
	            <td>
	                @Html.DisplayFor(modelItem => item.UserName)
	            </td>
	            <td>
	                @Html.DisplayFor(modelItem => item.Name)
	            </td>
	            <td>
	                @Html.DisplayFor(modelItem => item.EmailId)
	            </td>
	        </tr>
	}
	    </tbody>
	</table>
Add New Controller With Name Login
- Right click on controllers folder
- Select Add, then select Controller and then select MVC empty controller and click on Add button.
- Add controller with name Login as “LoginController”
- Add the below code into that controller:
using CookieAuthenticationDemo.Models; using Microsoft.AspNetCore.Authentication; using Microsoft.AspNetCore.Mvc; using System.Collections.Generic; using System.Linq; using System.Security.Claims; namespace CookieAuthenticationDemo.Controllers { public class LoginController : Controller { [HttpGet] public ActionResult UserLogin() { return View(); } [HttpPost] public ActionResult UserLogin([Bind] Users user) { // username = anet var users = new Users(); var allUsers = users.GetUsers().FirstOrDefault(); if (users.GetUsers().Any(u => u.UserName == user.UserName )) { var userClaims = new List<Claim>() { new Claim(ClaimTypes.Name, user.UserName), new Claim(ClaimTypes.Email, "anet@test.com"), }; var grandmaIdentity = new ClaimsIdentity(userClaims, "User Identity"); var userPrincipal = new ClaimsPrincipal(new[] { grandmaIdentity }); HttpContext.SignInAsync(userPrincipal); return RedirectToAction("Index", "Home"); } return View(user); } } } - Add a
UserLogin.cshtml(UserLogin view)page:- Add new folder into Views folder with name
User. - Add
UserLogininto User folder and add the below lines of code into it to user login:Code for UserLogin.cshtml:
@model CookieAuthenticationDemo.Models.Users

	@{
	    ViewData["Title"] = "User Login";
	}

	<hr />
	<div class="row">
	    <div class="col-md-4">
	        <form asp-action="UserLogin">
	            <h2>User Login</h2>
	            <div asp-validation-summary="ModelOnly" class="text-danger"></div>
	            <div class="form-group">
	                <label asp-for="UserName" class="control-label"></label>
	                <input asp-for="UserName" class="form-control" />
	                <span asp-validation-for="UserName" class="text-danger"></span>
	            </div>
	            <div class="form-group">
	                <label asp-for="Password" class="control-label"></label>
	                <input type="password" asp-for="Password"
                     class="form-control" />
	                <span asp-validation-for="Password" class="text-danger"></span>
	            </div>
	            <div class="form-group">
	                <input type="submit" value="Login"
                     class="btn btn-default btn-primary" />
	            </div>
	        </form>
	    </div>
	</div>
- Add new folder into Views folder with name
Update _Layout.cshtml Page
Update _Layout.cshtml page to add new tab/hyperlink to get list of users.
Code for _Layout.cshtml is as follows:
	<!DOCTYPE html>
	<html lang="en">
	<head>
	    <meta charset="utf-8" />
	    <meta name="viewport"
	    content="width=device-width, initial-scale=1.0" />
	    <title>@ViewData["Title"] - CookieAuthenticationDemo</title>
	    <link rel="stylesheet"
	    href="~/lib/bootstrap/dist/css/bootstrap.min.css" />
	    <link rel="stylesheet" href="~/css/site.css" />
	</head>
	<body>
	    <header>
	        <nav class="navbar navbar-expand-sm
	        navbar-toggleable-sm navbar-light bg-white border-bottom box-shadow mb-3">
	            <div class="container">
	                <a class="navbar-brand" asp-area=""
	                asp-controller="Home"
	                asp-action="Index">CookieAuthenticationDemo</a>
	                <button class="navbar-toggler" type="button"
	                data-toggle="collapse"
	                data-target=".navbar-collapse"
	                aria-controls="navbarSupportedContent"
	                        aria-expanded="false" aria-label="Toggle navigation">
	                    <span class="navbar-toggler-icon"></span>
	                </button>
	                <div class="navbar-collapse
	                collapse d-sm-inline-flex flex-sm-row-reverse">
	                    <ul class="navbar-nav flex-grow-1">
	                        <li class="nav-item">
	                            <a class="nav-link text-dark"
	                            asp-area="" asp-controller="Home"
	                            asp-action="Index">Home</a>
	                        </li>
	                        <li class="nav-item">
	                            <a class="nav-link text-dark"
	                            asp-area="" asp-controller="Home"
	                            asp-action="Users">Users</a>
	                        </li>
	                    </ul>
	                </div>
	            </div>
	        </nav>
	    </header>
	    <div class="container">
	        <main role="main" class="pb-3">
	            @RenderBody()
	        </main>
	    </div>

	    <footer class="border-top footer text-muted">
	        <div class="container">
	            © 2020 - CookieAuthenticationDemo - <a asp-area=""
	            asp-controller="Home" asp-action="Privacy">Privacy</a>
	        </div>
	    </footer>
	    <script src="~/lib/jquery/dist/jquery.min.js"></script>
	    <script src="~/lib/bootstrap/dist/js/bootstrap.bundle.min.js"></script>
	    <script src="~/js/site.js" asp-append-version="true"></script>
	    @RenderSection("Scripts", required: false)
	</body>
	</html>
Run Your Application
After successfully running your application, output of your application should be like the screen below:

Click on Users tab to get list of users, it will open a login page to login a user.
Question: Why will it ask for login?
Answer: [Authorize] attribute restricts to access data/information for unauthorized requests and redirects to login page to check whether user is valid or not. In our case, we have added this attribute over the Users action method of HomeController.

Provide username and password to login. After login, it will create a cookie in the browser like below:

Click on the Users tab again and now you can find the final result of user list without asking for login screen.

To test your cookie based authentication, you can delete that created cookie from browser and click on the Users tab. It will ask for login again.
Summary
In this article, I discussed how to add cookie based authentication in .NET Core 3.0. We have also created a user login form to login a user to our application to access useful information. Please find the attached code for better understanding.
History
- 14th January, 2020: Initial version