
Creating Pipeline Using Microsoft Azure DevOps
This article takes us to a journey of implementing a pipeline using Azure DevOps.
Introduction
This article aims to illustrate the proper guidance towards achieving continuous integration and continuous delivery through Microsoft Azure DevOps. We will try to cover many insights through a real case study as a case study can help in implicitly drawing our roadmap. Let us start!
Case Study
Suppose we have a large solution. This solution includes the below .NET Core projects:
- API project
- Web project (MVC)
- A number of class library projects
- Unit test project (class library)
- Integration test project (class library)
- SPA project (Angular 7)
Solution Dependencies
Regarding the dependencies, we need a specific version of “.NET Core SDK” (2.2.0 in our case). Of course, the mentioned projects may rely on some external packages. What if the mentioned projects have some dependencies on some NuGet packages? Actually, this is not a big deal. But what if those projects have dependencies on some additional packages packaged on our own server? This needs some special handling.
We ended up with the below dependencies:
- .NET Core SDK 2.2.0
- Traditional NuGet packages
- Special packages packaged on our own TFS server
Note: For the sake of keeping our process organized, creating two build definitions (Backend, SPA) is recommended.
Continuous Integration
Here is an extract from thought works
Continuous Integration (CI) is a development practice that requires developers to integrate code into a shared repository several times a day. Each check-in is then verified by an automated build, allowing teams to detect problems early. By integrating regularly, you can detect errors quickly, and locate them more easily.
Creating a Build Definition (Backend)
We will access the TFS through the web browser and then to the target project. We will select builds from the pipeline section in the sidebar menu and from “New”, we will select “New build pipeline”.

Select a Source
It makes sense that the first step is to tell our build definition the place where our source code is located. In our case, the source code is located in the TFS Git so, we will select “User the classic editor” then, “Azure Repos Git”. Also, we will identify the other needed options (Team project, Repository, the target branch). Finally, we will hit continue.

Select a Template
TFS can provide many ready-made templates. Actually, this can eliminate the effort of creating each task for the build definition. But I prefer creating each task to get as much knowledge as possible. So, we will start with an empty job.

Using NuGet Tool Installer
Installing the packages can be accomplished by using “NuGet.exe”. By adding the “NuGet Tool Installer” task, we can use NuGet.exe to install the NuGet packages. It doesn’t matter which version we will use as we are enabling Always download the latest matching version.

Restoring NuGet Packages
After adding the NuGet Tool Installer task, we can imagine that we are about to write the proper command to install our packages against the directory of the .sln file. Imagination is enough here as the NuGet task will handle the rest of the needed actions :). Let us add the NuGet task along with the below configurations:
- Command: restore
- Path to solution, packages.config, or project.json: This can be either the physical path of the .sln file or expression indicating any .sln extension. We will use the **\*.sln expression.
- Feeds to use: As we have mentioned, some of our packages are packaged in NuGet.org and the other packages are packaged in our own TFS server. To handle this case, we will wrap all the endpoints of the needed packages in NuGet.config file and let the NuGet task use only those endpoints during the restore process.

Note: We have to have a NuGet.config file located in our repository.
<configuration>
  <config>
    <add key="repositoryPath" value=".\packages" />
  </config>
  <packageSources>
    <add key="nuget" value="https://api.nuget.org/v3/index.json" />
    <add key="server1" value="http://server1.domain.com/nuget" />
  </packageSources>
</configuration>
Building the Solution
Now, all the needed dependencies are ready and our solution can be built seamlessly. Building the solution is a necessary task to ensure that all the dependencies are loaded correctly. Moreover, we cannot execute any further tasks - e.g., unit test - unless we guarantee the successful build. So, let us add a .NET core task.

Afterwards, we have to specify the below configurations:
- Command: build
- Path to project(s): **\*.sln
- Arguments: --configuration Release

Executing Unit Test
Ensuring a successful unit test is mandatory. And as we have mentioned, we have two test projects (Unit test, Integration test). We will add a “.NET Core” task to execute all the test cases that are included in the two projects.

Configurations will be as follows:
- Command: test
- Path to project(s):
- **\*Project.UnitTest*.csproj
- **\* Project.IntegrationTest*.csproj
Publish
A successful unit test is a green light to proceed to the publish step. We will add a “.NET Core” task to publish the API and MVC projects.

Configurations will be as follows:
- Command: publish
- Path to Project(s): **/Project.Api.csproj
- Arguments:
-c $(BuildConfiguration) -o $(Build.StagingDirectory) --no-build
The same configurations will be for the MVC project except the path to project(s) as the value will be **/Project.MVC.csproj.
Pre-defined Variables
We noticed in the Arguments configuration item that we used $(BuildConfiguration). This is a pre-defined variable. What is that variable and what is the benefit of using it? The below can give the proper answers to those questions and to many other questions too.
Archive the Publish Result
Archive each publish files as those archives will be used to get an artifact for each component. We will add two Archive Files task for both the API and MVC projects.

The same configuration will be for the MVC project except the Archive file to create as the value will be $(Build.ArtifactStagingDirectory)/Project.MVC.zip.
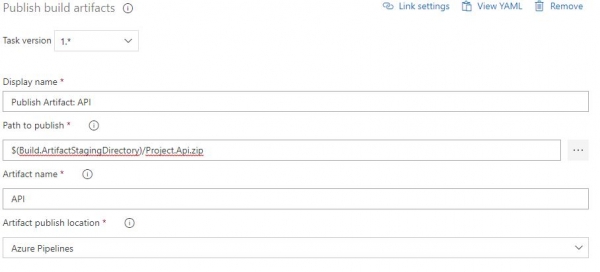
Publish Artifacts
We are about to finish our build definition for the backend. This is all about continuous integration. The next step is shipping the artifacts to the proper environment. So, we have to configure artifact for each archived publish so that the release definition can access them and take over the deployment process. We will add a task of “Publish Build Artifacts” type for both the API and MVC.
Configurations will be as follows:
- Path to publish: $(Build.ArtifactStagingDirectory)/Project.Api.zip
- Artifact name: API
The same configuration will be for the MVC project except the Path to publish as the value will be $(Build.ArtifactStagingDirectory)/Project.MVC.zip.
Build Definition (Front-end)
Remember, creating two build definitions is just for keeping our process organized and this is subject to be changed as per every solution topology.
Angular Environment Configurations
Every application has configurations and Angular is no exception. Actually, Angular is handling the configuration for each environment in a smart way as it introduces an environment.ts file for each environment and lets you choose which environment can be used while generating the deployment package. More details about the environment setup in Angular can be found here.
Create Build Definition (Front-end)
We will create a build definition that includes the below tasks:
- Install the packages from package.json file (
npm install). - Build the project (
npm build) to get the publish files. - Artifact the published files.
Installing Angular Packages
For installing the packages, we simply need to run npm install command against the directory that contains the package.json file. We will add “npm” task.

Configurations will be as follows:
- Command: custom
- Working folder with package.json: Project.SPA
- Command and arguments: run testing-build
Note: testing-build command must be included in the package.json file and for the rest of the environment, e.g., production, a new command will be added.

Publishing Angular Artifacts
We will add a task of Publish Build Artifacts type for the Angular project.

Enabling Continuous Integration
We need to add one more configuration to run the build definitions after every commit operation to our repository. This can be done by enabling continuous integration in the Triggers tab for the needed branches.

Continuous Delivery
Here is an extract from Wikipedia:
It is a software engineering approach in which teams produce software in short cycles, ensuring that the software can be reliably released at any time and, when releasing the software, doing so manually. It aims at building, testing, and releasing software with greater speed and frequency. The approach helps reduce the cost, time, and risk of delivering changes by allowing for more incremental updates to applications in production. A straightforward and repeatable deployment process is important for continuous delivery.
Creating Release Definition (Backend)
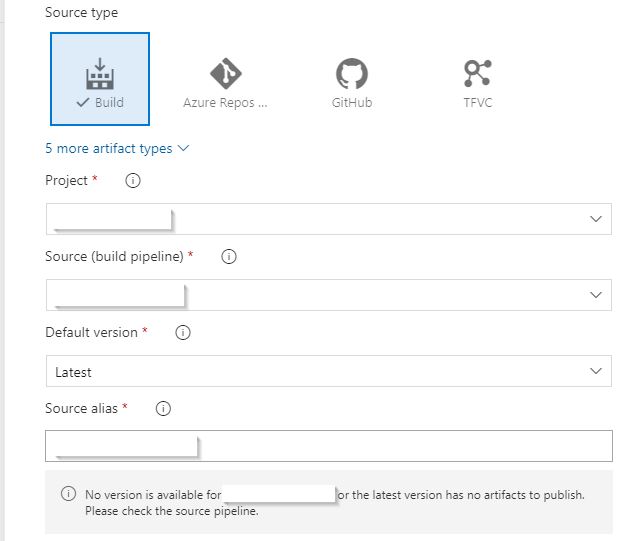
Executing the build definition produces an artifact that can be deployed. Our mission is to create a release definition and link it to the build definition. Once the build definition finishes, the release definition will automatically run and will deploy all the produced artifacts to the configured environment. To create a release definition, we will open TFS from the web browser and navigate to releases in the sidebar menu, then hit create a “New pipeline”. Similar to the build definition, we will start with an empty job. For the environment name, we will type API-Test. Also, we need to add an artifact. This is for determining from which build definition we will get the artifacts. So, we will hit Add artifact and for the Source (Build definition), we will select the backend build definition which we have created, then we will hit the “Add” button.
Now, let us configure the API-Test task. We will select API-Test from the Tasks menu.

Unzip the Artifacts
Back to the build definition which we have created, we have archived the published projects. Each project is corresponding to a .zip file. In the release definition, we will simply need to unzip the archived file, then copy the files to the target directory of the deployed website on the server. The configuration for this task will be as follows:
- Path to the zip file: $(System.DefaultWorkingDirectory)/{BuildDefinitionName}/API/Project.Api.zip
- Path to folder: $(System.DefaultWorkingDirectory)/{BuildDefinitionName}/API/Project.Api
Deploy the API Artifacts
After unzipping the archived files, we will copy those files to the target directory in the target server. We will add a "Windows Machine File Copy" task. The configuration for this task will be as follows:
- Source: $(System.DefaultWorkingDirectory)/{BuildDefinitionName}/API/Project.Api
- Machines: server IP
- Admin Login: Administrator login for the target machine.
- Password: $(E) Administrator password. It is recommended to access it from a secret variable.
- Destination Folder: The directory of the website on the server.
Creating Secret Variable
We will navigate to the variables menu, then add a new variable. Give a name for the variable and add the value, then change its type to a secret variable. Any variable can be accessed by following that pattern $(variable).

Creating Environmental appsettings.json
No doubt that application configurations are subject to be changed for each environment. For example, the value of the database connection string in the test environment differs from the value in the pre-production environment and for the production environment as well. This is can be for any other configurations (API endpoints, credentials, … etc.). We can create appsettings for each environment simply from the Visual Studio by adding a new solution configuration from Build -> Configuration Manager. We will name this configuration “Test” then, press right-click on the appsettings.json, then select “Add Config Transforms”. A new appsettings.Testing.json file will be created under the original appsettings.json file. For the web.config, we will do the same.

Now, after having the needed configuration files, we have to configure our package to use the proper appsettings.json file (appsettings.Testing.json in our case) at run time. We can do that by applying the following:
- Add the environment variable in the
aspNetCoresection of the web.config for the “ASPNETCORE_ENVIRONMENT” with “Testing” value. This step needs setting an environment variable on the testing server. - The previous step will help the “
ConfigureServices” to determine which appsettings file will be used.
Note: You may need to install Configuration Transform Visual Studio extension to be able to use “Add Config Transforms”. This extension may unload the project after generating the config files. Undoing the changes on the .csproj and reloading the project will solve this issue.
Environment Configuration Handling
We ended up with the below:
- We have two appsettings.json files (appsettings.Testing.json, appsettings.json).
- We have two web.config files (web.Testing.config, web.config).
- Each configuration file from the above-mentioned files corresponds to a server configuration. Our mission is to write a power shell script to handle the below. We can execute a power shell script by adding “Run Inline PowerShell” task.
- For the appsetting.json file, we will use the appsettings.Testing.json file. It means that no other files should be included. So, simply we will delete all the other appsettings files.
- For the web.config file, we have to use the configurations of the web.Testing.config. We can delete the default web.config file and rename the web.Testing.config file to be web.config.
cd {website directory}
Remove-Item web.config
Remove-Item appsettings.json
Get-Item web.Testing.config | Rename-Item -NewName($_.Name -replace '\.Testing','')
For the MVC project, an additional task will be added linked to the build definition of the back end and it will be similar to the task of the API project.
Creating Release Definition (Front-end)
We will follow the same approach of the release definition in the back-end for creating another one for the front-end. Of course, the Source alias will differ as it will be linked to the front-end build definition. Also, the task name can be front-end. We will navigate to the front-end task and add the needed tasks to handle the deployment of the produced artifact. We will simply need only one task to copy the artifact to the target directory of the website. A “Windows File Copy” task will be added to copy the front-end artifact to the target directory in the target server. Of course, this is similar to what we have done in deploying the back-end artifacts section but with some differences. Those differences are in the "Windows Machine File Copy" task and they are as below:
- Source: $(System.DefaultWorkingDirectory)/{BuildDefinitionName}/dist/Project.SPA
Summary
Creating a pipeline is really interesting. It gave us the opportunity to experience many technical aspects - restoring solution packages from multiple servers, handling environment configuration files, writing Powershell scripts, packaging and deploy websites with respect to each project type, dealing with build/release definition tasks, and many other aspects. Also remember, DevOps is about many and many concepts and it always quoted that "DevOps needs real software engineers".
History
- 30th November, 2019: Initial version