
Bring Your Existing Application to the Microsoft Store
3.74/5 (7 votes)
Bring your existing WPF and Winform application to the Microsoft Store
Table of Contents
- Introduction
- Reserve your App Name
- AppData Path
- Asset
- Desktop App Converter
- MSIX Packaging Tool
- App Certification
Introduction
In mid 2016, Microsoft introduced Desktop Bridge as a way to package a legacy Win32 application to be distributed in the Microsoft Store. The Win32 application running under this mode has access to UWP APIs. In this article, we are going to look at how to package the application with Desktop App Converter and MSIX Packaging Tool and certify the app with the App Certification, all of which you can download for free in the Microsoft Store. Desktop App Converter has been superceded by MSIX Packaging Tool in late 2018. The former is a commandline tool while the latter is a GUI tool. Both have their own pros and cons. As with commandline, the same command can be copied and pasted directly into command prompt and easily automated with a build script but with a GUI, options and information have to be retyped in UI every single time.
All the know-hows in this article have been gathered while I was submitting my slideshow app. The app is WPF application with its DirectX and video encoding backend written in C++. The WPF does pinvoke to call the C++ code. I have open-sourced the video encoder used in the app in the 2 articles below:
Without further waiting, let us begin.
Reserve Your App Name
If you are serious about submitting your app to MS Store, head over to dev.windows.com to register a developer account for yourself. You can choose between individual or corporate account. The former costs $24 while the latter costs $120. The reason for a price is to filter those who are toying with the idea vs those with a strong intention to see this to the end. You can reserve your app name for a maximum of 3 months. It isn't clear that upon expiration and if the app is still not submitted, whether you can reserve the same name again.
AppData Path
UWP apps have their own AppData folder, separate from the usual Win32 application. It is recommended to detect the UWP mode and change the AppData path programmatically. Below is the usual Win32 AppData for my app, Mandy Frenzy. When the UWP app gets uninstalled, its corresponding AppData folder gets wiped out.
C:\Users\{username}\AppData\Local\MandyFrenzy
This is the UWP AppData. Please note that there is no need to append your app name because the path is already your app path.
C:\Users\{username}\AppData\Local\Packages\xxxxMandyFrenzy_xxxxxxxx\LocalState
To detect UWP mode, install the nuget package: DesktopBridge.Helpers. The UWP detection code is below.
DesktopBridge.Helpers helper = new DesktopBridge.Helpers();
if (helper.IsRunningAsUwp())
{ // do your UWP specific work here }
To get UWP AppData path, add a library reference to C:\Program Files (x86)\Windows Kits\10\UnionMetadata\10.0.17763.0\Windows.winmd. Note: Your actual path may vary from mine depending on which and where Windows SDK is installed. Windows.winmd does not contain code, only metadata about UWP classes and APIs. Every time your application is built in Visual Studio, Windows.winmd will be copied to the output. Before using the app packaging tool or app certification tool, remove Windows.winmd from your output folder. This is how you access the AppData path.
string appLocalFolder = Windows.Storage.ApplicationData.Current.LocalFolder.Path;
Asset
Because your UWP is running in sandbox, all your resource like images and shaders that are in relative to executable path cannot be loaded, though it loads the DLLs fine. The most reliable method is to embed all your resources. You can programmatically get your installed path with the code below and append your resource path to get your resource loaded. It is highly unreliable, it sometimes works, sometimes, your app is barred from its own windows package folder, especially if your app is signed with a valid certificate.
string appFolder = Windows.ApplicationModel.Package.Current.InstalledLocation.Path;
Embed Your Resource
As discussed in the previous section, it is highly advisable to embed your image resource used by your WPF or Winform application by changing the Build Action to Embedded Resource and set Copy to Output Directory to Do not copy, so that those image files won't accidentally get picked up by the installer or Desktop App Converter(DAC) mentioned in the later section.

Inline Your OpenGL Shader
It is possible to inline the OpenGL shader code inside the C++ source file with C++ 11 raw string literals, to avoid saving and opening the shader from text file. Below are vertex and pixel shader of OpenGL 2.0.
const char* vert_shader = R"vert(uniform mat4 WorldViewProjection;
attribute vec3 a_position;
attribute vec2 a_texCoord;
varying vec2 v_texCoord;
void main()
{
    gl_Position = WorldViewProjection * vec4(a_position, 1.0);
    v_texCoord = a_texCoord;
})vert";

const char* frag_shader = R"frag(varying vec2 v_texCoord;
uniform sampler2D s_texture;
void main()
{
    vec4 color = texture2D( s_texture, v_texCoord );
    float alpha = clamp(1.0-color.r, 0.0, 1.0);
    if(v_texCoord.y <= 0.02)
        alpha = 0.0;
    color = vec4(0.0,0.0,0.0,alpha);
    gl_FragColor = color;
})frag";
Inline Your DirectX Shader
It is possible to specify in the Visual Studio to compile, generate and save the DirectX shader binary code in a global array in a header. You can access the array by including the header. The filename is prefixed with g_ to form the array variable. My shader, in this case, a pixel shader, is called BackgroundPS, so the generated header and variable is BackgroundPS.h and g_BackgroundPS respectively.

This is the way to create the g_BackgroundPS shader with ID3D11Device2::CreatePixelShader().
#include "BackgroundPS.h"

// The g_BackgroundPS defined in BackgroundPS.h,
// contains the pixel shader. g_BackgroundPS is binary byte array.

Microsoft::WRL::ComPtr<ID3D11PixelShader> pixelShader;
device->CreatePixelShader(g_BackgroundPS, sizeof(g_BackgroundPS),
nullptr, pixelShader.ReleaseAndGetAddressOf())
Desktop App Converter
Get Desktop App Converter(DAC) from the Microsoft Store and run it with administrator rights. We'll use DAC on our application folder. DAC can also be used on installer and bootstrapper but for my case, my app is new and does not have an existing installer. For that installer example, we use MSIX Packaging Tool(MPT) instead. MPT is the recommended tool for making app package. We use DAC because it enables us to install the app with a self-signed certificate which MPT cannot do. The commandline switches are self-explanatory below. -MakeAppx means to make an appx installer and -Sign is to generate a self-signed certificate and digitally sign the appx with it.
DesktopAppConverter.exe -Installer [Application folder] -AppExecutable [Executable Name]
-Destination [Destination Folder] -PackageName [App Package Name]
-Publisher [Publisher Name] -Version [App Version] -MakeAppx -Sign
Below is the example of how I used the DAC, together with its result output.
PS C:\WINDOWS\System32> DesktopAppConverter.exe -Installer D:\MandyFrenzyApp\Release\
-AppExecutable MandyFrenzy.exe -Destination D:\Output -PackageName "MandyFrenzyApp"
-Publisher "CN=WongShaoVoon" -Version 1.0.0.0 -MakeAppx -Sign

0
Output Paths:

Name                           Value
----                           -----
PackageFilesPath               D:\Output\MandyFrenzyApp\PackageFiles
MSIXPackageFilesPath
LogFilesPath                   D:\Output\MandyFrenzyApp\logs
CertPath                       D:\Output\MandyFrenzyApp\auto-generated.cer
AppxPackageFilesPath
PackagePath                    D:\Output\MandyFrenzyApp\MandyFrenzyApp.appx
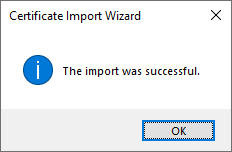
If DAC outputs 0, it means okay. Before we are off to install the app to test how well it runs, we have to install the self-signed certificate. Follow the instructions to install the certificate. Right click on the auto-generated.cer in the File Explorer to bring up the context-sensitive menu and click on Install Certificate.

Certificate Import Wizard comes up. Select the Local Machine option. Click Next.

Select the Place all certificates in the following store option. Browse to select the Trusted People.

Review the settings and click Finish.

You'll see the import was successful.
Now you can install your application under the MS Store and have fun and see if anything breaks.
MSIX Packaging Tool
MSIX Packaging Tool (MPT) is the officially recommended tool to package the Win32 application by Microsoft. In this section, we'll demonstrate app packaging using MPT. One glaring downside of MPT is that it can only package an application that already comes with an installer. If your application is new, as in my case, it does not have a existing installer; you have no choice but to make an installer in order for this tool to make a MSIX installer for MS Store. MSIX Packaging Tool can be downloaded for free from MS Store. It requires the Windows 10 version to be at least 1809, else it just installs but won't execute. I tried to update my Windows from 1803 to 1809 but that is not an option, I can only update to the latest 1903 (as of this article writing). Let's get started by running the MPT. Please disable your antivirus protection beforehand to prevent unintended intervention. We'll see this welcome screen with 3 options. Please click on the "Create your app package" to proceed.

On this Create new package page, input the path of your installer or bootstrapper. Enter installer arguments as '/q'. Specify your certificate to sign if you have any. If your MSIX is not digitally signed, Windows won't allow it to be installed. The funny thing here is that to submit your app to the Microsoft Store, your MSIX installer does not have to be digitally signed.

On the 3rd page, we have the option of creating the package on this computer, remote computer or local virtual machine. We'll go with the 1st option. Remember at this point to first uninstall your application if it is already installed on this PC.

On the 4th page, we enter the package information. You can enter any Publisher name if you haven't specified a digital certificate on the 2nd page. You can see that I just entered Package name and Publisher name as shown because I am not going to submit this package. Microsoft generated a Package name and Publisher name, prepended and appended with randomly characters whenever you reserve the app name and during developer account registration. For a real submission, you have to use that Package name and Publisher name, else the submission will fail. The problem is with a digital certificate, you cannot alter the Publisher name(greyed out), it defaults to the one, in the certificate, which is not aligned to the one Microsoft gives you.

On the 5th page, we have to wait a while for the tool to detect if its driver is installed and Windows update is not running. You can disable Windows search by checking it and click the Disable selected button.

On this page, no entry point is displayed. It is a no-go. The entry point is your executable path. It could be for 2 reasons that your executable was not detected; first, your application is not uninstalled prior to running this tool and second is your anti-virus(AV) interferes with the installer operation, so disable AV temporarily. Clicking the Refresh list and Browse... does not help the situation. You have to restart the tool and key in all the information again. Clicking the Previous button does not solve or rerun the packaging.

If your tool runs successfully to completion, you see your executable as the entry point.

Clicking the Next button asks you whether you are done. Click Yes, move one if all your entry points are already detected.

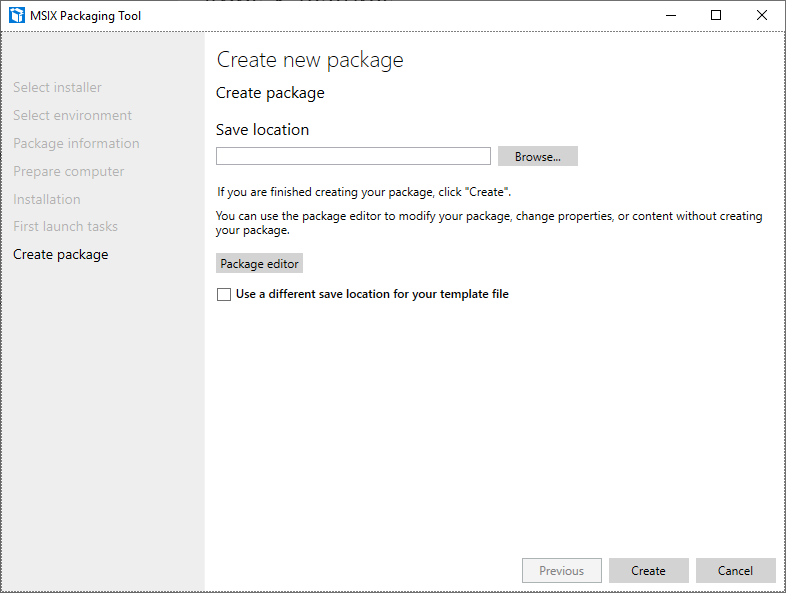
Now, the package is ready to be saved. Browse to your save location to save the package. You can click the Package editor to open up the package XML file in Notepad to edit some information. For my app, I just change the processor architecture from x64 to x86. Not sure why it isn't detected correctly.
Now the package is completed, you can install to test it or submit to the application. To increase your chance of successful submission, you have to do one more step which is app certification! That's the next section which is also the last section of this article.
App Certification
App Certification Tool comes with the Windows SDK which is installed by the Visual Studio. Make sure your app is built in release mode and Windows.winmd is not present in your application folder. Run your commandline prompt with administrator rights.
"C:\Program Files (x86)\Windows Kits\10\App Certification Kit\"
Reset the tool before using.
appcert.exe reset
The command argument can be as follows. Change directory to your app location.
appcert.exe test -packagefullname [package full name] -reportoutputpath [report file name]
This is an example of my commandline:
"C:\Program Files (x86)\Windows Kits\10\App Certification Kit\appcert.exe" test
-packagefullname MandyFrenzyApp -reportoutputpath c:\temp\test_report.xml
Open up the XML result file and check OVERALL_RESULT is PASS or FAIL. If it is PASS, congratulations. If not, narrow down the cause by searching for FAIL further down in the XML. Failure could have more than 1 cause. Some failure do not affect final result when OPTIONAL="TRUE". If you got this following error: "The App Package Manifest should have valid resources defined in the resources.pri file, as per the App Packaging Specification and App Manifest Schema.", it is normal because I have this as well and this error is only valid for UWP, not my app which is written in WPF and there is no way for me to generate the resources.pri to pass this test. I still went on ahead to submit my app and it got accepted.
History
- 22nd July, 2019: Initial version