
Image Classification: Face Detection and Identification using Azure Face API Cognitive Service
4.99/5 (26 votes)
Face recognition and detection using modern AI based Azure cognitive service
Table of Contents
- Preface
- Introduction
- Azure
- Azure Functions and Serverless Computing
- Azure Account Setup
- Face API
- Creating the Face API on Azure Portal
- Testing the Face API
- Face API SDK
- Face Identification
- Face Classification App
- Conclusion
- References
- Code
- History
Preface
This article is the submission for CodeProject’s Image Classification Challenge. The contest officially began on May 1st, 2019 and ended on June 28th, 2019.
This article is a complete end to end tutorial that will explain the concept of face recognition and face detection using modern AI based Azure cognitive service, i.e., Azure’s Face API service.
Introduction
With the world changing at a rapid pace in the technology space, we see ourselves surrounded by machine learning and artificial intelligence. AI base technologies are booming up and programming languages have become a medium to facilitate the techniques. The Face API enables developers to easily perform face identification, detection and sentiment analysis with simple HTTP calls. This functionality could be directly integrated into any app and could be used to solve n number of business problems. In this article, we’ll cover the Azure Face API topic in detail. We’ll set up an Azure account, a Face API account and get the Face API running within seconds. We’ll see what all are the APIs that could be used to get accustomed with Face API. We’ll also integrate those HTTP services to an application that performs face detection, face grouping, face identification and finding similar faces as well from the group of faces. You’ll see how easily you can detect a face in the picture, like getting its properties, or does a person whose face is detected wear glasses in the picture? Is the person a male or female, what is the age of the person, and what are the attributes like facial hair, eyes, nose, lips, etc. Not only this, we also get the on-demand details to find the facial expressions that indicate if the person is happy, sad or angry and what the scale of the emotion is detected. Get more details here. So, a lot of fun altogether.
Azure
Azure is a cloud platform from Microsoft and provides numerous resources in context on cloud computing. One of the resources is virtual machine. For example, a fully functional machine of your choice with the choice of your configurations and operating system could be created within seconds with just a few clicks and you can access the machine remotely from anywhere with your secure credentials and do whatever you want, like hosting your web site, developing applications, creating production or test environment for your software, etc. Let’s see a step by step tutorial of how we can achieve that.
Azure Functions and Serverless Computing
Talking about the definitions from here:
"Azure Functions is the serverless computing service hosted on the Microsoft Azure public cloud. Azure Functions, and serverless computing in general, is designed to accelerate and simplify application development."
The first thing to note about Azure Functions is that they operate in a fully-managed environment. Essentially what this means is that we don't have to go and create or manage virtual machines. Microsoft provides and provisions all the underlying hardware that our Azure Functions are based on. One of the benefits of this is that it gives us high reliability because we don't have to manually manage the underlying infrastructure. Another benefit is that we don't have to worry about going and applying security patches to the underlying infrastructure. Microsoft will take care of this for us. It is, however, up to us to ensure that the systems that we're building on top of Azure Functions are appropriately secured and managed. Another benefit of this fully- managed environment is that it gives us automatic scaling. The Azure Functions platform will automatically scale our functions out to deal with variations in incoming request volume. If we're executing our Azure Functions on the Consumption plan, then we're only going to pay when the functions are executed. Another benefit of Azure Functions is that we need to write less boilerplate code, and one of the reasons for this is that our Azure Functions can easily integrate with a range of Azure services. For example, integrating our function with Azure Blob storage is as simple as configuring the correct attributes on our C# code.

Azure Account Setup
If one does not have a paid Azure account, one could leverage Azure’s new account’s benefits of giving $200 credits. That means if you are new to Azure and want to play around with its free trial, you’ll get $200 credits that you can use to explore Azure. If you are new to Azure and do not have an account, follow the process I describe in the next section, or directly login to your portal.
- Open the Azure web site, i.e., azure.microsoft.com

- Click on Start free to create your free Azure account and get $200 as credits.

Creating an account and claiming $200 would need your credit/debit card for verification purposes only and will not deduct any amount from your card. You can play around with this credit and account for 30 days. You’ll see the signup page, where you fill all your information and signup step by step. Once signed-up successfully, you’ll see the link to the portal as shown below:

Click on the portal and you land up on the dashboard and are ready to use/play around with Azure.

Face API
Azure AI Services consists of many different services. The one that probably gets the most attention is Cognitive Services, which is Microsoft's prebuilt AI. The Face API is an example of a cognitive service, so it lives squarely in this category.
The Face API has five major feature areas. The most fundamental operation is face detection. The detection will provide the exact location of where faces appear in images, it will also provide metadata about the faces that it detects, such as age estimates, gender, and numerous face attributes such as facial hair, and whether the person has glasses. Emotion metadata is detected here as well. Identification is what we think of as facial recognition. It can identify a specific known individual, provided that the Face API has been pre-trained to identify that individual. Verification is a type of facial recognition, but with Verification, we're just trying to match a face against a specific person, not a group of people. The best example of this is when you try to unlock your computer or phone using your face. Face Grouping attempts to group faces of the same individual provided a list of faces. Finally, the Find Similar functionality will find similar faces, given a list of faces. This will either try to find the exact person or, depending on which mode you've selected, a face that looks similar. This second mode would be used, for example, if you're trying to find your celebrity look-alike. We're going to see each one of these features in action in this article.
Creating the Face API on Azure Portal
In this section, we'll get up and running with the Face API on Azure Portal. We’ll go step by step so that we do not miss any single detail.
- Log in to the Azure portal and click on "Create a resource". You can find this option at the left side panel.

- On the screen, select "AI + Machine Learning" and you’ll see all the ML offerings provided by Azure. There, we see an offering with the name as "Face". Select that option.

- Once you click on that Face option, you’ll be asked to create the
FaceAPI and that’s what we wanted. Provide the necessary details like your API name (provide whatever is convenient for you to remember. I gave the name "face-api" to my API). Provide the subscription detail, the location. In my case, I chose Central India. Choose the pricing tier, you can get the list of pricing tier by navigating to the link shown in the following image that says, "View full pricing details". I chose F0. Choose a resource group or create a new one. A resource group is just for logical separation of your resources. For example, I would name my resource group as "azure-machine learning" because I want to keep all my AI or ML related apps and services in this group.
- Once you fill all the details and submit the information, it will take a while to deploy the service for you (few seconds) and you’ll get the message the deployment is done, and a button will be shown that says "Go to resource" that will navigate you to the created
FaceAPI. You can also go to the createdFaceAPI from the main portal’s page by clicking on the resources link or dashboard.
- From the Dashboard, when you go to the created
FaceAPI resource, you can find the Endpoint as shown in the following image. Copy the endpoint in a Notepad or so. We’ll need that soon when we test the API.
- On the left side panel under Resource Management (on the same screen), you can find the security key. Copy that as well and place that in Notepad. We’ll need that as well.

Testing the Face API
Since the API is an endpoint and behaves like a REST service, we can use Postman to test the API. Open Postman and install if it is not installed on your computer. You can get the latest version of the app here.

Detect Call
We’ll start with making a detect call to the API. You can find all the endpoints details at this location that explains what all calls can be made to the API endpoint. These calls include find similar faces, detect the faces from the image, group faces and a lot more. We’ll cover each in detail one by one. Let’s start with detect.
- Once the postman app is on, we can test the API. Copy the endpoint that we secured in Notepad and paste the same to the Postman request. Make sure the request is a
POSTrequest. Append the "detect" at the end of the endpoint because it is a detect call as shown in the following image. In the Headers section, we must add a couple of headers, Content-Type, and we'll make this application/JSON. And the other one we're going to do for authentication purpose is Ocp-Apim-Subscription-Key, and this is the header that theFaceAPI wants for authentication. Now we need to paste our key in here. Get the key that we copied in the last step and paste it in the value for theOcp-Apim-Subscription-Keykey.
- In the Body tab (i.e., just next to Headers in Postman), select "raw" as the type of the content and in the body section, provide a JSON that contains the URL of a group of pictures. I used a location on a public server to place my image. You can use Azure blob storage or any other cloud provider to store your image. Make sure your image is publicly accessible and even if it is not, you can also send the image as an upload while testing the API. You just need to change the data type from raw to binary and upload your image. And the request content type as
application/octet-stream.
The following is the image I used that is located at public server that contains faces of my friends and family members.

- Press the blue Send button to make a request and test the API. We see that within no seconds, we get a response from the API. That first proves that our API is up and running and secondly, it is working as well. We get the response as a JSON that gives us the information of each detected face in that picture and the attributes of the face such as the dimensions in the form of
faceRectangleattribute and each face is uniquely detected and has a uniquefaceIdas well.
On the following cognitive services URL, you’ll get to see all the calls you can make to the API apart from only detect. URL: https://centralindia.dev.cognitive.microsoft.com/docs/services/563879b61984550e40cbbe8d/operations/563879b61984550f30395236

Scroll down to check what all query parameters you can send with the detect call itself to get more information about the faces.

Face Landmarks
"An array of 27-point face landmarks pointing to the important positions of face components. To return this, it requires 'returnFaceLandmarks' parameter to be true."
Face landmarks is a query string parameter that could be sent along with detect call to get the positions of face components like eyes, nose, lips, etc. Just in your detect call, add a query string parameter named "returnFaceLandmarks" and give it a value as true as shown below. When you click on Send, you get the response with a more detailed JSON telling you the position of each face component like pupil, eyebrows, mouth, nose, etc. Try to have fun.

Face Attributes
Getting the following details from the Azure documentation link: https://centralindia.dev.cognitive.microsoft.com/docs/services/563879b61984550e40cbbe8d/operations/563879b61984550f30395236
"Face Attributes:
age: an estimated "visual age" number in years. It is how old a person looks like rather than the actual biological agegender: male or femalesmile: smile intensity, a number between [0,1]facialHair: return lengths in three facial hair areas: moustache, beard and sideburns. The length is a number between [0,1]. 0 for no facial hair in this area, 1 for long or very thick facial hairs in this area.headPose: 3-D roll/yaw/pitch angles for face directionglasses: glasses type - values include 'NoGlasses', 'ReadingGlasses', 'Sunglasses', 'SwimmingGoggles'emotion: emotion intensity, including neutral, anger, contempt, disgust, fear, happiness, sadness and surprisehair: group of hair values indicating whether the hair is visible, bald, and hair color if hair is visible.makeup: whether eye, lip areas are made-up or not.accessories: accessories around face, including 'headwear', 'glasses' and 'mask'. Empty array means no accessories detected. Note this is after a face is detected. Large mask could result in no face to be detected.blur: face is blurry or not. Level returns 'Low', 'Medium' or 'High'. Value returns a number between [0,1], the larger the blurrier.exposure: face exposure level. Level returns 'GoodExposure', 'OverExposure' or 'UnderExposure'.noise: noise level of face pixels. Level returns 'Low', 'Medium' and 'High'. Value returns a number between [0,1], the larger the noisier"
Face attributes is also a query string parameter that could be sent along with the detect call. It returns you the attribute values as given in the list above. For example, if you say that returnFaceAttributes = age, it will return the age of the face detected.

Similarly, you can ask for gender, emotions, check whether a person is wearing glass or not, if the person is smiling or not. With the cognitive service AI technique, you get all these face attributes from the image.

Face API SDK
C# provides a rich SDK for the Face API which you can use to write C# code and perform all the endpoint operations. Let’s go step by step to see how this could be done.
- Open your Visual Studio. I am using VS 2017 professional and create a console application, name it
FaceApiSdkor the name of your choice.
- Right click on the project in Visual Studio and add a Nuget Package named
Microsoft.ProjectOxford.Face.DotNetStandard.
- Once done, we can add the code in the class as follows:
using Microsoft.ProjectOxford.Face;
using System;
using System.Threading.Tasks;

namespace FaceApiSdk
{
    class Program
    {
        static async Task Main(string[] args)
        {
            IFaceServiceClient faceServiceClient = new FaceServiceClient
                                                   ("<put your key here>",
                "https://centralindia.api.cognitive.microsoft.com/face/v1.0");
            var detectedFaces = await faceServiceClient.DetectAsync
            ("https://www.codeproject.com/script/Membership/Uploads/
              7869570/Faces.png");
            foreach (var detectedFace in detectedFaces)
            {
                Console.WriteLine($"{detectedFace.FaceId}");
            }
        }
    }
}
Go through this article to enable
async Mainmethod if you work on .NET Framework lesser than 4.7.In the above-mentioned code, first we make an instance of
IFaceServiceClientand provide the key and theFaceAPIURL in the constructor as a parameter. Then we await theDetectAsyncmethod of that instance and pass the URL of the image for which we want the faces to be detected as a parameter to theDetectAsyncmethod. Then we write the face IDs of all the faces returned.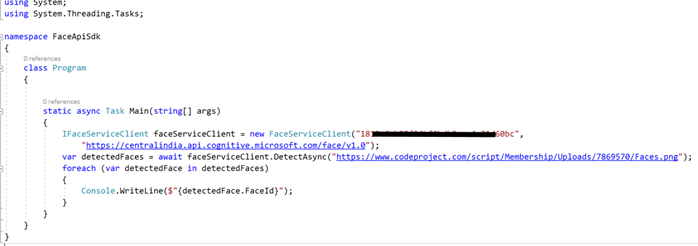
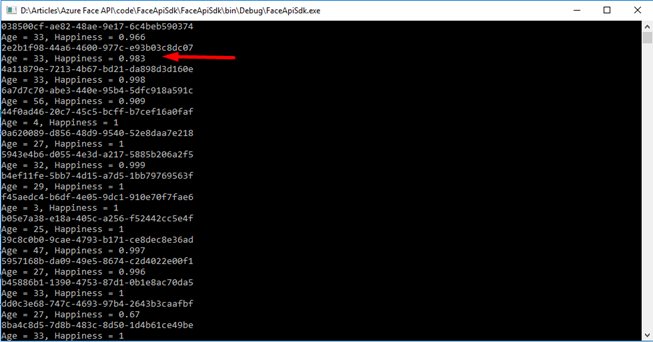
Compile the code and run it by pressing F5. In the following image that shows the output, we see that the faces of all the detected faces are returned.

- Time to test face attributes as well. Add an array called
faceAttributesmentioning what attributes you want to get returned in the response. In theDetectAsyncmethod, pass that as a parameter to thereturnFaceAttributesas shown below:
Code
using Microsoft.ProjectOxford.Face;
using System;
using System.Collections.Generic;
using System.Linq;
using System.Text;
using System.Threading.Tasks;

namespace FaceApiSdk
{
    class Program
    {
        /// <summary>
        /// Go through the following article to enable async Main method
        /// if you work on .Net Framework lesser than 4.7:
        /// https://www.c-sharpcorner.com/article/
        /// enabling-c-sharp-7-compilation-with-visual-studio-2017/
        /// </summary>
        /// <param name="args"></param>
        /// <returns></returns>
        static async Task Main(string[] args)
        {
            IFaceServiceClient faceServiceClient = new FaceServiceClient
                                                   ("<Provide your key here>",
                "https://centralindia.api.cognitive.microsoft.com/face/v1.0");

            var faceAttributes = new[]
                { FaceAttributeType.Emotion, FaceAttributeType.Age };

            var detectedFaces = await faceServiceClient.DetectAsync
            ("https://www.codeproject.com/script/Membership/Uploads/7869570/Faces.png",
                returnFaceAttributes:faceAttributes);

            foreach (var detectedFace in detectedFaces)
            {
                Console.WriteLine($"{detectedFace.FaceId}");
                Console.WriteLine($"Age = {detectedFace.FaceAttributes.Age},
                Happiness = {detectedFace.FaceAttributes.Emotion.Happiness}");
            }
            Console.ReadLine();
        }
    }
}
Output: We see the following output that also returns the face attributes we asked for. Happiness = 0.983 means that scale which the API thinks a person is happy upon. So, 0.983 means that there is a huge possibility that a person is smiling or laughing in the picture.
Face Identification
In the last section, we saw face detection. In this section, we’ll focus on face identification and check the capabilities of Face API to identify the faces of the persons. In this section, we’ll see what services we can write to perform face identification. We’ll test the services using Postman and in the next section, we’ll walk through a live face identification application.
Before we look at the individual operations in detail, it's important for us to first understand the high-level structure and the workflow of how everything fits together. The first thing we need to do is to create a person group. The Face API gives us all the CRUD operations. It gives us all these operations for managing person groups. Once our person group is created, we can add n number of persons to that person group. After we add a person to a person group, then we add n number of faces to each person. Once we've added as many persons and faces to our person group that we want, we then invoke the Face API method to train our person group. Once our person group is trained, we're ready to do face identification. Face identification always starts with face detection. You've already seen face detection. The key result is that we get a unique faceId for each face in face detection. Once we invoke detection, we can finally invoke face identification using the results of our face detection calls along with the person group we want to use for face identification. Let’s do that step by step.
Creating a Person Group
I have used some settings in the Postman to save my base URL (i.e., https://centralindia.api.cognitive.microsoft.com/face/v1.0) and the secret key. So I’ll use the keyword {{base-url}} and {{face-api-key}} for URL and key respectively. You can use the base URL and the key you have in place of my keywords.
Make a pull request in the Postman for actions persongroups/1 appended to base URL as shown below. In the body, provide the raw JSON telling the name of the person group. For example, in my case "family" and the userData as a description of the person group. The JSON should be like the following:
{
	"name": "family",
	"userData": "family person group"
}

In the headers section, provide two keys. For example, Ocp-Apim-Subscription-Key and Content-Type and their values as your API key and application/JSON respectively. Hit the Send button. Once you hit the send button, you get the response as 200, i.e., OK that means the person group is created.

Get a Person Group
We can check the created person group by making a get call to the API at https://centralindia.api.cognitive.microsoft.com/face/v1.0/persongroups/1.
And you get the created person group with a person group id, name, and user data. In the next step, we’ll add a few persons to the person group.

Create Person
In the person groups created, append the URL with "persons" and in the body section, provide the name and user data of the function as below:
{
	"name" : "Akhil Mittal",
	"userData" : "Author"
}
Keep the headers the same (i.e., providing key and content type) and hit Send button. Make sure the HTTP verb is Post. We get the response with a created person having a person id under person group 1.

Get Person
You can get the person with the id of the person that we received in the last step. Make a Get call to the API as https://centralindia.api.cognitive.microsoft.com/face/v1.0/persongroups/1/persons<personid>.
We get the JSON response with personId, name and userData and an additional field that says an array of persistedFaceIds. Since we have not created any face for this person so that the field remains empty.

Get All Persons
If you wish to get the list of all the persons you created for that particular person group, just name a Get call to the API at https://centralindia.api.cognitive.microsoft.com/face/v1.0/persongroups/1/persons/
This will get you all the persons created in the JSON response under the person group having Id as 1.

Create Face for the Person
Time to create the face of the person. For example, the persisted face for the created person. Since you have the person id of the created person for which we want to create a persisted face. We’ll make a call to the API as https://centralindia.api.cognitive.microsoft.com/face/v1.0/persongroups/1/persons/<personId>/persistedFaces.
In the body tag, provide a raw JSON that contains the URL of the person's face (i.e., the image of the person whose face has to be created).
{
	"url": "https://www.codeproject.com/script/Membership/Uploads/7869570/Akhil.png"
}
The following is the image of the person for which the URL is given:

Now, make a POST request with these configurations and make sure your header data has key and content-type defined. Hit the Send button. Once we get the response, we see that the response contains the JSON that has "persistedFaceId". That means the person's face is created and a corresponding Id is returned.

Now if you again make the get request for that person, you’ll also get the persisted face id attribute having value for that person’s face as shown below.

Train the Person Group
It’s time to train the person group. Since we got the person group, person and his face, we’ll train our model and then perform face identification for that person. Just append train to persongroups/<id> URL and make a POST request as https://centralindia.api.cognitive.microsoft.com/face/v1.0/persongroups/1/persons/train.
Once done, we’ll get the response as 200, i.e., Accepted.

Check Training Status
You can check the training status by making a Get request to the URL https://centralindia.api.cognitive.microsoft.com/face/v1.0/persongroups/1/persons/training.
We see here in the following image that we get the training status as succeeded. That means the person group is trained now to perform face identification operations.

Let’s do that in the next step.
Identification
I have uploaded the following image on the public URL that has my friend and me.

- Make a detect call to the uploaded image as we did initially and when we get the response, we see the JSON for two faces returned one for my friend and another for mine.

- Now, since our
persongroup is trained, we can send an identify request to the base-URL. In the body, provide the JSON with person group id and the faces we got in the detect call in last operations.{ "personGroupId" : "1", "faceIds" : [ "5a45a46a-6327-499e-8442-0fb404f4e426", "c88546a1-543c-4497-ab9c-df4e055820cd" ] }
Once we hit the Send button and make that POST request, we get the response for both the provided faces but only one face has candidates that are telling the personId and the confidence level that the identified person is there in the person group or not. It seems to be working. Here, we made a request for identification for two persons, but we got the response for only one, that is my face because my face is already there in the person's list of the created person group and our model is trained to process that. The response here is returned with the confidence level value which means that this is the level of confidence the API has that the identified person is there in the person group.

In the next section, we’ll go through a running application having all these operations and the visual view of the operations.
Face Classification App
Getting the Code
I have already created the app and you can get the same from the downloaded source code or the Git URL: https://github.com/akhilmittal/Face-API. In this app, we’ll perform the operations like creating person groups and persons, detecting and identifying the faces, verifying the faces, grouping the faces and finding look-alikes (i.e., similar looking faces).
- Go to the Git URL and click on clone or download button to get the Git URL of the code. Copy that URL.

- Open the command prompt, but before that make sure that the Git is installed on your computer. Move to the directory where you want to fetch the source code and perform git clone <git URL> operation there on the command prompt.

- Once the cloning is done, time to open the application. I am opening it in VS Code. So if you are using VS Code, just go into the fetched code directory from the command prompt and then type command "
code .". This will open the VS Code with the fetched code.
The following is the VS Code opened with the solution.

- Let’s install the packages before we get started. In the command window, type
npm installto install all the packages needed by the application here.
Set-Up the Code
- Once the code is downloaded, opened in the code editor and the packages are installed, we can move ahead to see what lies within. Open the face-api-service.service.ts file and in the file, on the top, provide your base URL for the
baseURLvariable as shown below: - Similarly, provide the key for your API in the
Ocp-Apim-Subscription-Keyfield on the same file in the end.
The code for the file is as follows:
import { Injectable } from '@angular/core';
import { HttpClient, HttpHeaders } from '@angular/common/http';
import { Observable } from 'rxjs/Observable';
import 'rxjs/add/operator/mergeMap';
import 'rxjs/add/observable/forkJoin';
import 'rxjs/add/observable/of';

@Injectable()
export class FaceApiService {

  private baseUrl = 'https://centralindia.api.cognitive.microsoft.com/face/v1.0';

  constructor(private http: HttpClient) { }

  // ***** Person Group Operations *****

  getPersonGroups() {
    return this.http.get<any[]>(`${this.baseUrl}/persongroups`, httpOptions);
  }

  createPersonGroup(personGroup) {
    return this.http.put<any[]>
    (`${this.baseUrl}/persongroups/${personGroup.personGroupId}`,
    personGroup, httpOptions);
  }

  deletePersonGroup(personGroupId) {
    return this.http.delete
    (`${this.baseUrl}/persongroups/${personGroupId}`, httpOptions);
  }

  trainPersonGroup(personGroupId) {
    return this.http.post<any[]>(`${this.baseUrl}/persongroups/
    ${personGroupId}/train`, null, httpOptions);
  }

  getPersonGroupTrainingStatus(personGroupId) {
    return this.http.get<any>(`${this.baseUrl}/persongroups/
    ${personGroupId}/training`, httpOptions);
  }

  // ***** Persons Operations *****

  getPersonsByGroup(personGroupId) {
    return this.http.get<any[]>(`${this.baseUrl}/persongroups/
    ${personGroupId}/persons`, httpOptions);
  }

  getPerson(personGroupId, personId) {
    return this.http.get<any[]>(`${this.baseUrl}/persongroups/
    ${personGroupId}/persons/${personId}`, httpOptions);
  }

  // ***** Person Operations *****

  createPerson(personGroupId, person) {
    return this.http.post<any>(`${this.baseUrl}/persongroups/
    ${personGroupId}/persons`, person, httpOptions);
  }

  deletePerson(personGroupId, personId) {
    return this.http.delete<any[]>(`${this.baseUrl}/persongroups/
    ${personGroupId}/persons/${personId}`, httpOptions);
  }

  // ***** Person Face Operations *****/

  getPersonFaces(personGroupId, personId) {
    return this.http.get<any>(`${this.baseUrl}/persongroups/
    ${personGroupId}/persons/${personId}`, httpOptions).flatMap(person => {
      let obsList = [];
      if (person.persistedFaceIds.length) {
        for (const faceId of person.persistedFaceIds) {
          obsList.push(this.getPersonFace(personGroupId, personId, faceId));
        }
        return Observable.forkJoin(obsList);
      } else {
        return Observable.of([]);
      }
    });
  }

  getPersonFace(personGroupId, personId, faceId) {
    return this.http.get(`${this.baseUrl}/persongroups/
    ${personGroupId}/persons/${personId}/persistedfaces/${faceId}`, httpOptions);
  }

  addPersonFace(personGroupId, personId, url) {
    return this.http.post<any>(`${this.baseUrl}/persongroups/
    ${personGroupId}/persons/${personId}/persistedfaces?userData=${url}`,
    { url: url}, httpOptions);
  }

  deletePersonFace(personGroupId, personId, faceId) {
    return this.http.delete(`${this.baseUrl}/persongroups/
    ${personGroupId}/persons/${personId}/persistedfaces/${faceId}`, httpOptions);
  }

  // ***** Face List Operations *****

  createFaceList(faceListId) {
    return this.http.put(`${this.baseUrl}/facelists/${faceListId}`,
    { name: faceListId }, httpOptions);
  }

  addFace(faceListId, url) {
    return this.http.post(`${this.baseUrl}/facelists/${faceListId}/persistedFaces`,
    { url: url }, httpOptions);
  }

  // ***** Face Operations *****

  detect(url) {
    return this.http.post<any[]>(`${this.baseUrl}/detect?returnFaceLandmarks=false&
    returnFaceAttributes=age,gender,smile,glasses,emotion,facialHair`, { url: url },
    httpOptions);
  }

  identify(personGroupId, faceIds) {
    let request = {
      personGroupId: personGroupId,
      faceIds: faceIds,
      confidenceThreshold: 0.4
    };
    return this.http.post<any[]>(`${this.baseUrl}/identify`, request, httpOptions);
  }

  group(faceIds) {
    return this.http.post<any>(`${this.baseUrl}/group`,
    { faceIds: faceIds }, httpOptions);
  }

  findSimilar(faceListId, faceId) {
    let request = { faceId: faceId, faceListId: faceListId };
    return this.http.post<any>(`${this.baseUrl}/findsimilars`, request, httpOptions);
  }
}

// private (non-exported)

const httpOptions = {
  headers: new HttpHeaders({
    'Content-Type': 'application/json',
    'Ocp-Apim-Subscription-Key': '<key>'
  })
};
If you closely look at the code, we have all the face operations that we performed previously defined here. They just need to get called from the UI which we are doing in the application.
Compile and Run the Application
It is an Angular application so you can run the application from the VS Code terminal or the command window as well. I am running it from the command window. So, type the ng serve command on the command window and press Enter.

Once compiled and the server is running, you’ll get the URL of the application. In my case, it is running at localhost 4200 port.

Copy that URL and open the same in the browser. We see the application running here. This application has Set-up and Face Detection buttons on the home page.

Create a Person Group
- Click on Set-up and add a
persongroup. Note that the UI is bound to all the API calls in the background. We already explored all the API calls for creating person, groups, and faces. So, just go through the application code to explore the files and see how they are bound to make calls to the API. - Add a
PersonGroup and name that asfamily.
- Once the
Persongroup has been created and is being shown, Add Persons to thatpersongroup.
Create a Person
Once a person is added, add a new face to that person.

Add Face
In the "Add Face" popup, provide the URL of the image of the face of the person and click Save. It will show the image below:

Similarly, add more people to that person group. For example, I added Akhil Mittal, Arsh and Udeep as people. I added three faces for Akhil Mittal.

Added four faces for Arsh.

Added three faces for Udeep.

Train the Person Group
Now if you remember, the next thing we did after adding person groups, persons and faces was to train the model. So, click on Train Model that in the background is bound to train API endpoint and it will train our person group model and makes it ready for detection and identification. Once you hit the "Train Model" button, you see the "Training initiated" message.

Once training is done, you see the "Training Succeeded" message if you press the "Check Training Status" button.

Code for All the Operations
In the configuration.component.ts, we have all the components defined that perform these operations.
import { Component, OnInit } from '@angular/core';
import { FaceApiService } from '../services/face-api-service.service';
import { InputBoxService } from '../input-box/input-box.service';
import * as _ from 'lodash';
import { ToasterService } from 'angular2-toaster';

@Component({
  selector: 'app-configuration',
  templateUrl: './configuration.component.html',
  styleUrls: ['./configuration.component.css']
})
export class ConfigurationComponent implements OnInit {
  public loading = false;
  public personFaces = [];
  public personGroups = [];
  public personList = [];
  public selectedGroupId = '';
  public selectedPerson: any;

  constructor(private faceApi: FaceApiService,
  private inputBox: InputBoxService, private toastr: ToasterService) { }

  ngOnInit() {
    this.faceApi.getPersonGroups().subscribe(data => this.personGroups = data);
  }

  addPersonGroup(){
    this.inputBox.show('Add Person Group', 'Person Group Name:').then(result => {
      let newPersonGroup = { personGroupId: _.kebabCase(result), name: result };
      this.faceApi.createPersonGroup(newPersonGroup).subscribe(data => {
        this.personGroups.push(newPersonGroup);
        this.selectedGroupId = newPersonGroup.personGroupId;
        this.onGroupsChange();
      });
    });
  }

  deletePersonGroup() {
    this.faceApi.deletePersonGroup(this.selectedGroupId).subscribe(() => {
      _.remove(this.personGroups, x => x.personGroupId === this.selectedGroupId);
      this.selectedGroupId = '';
    });
  }

  onGroupsChange() {
    if (this.selectedGroupId) {
      this.loading = true;
      this.faceApi.getPersonsByGroup(this.selectedGroupId).subscribe(data => {
        this.personList = data;
        this.selectedPerson = null;
        this.personFaces = [];
        this.loading = false;
      });
    }
  }

  personClick(person) {
    this.selectedPerson = person;
    this.faceApi.getPersonFaces(this.selectedGroupId,
    this.selectedPerson.personId).subscribe(data => {
      this.personFaces = data;
    });
  }

  addPerson() {
    this.inputBox.show('Add Person', 'Person Name:').then(result => {
      let newPerson: any = { name: result };
      this.faceApi.createPerson(this.selectedGroupId,
      { name: result }).subscribe(data => {
        newPerson.personId = data.personId;
        this.personList.push(newPerson);
        this.selectedPerson = newPerson;
      });
    });
  }

  deletePerson(personId) {
    this.faceApi.deletePerson(this.selectedGroupId,
    this.selectedPerson.personId).subscribe(() => {
      _.remove(this.personList, x => x.personId === this.selectedPerson.personId);
      this.selectedPerson = null;
    });
  }

  addPersonFace() {
    this.inputBox.show('Add Face', 'URL:').then(result => {
      this.faceApi.addPersonFace(this.selectedGroupId,
      this.selectedPerson.personId, result).subscribe(data => {
        let newFace = { persistedFaceId: data.persistedFaceId, userData: result };
        this.personFaces.push(newFace);
      });
    });
  }

  deletePersonFace(persistedFaceId) {
    this.faceApi.deletePersonFace(this.selectedGroupId,
    this.selectedPerson.personId, persistedFaceId).subscribe(() => {
      _.remove(this.personFaces, x => x.persistedFaceId === persistedFaceId);
    });
  }

  trainPersonGroup() {
    this.loading = true;
    this.faceApi.trainPersonGroup(this.selectedGroupId).subscribe(() => {
      this.toastr.pop('info', 'Training Initiated',
                      'Training has been initiated...');
      this.loading = false;
    });
  }

  getGroupTrainingStatus() {
    this.loading = true;
    this.faceApi.getPersonGroupTrainingStatus
    (this.selectedGroupId).subscribe(result => {
      switch (result.status) {
        case 'succeeded':
          this.toastr.pop('success', 'Training Succeeded');
          break;
        case 'running':
          this.toastr.pop
          ('info', 'Training still in progress...', 'Check back later');
          break;
        case 'failed':
          this.toastr.pop('error', 'Error during Training', result.message);
          break;
        default:
          break;
      }
      this.loading = false;
    });
  }
}
These keep track of all the ids and perform necessary operations with those ids on button clicks.

Face Detection
On the top right side of the application, you can find the Face Recognition tab that has submenu as Face Detection, Face Grouping and Look-alike faces. Click on Face Detection.

Selecting the Face Detection option will open up the screen to provide the image on which the faces needs to be detected. Put the URL of the image on that Image URL text box and click on Detect. Note that I have used the same image that I used initially with the API to detect faces. This time again, the same API call has been made and we see the faces detected with a yellow square.

The following is the code for face-tester.component.html under src->app->face-tester folder.
<div class="container">
  <ngx-loading [show]="loading" [config]="{ backdropBorderRadius: '14px' }">
  </ngx-loading>

  <div class="card">
    <h3 class="card-header">Test Faces</h3>
    <div class="card-body">

      <div class="form-group">
        <label>Person Group</label>
        <select [(ngModel)]="selectedGroupId"
         name="personGroups" class="form-control">
          <option value="">(Select)</option>
          <option *ngFor="let group of personGroups" [value]="group.personGroupId">
            {{group.name}} ({{group.personGroupId}})
          </option>
        </select>
      </div>
      <div class="form-group">
        <label>Image URL:</label>
        <input type="text" class="form-control"
         name="groupName" [(ngModel)]="imageUrl">
      </div>

      <button class="btn btn-primary mr-sm-2" (click)="detect()">Detect</button>
      <button class="btn btn-primary" (click)="identify()">Identify</button>

      <hr/>

      <div *ngIf="selectedFace" class="text-primary">
        <pre class="text-primary">{{selectedFace | json}}</pre>
      </div>
      <div *ngIf="selectedFace && selectedFace.identifiedPerson">
        <ngb-alert>
          Subject Identified: {{selectedFace.name}}
        </ngb-alert>
      </div>
    </div>
  </div>

  <div class="card">

    <div class="mainImgContainer" *ngIf="imageUrl">
      <img #mainImg class="card-img main-img" [src]="imageUrl"
      (load)="imageLoaded($event)" />

      <div [ngClass]="{'face-box-green': item.identifiedPerson,
      'face-box-yellow': !item.identifiedPerson}" *ngFor="let item of detectedFaces"
        (click)="faceClicked(item)" [style.top.px]="item.faceRectangle.top *
        multiplier" [style.left.px]="item.faceRectangle.left * multiplier"
        [style.height.px]="item.faceRectangle.height * multiplier"
        [style.width.px]="item.faceRectangle.width * multiplier"></div>

    </div>

  </div>

</div>
The code for face-tester.component.ts is below:
import { Component, OnInit, ViewChild } from '@angular/core';
import { FaceApiService } from '../services/face-api-service.service';
import * as _ from 'lodash';
import { forkJoin } from 'rxjs/observable/forkJoin';

@Component({
  selector: 'app-face-tester',
  templateUrl: './face-tester.component.html',
  styleUrls: ['./face-tester.component.css']
})
export class FaceTesterComponent implements OnInit {
  loading = false;
  public detectedFaces: any;
  public identifiedPersons = [];
  public imageUrl: string;
  public multiplier: number;
  public personGroups = [];
  public selectedFace: any;
  public selectedGroupId = '';
  @ViewChild('mainImg') mainImg;

  constructor(private faceApi: FaceApiService) { }

  ngOnInit() {
    this.loading = true;
    this.faceApi.getPersonGroups().subscribe(data => {
      this.personGroups = data;
      this.loading = false;
    });
  }

  detect() {
    this.loading = true;
    this.faceApi.detect(this.imageUrl).subscribe(data => {
      this.detectedFaces = data;
      console.log('**detect results', this.detectedFaces);
      this.loading = false;
    });
  }

  faceClicked(face) {
    this.selectedFace = face;
    if (this.selectedFace.identifiedPersonId) {
      let identifiedPerson = _.find(this.identifiedPersons,
      { 'personId': face.identifiedPersonId });
      this.selectedFace.name = identifiedPerson.name;
    }
  }

  identify() {
    let faceIds = _.map(this.detectedFaces, 'faceId');
    this.loading = true;

    //NOTE: for Production app, max groups of 10
    this.faceApi.identify(this.selectedGroupId, faceIds).subscribe(identifiedFaces => {
      console.log('**identify results', identifiedFaces);
      let obsList = [];

      _.forEach(identifiedFaces, identifiedFace => {
        if (identifiedFace.candidates.length > 0) {
          let detectedFace = _.find(this.detectedFaces,
                             { faceId: identifiedFace.faceId });
          detectedFace.identifiedPerson = true;
          detectedFace.identifiedPersonId = identifiedFace.candidates[0].personId;
          detectedFace.identifiedPersonConfidence =
                       identifiedFace.candidates[0].confidence;
          obsList.push(this.faceApi.getPerson
                      (this.selectedGroupId, identifiedFace.candidates[0].personId));
        }
      });

      // Call getPerson() for each identified face
      forkJoin(obsList).subscribe(results => {
        this.identifiedPersons = results;
        this.loading = false;
      });
    });
  }

  imageLoaded($event) {
    this.selectedFace = null;
    this.detectedFaces = [];
    let img = this.mainImg.nativeElement;
    this.multiplier = img.clientWidth / img.naturalWidth;
  }
}
This code gets the detected faces on the provided image and puts a yellow square on the image. When you click on the face, it shows up the JSON of that person’s face.

Again, performing another detect to make sure it works fine. I have uploaded one more image of my friend and mine together. Click on Detect and we have two yellow squares on both the faces. This time, select the Person group as well (i.e., family person group) that we created earlier. Note that we are now detecting the images of mine and my friend who are already added as a person in the person group and we earlier trained our person group as well. So, we get two yellow squares on the detect.

Face Identification
Now, since these persons were part of person group, ideally these should be identifiable. Click on Identify, that sends identify the call to the API. Once we get a response, we see the yellow square boxes are changed to green, which means identification is done and successful.

Cross-verify that by clicking on the face and we see the JSON corresponding to the identified face. So, the first one is subject identified as "Udeep".

And the second one identified as "Akhil". These faces are identified because these already have an entry in the person group and their faces were already there in the person group when it was trained.

Face Grouping
Let’s perform the face grouping operations. We’ll provide a few URLs separated by a newline character and execute grouping. These image URLs are few images of Udeep, Arsh and Akhil. Ideally, grouping should work in a way to group similar images together and show.

Once the grouping request is made, we see that the images are grouped per person. For example, out of eleven URLs provided for grouping, the faces identified for me are five, for Arsh, three, and for Udeep, three. It worked perfectly. Note that for my images, it also identified my face from the group of people as well in the image provided.

The code for face-grouping.component.html is as follows:
<div class="container">
  <ngx-loading [show]="loading" [config]="{ backdropBorderRadius: '14px' }">
  </ngx-loading>

  <div class="card">
    <h3 class="card-header">Face Grouping</h3>
    <div class="card-body">

      <textarea rows="8" cols="80" [(ngModel)]="imageUrls">
      </textarea>

      <hr/>

      <button class="btn btn-primary" (click)="executeGrouping()">
       Execute Grouping</button>

      <div *ngFor="let group of groupingResults.groups">
        <h3>Group</h3>
        <div class="row">
          <div class="col-md-3" *ngFor="let face of group">
            <div class="card text-center">
              <div class="card-body card-block-img-container">
                <span class="img-container">
                  <img class="img-person-face img-thumnail"
                  [src]="getUrlForFace(face)" height="140" width="140" />
                </span>
              </div>
            </div>
          </div>
        </div>
      </div>

      <div *ngIf="groupingResults.messyGroup">
          <h3>Mixed Group</h3>
          <div class="row">
            <div class="col-md-3" *ngFor="let face of groupingResults.messyGroup">
              <div class="card text-center">
                <div class="card-body card-block-img-container">
                  <span class="img-container">
                    <img class="img-person-face img-thumnail"
                    [src]="getUrlForFace(face)" height="140" width="140" />
                  </span>
                </div>
              </div>
            </div>
          </div>
        </div>

    </div>
  </div>
</div>
The code for face-grouping.component.ts is as follows:
import { Component, OnInit } from '@angular/core';
import * as _ from 'lodash';
import { FaceApiService } from '../services/face-api-service.service';
import { forkJoin } from 'rxjs/observable/forkJoin';

@Component({
  selector: 'app-face-grouping',
  templateUrl: './face-grouping.component.html',
  styleUrls: ['./face-grouping.component.css']
})
export class FaceGroupingComponent implements OnInit {
  public imageUrls: string[];
  public faces: any[];
  public groupingResults: any = {};
  public loading = false;

  constructor(private faceApi: FaceApiService) { }

  ngOnInit() { }

  executeGrouping() {
    let urls = _.split(this.imageUrls, '\n');

    let detectList = [];
    _.forEach(urls, url => {
      if (url){
        detectList.push(this.faceApi.detect(url));
      }
    });

    this.loading = true;
    forkJoin(detectList).subscribe(detectResults => {
      this.faces = [];
      _.forEach(detectResults, (value, index) =>
      this.faces.push({ url: urls[index], faceId: value[0].faceId} ));
      let faceIds = _.map(this.faces, 'faceId');

      this.faceApi.group(faceIds).subscribe(data => {
        this.groupingResults = data;
        this.loading = false;
      });
    });
  }

  getUrlForFace(faceId) {
    var face = _.find(this.faces, { faceId: faceId });
    return face.url;
  }
}
Finding Similar Faces
In this module of the application, we’ll try to find similar faces from the group of supplied images URL. We’ll supply a few images URL from which we need to find the face and one URL for which we want to find the similar face. For example, the following is the image URL for which I want to find the similar faces from the group of faces.

Now, in the find similar screen, provide new line character separated URLs for the same or other images of the person for which you want to find look alike and in the next box give the URL of the person for which you want to match. Click on the "Find Similar" button and it gives you the matching face. If the face does not match, it returns nothing.

You can find the find similar component at the following location shown in the image.

The code for find-similar.component.ts is as follows:
import { Component, OnInit } from '@angular/core';
import { FaceApiService } from '../services/face-api-service.service';
import * as _ from 'lodash';
import { forkJoin } from 'rxjs/observable/forkJoin';

@Component({
  selector: 'app-find-similar',
  templateUrl: './find-similar.component.html',
  styleUrls: ['./find-similar.component.css']
})
export class FindSimilarComponent implements OnInit {
  public faces: any[];
  public loading = false;
  public imageUrls: string[];
  public queryFace: string =
  'https://www.codeproject.com/script/Membership/Uploads/7869570/Akhil_5.png';
  public findSimilarResults: any[];

  constructor(private faceApi: FaceApiService) { }

  ngOnInit() { }

  findSimilar() {
    this.loading = true;

    // 1. First create a face list with all the imageUrls
    let faceListId = (new Date()).getTime().toString(); // comically naive,
                                            // but this is just for demo
    this.faceApi.createFaceList(faceListId).subscribe(() => {

      // 2. Now add all faces to face list
      let facesSubscribableList = [];
      let urls = _.split(this.imageUrls, '\n');
      _.forEach(urls, url => {
        if (url) {
          facesSubscribableList.push(this.faceApi.addFace(faceListId, url));
        }
      });

      forkJoin(facesSubscribableList).subscribe(results => {
        this.faces = [];
        _.forEach(results, (value, index) => this.faces.push
                 ({ url: urls[index], faceId: value.persistedFaceId }));

        // 3. Call Detect on query face so we can establish a faceId
        this.faceApi.detect(this.queryFace).subscribe(queryFaceDetectResult => {
          let queryFaceId = queryFaceDetectResult[0].faceId;

          // 4. Call Find Similar with the query face and the face list
          this.faceApi.findSimilar(faceListId, queryFaceId).subscribe(finalResults => {
            console.log('**findsimilar Results', finalResults);
            this.findSimilarResults = finalResults;
            this.loading = false;
          });
        });
      });
    });
  }

  getUrlForFace(faceId) {
    var face = _.find(this.faces, { faceId: faceId });
    return face.url;
  }
}
The code for find-similar.component.html is as follows:
<div class="container">
  <ngx-loading [show]="loading" [config]="{ backdropBorderRadius: '14px' }">
  </ngx-loading>

  <div class="card">
    <h3 class="card-header">Find Similar</h3>
    <div class="card-body">

      <textarea rows="8" cols="80" [(ngModel)]="imageUrls">
        </textarea>

      <input type="text" class="form-control" placeholder="Query Face"
      [(ngModel)]="queryFace" />

      <hr/>

      <button class="btn btn-primary" (click)="findSimilar()">Find Similar</button>

      <div *ngIf="queryFace">
        <h3>Query Face</h3>
        <div class="row">
          <div class="col-md-3">
            <div class="card text-center">
              <div class="card-body card-block-img-container">
                <span class="img-container">
                  <img class="img-person-face img-thumnail"
                  [src]="queryFace" height="140" width="140" />
                </span>
              </div>
            </div>
          </div>
        </div>
      </div>

      <div *ngIf="findSimilarResults">
        <h3>Find Similar Results</h3>
        <div class="row">
          <div class="col-md-3" *ngFor="let face of findSimilarResults">
            <div class="card text-center">
              <div class="card-body card-block-img-container">
                <span class="img-container">
                  <img class="img-person-face img-thumnail"
                  [src]="getUrlForFace(face.persistedFaceId)"
                   height="140" width="140" />
                </span>
                <hr/>
                <span>Confidence: {{face.confidence}}</span>
              </div>
            </div>
          </div>
        </div>
      </div>

    </div>
  </div>
</div>
Conclusion
This is an end to end article to show the capabilities of Azure Face API (i.e., one of the Azure’s cognitive services). The API is quite intelligent and strong to leverage the AI and machine learning capabilities and perform the actions. We saw in detail how to create an Azure account, how to create a Face API and make it up and running. We saw how CRUD operations could be performed over the Face API for person groups, persons and faces. Not only detection, but the API also performs operations like giving the facial attributes of the detected face, identifying the face from the trained model, grouping and finding similar faces as well. I hope it was fun.
References
- https://github.com/smichelotti/ps-face-api-explorer
- https://www.nuget.org/packages/Microsoft.Azure.CognitiveServices.Vision.Face/
- https://azure.microsoft.com/en-in/services/cognitive-services/face/
- https://centralindia.dev.cognitive.microsoft.com/docs/services/563879b61984550e40cbbe8d/operations/563879b61984550f30395236

Code
- SDK code: https://github.com/akhilmittal/Face-API-SDK
- Image Classification application: https://github.com/akhilmittal/Face-API
History
- 27th May, 2019: Initial version