
BizTalk Static and Dynamic FTP Send Port Sample
4.20/5 (3 votes)
A BizTalk static and dynamic FTP Send Port sample.
Contents
- Introduction
- Prerequisites for development
- Development
- Deployment
- Server administration configuration
- Errors and fixes
- References
- History
Introduction
This article has been written assuming you have a basic knowledge of BizTalk and you have already worked on static send ports. Even if you have not, I will brief about BizTalk ports. Before thinking about BizTalk ports, just remember airports, sea ports etc. connect us to the right source and destination locations. BizTalk ports are very similar, were a receive port picks the required file from the specified location and a send port drops it at the specified one.
Now when we talk about static and dynamic, the approach is different but the end result is the same. Well, there are pros and cons which I am not covering in the article.
Static port: A port where we do the configuration / set the destination folder details in the BizTalk Server Administration console of a specific application (covered below with an example).
Dynamic: We will specify the configuration / destination path details in the Orchestration expression.
Prerequisites for development
- BizTalk Server 2010
- FTP location
- Basic understanding of BizTalk
Development
For application development, we will look into a very simple sample which picks a file from a specified location, passes it through an orchestration, and does some transition and drops at a specified location. Now that specified location is nothing but an FTP location.
FTP Testing
Before we start application development, let us test whether our FTP connection is working perfectly fine.
For that, go to ->Windows Command Prompt ->Test the FTP connection < Syntax is below >.
FTP <your ftp path>
User: <FTP user name to connect>
Password: <FTP user Password>

Once you are able to connect, we shall use the same credentials for application development.
Sample application development
You can either follow me with the below content or can download the attachment and run the sample.
To start development, in Visual Studio -> File -> New Project -> BizTalk Projects ->Select Empty BizTalk Server Project-> Add the application name, e.g., FTPDynamicSendPortSample and specify the location.
Step I
Add flat files schema with below structure:


Step II
Add mapping file

Here the concatenate functoid is used to combine the source file attributes: street, city, and country to destination address attribute.
Step III
Add the BizTalk orchestration file and drag the shapes as below for static send port:

Here when you drag the receive port and right click, select Configure port and give the port name and set the communication pattern
as one way and let the port direction and port binding as is on click of Next button. Now on click on Request object
on Receive Port property and set the Message Type value as FTPDynamicSendPortSample.EmpScource_Schema, which is nothing but the source schema.
Create two messages in the orchestration view of the static odx (screen below) file, e.g.,
MsgStaticMsgReceive of Message Type
FTPDynamicSendPortSample.EmpScource_Schema which is a source schema and
another message with name MsgStaticMsgSend of
type FTPDynamicSendPortSample.EmpDestination_Schema which is the destination
schema.
On Send Port, right click and select Configure port and give the port name and set the communication pattern as one
way and set the port direction as “I’ll always be sending message on this port” and let the port binding as is on
the click of Next button. Now on click
of Request object on Receive Port property set the Message Type value as FTPDynamicSendPortSample.EmpScource_Schema, which is nothing but the destination schema.

Now on the Receiver shape, set the property as below. Message as MsgStaticMsgReceive and operation as
ReceivePort.Operation_1.Request.
Also set the property Activate as true in object type
Receive.
Now let’s configure the Transform shape in the construct shape, right click -> Select the existing map and set the values as below:

Here, set the source and destination transform. In Source, the variable must be the receive message which is
MsgStaticMsgReceive
and Destination variable name must be MsgStaticMsgSend.
Now on the Send shape, set the property as: Message as MsgStaticMsgSend and Operation as SendPort.Operation_1.Request.
Step IV
Add the odx file and drag the shapes as below for the dynamic send port:

Note: The difference between static and dynamic ports is only the Message Assignment shape, which is mandatory in
a dynamic port to specify the FTP
port details. If you notice the above odx image, we have two more Expression shapes with
StartEventLog and EndEventLog which are really not mandatory.
Please follow the properties which we have set in Step IV. Give a unique name for the object type as and when required.
Now in the Message assignment shape, add the code below:
Msg_DynamicSend(FTP.CommandLogFileName) =  "D:\\BiztalkLogs\\FTPLog\\DynamicFTPLog.txt";
Msg_DynamicSend(FTP.UserName) =  "FTPUSER";
Msg_DynamicSend(FTP.Password) =  "Pass1234";
Msg_DynamicSend(FTP.SpoolingFolder) =  "/IN/";
Msg_DynamicSend(FTP.RepresentationType) =  "ASCII";
DynSendPort(Microsoft.XLANGs.BaseTypes.Address)= "ftp://inhydeshrilata";
DynSendPort(Microsoft.XLANGs.BaseTypes.TransportType) = "FTP";
Note: Msg_DynamicSend is the message name set for send port and
DynSendPort is the port name for dynamic send port. One very important note
here is I have created my FTP in the local machine and did very limited setting so
the above configuration setting is sufficient for me but in case you have added CCID
for folder, then that should go to the Before Put property of FTP. Similar other settings as per FTP setting must
be updated and deployed for the application to work.
Good part: Check the log file in the specified location to trace the FTP error (sample attached).
Deployment
Step I
Create strong name and assign to the application
Once you are done with all the settings, build the project and create a strong name key and assign it to the application as below:

Go to to the application Properties -> Signing -> update the newly created strong name key.
Step II
Set the application name at application deployment property
And add the application name in Deployment properties of the Application property as below:

Now Save all and build the application, that's all we set for deployment. Now right click on the application solution and select Deploy. All the content will get deployed at BizTalk Server Administration.
Server administration configuration
Now to run the application we must have a physical receive and send port. On the BizTalk Server Administration do the configuration as below:
Step I
Create two receive ports, one for static testing and other for dynamic
Follow the screen below, right click on the Receive port of the application, and give name in General properties of Receive port and then select Receive location and select the new link as shown below:

Then set the properties as below:

- Name: Specify the receive location name
- Type: File
- Receive handler: BiztalkserverApplication
- Receive pipeline: XML Receiver
Select the Configuration button and set the locations. For one location, set the folder name SaticInFiles and for select, DynamicInFiles.
Note: here you are creating two folders in your solution folder for static and dynamic testing, however you can give the same folder name for both.
Step II
Create the FTP static send port
Right click on the Send Port -> New ->Static one way send port -> you will notice the screen below:

- Name: Specify the send port name
- Type: FTP
- Send Handler: BiztalkFTPHost
- Receive pipeline: XML Receiver
On click of configuration button, you will find the transport properties:
- Account: <FTP User Name>
- After Put: <set it as per you FTP setting , I have left it blank>
- Allocate Storage: <set it as per you FTP setting , I have left it blank>
- Before put <set it as per you FTP setting, I have left it blank> e.g., SITE NAMEFMT 1; TYPE C 218
- Note: Here C 218 is CCID, which has set per folder in FTP
- Folder: <Specify the folder name, if any specific to FTP>
- Log: Give the log file name. E.g., D:\BiztalkLog\Logs.txt.
- Password: <FTP Password>
- Port: 21 <let the default>
- Representation: ASCII <let the default>
- Server: <FTP Server name>
- SSO Affiliate: <set it as per you FTP setting , I have left it blank>
- Target File Name: <Specify the name of file how exactly you need> Eg : POJobsOrder_%SourceFileName%_%datetime_bts2000%.txt
- Username: <FTP User Name>
Note here: POJobsOrder is the constant and SourceFileName is the name promoted in the schema and
datetime_bts2000
is the current date time, so the example name will look like POJobsOrder_5000067354_201208310532506.
Step II
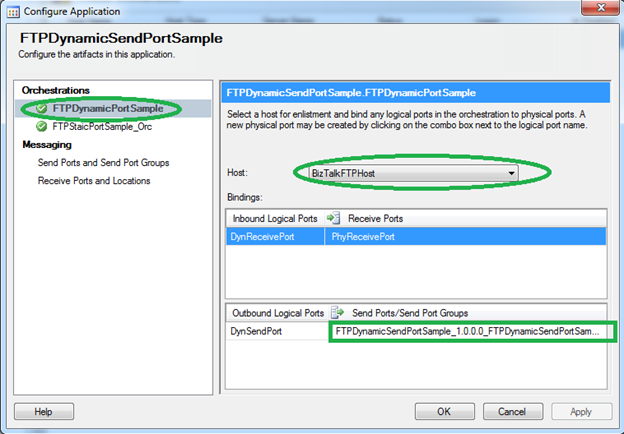
Configure application on Administrator console
Right click on the application and select Configure, do settings as below where you find the orchestration names. In Dynamic odx, you will find the pre-generated send port marked below which you must assign to a logical send port. And in Static, you must select the appropriate physical receive and send port.
Once you are done with configuration, start the application and place the input XML files in the specified receive locations and check the output in the FTP location.
Errors and fixes
Error: You must specify at least one already-initialized correlation set for a non-activation receive that is on a non-self-correlating port.
Resolution: In Receive Shape of Orc, make the Activate property true.
Thank you note
Thank you very much for going through this article, your input is very much valuable for me and will encourage me to write more quality articles. Also I will be pleased if you have any specific topics to suggest to me to come up in BizTalk. I love spending time for something more demanding.
References
History
- 5 December 2012: Initial version.