
Debugging SSL on Both iOS Devices and Simulators with Man-in-the-middle Proxies
This article describes how to set up a debugging environment for SSL web services from iOS clients to a server using man-in-the-middle proxies.
Introduction
The use of web services from mobile devices is very common in today's mobile application architecture. For transport of sensitive information, encryption of data with SSL is usually a must-have requirement. Using a Man-in-the-middle (MITM) proxy to sniff traffic in this situation is a very powerful technique. However, developing iOS native application using MITM proxies introduces unique challenges. This article provides a step-by-step instruction on how to set up an environment for debugging using freely available software.
Background
The ability to sniff the traffic on what is transported between the client and server side is extremely useful in developing and troubleshooting network applications. For web service development using SSL, introduction of a MITM proxy will generate a security warning about the untrusted certificate returned from the proxy. If the client is a web browser, we simply need to accept the exception on the browser warning prompt. For iOS native applications using NSURLConnection or related class, it is a little tricky as it will generate the "untrusted server certificate" error. Although we can get around it by using plain HTTP for development or programmatically disable certificate verification, those techniques require code changes at the end of development. Forgetting to do so will obviously lead to security issues in the application. There is also no functional or performance testing on the SSL infrastructure that can be performed before the final code change. A better strategy is to install the certificate (preferably the root certificate used by the proxy) in the client key chain as a trusted certificate. This article will provide a step-by-step guide from installing MITM proxy to setting up custom root CA on client devices and simulators.
Installing certificates on iOS simulators turns out to be not straightforward. Fortunately, there are some good research done on this topic [1,2]. Lots of information discussed in this article are taken from these references. Some for them are outdated but for those who wants to look for more details and history, they are excellent sources for information.
Even though you may not be using MITM proxies, you may come across other cases where we need to develop iOS applications using custom certificates for development. Examples are:- developing application for corporate that is already using an internal custom root CA
- development environment is not configured with a certificate that is signed by any well known root CA trusted by the devices or simulators (perhaps due to cost or inter-departmental overhead)
For all these cases, the information provided in this article will also be helpful.
Choosing the Proxy
There are a number of free MITM proxies that can be used for sniffing SSL traffic. Here, we use OWASP ZAP to illustrate this. There are a few reasons we choose OWASP ZAP:
- It supports dynamic site certificate generation signed by the the custom root CA certificate - this feature allows only one custom root CA certificate to be installed in the device which, in turn, allows traffic from all SSL host to be automatically accepted by any applications on the device. This will be the strategy used in our examples.
- It supports custom key generation - this reduces security risk for developers as they mostly likely would install that root ca-cert as trusted root CA in their own devices. Some proxy ships with only one root certificate and it is not easy to change. Although the chance is slim, whoever downloads the same private key can decrypt the SSL traffic and thus make the developer's device itself vulnerable. With custom generated keys, this would not be a concern.
- It also supports a competitive list of features compared with other proxies.
Installing OWASP ZAP on OSX and Connecting it with Physical iOS Devices
- Download OWASP ZAP from [3].
- Extract and move the application to the /Applications folder (optional).
- Start OWASP ZAP. You will be prompted to generate the Root CA certificate. Generate and save it (a .cer file).
- Attach the certificate to an email and send it to yourself.
- Open the email with the certificate attachment in your iOS device. Click on the attached certificate and install it to the device.
- By default, the proxy listens on port localhost:8080. Go to Tools -> Options and Local proxy tab and change the Address to 0.0.0.0 allowing traffic from all interfaces and update the port number if necessary.

- Point your device network HTTP proxy to your computer running OWASP ZAP. Specify both IP and port.
- Browse with Safari or using any apps that uses HTTP/HTTPS. The traffic should now be captured by OWASP ZAP.
Using the Proxy with iOS Simulators
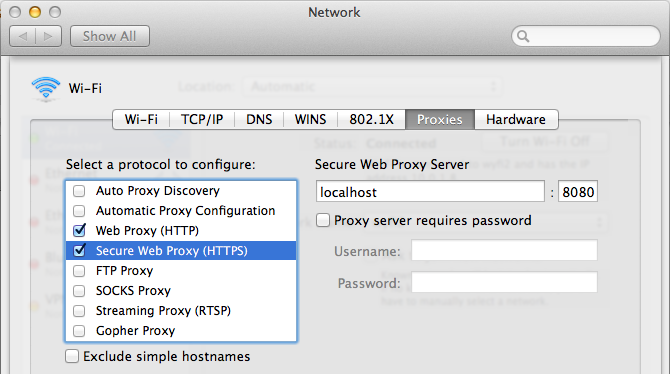
Setting up Host Computer Internet Connection to Use Proxy
Simulators use the internet connection settings of the host OSX computer. So we need to change the network settings. Make sure https traffic is using the proxy setup above.
Installing custom CA to iOS Simulator Key Chains
This is the tricky part. Each version of the iPhone simulator has its own location to store the custom trusted certificate information. To add a custom root CA certificate, you will need to update the corresponding SQLite file. Adding them to the OSX system certificate list just would not help eliminating the SSL error when proxying traffic from the simulator. However, it will allow you to proxy web applications traffic from Safari in OSX though.
The SQLite databases (called TrustStore.sqlite3) mentioned are stored in ~/Library/Application Support/iPhone Simulator/<ios version>/Library/Keychains/ folders. The ~/Library folder is hidden in Finder by default. You can unhide it using the "chflags" command for convenience.
chflags nohidden ~/Library
Like other SQLite databases, you can view and edit them with your favourite editor. We are using SQLite Manager Firefox plugin for demonstration purpose.
However, the iPhone simulator does not have the UI for you to add the certificate. Even if you access the custom CA certificate using Safari (by putting the certificate in a web server), you can only see the Settings app popping up and nothing else will happen.
Fortunately, the same mechanism is used in both iOS devices and simulators so we can make use of the SQLite database in the physical device that already have the custom certificate accepted described earlier in this document. To get the SQLite database from the device, use a free desktop app [4] called iPhone Backup Extractor. No jailbreaking is required. Create a backup for the device you used earlier using iTunes. Make sure encryption is turned off.
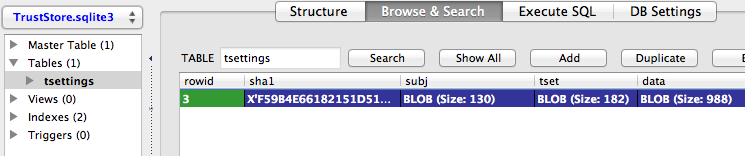
Extract the SQLite database using the iPhone Backup Extractor. This program knows where to find your iTunes backups in your computer. Start the program and choose the backup of your device. Select "iOS Files" from the list of backups and save it to the drive. The SQLite database in question (TrustStore.sqlite3) can be found in the created "iOS Files" folder. Open that up with the SQLite editor. We will see an entry for the accepted certificate under the "tsettings" table. Copy this entry to the corresponding table in the Simulator’s TrustStore.sqlite3 found in the location mentioned above. If you are using the Firefox plugin to edit it and since the last 4 values are Blob data (at least in both iOS 5 & 6), you will need to export individual fields as files and import them back to other TrustStore.sqlite3 of the Simulator. Double click on the Blob field will bring up the import/export menu.
If you have only one or a few entries in your device and you don’t mind putting them in the simulator, you can also just do a plain copy. We have tried that on for both iOS 5 and 6 and they all seem to work. In addition, the file format seems to be compatible across the two versions as well so you can, for example, extract it from a iOS 5 device and put that on an iOS 6 simulator.
Restart iPhone Simulator after these changes and you should now be able to see SSL traffic through the proxy without errors.