
Optical Character Recognition
4.85/5 (20 votes)
Download demo project - 37.5 Kb
Introduction
The OCR (Optical Character Recognition) algorithm relies on a set of learned characters. It compares the characters in the scanned image file to the characters in this learned set. Generating the learned set is quite simple. Learned set requires an image file with the desired characters in the desired font be created, and a text file representing the characters in this image file.
In the below discussion the learned set is in xml format. This learned set is basically coordinates related information which will be explained in below article.
The below article describes the OCR recognition character example. Generating the
learned set for different font style and sizes will be described in my next article.
In this article we have already generated learned character set for font style verdana
and font size 8px.
Background
Four basic algorithms
• Image labelling.
• Finding boundary and Generating X, Y coordinate pixel array.
• Matching connected pixels with learned set (.xml).
• Forming words.
Image labeling algorithm:
It uses the Two-pass algorithm, which relatively simple to implement and understand,
the two-pass algorithm iterates through 2-dimensional, binary data. The algorithm
makes two passes over the image: one pass to record equivalences and assign temporary
labels and the second to replace each temporary label by the label of its equivalence
class.
 Connectivity checks are carried out by checking the labels of pixels that are North-East,
North, North-West and West of the current pixel (assuming 8-connectivity). 4-connectivity
uses only North and West neighbors of the current pixel. The following conditions
are checked to determine the value of the label to be assigned to the current.
Connectivity checks are carried out by checking the labels of pixels that are North-East,
North, North-West and West of the current pixel (assuming 8-connectivity). 4-connectivity
uses only North and West neighbors of the current pixel. The following conditions
are checked to determine the value of the label to be assigned to the current.
The above enlarged image is a pixel representation which serves purpose for our
discussion. Every pixel in the bitmap image is represented by its X and Y coordinates.
The letter "B" in the above example shows how all the pixels are connected. The
image labeling algorithm will label the entire connected pixel with the same label.
The UML diagram below illustrates the flow of the algorithm.
On the first pass:

The below example illustrates how the image labeling algorithm perform as per the
above flow chart.
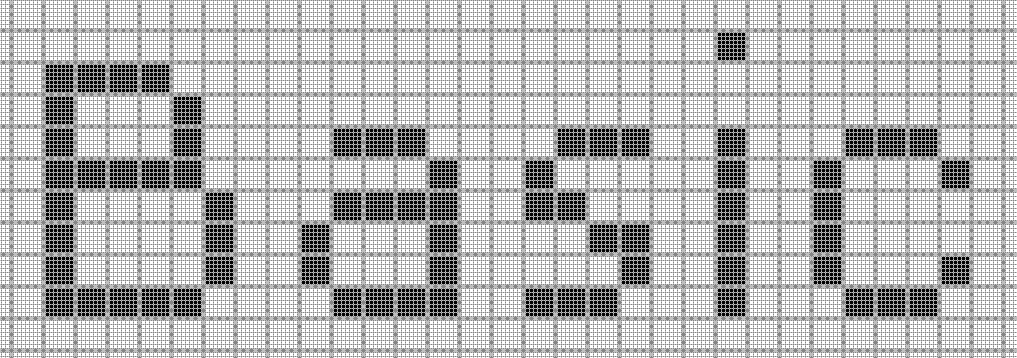
- The array from which connected regions are to be extracted is given below (8-connectivity based)
- After the first pass, the following labels are generated. Total of 9 labels are generated in accordance with the conditions highlighted above. I have shown 8 labels below. The background of the "Basic" in the image is one label. But I have not shown it in the below image since it gets discarded as we only match connected component of max 10 x 10 dimensions.
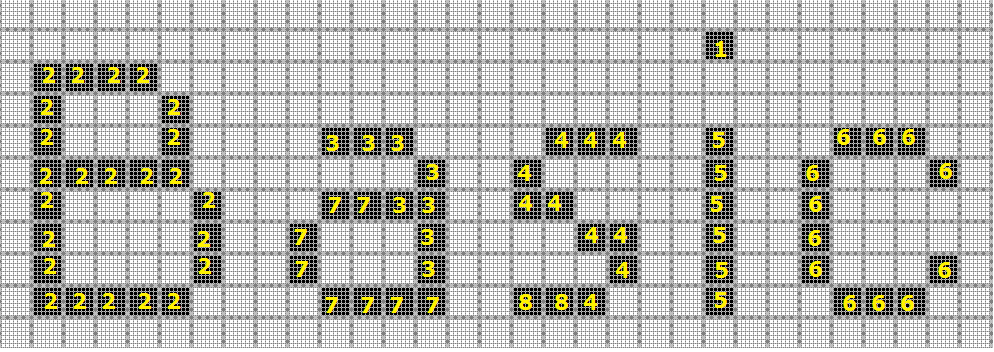
The label equivalence relationships generated are
| Set ID | Equivalent Labels |
|---|---|
| 1 | 1 |
| 2 | 2 |
| 3 | 3,7 |
| 4 | 4,8 |
| 5 | 5 |
| 6 | 6 |
| 7 | 3,7 |
| 8 | 4,8 |
On the second pass:
The UML diagram below shows how the connected pixel, whose labels are not same,
is assigned the lowest label value from the Equivalence record. In the end all the
connected component will have the same label. Character "B" will have one label
i.e. 2 and character "a" will have label 3.Once we get the relabel the distinct
labels with the available lowest label value from the equivalence record we get
one complete connected component. Each character "B", "a" etc will have distinct
connect component. The character "i" has extra dot above so the Second pass algorithm
also looks for extra dot above and below connected component. So extra dot of "i"
is also will be joined with label 5.

Finding boundary and Generating X, Y coordinate pixel array:

From the labels from the above algorithm, then its merely adding all the connected X, Y coordinates in the connect component list. The above image shows all the connected component boundary which marked in yellow. I have highlighted the boundary (X, Y) coordinates of the connected component "a".
- LeftXCor: - Starting left X coordinate of the connected component. For the connected component "a" it is 9.
- RightXCor: - Ending left X coordinate of the connected component. For the connected component "a" it is 13.
- TopYIndex: - Starting or the lowest Y coordinate of the connected component. For the connected component "a" it is 4.
- BottomYIndex: - Ending or the highest Y coordinate of the connected component. For the connected component "a" it is 9.
- Width: - Width of the connect component will be RightXCor – LeftXCor.In case of "a" it will be 13 - 9 = 4.But add one since it start from zero so the width will be 5. Height:-Similarly height of the connected component will be BottonYCor – TopYCor.In this case for "a" the height will be
- 6. PixelCoordinate [,]:- As per the height and width of the connected component initialize the two dimensional array. For "a" it will be [5, 6].For the appropriate connected pixel coordinate set the bit high. For e.g. for the connected component "a" (9, 4) coordinate there is no connected pixel so set [0,0] to false. Since (9, 4) is the starting X, Y coordinate, so it is (0, 0).Similarly for (13, 9) there is a connected coordinate so [4, 5] is set to true. Similarly for the entire connected component X and Y coordinates.
Explaining data in xml.

    <characterinfo>
     <ParamValue>a>⁄ParamValue>
     <PixelInfo>
      (0,3)(0,4)(1,0)(1,2)(1,5)(2,0)(2,2)(2,5)(3,0)(3,2)(3,5)(4,1)(4,2)(4,3)(4,4)(4,5)
     <⁄PixelInfo>
    <⁄characterinfo>
Let take the above bitmap image and pixel information in xml for character "a". As we see the boundary in yellow line. In above diagram the first pixel coordinate (0,0) where X and Y coordinates are zero. As explained earlier the boundary conditions. The properties and their values are listed below.
- LeftXCor: - Starting left X coordinate of the connected component. For the connected component "a" it is 0.
- RightXCor: - Ending left X coordinate of the connected component. For the connected component "a" it is 4.
- TopYIndex: - Starting or the lowest Y coordinate of the connected component. For the connected component "a" it is 0.
- BottomYIndex: - Ending or the highest Y coordinate of the connected component. For the connected component "a" it is 5.
- Width: - Width of the connect component will be RightXCor – LeftXCor.In case of "a" it will be 4 - 0 = 4.But add one since it start from zero so the width will be 5.
- Height:-Similarly height of the connected component will be BottonYCor – TopYCor.In this case for "a" the height will be 6.
Note the connected X, Y coordinate in the xml.For "a" (0,3)(0,4) etc pixels are high so they are noted down.X,Y coordinates whose pixels are not high they are not noted.The tag <pixelinfo> represent the pixel coordinates whose pixels are high. The <ParamValue> tag has the character value "a".
Matching character:
Finally this most easy task. We match the connect component bit array with the xml
data. Each pixel are matched according the X, Y coordinates. The fully matched pixels
coordinates is the matched character from the xml.
Forming words.:
As per the above example "Basic". We maintain the LeftXindex and RightXindex for
each character. The LeftXindex represent the left most index of the character in
the bitmap specified initially in the blog. The RightXindex represent the right
most X coordinate of the character. When the difference coordinates of current character
and previous character is less than 3 pixels then they are joined. This algorithm
is quite simple. But you can extend to join words according to grammar in the dictionary.
I have attached the demo exe with the sample image. In the demo app just browse the image and click submit. The grid displays all the character with coordinates.
Reference
1. Artificial Intelligence and cognitive science © 2006, Nils J. Nilsson Stanford
AI Lab http://ai.stanford.edu/~nilsson
2. Neural Networks and Fuzzy Logic.
3. http://www.cs.berkeley.edu/~fateman/kathey/char_recognition.html
4. http://en.wikipedia.org/wiki/Optical_character_recognition
5 .http://en.wikipedia.org/wiki/Connected-component_labeling