
Getting Started with Kindle Fire
4.50/5 (2 votes)
A chapter excerpt from Learning Android Application Programming for the Kindle Fire
|
|
Lauren Darcey, Shane Conder Published by Addison-Wesley Professional ISBN-10: 0-321-83397-X ISBN-13: 978-0-321-83397-6 |

Android is the first complete, open, and free mobile platform. Developers enjoy a comprehensive software development kit (SDK), with ample tools for developing powerful, feature-rich applications. The platform is open source, relying on tried-and-true open standards with which developers will be familiar. Best of all, there are no costly barriers to entry for developers: no required fees. (A modest fee is required to publish on third-party distribution mechanisms, such as the Android Market.) Android developers have numerous options for distributing and commercializing their applications.
Introducing Android
To understand where Android fits with other mobile technologies, let’s take a minute to talk about how and why this platform came about.
Google and the Open Handset Alliance
In 2007, a group of handset manufacturers, wireless carriers, and software developers (notably, Google) formed the Open Handset Alliance, with the goal of developing the next generation of wireless platform. Unlike existing platforms, this new platform would be nonproprietary and based on open standards, which would lead to lower development costs and increased profits. Mobile software developers would also have unprecedented access to the handset features, allowing for greater innovation.
As proprietary platforms, such as RIM BlackBerry and Apple iPhone, gained traction, the mobile development community eagerly listened for news of this potential game-changing platform.
Android Makes Its Entrance
In 2007, the Open Handset Alliance announced the Android platform and launched a beta program for developers. Android went through the typical revisions of a new platform. Several preview versions of the Android SDK were released. The first Android handset (the T-Mobile G1) began shipping in late 2008. Throughout 2009 and 2010, new and exciting Android smart-phones reached markets throughout the world, and the platform proved itself to industry and consumers alike. Over the last three years, numerous revisions to the Android platform have been rolled out, each providing compelling features for developers to leverage and users to enjoy. Recently, mobile platforms began to consider devices above and beyond the traditional smartphone paradigm to other devices, such as tablets, ebook readers, and set-top boxes, like Google TV.
As of this writing, hundreds of Android devices are available to consumers around the world— from high-end smartphones to low-end "free with contract" handsets and everything in between. This figure does not include the numerous Android tablet and e-book readers also available, the dozens of upcoming devices already announced, or the consumer electronics running Android. (For a nice list of Android devices, check out this Wikipedia link: http:// goo.gl/fU2X5 .) More than 450,000 applications are currently published on the Android Market (now called Google Play), and there are more than 30,000 applications on the Amazon Appstore for Android. In the United States, all major carriers now carry Android phones prominently in their product lines, as do many in Asia, Europe, Central/South America, and beyond. The rate of new Android devices reaching the world markets continues to increase.
Google has been a contributing member of the Open Handset Alliance from the beginning. The company hosts the Android open source project and the developer website ( http://developer. android.com ). This website is your go-to site for downloading the Android SDK, getting the latest platform documentation, and browsing the Android developer forums. Google also runs the most popular service for selling Android applications to end users: the Android Market. The Android mascot is a little green robot (see Figure 1.1 ).
Cheap and Easy Development
If there’s one time when "cheap and easy" is a benefit, it’s with mobile development. Wireless application development, with its ridiculously expensive compilers and preferential developer programs, has been notoriously expensive to break into compared to desktop development. Here, Android breaks the proprietary mold. Unlike other mobile platforms, there are virtually no costs to developing Android applications.
The Android SDK and tools are freely available on the Android developer website ( http:// developer.android.com [ http://goo.gl/K8GgD ]). The freely available Eclipse program has become the most popular integrated development environment (IDE) for Android application development; there is a powerful plug-in available on the Android developer site for facilitating Android development with Eclipse.

So, we covered cheap; now let’s talk about why Android development is easy. Android applications are written in Java, which is one of the most popular development languages around. Java developers will be familiar with many of the packages provided as part of the Android SDK, such as java.net. Experienced Java developers will be pleased to find that the learning curve for Android is reasonable.
In this book, we focus on the most common, popular, and simple setup for developing Android applications:
We use the most common and supported development language: Java. Although we do not teach you Java, we try our best to keep the Java code we use simple and straightforward so that even beginners won’t wrestle with syntax. Even so, if you are new to Java, we recommend Sams Teach Yourself Java in 24 Hours by Rogers Cadenhead and Thinking in Java by Bruce Eckel, Fourth Edition in Print (Third Edition free from http:// goo.gl/mtjoz —a zip file from Bruce Eckel’s site at http://www.mindviewinc.com/Books/ ).
We use the most popular development environment: Eclipse. It’s free, it’s well supported by the Android team, and it’s the only supported IDE compatible with the Android Development Tools plug-in. Did we mention it’s free?
We write instructions for the most common operating system used by developers: Windows. Users of Linux or Mac may need to translate some keyboard commands, paths, and installation procedures.
We focus on the Android platform version available on the Amazon Kindle Fire: Android
If you haven’t installed the development tools needed to develop Android applications or the Android SDK and tools yet, do so at this time.
Let’s get started!
Note: You can find all the details of how to install and configure your computer for Android application development in Appendix A , "Configuring Your Android Development Environment." You will need to install and configure Java, Eclipse, the Android SDK, and the ADT plug-in for Eclipse. You will need to configure ADB and possibly USB drivers for connecting your development machine to Kindle Fire for debugging. Again, all this is covered in Appendix A .
Familiarizing Yourself with Eclipse
Let’s begin by writing a simple Android "Hello, World" application that displays a line of text to the user. As you do so, you also tour the Eclipse environment. Specifically, you learn about some of the features offered by the Android development tools (ADT) plug-in for Eclipse. The ADT plug-in provides functionality for developing, compiling, packaging, and deploying Android applications. Specifically, the ADT plug-in provides the following features:
The Android project wizard, which generates all the required project files
Android-specific resource editors, including a graphical layout editor for designing Android application user interfaces
The Android SDK and the AVD Manager
The Eclipse DDMS perspective for monitoring and debugging Android applications
Integration with the Android LogCat logging utility
Integration with the Android Hierarchy Viewer layout utility
Automated builds and application deployment to Android emulators and devices
Application packaging and code signing tools for release deployment, including ProGuard support for code optimization and obfuscation
Now, let’s take some of these features for a spin.
Creating Android Projects
The Android project wizard creates all the required files for an Android application. Open Eclipse and follow these steps to create a new project:
- Choose File, New, Android Project or click the Android Project creator icon on the Eclipse toolbar.
Note: The first time you try to create an Android Project in Eclipse, you might need to choose File, New, Project, and then select Android, Android Project. After you do this once, the Android project type appears in the Eclipse project types, and you can use the method described in step 1.
- Choose a project name. In this case, name the project HelloKindle.
- Choose a location for the project source code. Because this is a new project, select the Create New Project in Workspace radio button. If you prefer to store your project files in a location other than the default, simply uncheck the Use Default Location checkbox and browse to the directory of your choice. The settings should look like Figure 1.2 .

- Click the Next button.
- Select a build target for your application, as shown in Figure 1.3 . For most applications, you want to select the version of Android that’s most appropriate for the devices used by your target audience and the needs of your application. For Kindle development, choose API Level 10 (Android 2.3.3) using the Android Open Source Project vender version (not the Google, Inc., vender version). Kindle Fire devices do not have access to Google add-ons.
- Click the Next button.
- Specify an application name. This name is what users will see. In this case, call the application Hello Kindle.

- Specify a package name, following standard package-namespace conventions for Java. Because all code in this book falls under the com.kindlebook.* namespace, use the package name com.kindlebook.hellokindle.
-
If needed, check the Create
Activity checkbox. This instructs the wizard to
create a default launch Activity class for the application. Call your activity
HelloKindleActivity. - Confirm that the Minimum SDK field is correct. This field will be set to the API level of the build target by default. (Android 2.3.3 is API Level 10.) If you want to support older versions of the Android SDK, you need to change this value. For example, to support devices with Android 1.6, set the Minimum SDK field to API Level 4. The Kindle is based on API Level 10, however, so an application just targeting the Kindle does not need to worry about this. Your project settings will look like what’s shown in Figure 1.4 .
- The Android project wizard allows you to create a test project in conjunction with your Android application, also shown in Figure 1.4 . For this example, a test project is unnecessary. However, you can always add a test project later by clicking the Android Test Project creator icon, which is to the right of the Android project wizard icon on the Eclipse toolbar. Test projects are discussed further in Chapter 16 , "Testing Kindle Fire Applications."
- Click the Finish button.

Note: You can also add existing Android projects to Eclipse by using the Android project wizard. To do this, simply select Create Project from Existing Source instead of the default Create New Project in Workspace in the New Android Project dialog (refer to Figure 1.2 ). Several sample projects are provided in the /samples directory of the Android SDK, under the specific platform they support. For example, the Android SDK sample projects are found in the directory /platforms/android-xxx/samples (where xxx is the platform level number, such as 10).
You can also select a third option: Create Project from Existing Sample, which will do as it says. However, make sure that you choose the build target first option to get the list of sample projects that you can create.
Exploring Your Android Project Files
You will now see a new Android project called HelloKindle in the Eclipse File Explorer. In addition to linking the appropriate Android SDK jar file, the following core files and directories are created:
- AndroidManifest.xml - The central configuration file for the application.
- project.properties — A generated build file used by Eclipse and the Android ADT plug-in. Do not edit this file.
- proguard.cfg — A generated build file used by Eclipse, ProGuard, and the Android ADT plug-in. Edit this file to configure your code optimization and obfuscation settings for release builds.
- /src folder — Required folder for all source code.
- /src/com.kindlebook.hellokindle/HelloKindleActivity.java — Main entry point to this application, named HelloKindleActivity. This activity has been defined as the default launch activity in the Android manifest file.
- /gen/com.kindlebook.hellokindle/R.java — A generated resource management source file. Do not edit this file. \
- /assets folder — Required folder where uncompiled file resources can be included in the project.
- /res folder — Required folder where all application resources are managed. Application resources include animations, drawable graphics, layout files, data-like strings and numbers, and raw files.
- /res/drawable-* folders— Application icon graphic resources are included in several sizes for different device screen resolutions.
- /res/layout/main.xml — Layout resource file used by HelloKindleActivity to organize controls on the main application screen.
- /res/values/strings.xml — The resource file where string resources are defined.
Editing Project Resources
The Android manifest file is the central configuration file for an Android application. Double-click the AndroidManifest.xml file within your new project to launch the Android manifest file editor (see Figure 1.5 ).

Editing the Android Manifest File
The Android manifest file editor organizes the manifest information into numerous tabs:
- Manifest—This tab, shown in Figure 1.5 , is used for general application-wide settings, such as the package name and application version information (used for installation and upgrade purposes).
- Application—This tab is used to define application details, such as the name and icon the application displays, as well as the "guts" of the application, such as what activities can be run (including the default launch HelloKindleActivity) and other functionality and services that the application provides.
- Permissions—This tab is used to define the application’s permissions. For example, if the application requires the ability to access Internet resources, it must register a uses-permission tag within the manifest, with the name android.permission.INTERNET.
- Instrumentation—This tab is used for unit testing, using the various instrumentation classes available within the Android SDK.
- AndroidManifest.xml—This tab provides a simple XML editor to directly edit the manifest file. Because all Android resource files, including the Android manifest file, are simply XML files, you can always edit the XML instead of using the resource editors. You can create a new Android XML resource file by clicking the Android XML creator icon on the Eclipse toolbar.
If you switch to the AndroidManifest.xml tab, your manifest file will look something like this:
<?xml version="1.0" encoding="utf-8"?>

<manifest xmlns:android="http://schemas.android.com/apk/res/android"
 package="com.kindlebook.hellokindle"
 android:versionCode="1"
 android:versionName="1.0" >
 <uses-sdk

 android:minSdkVersion="10"
 android:targetSdkVersion="10" />

 <application
 android:icon="@drawable/ic_launcher"
 android:label="@string/app_name" >
 <activity

 android:name=".HelloKindleActivity"
 android:label="@string/app_name" >
 <intent-filter>

 <action
 android:name="android.intent.action.MAIN" />
 <category
 android:name="android.intent.category.LAUNCHER" />
 </intent-filter>
 </activity>
 </application>
</manifest>
Editing Other Resource Files
Android applications are made up of functions (Java code, classes) and data (including resources like graphics, strings, and so on). Most Android application resources are stored under the /res subdirectory of the project. The following subdirectories are also available by default in a new Android project:
- /drawable-ldpi, /drawable-hdpi, /drawable-mdpi — These subdirectories store graphics and drawable resource files for different screen densities and resolutions. If you browse through these directories using the Eclipse Project Explorer, you will find the icon.png graphics file in each one; this is your application’s icon.
- /layout— This subdirectory stores user interface layout files. Within this subdirectory, you will find the main.xml screen layout resource file, which defines the user interface for the one activity in this simple application.
- /values — This subdirectory organizes the various types of resources, such as text strings, color values, and other primitive types. Here, you find the strings.xml resource file, which contains all the string resources used by the application.
If you double-click any of the resource files, the resource editor launches. Remember that you can always directly edit the XML. For example, let’s try editing a string resource file. If you inspect the main.xml layout file of the project, you notice that it displays a simple layout with a single TextView control. This user-interface control simply displays a string. In this case, the string displayed is defined in the string resource called @string/hello. To edit the string resource called @string/hello using the string resource editor, follow these steps:
- Open the strings.xml file in the resource editor by double-clicking it in the Package Explorer of Eclipse.
- Select the String called hello and note the name (hello) and value (Hello World, HelloKindleActivity!) shown in the resource editor.
- Within the Value field, change the text to Hello, Kindle Fire.
- Save the file.
If you switch to the strings.xml tab and look through the raw XML, you notice that two string elements are defined within a <resources> block:
<?xml version="1.0" encoding="utf-8"?>

<resources>

 <string name="hello">Hello, Kindle Fire</string>

 <string name="app_name">Hello Kindle</string>
</resources>
The first resource is the string called @string/hello. The second resource is the string called @string/app_name, which contains the name label for the application. If you look at the Android manifest file again, you see @string/app_name used in the application configuration.
We talk more about project resources in Chapter 4 , "Managing Application Resources." For now, let’s move on to compiling and running the application.
Running and Debugging Applications
To build and debug an Android application, you must first configure your project for debugging. The ADT plug-in enables you to do this entirely within the Eclipse development environment. Specifically, you need to do the following:
- Create and configure an Android Virtual Device (AVD).
- Create an Eclipse debug configuration for your project.
- Build the Android project and launch the emulator with the new AVD.
When you complete each of these tasks, Eclipse attaches its debugger to the Android emulator (or Android device connected via USB), and you are free to run and debug the application as desired.
Managing Android Virtual Devices
To run an application in the Android emulator, you must configure an AVD. The AVD profile describes the type of device you want the emulator to simulate, including which Android platform to support. You can specify different screen sizes and resolutions, and you can specify whether the emulator has an SD card and, if so, its capacity. In this case, a slightly modified AVD for the default installation of Android 2.3.3 will suffice. Here are the steps for creating a basic AVD:
- Launch the Android Virtual Device Manager from within Eclipse by clicking the little Android icon with the bugdroid in mini-phone on the toolbar. You can also launch the manager by selecting Window, AVD Manager in Eclipse.
- Click the New button to create a new AVD.
- Choose a name for the AVD. Because you are going to take all the defaults, name this AVD KindleFire-Portrait.
- Choose a build target. The Kindle Fire is based on API Level 10 (Android 2.3.3). Remember not to use a Google API version, because Kindle Fire does not support this.
-
Choose an SD card capacity, in
either kibibytes or mibibytes. (Not familiar with kibibytes? See this Wikipedia
entry: http://goo.gl/N3Rdd .)
Note
Although to mimic a Kindle Fire, you’d choose 8GiB, we recommend choosing something fairly small, because a file of the size of the SD card will be allocated on your drive each time you create a new AVD; these can add up quickly. Unless your application requires substantial storage, we recommend something like 64MiB.
- Choose a skin. This option controls the different visual looks of the emulator. In this case, we use the effective resolution of the Kindle Fire screen of 600 pixels wide and 1004 pixels high (the default portrait resolution). Alternatively, we could create an AVD for landscape mode, where we’d need to use 1024-pixels wide and 580-pixels high. The Kindle Fire reserves some space for a soft key menu.
-
Under Hardware, change the Abstracted
LCD Density to 169 and change the Device RAM Size to 512 to better emulate the
Kindle Fire device characteristics.
Optionally, enable the Snapshot feature. This allows you to save and restore the state of an emulator session, which dramatically improves the speed with which it launches.
Your project settings should look like what’s shown in Figure 1.6 .
- Click the Create AVD button and wait for the operation to complete. This may take a few seconds if your SD card capacity is large, because the memory allocated for the SD card emulation is formatted as part of the AVD creation process. You should now see your newly created AVD in the list.

Creating Debug and Run Configurations in Eclipse
You are almost ready to launch your application. You have one last task remaining: You need to create a debug configuration (or a run configuration) for your project in Eclipse. To do this, follow these steps:
In Eclipse, choose Run, Debug Configurations from the menu or, alternatively, click the dropdown menu next to the debug icon on the Eclipse toolbar and choose the Debug Configurations option.
- Double-click the Android Application item to create a new entry.
- Edit that new entry, currently called New_configuration, by clicking it in the left pane.
- Change the name of the configuration to HelloKindleDebug.
- Set the project by clicking the Browse button and choosing the HelloKindle project.
- On the Target tab, check the box next to the AVD you created.
- Apply your changes by clicking the Apply button. Your Debug Configurations dialog should look like what’s shown in Figure 1.7 .

Launching Android Applications Using the Emulator
Note: The first time you try to select HelloKindleDebug debug configuration from the little green bug dropdown, you have to navigate through the Debug Configuration Manager. Future attempts will show the HelloKindleDebug configuration for convenient access.
After you click the Debug button, the emulator launches (see Figure 1.8 ). This can take some time, so be patient.

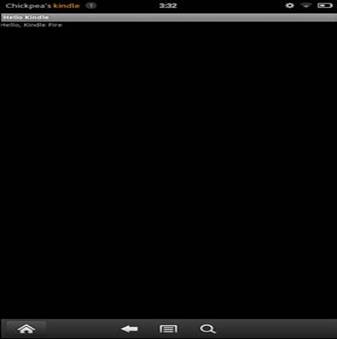
Now, the Eclipse debugger is attached, and your application runs, as shown in Figure 1.9 .

As you can see, the application is simple. It displays a single TextView control with a line of text. The application does nothing else.
The emulator’s home screen doesn’t look anything like the home screen on a real Kindle Fire device, because it has been redesigned by Amazon. Among other things, this means that the emulator won’t work for full application testing. You need to get a real Kindle Fire device for that.
Controlling the Emulator
When you create a custom AVD in this way, it will not have the keyboard and control buttons to the left of the screen, like you might be used to with the default emulators. All the commands are available through your development machine keyboard. For example, the Home key maps conveniently to the Home key. The menu key maps to F2 or page-up. Search maps to F5. Back maps to Esc. There are many more; find them in the Android documentation at http://goo.gl/5DMiI.
Debugging Android Applications Using DDMS
In addition to the normal Debug perspective built into Eclipse for stepping through code and debugging, the ADT plug-in adds the DDMS perspective. While you have the application running, quickly look at this perspective in Eclipse. You can get to the DDMS perspective (see
![]() in the
top-right corner of Eclipse. To switch back to the Eclipse Project
Explorer, simply choose the Java perspective from the top-right corner of
Eclipse.
in the
top-right corner of Eclipse. To switch back to the Eclipse Project
Explorer, simply choose the Java perspective from the top-right corner of
Eclipse.
The DDMS perspective can be used to monitor application processes, as well as interact with the emulator. You can simulate voice calls and send SMS messages to the emulator. You can send a mock location fix to the emulator to mimic location-based services. You learn more about DDMS and the other tools available to Android developers in Chapter 2 , "Mastering the Android Development Tools."
The LogCat logging tool is displayed on both the DDMS perspective and the Debug perspective. This tool displays logging information from the emulator or the device, if a device is plugged in via USB.
Launching Android Applications on a Device
It’s time to load your application onto a real Kindle Fire device. To do this, you need to connect the Kindle Fire to your computer using a USB data cable. Make sure that you have your machine configured for Kindle Fire debugging, as discussed in Appendix A .
To ensure that you debug using the correct settings, follow these steps:
- In Eclipse, from the Java perspective (as opposed to the DDMS perspective), choose Run, Debug Configurations.
- Single-click HelloKindleDebug Debug Configuration.
- On the Target tab, change Deployment Target Selection Mode to Manual. You can always change it back to Automatic later, but choosing Manual forces you to choose whether to debug within the emulator (with a specific AVD) or a device, if one is plugged in via USB, whenever you choose to deploy and debug your application from Eclipse.

- Apply your changes by clicking the Apply button.
- Plug a Kindle Fire device into your development computer by using a USB cable.
- Click the Debug button within Eclipse. A dialog appears (see Figure 1.11 ), showing all available configurations for running and debugging your application. All physical devices are listed, as are existing emulators that are running. You can also launch new emulator instances by using other AVDs that you have created.
- Choose the available Kindle Fire device. If you do not see the Kindle Fire listed, check your cables and make sure that you installed the appropriate drivers, as explained in Appendix A .
Eclipse now installs the Android application onto your Kindle Fire, attaches the debugger, and runs your application. Your device will show a screen similar to the one you saw in the emulator. If you look at the DDMS perspective in Eclipse, you see that logging information is available, and many features of the DDMS perspective work with physical devices and the emulator, such as taking a screenshot (see Figure 1.12 ).

New to Eclipse?
If you’re still learning the ropes of the Eclipse development environment, now is a great time to check out Appendix B , "Eclipse IDE Tips and Tricks."
Summary
Congratulations! You are now a Kindle Fire Android developer. You have begun to learn your way around the Eclipse development environment. You created your first Android project. You reviewed and compiled working Android code. Finally, you ran your newly created Android application on the Android emulator and on a real Kindle Fire.
Exercises
- Visit the Android website at http://developer.android.com and look around. Check out the online Developer’s Guide and reference materials. Check out the Community tab and seriously consider signing up for the Android Beginners and Android Developers Google Groups.
- Visit the Eclipse website and look around. Check out the online documentation at http:// www.eclipse.org/documentation/ ( http://goo.gl/fc406 ). Eclipse is an open source project made freely available; check out the Contribute link ( http://www.eclipse.org/contribute/ ) and consider how you might give back to this great project in some way—either by reporting bugs or doing one of the many other options suggested.
- Visit the Amazon Appstore Developer portal and look around. You can get started here: https://developer.amazon.com/welcome.html . While you’re at it, head over to Amazon Appstore Developer Blog at http://www.amazonappstoredev.com .