
GIT for Beginners
4.59/5 (15 votes)
A brief introduction to GIT for dummies
Introduction
It makes no difference what you are doing, if you are working as a programmer, for sure you need to use some kind of version control system. There are several of them, but the most popular is GIT and if you understand the logic of GIT, you can easily understand the logic of any version control system.
I worked with a lot of programmers who were good and well experienced, but they couldn’t use GIT properly and because of this reason, it was a nightmare to work with them. The other typical situation that I often see is that someone has no experience with GIT, but instead of trying to understand the main logic, he tries to understand how each command is working. The problem is that without understanding the main logic, the context you will never be able to work properly with GIT.
There are thousands of GIT tutorials online, but in my view, most of them are either too detailed or not structured correctly. So I will try to summarize now in one long post what is the main logic of GIT. The goal of this post is not to give a deep understanding. Most likely, you will need to search for the specific GIT commands to find their exact parameters. In some cases, I also tried to describe things as simple as possible to avoid mentioning some details. The goal is to give a fast overview and main understanding to be able to start to work with GIT on your project.
As a practice, you can try out everything online here: http://git-school.github.io/visualizing-git/.
What’s the Purpose of GIT?
The purpose of GIT is to make it possible to have multiple developers to work on the same files and let’s them share their results with each other in a safe and comfortable way. Furthermore, GIT is tracking the changes, so you can change anytime to any older version.
A big advantage of GIT is that you are able to work totally offline. You need to be online only during the time of synchronization with the so called remote repository. GIT is also running on multiple platforms. GIT runs is a command line tool by default, but there are thousands of GUI tools which can be used.
Communication with Remote in GIT
The main logic is that there is a so called remote repository. It can be created by calling git init --bare. This repository will be cloned to multiple computers (example, for each developer). This step can be done by git clone command. After git clone, you will have the latest state of the remote repository on your computer.
At this point, you can start to make changes on the code, at this step, these changes existing only on your local and they are so called unstaged changes. The changes which you want to keep needs to be staged by git add command. This will move your changes to the staged changes. At this point, we are still not done, it is still not really part of your local GIT repository.
First, you need to do a GIT commit. A commit contains several changes which belong together. It can contain changes also in multiple files. If you are calling the git commit command, it is creating a commit of all staged changes. A commit is also a snapshot of a version of your code, you can switch back to that version any time later. Once you committed, you can call git log, this command is listing the commits of the repository started by the last commit which should be your commit in this case.
This is now part of your local git repository, but it is still not visible for the others. To make it visible to the others, you need to push your changes to the remote. You can do it with git push. It is pushing all the changes which are existing in your repo, but not on the server, to the server.

To get the changes of other from the server, you need to call git fetch. This command is getting all changes from the remote which you still don’t have. But it is important that it is still not overwriting the current code on your side. To be able to do that, you need to do a git merge. Later, we will see in detail what it exactly means. Since git fetch and git merge are mostly used together, there is one more git command: git pull, which is equal to git fetch + git merge. In most of the cases, programmers are simply using this command.
As a summary, I played a bit with paint and created this picture:

What Is a Commit?
In GIT, each commit has a content, which is a collection of changes in the repo. It also has a commit message which is the description of the commit. You need to add it at using git commit. A commit has also a hash key, this is auto generated and it is the identifier of the commit. The commit has also a parent, which is the hash of one (or more) git commits. By using git commit operation, such a commit will be generated, the parent is automatically your current HEAD commit.
How Are Commits Connected to Each Other?
The idea is easy, whenever you have new changes, you are creating a commit and pushing it, so it is available for the others. But how to know which comment is the last one? Normally, each commit knows its parent and the commits are in a chain. In this case, the situation is easy. But sometimes, the situation becomes more complicated.
Branches
Let’s see the situation if there are multiple commits with the same parent. It can be the case if when two colleagues are working on two different features based on the same commit. And both of these commits also have a child commit and so on. This is quite typical, but if you have a lot of such kind of “branches” in your git history, it will become a chaos. To resolve it, you can introduce branches. A branch is nothing other than a named label (or pointer) to a commit. The main branch is called as master by default. The branch master always points to the last commit of your main chain. You can anytime create a new branch, a new named label to your current commit by calling git branch branch_name. So that later, you can always get that commit by git checkout branch_name. You can list all local branches by git branch -l and delete any branch by git branch -D branch_name. What is important that if there will be a child commit of your branch (a commit which parent is the labelled commit), then the branch label will point to this child commit. With other words: it is always pointing to the latest commit of your branch in the history. Thanks to that, you can also push or fetch only a specific branch.

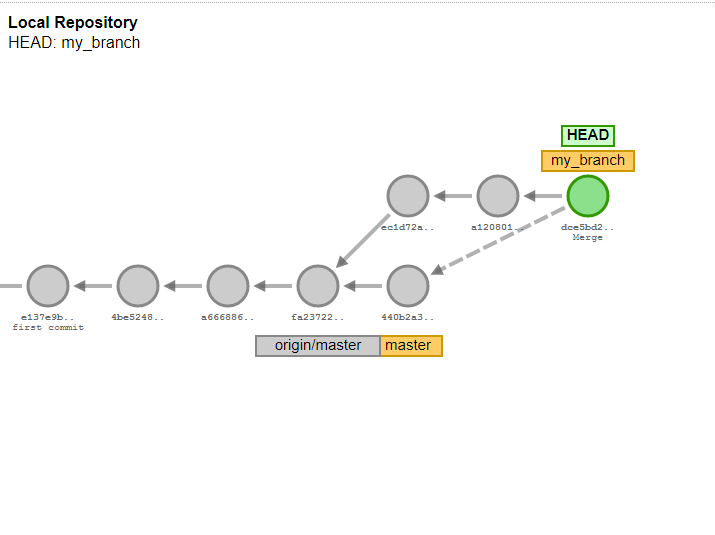
Merge Commits
Now let’s make the example: you and your colleague are working on two features, you started at the same time, you are based on the same commit. Both of you are working and then pushing your new code. So you will have two commits with the same parent, but none of them will contain all the features. How to resolve this problem?
Simple, you should create a commit which contains both changes. It is called as a merge commit in GIT. A merge commit has two parents. Luckily, the biggest part of the work is done by GIT, it can take over the changes from both commits. You can reach this functionality by calling git merge.
When the same piece of code has been modified in both commits, GIT cannot decide which version is the correct one. This is called merge conflict. Git will let you know which files contain merge conflicts. In that case, it will show you both versions in the file. You need to manually open these files, remove the not needed version, save it and call git add for the file. Once all merge conflicts are resolved, you should type git merge --continue.

Amend Commits
There’s a way to change an already existing commit. To do that, you need to checkout the commit. Make your changes, stage your changes by git add and as you are committing commit with command git commit --amend. In this case, your changes will be applied for your current commit. But pay attention, it can be dangerous if different people have the same commit with different content on their local. So try to avoid this method.
How to Move Commits?
There’s also a possibility to move one or more commits between the branches, remove commits from the chain or change the order of commit.
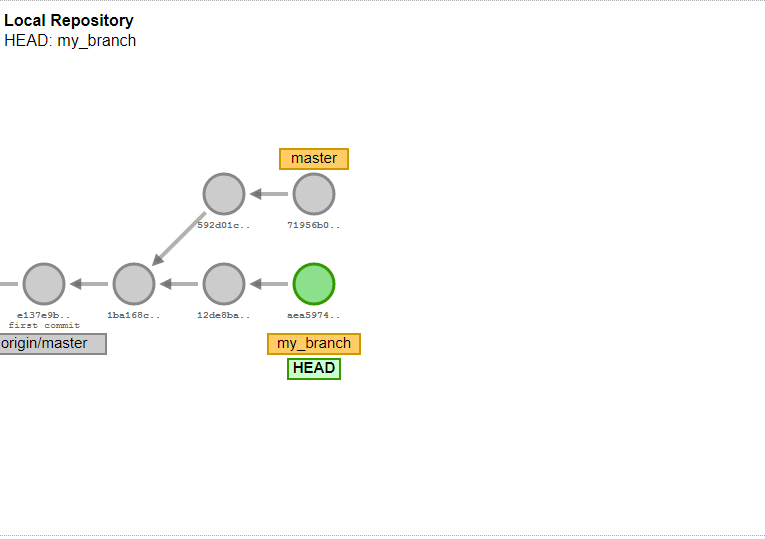
Rebase
Rebasing means changing the parent of a commit or a branch. First, you need to checkout the branch you would like to rebase. Then git rebase new_base, where new_base can be a commit or a branch name. It will change the parent of the branch to the top of the given branch. It also means that all changes will be applied for our commits which are in the new base. At rebasing, conflicts can happen as well. They can be resolved in the same way as at merging. Pay attention, no consistent usage of merging and rebasing can easily end up in a chaos.

Interactive Rebase
Interactive rebase is a very advanced opportunity. With that, you can squash multiple commits into one, drop existing commits, change the commit order, etc. You can do it by typing git rebase --interactive HEAD~10, where 10 means that you would like to make changes in the last 10 commits (of course, you can add any number). After typing this command, you will see the list of the commits with the pick keyword at the start of the line. Below, you will see the possible keywords. The most important is maybe drop, which can just remove a commit and squash which is melding it to the previous commit. It can be useful if we have a lot of small commits and we would like to clean up the history a bit. If you are changing the order of these lines, the order of commits will also change. Once you are saving this text file, the changes will be applied. Of course, conflicts can appear, you can resolve them as usual.
Cherry-pick
Witch git cherry-pick, you can apply the changes in one specific commit to another branch. It can be useful if you need only one or two commits from another branch. You need to checkout the branch you would like the apply the changes to. Then simply type git cherry-pick commit_id.
Other Useful Features
There are some other useful possibilities which can make your life easier at using git.
Git reflog
Git reflog is storying all steps you did in your local repository. You can reach it by git reflog. It will list every step you did. You can step back to any state by checking out the commit_id mentioned at the start of the lines. It is an opportunity to do an undo if you made a mistake.
Git stash
With git stash, you can do a local save of changes. It can be useful when you would like to change to another branch or commit, but you don’t want to commit your current changes. Type simply git stash and it will save your local changes. You can do multiple times git stash, it will store each change separately in a stack structure. You can list your stashed changes by calling git stash list and you can get them again by git stash pop.
Useful Tools
There are thousands of tools you can use for GIT. However, a lot of programmers prefer to do everything from the command line, there are different situations when a graphical overview helps a lot. I will mention my two favourite tools, which are also quite commonly used.
Gitk
Gitk is a nice tool to visualize your history (git log) and the changes in each commit for you.

Git GUI
Git GUI is a great tool to stage and commit your changes in an easy way.
