
ASP.NET AJAX 4.0 Template Programming - Part II
4.33/5 (3 votes)
This article describes the live data binding of client side template programming in ASP.NET AJAX 4.0
The source code for this article can be downloaded from http://udooz.net/index.php?option=com_docman&task=doc_download&gid=2&Itemid=5.
This article is continuation of ASP.NET AJAX 4.0 Template Programming Part 1. In this part, I explain the different data binding options in ASP.NET AJAX 4.0 templates. Just a recap that I've consumed an ADO.NET data services to fetch AdventureWorks's Product table records. In this article, I explain how to update/add new record from client side.
Bindings
Template supports the following bindings:
- One-time - The expression is evaluated only once when the template rendering happen
- One-way Live Binding - The expression is evaluated and update the value, if items in the data source changed
- Two-way Live Binding - If the data source value changed, the value in the expression updated. And if the value in the expression is updated, it will update data source also.
The below diagram depicts the binding.
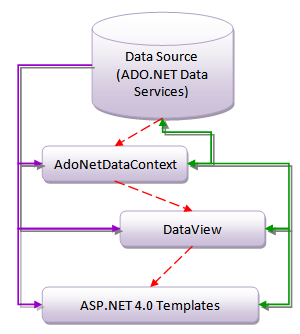
In the above diagram, the red dashed arrow shows one-time data binding. Once the data from data source has been fetched by DataView using AdoNetDataContext. The one-way live binding has been shown as purple shadowed arrow. The purpose shadow here is whenever a data updated at data source, it is being updated to data view through AdoNetDataContext. The two-way live binding has been shown as green shadowed two-head arrow. In this case, data context should have the knowledge about update operation on data source and provide an interface to data view to send the modified values.
The these three bindings, ASP.NET AJAX provides the following expression convention:
- {{
}} - One-time (can be used on any HTML controls for example <p>{{ Name }}</p>) - { binding
} - One-way if other than user input HTML controls for example <td>{ binding Name } </td> - {binding
} - Two-way if INPUT HTML controls for example <input type="text" sys:value="{{ binding Name }}" />
Master-Detail Layout
<body xmlns:sys="javascript:Sys"
xmlns:dataview="javascript:Sys.UI.DataView"
sys:activate="*">
  <form id="form1" runat="server">
  <div>
      <!--Master View-->
      <ul sys:attach="dataview" class=" sys-template"
          dataview:autofetch="true"
          dataview:dataprovider="{{ dataContext }}"
          dataview:fetchoperation="Products"
          dataview:selecteditemclass="myselected"
          dataview:fetchparameters="{{ {$top:'5'} }}"
          dataview:sys-key="master"
      >
          <li sys:command="Select">{binding Name }</li>
      </ul>

      <!--Detail View-->
      <div class="sys-template"
          sys:attach="dataview"
          dataview:autofetch="true"
          dataview:data="{binding selectedData, source={{master}} }">
          <fieldset>
            <legend>{binding Name}</legend>
            <label for="detailsListPrice">List Price:</label>
            <input type="text" id="detailsListPrice"
                sys:value="{binding ListPrice}" />
            <br />
            <label for="detailsWeight">Weight:</label>
            <input type="text" id="detailsWeight" sys:value="{binding Weight}" />
            <br />
          </fieldset>
          <button onclick="dataContext.saveChanges()">Save Changes</button>
      </div>
  </div>
  </form>
</body>
Selectable And Editable
An unordered list shows the master details, here the product name (line 15). This line also indicates that the list item is selectable using sys:command="Select". For maintaining master-detail or selectable item, primary key needs to be specified. The sys-key property of data view refers that primary key. In this example, I call the primary key as "master" (line 13). Also, you can see that I've passed a filter option using fetchparameter property of data view (line 12). In this example, I request the ADO.NET data service to give only top five records using its filter syntax.
Whenever an item in the master list is selected, the details view needs to be notified. The widget for the details view and binding details should be identified using regular sys:attach="dataview" and dataview's data property. In this example, dataview:data="{binding selectedData, source={{master}} }" specifies that binding with data view with sys-key name "master". The fieldset is used to show set of values for a product. Here, the list price and weight can be editable.
Once an item has been edited, this needs to be notified to the data source through data context. The button with caption "Save Changes" specifies that whenver this button is clicked, save the items in the details view into data source through data context's saveChanges() method. The corresponding data source's update option should be set on data context's set_saveOperation(). The following JavaScript code explains this.
var dataContext = new Sys.Data.AdoNetDataContext();
dataContext.set_serviceUri("AWProductDataService.svc");
dataContext.set_saveOperation("Products(master)");
dataContext.initialize();
The ADO.NET Product data service's Products(id) method is used on set_saveOperation. An item can be updated, when Product service of ADO.NET data service is being invoked with product primary key as argument. Here, again I'm referring master layout's "master" sys-key as primary key of Product.
The output of the above code is
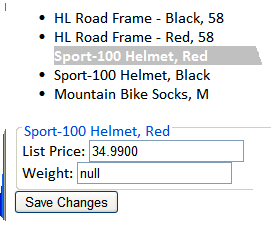
The top one is master view where Sport-100 Helmet, Red is selected and the details has been shown in the bottom page. You can edit and update the data source.
The selecteditemclass property of data view is used to show the selected item in different style.
.myselected  {
        color: white;
        font-weight: bold;
        background-color: Silver;
      }