
Turn Affiliate RSS Feeds into Website using Drupal
0/5 (0 vote)
Convert your affiliate RSS feeds into website in a few steps using Drupal
Table 1
 |  |
 |  |
Getting Started
I assume that Drupal is installed on your hosting account. The theme that I’m using is Marinelli, you can use any other theme. Make sure you have Views and Chaos tools module install/enable and Aggregator module enable. Go to Modules, enable Aggregator and hit the Save configuration button to enable Aggregator module. Here are the steps.
1. RSS Affiliate Feed
Subscribe to RSS feed from Amazon, eBay, link share, etc.
2. Setup Feed Aggregator
In Drupal, go to Configuration, Feed aggregator, click on Setting and include <div> and <img> tag into Allowed HTML tags list. This will allow the image to display in the content feed. After that, click on List and then Add Feed. Fill up the title, RSS Feed URL, Update Interval and save. Repeat the same step for all the feeds and group them by category if necessary.
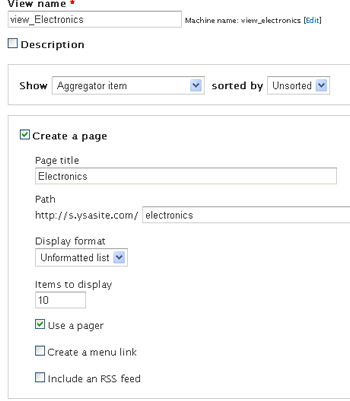
3. Create View
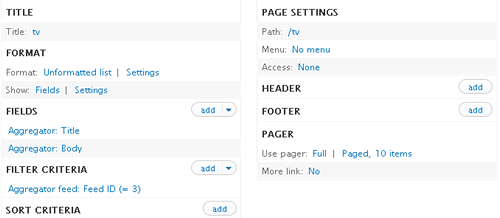
Go to Structure, View, Add New View. I noticed that the Drupal search module does not work well with view in Block and Page. But there is a Search by Page plug-in we can use to index the page. After filled up all the information, click on continue, refer to Figure 1.
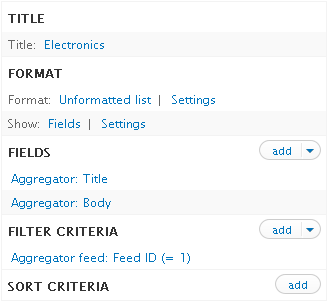
On the Fields section, click on Add and select “Aggregator: Title” and “Aggregator: Body”, click Apply and uncheck the Create a label and hit the Apply button. Then click on the dropdrown icon next to Add, select rearrange, delete the field that you don't need and arrange the field accordingly. On the Filter Criteria section, click on Add and choose “Aggregator feed: Feed ID“. Then hit Apply, select “Operator is equal to” and in the value box, insert any of the Feed ID created in step 2. You can add sort criteria to sort the result by Feed ID, Aggregator title, Timestamp, Random, etc.
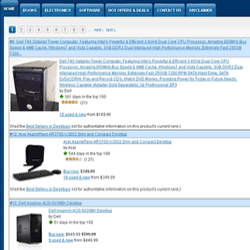
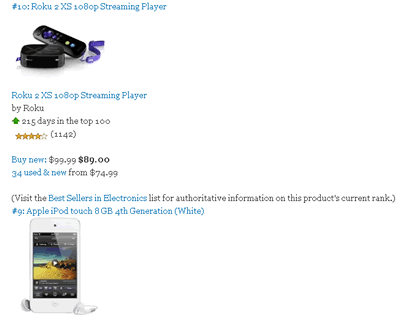
Hit on the Save button and navigate to the page to review the result. You should see something similar to figure 3.
Now, let's decorate it a little bit. Go back to the View, expand the advanced panel, and click on theme information under other. Notice that the selected template is “views-view-fields.tpl.php” instead of “views-view-fields—view-electronic—page.tpl.php”. Usually, I will modify the later template to customize a single view.

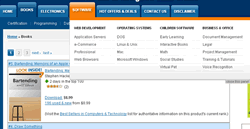
Since we will reuse the same template again, I will go ahead and replace the “views-view-fields.tpl.php” template with the code in listing 1. The title and description field in the code below is corresponding to the fields we selected earlier, refer to figure 2. For the sake of simplification, I wrap the title and body in the div tag. Depending on your requirements, you can exercise your creativity here.
Listing 1
<div class="custom_view_title">
  <?php print $fields["title"]->content; ?>
</div>
<div class="custom_view_content">
  <?php print $fields["description"]->content; ?>
</div>
Next, let's create the style for the “custom_view_title” and “custom_view_content” class. In this tutorial, we will put all the styles in a separate file. If your theme is not inside the themes folder, look under Sites>all>themes. Create a new file with the name custom.css with the styles in listing 2 and upload it to the theme, css folder.
Listing 2
.custom_view_title {
	background-color:#000;
	opacity:.7;
	filter: alpha(opacity = 70);
	border-left:1px solid #828282;
	border-right:1px solid #828282;
	border-bottom:1px solid #828282;
	padding: 2px;
}
.custom_view_content {
	min-height:180px;
	border-left:1px solid #828282;
	border-right:1px solid #828282;
	border-bottom:1px solid #828282;
	padding:2px;
}
.custom_view_content img {
	float:left;
	padding: 2px;
}
Open your theme .info file. If your theme is bartik, then the file name should be bartik.info. Add stylesheets[all][] = css/custom.css on top of stylesheets[all][] = css/layout.css line. Go to Configuration, Performance, Clear all caches and navigate to the page to review the result again.
4. Create More Views
Go to Structure, View and find the view created earlier, under operations, select clone. Give the view a new name, modify the title and provide a different Feed ID under filter criteria. On the page settings, modify the path and hit the Save button. Repeat this step if necessary.
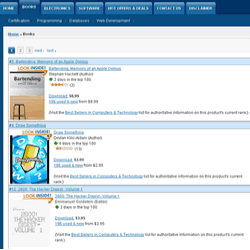
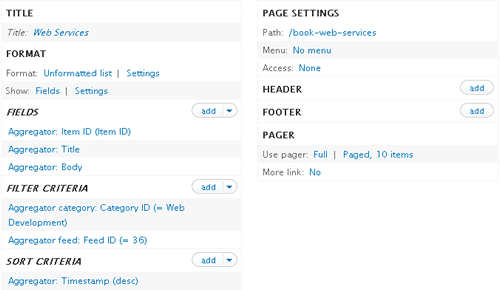
We also can filter by Category and then Feed ID, take a look at figure 7.
5. Create Menu
The next step is to decorate the menu. If the menu from the theme is not fancy enough, you can always try other plug-in such as superfish. I’m not going to cover the menu here and you can find lots of good resources on Google.
Conclusion
I hope someone will find this post useful. Please drop me a line if you have any questions.
History
- 2nd May, 2012: Initial version