
Reading and Rendering - PGM and PBM images
4.73/5 (9 votes)
An article on processing and rendering P1 and P2 bitmap images.
Introduction
Have you ever been completely shocked (and a little scared) at the vast array of image formats there are out there? Well, in my eyes, there’s only one thing more annoying than confusing image formats, and that is… old confusing image formats. This article hopes to clear the battlefield of just two of them - ‘P1’ and ‘P2’ type grayscale and black and white images, the rare yet beautiful PBM and PGM bitmap formats.
Background
The PBM Format
There are many variants of this format with the same extension. Right now, we are going to deal with ‘P1’ images. These store a simple ‘1’ or ‘0’ for each pixel in the image, with ‘1’ signifying white, and ‘0’ signifying black. For example:
#Comments Can Appear Here
P1
#Comments Can Appear Here
24 7
0 0 0 0 0 0 0 0 0 0 0 0 0 0 0 0 0 0 0 0 0 0 0 0
0 1 1 1 1 0 0 1 1 1 1 0 0 1 1 1 1 0 0 1 1 1 1 0
0 1 0 0 0 0 0 1 0 0 0 0 0 1 0 0 0 0 0 1 0 0 1 0
0 1 1 1 0 0 0 1 1 1 0 0 0 1 1 1 0 0 0 1 1 1 1 0
0 1 0 0 0 0 0 1 0 0 0 0 0 1 0 0 0 0 0 1 0 0 0 0
0 1 0 0 0 0 0 1 1 1 1 0 0 1 1 1 1 0 0 1 0 0 0 0
0 0 0 0 0 0 0 0 0 0 0 0 0 0 0 0 0 0 0 0 0 0 0 0
This is a simple PBM file that spells ‘FEEP’. When it is rendered, it will produce a 24x7 image which displays white letters on a black background. Look closely, and you’ll see the letters spelt out in ones. Let’s break this block-o-binary down and see what does what.
Lines beginning with ‘#’
These are comment lines, which can only appear (but do not have to appear) at the points marked “#Comments Can Appear Here”. They can, however, appear any number of times. For example:
#Comments Can Appear Here
#Comments Can Appear Here
P1
#Comments Can Appear Here
#Comments Can Appear Here
#Comments Can Appear Here
24 7
0 0 0 0 0 0 0 0 0 0 0 0 0 0 0 0 0 0 0 0 0 0 0 0
0 1 1 1 1 0 0 1 1 1 1 0 0 1 1 1 1 0 0 1 1 1 1 0
0 1 0 0 0 0 0 1 0 0 0 0 0 1 0 0 0 0 0 1 0 0 1 0
0 1 1 1 0 0 0 1 1 1 0 0 0 1 1 1 0 0 0 1 1 1 1 0
0 1 0 0 0 0 0 1 0 0 0 0 0 1 0 0 0 0 0 1 0 0 0 0
0 1 0 0 0 0 0 1 1 1 1 0 0 1 1 1 1 0 0 1 0 0 0 0
0 0 0 0 0 0 0 0 0 0 0 0 0 0 0 0 0 0 0 0 0 0 0 0
This is completely valid.
Line 2: The image ‘Magic Number’
This distinguishes this file as a single-bit portable bitmap file, and doesn’t do anything other than show what type of file it is.
Line 4: The image dimensions
Very important. These two numbers show simple width-height dimensions for the image in pixels.
Line 5 and onwards: The image pixel data
The actual image body which describes the picture itself.
Not so complicated, is it?
So, behold this simplest of the simple image format. Small, compact, and easy to render. But now, we will travel into slightly more complicated territory with… the PGM format!
The PGM Format
As before, there are many different types of this image file, each bearing the same or similar extensions. We’ll be tackling the ‘P2’ type for now. This is pretty much like before, only this time, the value of each pixel can be from 0 to what is called the ‘MBV’ or ‘Maximum Brightness Value’ of the image. Let’s examine a file:
#Comments Can Appear Here
P2
#Comments Can Appear Here
11 10
#Comments Can Appear Here
100
0 10 20 30 40 50 60 70 80 90 100
0 10 20 30 40 50 60 70 80 90 100
0 10 20 30 40 50 60 70 80 90 100
0 10 20 30 40 50 60 70 80 90 100
0 10 20 30 40 50 60 70 80 90 100
0 10 20 30 40 50 60 70 80 90 100
0 10 20 30 40 50 60 70 80 90 100
0 10 20 30 40 50 60 70 80 90 100
0 10 20 30 40 50 60 70 80 90 100
0 10 20 30 40 50 60 70 80 90 100
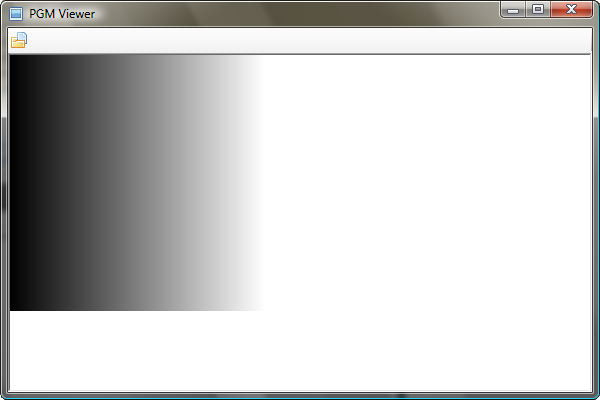
This file is a simple horizontal gradient, getting lighter as it progresses towards the right hand side of the image. But, let’s break it down to more clearly understand it.
Lines beginning with ‘#’
These, as previously explained, are comment lines.
Line 2: The image “Magic Number”
The magic number, as previously explained, identifies the file format used in the image pixel data.
Line 4: The image dimensions
A simple width-height image size describing the size of the image body.
Line 6: The MBV (Maximum Brightness Value)
This number describes the maximum (0 - 255) brightness value for every pixel in the image body. This section of the header, however, is absent in the ‘P1’ PBM format for the simple reason that the colour of each pixel is either white or black.
Line 7 and onwards: The image pixel data
This, as explained before, is the actual image bitmap data which is rendered.
So, how would we go about rendering these formats?
Rendering these formats is not straightforward. No type of image rendering really is. But, it’s by far one of the simplest because it is stored on the disk in raw, uncompressed, plain-textual data, making parsing easier.
Using the Code
UserControls are easier than writing a class
One of Microsoft’s best ideas to date was to add UserControl capabilities to Visual Studio. This allows us to create a fantastic-looking control without bashing out a bunch of tiresome code. Now, we can design full-fledged controls in the Forms Designer that we have all come to know and love.
Firstly, create a new Class Library project in Visual Studio. Then, delete the default “Class1” and click on “Add New Item”, and then on “UserControl”.
Drag a PictureBox onto the control, name it DisplayPanel, and we’re ready to go!
There are three main functions in the attached VB UserControl. These are:
OpenFile(ByVal FilePath As String)- Opens a file, parses the image header, and stores the image data in memory.DrawToCanvas()- Draws the image data to thePictureBox. This is where the actual rendering takes place.PurgeGlobalData()- Clears the global variables completely, and readies the control to open another file.
The global variables that are central to the entire control come in to carry data between functions:
Private CurrentBitmap As New Bitmap(25, 25)- Holds theBitmapto be displayed in the PictureBox.Private CurrentFile As String = ""- Holds the image body of the current picture.Private CurrentFilePath As String = ""- Holds the file path of the current image.Public ImageType As String = ""- Holds the ‘P1’ or ‘P2’ type of the image.Private CurrentX As Integer = 0- Holds the index number of the current column for rendering.Private CurrentY As Integer = 0- Holds the index number of the current row for rendering.Private ImageHeight As Integer = 0- Holds the height of the current image.Private ImageWidth As Integer = 0- Holds the width of the current image.Public ImageMaxGreyValue As Integer = 255- Holds the MBV for the image.
First, the PurgeGlobalData() function just resets all these values to their default:
Private Function PurgeGlobalData() As Boolean

    CurrentBitmap = New Bitmap(25, 25)
    DisplayPanel.Image = Nothing
    CurrentX = 0
    CurrentY = 0
    ImageHeight = 0
    ImageWidth = 0
    ImageMaxGreyValue = 255
    CurrentFile = ""
    CurrentFilePath = ""
    ImageType = ""

End Function
That’s simple, so let’s have a look at the OpenFile() function. It gradually reads data in from the file path provided line by line, and parses each line individually in the image header, then reads the pixel data into the CurrentFile variable so that DrawToCanvas() can render it.
Public Function OpenFile(ByVal FilePath As String) As Boolean
    Try
    'Check For Invalid File Paths [

        If FilePath = "" Then
            Return False
            Exit Function
        End If

        If Not My.Computer.FileSystem.FileExists(FilePath) Then
            Return False
            Exit Function
        Else
            CurrentFilePath = FilePath
        End If

    ']

    'Set Up A StreamReader, Buffer, And Array For Our Data [

        Dim ImageStreamReader As New StreamReader(FilePath)
        Dim LineBuffer As String
        Dim ExtractDimensions As Array

    ']

    PurgeGlobalData() ‘Empty The Global Variables

    'Skip Over Comment Lines [

        LineBuffer = "#"
        Do While LineBuffer.StartsWith("#")
            LineBuffer = ImageStreamReader.ReadLine()
        Loop

    ']

    'Get The Image Type [

    If LineBuffer.StartsWith("P2") Then
        ImageType = "P2"
    ElseIf LineBuffer.StartsWith("P1") Then
        ImageType = "P1"
    Else
        ImageStreamReader.Close()
        Return False
        Exit Function
    End If

    ']

    'Skip Over Comment Lines [

        LineBuffer = "#"
        Do While LineBuffer.StartsWith("#")
            LineBuffer = ImageStreamReader.ReadLine()
        Loop

    ']

    'Read In The Height And Width And Split Them Up [

        ExtractDimensions = LineBuffer.Split(" ")
        ImageHeight = Val(ExtractDimensions(1))
        ImageWidth = Val(ExtractDimensions(0))

    ']

    'Assign This Height And With To the Picture Box [

        DisplayPanel.Width = ImageWidth
        DisplayPanel.Height = ImageHeight

    ']

    'Resize The Bitmap [
    CurrentBitmap = New Bitmap(ImageWidth, ImageHeight)
    ']

    'If It's A P2 Image, Skip Comments and Read MBV
    If ImageType = "P2" Then

        LineBuffer = "#"
        Do While LineBuffer.StartsWith("#")
            LineBuffer = ImageStreamReader.ReadLine()
        Loop

        ImageMaxGreyValue = Val(LineBuffer)

    End If

    ']

    'Read In The Image Data And Close The File [
        CurrentFile = ImageStreamReader.ReadToEnd
        CurrentFile = CurrentFile.Replace(vbNewLine, " ")
        ImageStreamReader.Close()
    ']

    'Begin Rendering Image [
        DrawToCanvas()
    ']

    Catch MyException As Exception
        PurgeGlobalData() ‘Reset Globals
        Return False
    End Try

    Return True

End Function
The first problem that we have is comments. They can really get in the way of parsing anything, including images. We can bypass this with a simple loop that reads input from a StreamReader until it hits a line that does not begin with “#“.
Dim LineBuffer As String = "#"

Do While LineBuffer.StartsWith("#")
    LineBuffer = ImageStreamReader.ReadLine()
Loop
The rest is fairly self-explanatory, the comments should make it clear what’s happening. The DrawToCanvas() function, however, is slightly more complex:
Private Function DrawToCanvas() As Boolean
    Try
       Dim NewString As String = CurrentFile.Replace(Chr(13), " ")
       'Remove NewLine Characters

       Dim ColorArray As Array = NewString.Split(" ")
       'Split Image Data into Pixel Values

       Dim ColorArrayFiltered As New ArrayList
       'An Array List To Hold Our Inamage Data With All Spaces Removed

       Dim Counter As Integer = 0 ‘A Counter To Count Repetitions
       'Remove Duplicate Spaces [

       Dim NewCounter As Integer = 0

       Do Until NewCounter = ColorArray.Length

         If Not ColorArray(NewCounter).ToString.Length = 0 Then
             ColorArrayFiltered.Add(ColorArray(NewCounter))
         End If

         NewCounter += 1

       Loop

       ']

        'Sort Out The Image Types
        If ImageType = "P2" Then

            'Loop Through File [
            Do Until Counter = ColorArray.Length

                'Move To Next Line [
                If CurrentX = DisplayPanel.Width Then
                    CurrentX = 0
                    CurrentY += 1
                End If
                ']

                'Get Ready To Exit [
                If CurrentY = DisplayPanel.Height Then
                    Exit Do
                End If
                ']

                'Set A Pixel [
                CurrentBitmap.SetPixel(CurrentX, CurrentY, _
                   Color.FromArgb(255, Val( ColorArrayFiltered(Counter).ToString), _
                   Val(ColorArrayFiltered(Counter).ToString), _
                   Val(ColorArrayFiltered(Counter).ToString)))
                ']

                'Update Tracking Variables [
                CurrentX += 1
                Counter += 1
                ']

            Loop
            ']

            'Assign Picture To PictureBox [
            DisplayPanel.Image = CurrentBitmap
            ']

        ElseIf ImageType = "P1" Then

            'Loop Though Array [
            Do Until Counter = ColorArray.Length

                'Move To Next Line [
                If CurrentX = DisplayPanel.Width Then
                    CurrentX = 0
                    CurrentY += 1
                End If
                ']

                'Get Ready To Exit [
                If CurrentY = DisplayPanel.Height Then
                    Exit Do
                End If
                ']

                'Set A Pixel [


                'Set A Black Pixel [
               If ColorArrayFiltered(Counter).ToString = "0" Then
                    CurrentBitmap.SetPixel(CurrentX, _
                          CurrentY, Color.FromArgb(255, 0, 0, 0))
               End If
                ']

                'Set A White Pixel [
               If ColorArrayFiltered(Counter).ToString = "1" Then
                    CurrentBitmap.SetPixel(CurrentX, _
                            CurrentY, Color.FromArgb(255, 255, 255, 255))
               End If
                ']

                ']

                'Update Positioning Variables [
                CurrentX += 1
                Counter += 1
                ']

            Loop
            ']

            'Assign Picture To PictureBox [
            DisplayPanel.Image = CurrentBitmap
            ']

        Else

            'Exit [
            Return False
            Exit Function
            ']

        End If

    Catch MyException As Exception

        'Return A Failure [
        PurgeGlobalData() 'Clear Globals
        Return False
        ']

    End Try

    'Return A Success [
    Return True
    ']

End Function
Though the comments explain this function quite clearly, it is also equally obvious that this is not the most efficient way to render an image file, but I have tried to keep it as clear as possible in order to more clearly show the process of drawing each pixel’s value to the bitmap.
The process of this function is quite simple:
- Remove all double, triple, quadruple etc., spaces from the array that holds each pixel value.
- Split the data into an array for individual processing.
- Loop through the array and draw each pixel to the bitmap.
- Assign the bitmap to the
PictureBox.
And There You Go!
So now, we have created a user control that is capable of rendering these formats, and hopefully, this control will be useful to you at some time in the future. It is extremely lightweight, and is capable of detecting the image “Magic Number” and adjusting the method of rendering as appropriate. With this article, and the comments and clear method in the code, you will see just how simple image rendering can be! So, good luck!
Credits
- A huge thank you to Mark James for his Silk Icon Pack (used in the demo app). Visit his site here.
History
- 13/12/08 - Article submitted at 18:09