
Build Simple Twitter Client with ASP.NET MVC2
5.00/5 (3 votes)
The main purpose of this tutorial is to get you started with ASP.NET MVC easily, which will be through building a simple Twitter client to demonstrate the components of the framework and exposing some concepts too.
ASP.NET MVC2 Overview
The tutorial is not about a specific version of ASP.NET MVC framework, but after it you will be able to pick up any version you want with a few not essential differences.
ASP.NET MVC2 is an open source web application framework that follows the MVC pattern, and is build on ASP.NET.
Model-View-Controller Quick Look
MVC is categorized as an Architectural Pattern, with a concept called Separation of Concerns or Roles, which means splitting your app into different module, each one responsible for related stuff.
In case of ASP; you have modules responsible for data storing and retrieving, other responsible for displaying your data in a formatted way, and the last one responsible for manipulating the data and applying any logic or whatever you want on them.
In the next three sub-sections, we will discuss each component of the MVC.
The Model
Models are the main component of your app, which is usually; what is stored and retrieve from the database, in our app, it will the tweet info and text.
The View
Views are the date in formatted form, delivered to the user. Here it will be the HTML pages.
The Controller
Controllers are the components that respond to all user requests, decide the appropriate response; which might be render a view, redirect to other URI or many other things.
Pros and Cons
Pros
It has many pros, but these are the most remarkable:
- Full control over the HTML, CSS, and JavaScript code, helping you to write clean, standards-compliant markup
- It's Extensible which means that you can use a default component, or reconfigure it, or even use another component
- HTTP friendly, it gives you total control over the requests passing between browser and server
- Testability of MVC makes it simple to unit test the logic that is specific to a page, by testing controller methods
Cons
It does not really have many cons compared to its pros:
- The lake of drag and drop component in WebForms, despite that JQuery and other JavaScipt library overcome this problem
- It's not as easy as WebForms, you should understand the role of each component individually and all of them together.
Let' Started Building The App
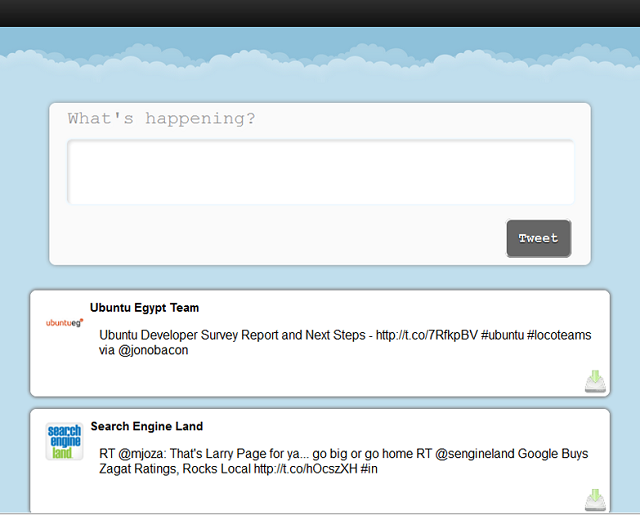
After this introduction, let's see how all this fits in a real world app like a Twitter client, which will have a simple functionality like showing the timeline, tweeting from it, and storing a tweet on your local database.
Step 1: Create ASP.NET MVC Project
Start Visual Studio 2010 and go to File > New > Project and choose ASP.NET MVC 2 Web Application and rename it to SimpleTwitterClient and press ok. Next, it will ask you if you want to create a unit test project for the app, select No and press ok. We are not going to create this project because it's not part of the purpose of the tutorial.


Step 2: What are All these Folders and Files in the Project
Convention over configuration (also known as coding by convention) is a software design paradigm which seeks to decrease the number of decisions that developers need to make, gaining simplicity, but not necessarily losing flexibility.
-Wikipedia
This template is very useful, and it will save some time for you to start any app. The other important thing about this template, is what called Convention over configuration as defined above, here's some of this concept spotlight on the project and MVC. Every controller must end with word Controller and the page name must be the same as the Action (we will define actions soon), and must be located in folder that match the name of the controller, you can customize this for sure with Routing object (we will see this very soon), else your app is not going to work.
Here are the folders and its uses:
- App_Data: Contains your all database instances
- Content: Contains your css file and over related resources
- Controller: Contains all your controller classes
- Model: Contains all your model classes
- Views: Contains all your pages
- All other folders and files are as in WebForms

Step 3: Edit Project Folders and Files
Delete the following folders and file /Views/Account/, /Views/Shared/, /Modules/AccountModules.cs,
/Controller/AccountController.cs, /Content/Site.css, and /Home/about.aspx. We will add and edit the ones that are left as we go.
So the project will look like the picture below:

Step 4: The Model
First: What is that data that will concern us here? It's the tweets, more specific the text of the tweet and the picture of that person who tweeted it, and its name.
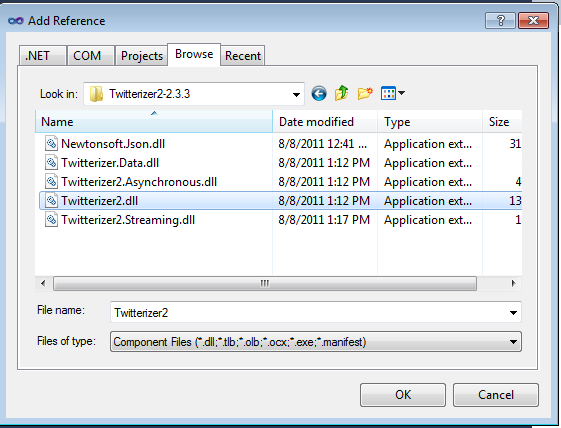
Secondly: What is that database that we will deal with? It's two different databases, the first database is the twitter one which we will deal with through Twitterizer wrapper. Please download the last version 2.3.3 Binaries here to use it in the app.
So we will see how to work with Twitterizer after few next steps, but now we will create the local database and its access class..
Step 5: Create Database for Stored Tweets
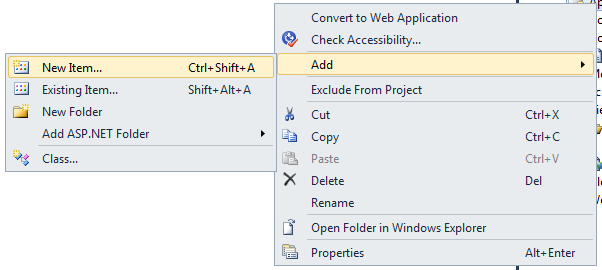
Click the right button on the App_Data folder, the menu will appears as below, so, go to Add/New Item..., then the other box will appear, choose SQL Server Database and rename it to StoredTweets and press ok.

Step 6: Add Table to the Database
Click the right button on the Tables folder, the menu will appear as below, so, go to Add New Table, then the SQL table will open, so write the columns name and Datatypes as it is in the picture below.


Step 7: Make a Primary Key of the Table
Click the right button on the first column and choose Set Primary Key, then go to the Column Properties and change the property (Is Identity) from No to Yes, the press Ctrl+S the below box will appear, rename the table to Tweet and press ok.


Step 8: Create the Model of the StoredTweet Database
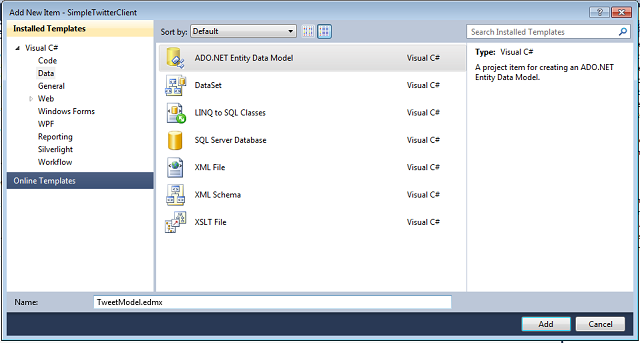
Click the right button on the Model folder, the menu will appears as below, so, go to Add/New Item..., then the other box will appear, choose from it ADO.NET Entity Data Model and rename it to TweetModel and press ok.
Step 9: Configure the Model
The first box will appear, select Generate from database and press next, the press next again without changing anything, the third box will appear, select the tables, and press Finish.


Step 10: Create Twitter Application
In this step, we will create the twitter app on Twitter Developers site, press Create an app then fill the app details like the image below, and finish the agreement and the caption, and press Create.
You will direct to setting page at the end of it, you will find OAuth setting as in image, note that; you will need to copy the Customer key and Customer secret to the OAuth action after few steps.
We using here Single-user OAuth which offered by twitter to make the ability for you to retrieve a single access token (complete with oauth_token_secret) from application detail pages found in your application control panel. Read more.
I had already deleted the app before publishing this tutorial. So, create your app, and get your tokens.


Step 11: Add Twitterizer to the Project
Click the right button on the References folder, the menu will appear as below, go to Add Reference... , then the other box will appear, go to the folder of the Twitterizer that you downloaded, choose from it Twiterizer2.dll and press ok, then go to the HomeController and the last two lines in the picture below to import the Twitterizer classes and the model class to use it later.


Step 12: The Views
Now we are going to write the views and show how to format it. As mentioned before, the View name must be the same as the action name.
To add a new view, click the right button on the /Views/Home folder, the menu will appears as below, so, go to Add/View..., then this box will open, unselect Select master page, then rename the view to StoredTweets and press add.


Step 13: Adding Pictures for Styling
Here we will add some picture to be used in CSS, we use embedded style in the pages.


Step 14: Index View
In the below code is the important part of the view, the rest of the page is just normal HTML and CSS.
You can see in line 3 ViewData["pic1"] which is a dictionary object used to exchange data between the view and the controller. Here we are using it to get the address of the picture of the user tweet. The same as in ViewData["name1"] to get the name, the last one ViewData["text1"] to get the tweet text, try and catch that is used here is to prevent the exception that happens when Replace method return null, which is used because that # was making some problems when passed as query string to store action as we see in line 18, at this line we pass the selected tweet to store action to store it in the database.
 <div class="tweet">
                <img class="pic" alt="pic" src="<%: ViewData["pic1"] %>"
			height="48px" width="48px" />
                <h1 class="name">
                    <%: ViewData["name1"]%>
                </h1>
                <% try %>
                <%    {	        %>
                <p id="P2">
                    <%:	 ViewData["text1"].ToString().Replace("=", "#")%>
                </p>
                <%    }%>
                <%    catch%>
                <%	    {%>
                <p id="P1">
                    <%: ViewData["text1"]%>
                </p>
                <%    }  %>
                <a href="http://www.codeproject.com/Timeline/Store?name=
		<%: ViewData["name1"]%>&text=<%: ViewData["text1"]%>
		&pic=<%: ViewData["pic1"] %>">
                    <img class="store" src="../../Content/store.png" alt="store"
			height="30px" width="30px" />
                </a>
            </div>
Step 15: StoredTweets View
This code is much like the above one, except the for loop which is used here to loop through all the tweets in the ViewData object and write them in real time.
<div class="tweet">
            <% for (int i = 0; i < int.Parse(ViewData["count"].ToString()); i++)
               { %>
            <img class="pic" alt="pic"
		src="<%: ViewData["user_pic" + i]%>" height="48px" width="48px" />
            <h1 class="name">
                <%: ViewData["user_name"+i]%>
            </h1>
            <% try %>
            <%   {  %>
            <p id="P2">
            <%:	    ViewData["text" + i].ToString().Replace("=", "#")%>
            </p>
            <hr />
            <%    }%>
            <%    catch%>
            <%	    {%>
             <p id="P1">
            <%:   ViewData["text" + i]%>
            </p>
            <hr />
            <%    } %>
            <%} %>
        </div>
Step 16: The Controllers
We use here only one controller just for simplicity.
Every controller must at least have one method that is public and return ActionResult type or any other derived type, this method with this signature called action is responsible for responding to the user, actions can respond in many ways like render a view, redirect to another URI or even return a JSON object.
Step 17: OAuth Action
The purpose of this action is to create the tokens object. In line 3, we create the OAuthTokens object, and in next lines we set the object variable with the appropriate values, and then return the object.
public static OAuthTokens OAuth()
        {
            OAuthTokens tokens = new OAuthTokens();
            tokens.AccessToken = "149986120-UrYpRgSJigTAOTvaUlQq1syEd0TmUs5DEN6mcaKz";
            tokens.AccessTokenSecret = "XxUuIvn9sg19a6URSvS1Xdzelq1MyMdMu1bikZb6VoM";
            tokens.ConsumerKey = "iclRhUctHXh6uQe6o1HEQ";
            tokens.ConsumerSecret = "61JALtKUSmiaPn899fVJum6rpT9IQ3sYKZy6o";
            return tokens;
        }
Step 18: Index Action
This action is the main one, because it return the timeline view, in line 3 here, we initialize the tokens object with OAuth method, and then create the TwitterResponse to represent the timeline by initializing it using HomeTimeLine method which take two arguments, first one is the tokens and the other one is TimelineOptions. It's optional, you can remove it, but are we using it here to ensure the number of tweets that extract from the Twitter fitting for the view.
public ActionResult Index()
        {
	    OAuthTokens tokens = OAuth();
            TwitterResponse<twitterstatuscollection /> timeline = TwitterTimeline.HomeTimeline
		(tokens, new TimelineOptions() { Page = 4, Count = 15 });
            int count = 0;
            foreach (var tweet in timeline.ResponseObject)
            {
                ViewData["text" + count] = tweet.Text.Replace('#', '=');
                ViewData["name" + count] = tweet.User.Name;
                ViewData["pic" + count] = tweet.User.ProfileImageLocation;
                count++;
            }
            return View();
        }
Step 19: Store Action
We use this method to store the selected tweets in the database, in line 3 we create an object to represent the database using the Entity model that we created few steps above, and the second object is to represent the table of stored tweets, then assigning the parameter to the properties that represent the columns in the table. Note that the parameter of the action is passed as a Querystring few steps back in the index view, then add this new table data to the database and save this using SaveChanges method, and finally redirect again to the index method.
public RedirectResult Store(string name, string text, string pic)
        {
            favorit_tweets_dbEntities tweets_db = new favorit_tweets_dbEntities();

            tweet new_stored_tweet = new tweet();

            new_stored_tweet.tweet_text = text;
            new_stored_tweet.tweet_user_name = name;
            new_stored_tweet.tweet_user_pic = pic;

            tweets_db.AddTotweets(new_stored_tweet);
            tweets_db.SaveChanges();
            return Redirect("/Timeline/index");
        }
Step 20: StoredTweets Action
Here we do like what we did in the index action, but here we retrieve the data from the local database, and then add it inclemently to the ViewData object to pass it to the StoredTweets view, and then render the StoredTweets view by calling View method without any parameter.
public ActionResult StoredTweets()
        {
            favorit_tweets_dbEntities tweets_db = new favorit_tweets_dbEntities();
            int count = tweets_db.tweets.ToList().Count;
            for (int i = 0; i < count; i++)
            {
                ViewData["user_name" + i] = tweets_db.tweets.ToList()[i].tweet_user_name;
                ViewData["user_pic" + i] = tweets_db.tweets.ToList()[i].tweet_user_pic;
                ViewData["text" + i] = tweets_db.tweets.ToList()[i].tweet_text;
            }
            ViewData["count"] = count;
            return View();
        }
Step 21: Tweet Action
Finally, here we just get the tweet text as a parameter from the Querystring and pass it to the Update method with the tokens and redirect the index.
public ActionResult tweet(string status)
        {
	    OAuthTokens tokens = OAuth();
            TwitterResponse<twitterstatus /> new_tweet = TwitterStatus.Update(tokens, status);
            return Redirect("/timeline/index");
        }
Conclusion
Okay, we covered with this simple app many important aspects of the MVC like how the controller actions work with views and how they both interact with the model, and we covered some classes of the Twitterizer and OAuth process.
Thank you for reading, and I hope that you learned something new today.