
3D Basics using Silverlight-5 and XNA (Part 2)
4.50/5 (6 votes)
Learn 3D programming with Silverlight-5 and XNA
- Download source (Step 1) - 12.75 KB
- Download source (Step 2) - 13.07 KB
- Download source (Step 3) - 13.54 KB
- Download source (Completed project) - 14.6 KB
Introduction
This second introductory article builds on the 'Hello World' program of the first article, and through a series of refactoring steps, it shows how to create a 3D world of spinning polyhedra.
Each step is explained in detail, several new XNA concepts are introduced along the way, and the final program should provide a good foundation for more complex 3D applications.
If you haven’t read the first article, you should do that first, because this article uses it for its starting point. It can be found here:
Step One - Optimise the Draw Event Handler
In the first article, we created the simplest possible Silverlight-XNA program with a single rotating triangle. To keep the program small, we put all the code in the Draw event handler, which is not the way to do it for a larger program.
To make the program scalable, we need to move everything possible out of the Draw handler to make it as fast and efficient as possible.
In our program, we:
- Create class variables for the
Texture2D,VertexBufferandBasicEffectobjects - Create a ‘
Loaded’ event handler on theDrawingSurfaceand put the setup code for these objects in there
There are some things that can’t be moved out of the Draw handler. Specifically, anything that directly affects the state of the GraphicsDevice has to be done in the Draw handler, otherwise you will get an exception:
The GraphicsDevice can only be used when accessed inside a Draw callback
on the render thread.
This includes the setting of vertex buffers and effects as well as changing simple settings such as the RasterizerState. The reason for the restriction is that the GraphicsDevice is ‘owned’ by the composition thread, so we are not allowed to change it from any other thread. Note: The ‘render’ thread and the ‘composition’ thread are synonymous.
We can however reference the GraphicsDevice from other threads - we have to do that to create our textures and vertex buffers - we’re just not allowed to change it.
Note that we haven’t implemented any locking between our Draw handler and our Loaded handler – we’re assuming that the Loaded handler will complete before the Draw event is raised.
Here is the streamlined Draw handler:
private void drawingSurface1_Draw(object sender, DrawEventArgs e)
{
  GraphicsDevice g = GraphicsDeviceManager.Current.GraphicsDevice;
  g.RasterizerState = RasterizerState.CullNone;
  g.SetVertexBuffer(vb);

  basicEffect.World = Matrix.CreateRotationY((float)e.TotalTime.TotalSeconds * 2);
  basicEffect.View = Matrix.CreateLookAt(new Vector3(0, 0, 5.0f),
            Vector3.Zero, Vector3.Up);
  basicEffect.Projection = Matrix.CreatePerspectiveFieldOfView
(0.85f, aspectRatio, 0.01f, 1000.0f);

  g.Clear(new Color(0.8f, 0.8f, 0.8f, 1.0f));
  basicEffect.CurrentTechnique.Passes[0].Apply();
  g.DrawPrimitives(PrimitiveType.TriangleList, 0, 1);
  e.InvalidateSurface();
}
And here is the Loaded handler doing all the one-time setup:
private void drawingSurface1_Loaded(object sender,System.Windows.RoutedEventArgs e)
{
  if (Is3dBlocked())
    return;
  GraphicsDevice g = GraphicsDeviceManager.Current.GraphicsDevice;

  VertexPositionNormalTexture[] vertices = new VertexPositionNormalTexture[]{
    new VertexPositionNormalTexture(new Vector3(-1, -1, 0),Vector3.Forward,Vector2.Zero),
    new VertexPositionNormalTexture(new Vector3(0, 1, 0),Vector3.Forward,Vector2.Zero),
    new VertexPositionNormalTexture(new Vector3(1, -1, 0),Vector3.Forward,Vector2.Zero)};
  vb = new VertexBuffer(g, VertexPositionNormalTexture.VertexDeclaration,
            vertices.Length, BufferUsage.WriteOnly);
  vb.SetData(0, vertices, 0, vertices.Length, 0);

  texture = new Texture2D(g, 1, 1, false, SurfaceFormat.Color);
  texture.SetData<Color>(new Color[1] { new Color(1f, 0, 0) });

  basicEffect = new BasicEffect(g);
  basicEffect.EnableDefaultLighting();
  basicEffect.LightingEnabled = true;
  basicEffect.Texture = texture;
  basicEffect.TextureEnabled = true;
}

private bool Is3dBlocked()
{
  if (GraphicsDeviceManager.Current.RenderMode == RenderMode.Hardware)
    return false;
  string message;
  switch (GraphicsDeviceManager.Current.RenderModeReason)
  {
    case RenderModeReason.Not3DCapable:
      message = "You graphics hardware is not capable of displaying this page ";
      break;
    case RenderModeReason.GPUAccelerationDisabled:
      message = "Hardware graphics acceleration has not been enabled
            on this web page.\n\n" +
        "Please notify the web site owner.";
      break;
    case RenderModeReason.TemporarilyUnavailable:
      message = "Your graphics hardware is temporarily unavailable.\n\n" +
        "Try reloading the web page or restarting your browser.";
      break;
    case RenderModeReason.SecurityBlocked:
      message =
        "You need to configure your system to allow this web site
            to display 3D graphics:\n\n" +
        "  1. Right-click the page\n" +
        "  2. Select 'Silverlight'\n" +
        "     (The 'Microsoft Silverlight Configuration' dialog will be displayed)\n" +
        "  3. Select the 'Permissions' tab\n" +
        "  4. Find this site in the list and change its
        3D Graphics permission from 'Deny' to 'Allow'\n" +
        "  5. Click 'OK'\n" +
        "  6. Reload the page";
      break;
    default:
      message = "Unknown error";
      break;
  }
  MessageBox.Show(message, "3D Content Blocked", MessageBoxButton.OK);
  return true;
}
Step Two – Create a Cube
Now that we’ve streamlined the rendering, it’s time to add some solid 3D objects to our program. We’ll start with a simple cube. At this point, we will also introduce ‘Index Buffers’.
Index buffers are an optional technique that can improve performance. If we don’t want to use them, then we draw our triangles with the DrawPrimitives() method, if we do want to use them, we use the DrawIndexedPrimitives() method. Index buffers can reduce the number vertices that we send to the GPU. The idea is that because multiple triangles often share vertices, we can define the unique vertices once, then we can define our triangles as simple lists of indices into our vertex buffer.
A cube has six square faces, which we build from two triangles each, that’s twelve triangles in total, and 36 vertices. At this point, you might be thinking that with an index buffer we can reduce that to eight vertices. After all, a cube only has eight corners. Unfortunately, an XNA vertex defines more than just the position; it also defines the lighting ‘normal’, which is used for calculating highlights and shadows on the adjoining triangles. A lighting normal is a unit length vector at right angles to the surface of the 3D object. Our cube has six flat faces, so the normals need to be at right angles to those. This means that we can’t share vertices between triangles that are on different faces of the cube. We do get some saving, because for each face we can use four vertices instead of six – that’s a total of 24 vertices instead of 36.
Here’s the start of our vertex definitions:
VertexPositionNormalTexture[] vertices = new VertexPositionNormalTexture[]
{
  new VertexPositionNormalTexture(new Vector3(-1, 1, 1),Vector3.Forward,Vector2.Zero),
  new VertexPositionNormalTexture(new Vector3(1, 1, 1),Vector3.Forward,Vector2.Zero),
  new VertexPositionNormalTexture(new Vector3(1, -1, 1),Vector3.Forward,Vector2.Zero),
  new VertexPositionNormalTexture(new Vector3(-1, -1, 1),Vector3.Forward,Vector2.Zero),
.
.
.
And here’s how we define our triangles using an index buffer:
short[] indices = new short[]
  {0,1,2,2,3,0,4,5,6,6,7,4,8,9,10,10,11,8, ... };
ib = new IndexBuffer(g, typeof(short), indices.Length, BufferUsage.WriteOnly);
ib.SetData(indices);
Rotation using Quaternions
Previously, our triangle rotated in a simple way around the Y axis. But now we’ve got a cube, it would be nice for it to rotate around a diagonal axis, so that it shows off all its faces. There are several ways of achieving this, but by far the neatest, and the coolest, is to use a Quaternion to create our rotation matrix.
Quaternions are easy to use in XNA, despite being based on some fairly deep maths. As an aside, they were invented over a hundred years ago and for a long time they languished in the backwaters of abstract mathematics, with no known practical application - they are now widely used for both space flight and computer graphics.
Here’s how we use a Quaternion to create diagonal rotation:
Vector3 axis = new Vector3(-0.5f, 1, -0.5f);
axis.Normalize();
Quaternion quaternion = Quaternion.CreateFromAxisAngle
            (axis, (float)e.TotalTime.TotalSeconds * 2);
basicEffect.World = Matrix.CreateFromQuaternion(quaternion);
We now have a rotating cube:

Step Three – Encapsulate the Cube into a Separate Class
So far, we’ve put all our code into the MainPage.xaml.cs file. This is great for learning, but it doesn’t scale. It’s impractical to even introduce a second spinning cube with our current program structure.
3D graphics programs represent 3D objects – they are inherently object-oriented. It’s time to create a Cube class.
We want to encapsulate as much of the cube’s behaviour and properties as possible, leaving the main program to orchestrate things at the global level.
XNA presents a bit of dilemma here, because the effect classes, and the BasicEffect class in particular, encapsulate a mixture of things: some global and some specific to individual 3D objects. The lighting setup and camera position are clearly global and should belong to the main program, but vertex buffers and textures definitely need to be associated with each 3D object, and maybe the choice of effect does too.
There is probably no single correct answer here. So, based on the immediate needs of our still relatively simple program, we will encapsulate the Effect object in our cube class. We will assume a standardised default lighting setup and we will pass the camera details into the draw method of our cube class.
Our cube class has the following private data:
private VertexBuffer vb;
private IndexBuffer ib;
private Texture2D texture;
private BasicEffect be;
private Matrix world;
We pass a color parameter into the constructor that we use to generate the texture, and we expose the world transform through a public read/write property so that the main program is able to position or move instances of the class.
We provide a public Draw method for the main program to call:
public void Draw(Matrix view, Matrix projection)
{
  GraphicsDevice g = GraphicsDeviceManager.Current.GraphicsDevice;
  g.SetVertexBuffer(vb);
  g.Indices = ib;

  be.World = world;
  be.View = view;
  be.Projection = projection;

  be.CurrentTechnique.Passes[0].Apply();
  g.DrawIndexedPrimitives(PrimitiveType.TriangleList, 0, 0,
            vb.VertexCount, 0, ib.IndexCount / 3);
}
Our main page can now easily create two cubes:
private void drawingSurface1_Loaded(object sender, System.Windows.RoutedEventArgs e)
{
  cube1 = new SolidColorCube(new Color(1f,0,0));
  cube2 = new SolidColorCube(new Color(0,0,1f));
}
.. and draw and rotate them:
private void drawingSurface1_Draw(object sender, DrawEventArgs e)
{
  GraphicsDevice g = GraphicsDeviceManager.Current.GraphicsDevice;
  Matrix view = Matrix.CreateLookAt(new Vector3(0, 0, 8.0f), Vector3.Zero, Vector3.Up);
  Matrix projection = Matrix.CreatePerspectiveFieldOfView
            (0.85f, aspectRatio, 0.01f, 1000.0f);

  Vector3 axis = new Vector3(-0.5f, 1, -0.5f);
  axis.Normalize();
  Matrix rotation = Matrix.CreateFromQuaternion
    (Quaternion.CreateFromAxisAngle(axis, (float)e.TotalTime.TotalSeconds * 3));
  cube1.World = rotation * Matrix.CreateTranslation(2, 0, 0);
  cube2.World = rotation * Matrix.CreateTranslation(-2, 0, 0);

  g.Clear(new Color(0.8f, 0.8f, 0.8f, 1.0f));
  cube1.Draw(view, projection);
  cube2.Draw(view, projection);
  e.InvalidateSurface();
}

Step Four – Create a Generalised Polyhedron Class
As a final step, we’ll extend things further and create models of all five regular polyhedrons.
We could obviously create a class similar to our cube class for each of them, but there would be lots of repeated code and manually defining the triangle meshes for the more complex solids would be very laborious. Instead, we will create a generalised Polyhedron class that automatically triangulates the faces. Automatic triangulation is something that is often done in more complex 3D programs, so it’s good to show a simple example here.
Here is the signature of our Polyhedron constructor:
public Polyhedron(Vector3[] corners, int[][] faces, Color color)
We pass in two data structures that together define the shape of our polyhedron in a simple, natural way. Inside the constructor, we call a helper method to triangulate the faces and create the vertex buffer (we’re not using an index buffer here):
private static VertexPositionNormalTexture[] CreateVertices
            (Vector3[] corners, int[][] faces)
{
  int triangleCount = 0;
  foreach (int[] face in faces)
    triangleCount += face.Length - 2;

  VertexPositionNormalTexture[] vertices =
    new VertexPositionNormalTexture[triangleCount * 3];
  int i = 0;
  foreach (int[] face in faces)
  {
    for (int j = 0; j < face.Length - 2; j++)
    {
      vertices[i++] = new VertexPositionNormalTexture
            (corners[face[0]], Vector3.Zero, Vector2.Zero);
      vertices[i++] = new VertexPositionNormalTexture
            (corners[face[j + 1]], Vector3.Zero, Vector2.Zero);
      vertices[i++] = new VertexPositionNormalTexture
            (corners[face[j + 2]], Vector3.Zero, Vector2.Zero);
    }
    Vector3 vectorA = vertices[i - 1].Position - vertices[i - 3].Position;
    Vector3 vectorB = vertices[i - 1].Position - vertices[i - 2].Position;
    Vector3 normal = Vector3.Cross(vectorB, vectorA);
    for (int j = 0; j < (face.Length - 2) * 3; j++)
      vertices[i - 1 - j].Normal = normal;
  }
  return vertices;
}
This very useful function doesn’t have too many lines of code and it should be possible to work out how it works. But there are a couple of things that are worth highlighting.
Calculating Normals
The first is that we use the Vector3.Cross() method to calculate the normal vector for each face, we use two arbitrary triangle edges within the face to pass into the Cross() method. In mathematical language: the cross product of two vectors is the normal to the plane defined by those vectors. Once we’ve calculated the normal for a face, we update all the vertices of all the triangles in that face with the calculated normal.
Triangle Vertex Order
The second thing to note is that in this type of code, where we are automatically generating triangles, we need to be very careful to get the vertex order of each triangle correct. In the 3D world, triangles have a front face and a back face, and the rendering process needs to know which is which - both lighting calculations and back-face culling depend on it.
XNA uses a ‘clockwise’ convention to define the front face of triangles. In other words, if the three vertices, when read in the order that they appear in the vertex buffer (or the index buffer if we are using one) go in a clockwise direction around the triangle, then we are looking at the front face of the triangle. For our Polyhedron class, we adopt the same convention for our polyhedron faces. This ensures that the front faces are on the outside of our solid objects.
The Main Page
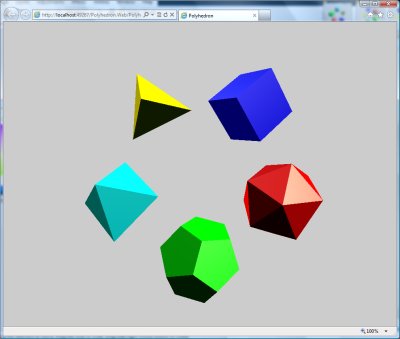
With our general purposepolyhedron class in place, we can now create any number of different shaped polyhedrons by defining their geometries in a simple and natural way. The geometry definitions for the five platonic solids are in the static Polyhedra class.
The final enhancement to our program is that our main page now holds its 3D objects in an array so that it can iterate over them in the Draw handler.
The setup code is now:
private void drawingSurface1_Loaded
    (object sender, System.Windows.RoutedEventArgs e)
{
  polyhedrons = new Polyhedron[]
  {
    new Polyhedron(Polyhedra.CubeCorners,
        Polyhedra.CubeFaces, new Color(0, 0, 1f)),
    new Polyhedron(Polyhedra.TetrahedronCorners,
        Polyhedra.TetrahedronFaces, new Color(1f, 1f, 0)),
    new Polyhedron(Polyhedra.OctahedronCorners,
        Polyhedra.OctahedronFaces, new Color(0, 1f, 1f)),
    new Polyhedron(Polyhedra.DodecahedronCorners,
        Polyhedra.DodecahedronFaces, new Color(0, 1f, 0)),
    new Polyhedron(Polyhedra.IcosahedronCorners,
        Polyhedra.IcosahedronFaces, new Color(1f, 0, 0))
  };
}
...and the Drawing code is now:
private void drawingSurface1_Draw(object sender, DrawEventArgs e)
{
  GraphicsDevice g = GraphicsDeviceManager.Current.GraphicsDevice;
  Matrix view = Matrix.CreateLookAt(new Vector3(0, 0, 8.0f), Vector3.Zero, Vector3.Up);
  Matrix projection = Matrix.CreatePerspectiveFieldOfView
            (0.85f, aspectRatio, 0.01f, 1000.0f);

  Vector3 axis = new Vector3(-0.5f, 1, -0.5f);
  axis.Normalize();
  Matrix rotate1 = Matrix.CreateFromQuaternion
    (Quaternion.CreateFromAxisAngle(axis, (float)e.TotalTime.TotalSeconds * 3));
  Matrix translate = Matrix.CreateTranslation(2, 0, 0);
  for (int i = 0; i < polyhedrons.Length; i++)
  {
    Matrix rotate2 = Matrix.CreateRotationZ
    (i * MathHelper.TwoPi / 5 + (float)e.TotalTime.TotalSeconds / 3);
    polyhedrons[i].World = rotate1 * translate * rotate2;
  }
  g.Clear(new Color(0.8f, 0.8f, 0.8f, 1.0f));
  foreach (Polyhedron polyhedron in polyhedrons)
    polyhedron.Draw(view, projection);
  e.InvalidateSurface();
}
Conclusion
Even with all these enhancements in place, the entire program now comprises just 125 lines of code plus 150 lines of geometry definitions for the regular polyhedrons. This is quite impressive, and is a good illustration of the power of XNA.