
Creating Highly Compressed Searchable PDFs
Turn a scanned TIFF into a searchable image-over-text PDF and make the file a fraction of its original size using Pegasus Imaging SDKs. Save server space and search documents that were originally not searchable. We’ll show you how we do it, and give you the sample code in C#.
The Case for Compressed PDF
Compressing electronic document images to the smallest file size possible yields many benefits, such as storage space savings, smaller email attachments and faster document retrieval over internal networks or via the Internet. However, file size is only one consideration when creating these optimized documents. Quality must also be maintained because a small, unreadable document with no searchable text is not very useful in most situations. The optimal solution would be to provide a high quality rendition of the original document image’s view and also provide completely searchable text.
To create the smallest possible file size, while maintaining image quality and searchable text, one must rely on imaging toolkits to provide access to the various levels of document imaging. By using Pegasus Imaging’s suite of industry leading .NET toolkits, developers can create highly compressed and completely searchable PDF documents from document images.
How It’s Made!
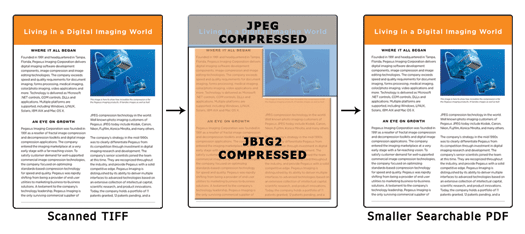
Without accurate, full-page OCR recognition capabilities and a PDF toolkit that allows the developer to assemble a PDF document in pieces, the options for creating searchable text PDF files are fairly limited. The typical method would most likely involve compressing the entire image of the document and inserting that image on top of a text-only PDF. This method results in files that are larger than necessary and often results in artifacts around the text making it difficult to read.
A much better solution would be to compress the different portions of the image according to the content that portion contains. By segmenting the original image into its various text and picture components, we can make more informed decisions about compression and create a much more optimized PDF document. We then need a PDF toolkit that allows us to access the lowest levels of the resulting PDF file so that the image data can be compressed individually and the various components of the original document image can then be inserted over fully searchable text. This method will result in highly compressed PDF documents a fraction of the original size while still maintaining the original image quality.
Using these technologies together provides the ability to create much smaller, yet fully searchable PDF documents. Pegasus Imaging’s OCR Xpress TM toolkit provides the ability to perform full-page OCR on a document and obtain coordinates for individual text and picture regions. ImagXpress® provides access to Pegasus Imaging’s industry-leading compression algorithms. Pegasus Imaging’s PDF Xpress TM product provides access to the lowest levels of a PDF document, allowing a developer to build a PDF document piecemeal.
The remainder of this discussion will explain the details of how to create a highly compressed, text-searchable PDF document from a scanned image.
Coding Details
Pegasus Objects
The following objects were created when we dropped our Pegasus components on our form. We will use these objects in the code snippets throughout the rest of this whitepaper:
private PegasusImaging.WinForms.ImagXpress9.ImagXpress imagXpress1;
private PegasusImaging.WinForms.OcrXpress1.OcrXpress ocrXpress1;
private PegasusImaging.WinForms.PdfXpress2.PdfXpress pdfXpress1;
Full-Page OCR
One of the keys to creating highly compressed PDF documents is being able to use a full page OCR toolkit like OCR Xpress to accurately recognize text, and segment the original document image into individual picture and text regions. In our case, coordinates from OCR Xpress can be used by ImagXpress to clip images of the original document and make compression decisions for each individual segment. The individually compressed segments can then be inserted on top of the text-only PDF produced by OCR Xpress to form the original view of the document image.
The first step is to perform full-page OCR recognition on the original scanned document image. The resulting text can be exported as a text-only PDF using OCR Xpress. This exported PDF will become the new PDF document into which we will insert the individually clipped image segments. Let’s take a look at the steps needed to recognize and export the text using OCR Xpress:
using (ImageX image = ImageX.FromFile(imagXpress1, sourceImageBox.Text))
{
    //temp file for OCR results
    string tempOCRFile = System.IO.Path.GetTempPath() + "tempPDFText.pdf";
    System.IO.FileInfo exportedFile = new System.IO.FileInfo(tempOCRFile);
    if (exportedFile.Exists)
        exportedFile.Delete();
    ocrXpress1.Document.ClearPages();
    using (System.Drawing.Bitmap inputImage = image.ToBitmap(false))
    {
        PegasusImaging.WinForms.OcrXpress1.Page exportPage =
            ocrXpress1.Document.AddPage(inputImage);
        //turning off pictureIdentification will cause OCR Xpress to
        //ignore picture regions, providing more accurate text recognition
        //results.
        ocrXpress1.Document.PictureIdentification = false;
        //segment the image into text and picture regions
        ocrXpress1.Document.Locate(exportPage);
        //perform OCR on the image
        ocrXpress1.Document.Recognize(exportPage);
        //export OCRed text as a PDF.
        ocrXpress1.Document.Export(PegasusImaging.WinForms.OcrXpress1.ExportFormat.Pdf,
            tempOCRFile);
    }
    return tempOCRFile;
}
Using OCR Xpress to Segment the Image
The Locate() method in OCR Xpress segments an image by locating the regions of text and the regions of pictures. The information from these regions can then be used by ImagXpress to create individually clipped segments of the image. Compression can then be performed on each image clip separately, giving the developer much greater control to make decisions such as quality versus size.
Unlike the previous OCR operation, we want to turn PictureIdentification on this time to make sure we get accurate coordinates for the picture regions. For best segmentation results, the Locate method should be called, followed by the Recognize method. The resulting region segments will then be stored in a RegionCollection, which we can then loop through for our final few steps:
ocrXpress1.Document.PictureIdentification = true;
//locate and then call GetRegions to return a RegionCollection.
//RegionCollection contains TextRegions and PictureRegions.
ocrXpress1.Document.Locate(thePage);
ocrXpress1.Document.Recognize(thePage);
PegasusImaging.WinForms.OcrXpress1.RegionCollection segmentRegions =
    new RegionCollection();
segmentRegions = thePage.GetRegions();
Now that we have a collection of regions, we can use ImagXpress to crop the original image into separate image clips defined by the coordinates now stored in the RegionCollection. The rest of our steps will be performed on each region as we iterate through the RegionCollection. The loop containing the remainder of our steps looks like this:
for (int i = 0; i < segmentRegions.Count; i++)
{
    PegasusImaging.WinForms.OcrXpress1.Region currentRegion = segmentRegions[i];
    //get a copy of the original image
    using (ImageX croppedImage = image.Copy())
    {
        //we will crop and compress the image in memory and then pass it
        //to PDF Xpress for reconstruction
        using (System.IO.MemoryStream croppedImageStream = new System.IO.MemoryStream())
        {
            using (Processor cropIt = new Processor(imagXpress1, croppedImage))
            {
                cropIt.Crop(currentRegion.Area);
Compressing the Images with ImagXpress
Now we can use the Processor class in ImagXpress to examine the image data for the cropped image and choose the most appropriate compression technique and settings. JBIG2 compression will be used for text regions and picture regions that are 1 bit per pixel. For all other picture regions, we can use the UniqueColorCount to determine the amount of color data in the picture. If there are more than 256 unique colors in the picture region, we want to create the best compressed quality using JPEG or JPEG 2000. JPEG compression parameters can be adjusted to control the amount of loss. For picture regions with less than 256 unique colors, we can further reduce size by making the image 8 bits per pixel and then compressing the resulting image with TIFF LZW:
using (Processor cropIt = new Processor(imagXpress1, croppedImage))
{
    PegasusImaging.WinForms.ImagXpress9.SaveOptions so =
        new PegasusImaging.WinForms.ImagXpress9.SaveOptions();
    //if it is a text region or a 1bpp image, use JBIG2
    if (theCurrentRegion is PegasusImaging.WinForms.OcrXpress1.TextRegion
        || theCroppedImage.ImageXData.BitsPerPixel == 1)
    {
        so.Format = ImageXFormat.Jbig2;
        so.Jbig2.LoosenessCompression = 1;
    }
    //for all other picture regions, we can check the unique color count.
    //if the unique color count is greater than 256, we should use JPG or
    //JP2K.
    //if the color count is less than 256, we can use TIFF LZW
    else
    {
        long uniqueColorCount = croppedImageProcessor.UniqueColors();
        if (uniqueColorCount < 256)
        {
            //we can further reduce size by making this 8 bpp
            croppedImageProcessor.ColorDepth(8, PaletteType.Gray, DitherType.NoDither);
            so.Format = ImageXFormat.Tiff;
            so.Tiff.Compression = Compression.Lzw;
        }
        else
        {
            so.Format = ImageXFormat.Jpeg;
            so.Jpeg.Chrominance = 40;
            so.Jpeg.Luminance = 40;
        }
    }
}
Now we will save the cropped and compressed image data to a MemoryStream to be passed to PDF Xpress:
croppedImage.SaveStream(croppedImageStream, so);
//compressed image from mem stream
croppedImageStream.Flush();
croppedImageStream.Position = 0;
byte[] byteData = new byte[croppedImageStream.Length];
croppedImageStream.Read(byteData, 0, byteData.Length);
croppedImageStream.Close();
Piecing Together the PDF with PDF Xpress
At this point we have a text-only PDF document containing searchable text generated by OCR Xpress. We also have individually clipped text and picture regions from the original document image stored in memory that we compressed using the most appropriate compression algorithm for that clip’s data. Now all we have to do is read each image from memory and piece the whole thing back together using PDF Xpress.
PDF Xpress provides a simple method to add individual images to a page in a PDF document. Location and image fit (stretch, shrink, etc.) parameters give developers the flexibility to precisely position the image data on the page.
ocredDoc.AddImage(0, 72 * currentRegion.Area.X / imageDPI,
    pdfY,
    currentRegion.Area.Width * conversionFactor,
    currentRegion.Area.Height * conversionFactor,
    fitSettings, byteData, 0);
Once all of the individual image regions are inserted over our searchable text, we can set our PDF save options and save our new image over text PDF:
string destinationFileName = “destination for the PDF”;
PegasusImaging.WinForms.PdfXpress2.SaveOptions pdfSaveOpts =
    new PegasusImaging.WinForms.PdfXpress2.SaveOptions();

pdfSaveOpts.Filename = destinationFileName;
pdfSaveOpts.Overwrite = true;
ocredDoc.Save(pdfSaveOpts);
That’s it!
Conclusion
Let’s look back on what we accomplished. First, we used OCR Xpress to perform full-page OCR on our original image, creating searchable text and identifying individual regions of text and picture image data. We then were able to use ImagXpress to clip those individual regions of image data. ImagXpress also gave us the means to maintain the quality of the image by allowing us to examine the image data from the clipped regions and make decisions about the correct compression settings. Finally, we used PDF Xpress to add our images to the OCR text results to create our highly compressed, yet completely searchable PDF document.
You can find Pegasus Imaging product downloads and features at Pegasus Imaging's homepage. Please contact us at Sales or Support for more information.
Tips and Tricks
Creating a Blank Canvas
The exported text can contain slightly different font sizes that often create larger regions than the actual cropped image of the same text. This can cause the text underneath to show through or “bleed over” from the edges of the text region images. For the final PDF, we want the searchable text to be completely hidden from view so that the viewer only sees the images from the original document.
One technique we can use to ensure that the searchable text is hidden is to use a small white canvas bitmap image and add it to the PDF using the addImage method in PDF Xpress. When calling the addImage method, we can set certain parameters, including an ImageFitSettings enumeration to tell the PDF Xpress component to stretch the small white canvas over the entire PDF document. This method gives us a blank canvas on which we can begin to insert our cropped image segments:
using (PegasusImaging.WinForms.PdfXpress2.Document ocredDoc =
    new PegasusImaging.WinForms.PdfXpress2.Document(pdfXpress1, tempOCRFile))
{
    //description of the current page
    PegasusImaging.WinForms.PdfXpress2.PageInfo pageInfo =   ocredDoc.GetInfo(0);
    //create our 1 pixel "canvas"
    using (System.Drawing.Bitmap blankCanvas = new Bitmap(1, 1))
    {
        using (System.Drawing.Graphics g = Graphics.FromImage(blankCanvas))
        {
            g.Clear(Color.White);
        }
        using (System.IO.MemoryStream blankMem = new System.IO.MemoryStream())
        {
            blankCanvas.Save(blankMem, System.Drawing.Imaging.ImageFormat.Bmp);
            byte[] blankBytes = new byte[blankMem.Length];
            blankMem.Flush();
            blankMem.Position = 0;
            blankMem.Read(blankBytes, 0, blankBytes.Length);
            //now use PDF Xpress to add the blank canvas image
            //and stretch it over the entire area of the PDF.
            ocredDoc.AddImage(0, 0, 0, pageInfo.MediaWidth,
                pageInfo.MediaHeight, ImageFitSettings.Stretch, blankBytes, 0);
            blankMem.Close();
        }
    }
}
About the Author
Steve Wilson joined Pegasus Imaging in 2007. As a product development manager, Steve coordinates the efforts of several engineers to further strengthen Pegasus’ position in the document imaging marketplace. With that goal in mind, Steve is responsible for leading his teams to increase the feature sets within several Pegasus product lines. He brings a strong technical background to the management team, as well as experience managing diverse offshore and onshore development teams. Steve came to Pegasus after 7 years at Viryanet. There, he moved from software engineering to software development management, delivering workforce management software for utility companies. Steve earned a Bachelor of Science in Computer Science from the University of South Florida.