
Agile Sandbox (Part III)
5.00/5 (14 votes)
This article covers a selection of best practices related to the internals of the project “sandbox”. The sandbox is understood as a folder with a complete structure containing the source files of a specific product.
Introduction
This article covers a selection of best practices related to the internals of the project “sandbox”. The sandbox is understood as a folder with a complete structure containing the source files of a specific product.
This is Part III of “Agile Sandbox” article. Make sure you've read Part I and Part II.
Total Build with NAnt
The last, but one of the most important aspects of the sandbox operation is assembling all of contents into a product. A product is a setup.exe file that you can upload to your site and mention in your press release; or an ISO file ready to be burnt onto a CD; or an archive to be passed to the QA department for testing; or anything else having a distinct finite form.
For these purposes, we use NAnt within the described sandbox structure. Those who prefer MSBuild or, perhaps, a commercial build system, will be able to perform the described actions using these alternative tools. For us, NAnt has proven to be efficient, simple and powerful.
First of all, let’s take a look at the NAnt scripts usually found in a sandbox:
- Debug.build.xml – intended for building internal versions with enabled cheat buttons, internal statistics, debug resources, etc.
- Release.build.xml – intended for building release versions.
- Retail.build.xml – uses the output of the previous script, but wraps the result into the necessary package, be it an msi distributive or an ISO image.
- Documentation.build.xml, Media.build.xml and so forth: one script per “sandbox in a sandbox” for assembling resources into a specific form that will be later used for Debug and Release scripts.
- Common.include.xml – definitions of common properties and targets.
We won’t review scripts like Documentation.build.xml, Media.build.xml, as their structure largely depends on the project specifics and they can be completely different for any given sandbox. I will only note that their artifacts are saved into a corresponding subfolder of the Output folder. Documentation goes to Output\Documentation; Media - into Output\Media and so forth.
The remaining scripts also output their results into their own subdirectories. Below is an example of an Output folder structure:
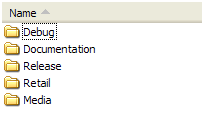
Debug and Release scripts have similar purposes: first of all, they compile C# source codes, secondly, they copy the necessary resources inside. Differences are only found in the settings that affect MSBuild behavior, various configuration files and, probably, sets of resources. The examples below are equally applicable to both scripts.
Let’s take a look at how C# build is made.
Determining the Version Number
First of all, you need to determine the version number that you want to assign to the build assemblies. As you know, the version identifier has the following form in .NET: Major.Minor.Build.Revision. I believe everything is clear about major and minor values: they should be controlled by the developer for “marketing” reasons. However, revision and build values are interpreted quite differently. That’s another holy war, which I don’t want to partake in. In our company, the revision number is the SVN revision number, while Build is not used at all (always 0). Depending on the project, it can assume some values – for instance, the number of revision in the version control system used for project resources, if it's separated from the main Subversion. In any case, storing the SVN-revision number in the “Revision” element is very comfortable, as a single glance at the version identifier gives you an idea of how old the version is and how to roll back to its source code. This is essential for efficient communication with the QA department and clients.
Compare two situations involving communication with the QA department. In the first situation, your QA colleagues tell you about a bug found yesterday in the build that was published to the server at 4 PM. You need to find out what changes caused the bug to appear. But how can you do this? Take the SVN log and see which revision matches this time? That won’t work: the build time, the product upload time and the build server’s idle time are not taken into account. However, there could’ve been a dozen commits over these periods. Now imagine that a tester tells you that the bug first appeared in version 0.0.0.568. Apparently, the search scope will be much more efficient in the latter case.
All right, so our task is to get the version number into a NAnt variable. To get the Major.Minor substring, use the VersionInfo.xml file from BuildScripts. Here is an example of its content:
<?xml version="1.0"?>
<versionInfo>
    <major>1</major>
    <minor>3</minor>
</versionInfo>
The file is changed manually for marketing purposes. To get the values defined in XML, use the following NAnt-snippet:
<property name="version.xml.file-path" value="BuildScripts\VersionInfo.xml" />

<xmlpeek file="${version.xml.file-path}" property="version.major"
         xpath="/versionInfo/major" />

<xmlpeek file="${version.xml.file-path}" property="version.minor"
         xpath="/versionInfo/minor" />
Now we need to get the SVN revision number. This can be done with the help of SubWCRev, a utility included in TortoiseSVN . I will not explain the exact meaning of the command line here – all the documentation is available in the TortoiseSVN manual. I will only provide the code of the necessary NAnt-snippet:
<!--
Run SubWCRev utility to replace token in RevisionInfo.template.xml file to the
current revision number.
Execution will fail if sandbox has local modifications or mixed revisions.
-->
<mkdir dir="${output.generated-files.dir}" />
<property name="version.revision.file-path"
          value="${output.generated-files.dir}\RevisionInfo.xml" />

<exec program="SubWCRev.exe" basedir="BuildTools\SubWCRev" workingdir=".">
    <arg dir="." />
    <arg file="BuildScripts\RevisionInfo.template.xml" />
    <arg file="${version.revision.file-path}" />
    <arg value="-nm" />
</exec>

<property name="version.xml.file-path" value="BuildScripts\VersionInfo.xml" />

<xmlpeek file="${version.revision.file-path}" property="version.revision"
         xpath="/revisionInfo/revisionNumber" />
If the current version of the sandbox has a mixed revision number (that is, some files have been updated to one version and others to a different one or the sandbox contains local changes that haven’t been added to the repository) the program will return an error and stop the execution of the script. Which is perfectly normal behavior, as the value of a numeric build identifier generated from a heterogeneous build is rather questionable. Take it as yet another guarantee of integrity and reliability of your builds.
Now that we have all the components, we need to merge them:
<property name="version.literal"
          value="${version.major}.${version.minor}.0.${version.revision}" />
The version number is ready.
Preparing for Compilation
First of all, use regular XCopy to copy the contents of CodeBase to a separate location. Copying to the Output\Debug\Intermediate\CodeBase folder is a good idea.
<target name="copy-codebase">

    <copy todir="${output.codebase.dir}">
        <fileset basedir="CodeBase">
            <include name="**\*" />
            <exclude name="**\*.suo" />
            <exclude name="**\*.user" />
            <exclude name="*\bin" />
            <exclude name="*\obj" />
        </fileset>
    </copy>

</target>
This is necessary for hassle-free editing of its content without having to worry about the status of the files in the SVN. Changes are needed at least in AssemblyInfo.cs for setting the correct version number of .NET assemblies.
Let’s cut to the chase now. Generate a new AssemblyInfo.cs using an asminfo task and the previously obtained version identifier:
<target name="replace-assembly-infos" depends="copy-codebase">

    <foreach item="File" property="iterator.asm-info">
        <in>
        <items>
           <include name="${output.codebase.dir}\*\Properties\AssemblyInfo.cs" />
        </items>
        </in>
        <do>
            <asminfo output="${iterator.asm-info}" language="CSharp">
                <imports>
                    <import namespace="System" />
                    <import namespace="System.Reflection" />
                    <import namespace="System.Runtime.InteropServices" />
                </imports>
                <attributes>
                    <attribute type="ComVisibleAttribute" value="false" />

                    <attribute type="AssemblyVersionAttribute"
                               value="${version.literal}" />

                    <attribute type="AssemblyCopyrightAttribute"
                               value="Copyright (c) 2008, Your Company, Inc." />
                </attributes>
            </asminfo>
        </do>
    </foreach>

</target>
In the snippet above, I intentionally omitted the purpose of most assembly attributes. In real projects, they are either available or can be easily obtained during the target execution stage.
After that, you may need to modify csproj files for one of the following reasons:
- To specify the path to MSBuildExtensions, if they are used.
- To add or modify the path to the file containing keys for assembly signatures.
As csproj is a standard XML file, its content can be modified by XSLT processing or similar methods. Below is the content of an XSLT file that specifies the path to WebApplication, an MSBuild extension:
<?xml version="1.0" encoding="utf-8"?>

<xsl:stylesheet version="1.0"
                xmlns:xsl="http://www.w3.org/1999/XSL/Transform"
                xmlns:ms="http://schemas.microsoft.com/developer/msbuild/2003">

    <!-- Identity transform -->
    <xsl:template match="node() | @*">
        <xsl:copy>
            <xsl:apply-templates select="node() | @*" />
        </xsl:copy>
    </xsl:template>

    <!-- Web application extension path replacement -->
    <xsl:template match="/ms:Project/ms:Import[@Project='$(MSBuildExtensionsPath)\
                                      Microsoft\VisualStudio\v8.0\WebApplications\
                                      Microsoft.WebApplication.targets']">
        <xsl:copy>
            <xsl:apply-templates select="node() | @*" />
            <xsl:attribute name="Project">
                <xsl:text>..\Microsoft.WebApplication.targets</xsl:text>
            </xsl:attribute>
        </xsl:copy>
    </xsl:template>

</xsl:stylesheet>
To apply it to csproj, use a NAnt-snippet:
<target name="fix-msbuild-extension-paths" depends="copy-codebase">

    <foreach item="File" property="iterator.cs-proj">
        <in>
            <items>
                <include name="${output.codebase.dir}\*\*.csproj" />
            </items>
        </in>
        <do>

            <property name="temp.filename" value="${iterator.cs-proj}.transformed" />

            <style style="BuildScripts\FixMSBuildExtensionPaths.xslt"
                   in="${iterator.cs-proj}" out="${temp.filename}"/>

            <move file="${temp.filename}" tofile="${iterator.cs-proj}"
                  overwrite="true" />

        </do>
    </foreach>

</target>
This method allows you to make any changes to csproj files prior to building. Just make sure to keep one modification per XSLT file. This will allow you to use them in various combinations in the future.
Compilation and Publishing
Now we are ready for the final step. First we feed our solution files to the msbuild task. Now the binaries are ready in the “bin” folders of corresponding projects. Let’s create a clean spot for our output files. Output\Debug\Build will do just fine. After that, copy all the necessary files from the fresh compilation in the NAnt script excluding such “trash” as PDB and vshost files. The binaries are in place!
Then we launch the necessary build scripts and copy them to our location in the same manner. If the size of resources is really big and their copying slows down build process, you can use junction, a utility for creating hard-links in NTFS. Once these tasks are complete, the build is ready!
Again, I suggest creating a separate Retail script that would start the Release build and then assemble something totally final from the result. Something that is ready to hit the market.
Conclusion
You have taken a look at a set of practices that may improve your sandbox. Please note that this article should not be regarded as absolute truth. All I can say is that the methods and approaches that it covers work well in companies that adopted them.
Some solutions have already proved their efficiency, some are relatively new and may appear erroneous.
The conclusion is as follows:
- We have created a recipe of a mobile sandbox ready to be deployed on any “clean” system.
- The resulting build of all source files is always the same and is independent from system settings, relation of the sandbox to the version control system or any other factors.
- You can build any configuration from scratch by making a couple of clicks in NAnt Wizard.
- The sandbox has a sufficient reserve of expandability for product-specific solutions.
- You can easily find a dozen naïve statements in the introductory chapter.
I hope that the article contained ideas that can be applied to your won projects. I will be happy if this article makes you experiment and seek your own creative solutions.